Bauknecht EMZD 5265 BR Program Chart

Type
Program Chart

This manual is also suitable for

EMZD 5265
PRODUCT DESCRIPTION SHEET
DE GB
5019 410 56265
1.
Control panel
2.
Cooling fan (not visible)
3.
Top heating element
4.
Grill element
5.
Rear oven lamp
6.
Fan
7.
Bottom heating element (not visible)
8.
Oven cool door
ACCESSORIES
CONTROL PANEL
1. Function selector knob
2. Thermostat knob
3. Thermostat indicator light (red)
4. 6-button programmer
5. Knob to switch on the left front cooking zone of
the hob 0 1 ...10 . *
6. Knob to switch on the left rear cooking zone of
the hob 0 1 ...10 . *
7. Knob to switch on the right rear cooking zone of
the hob 0 1 ...10 . *
8. Knob to switch on the right front cooking zone of
the hob 0 1 ...10 . *
9. Hob operation indicator.
* The hob knobs are not interchangeable.
After any cleaning or Service operation, replace them in their
original position.
Retractable knobs
To use this type of knob, press it in the middle.
The knob comes out.
Turn it to the required position.
Once cooking is over, turn the knob to
0
and press it
again to restore it to its original position.
First
Highest
level
level
Wire Shelf:Baking tray:
SWITCHING ON THE OVEN
Turn the selector knob to the required function.
The oven light switches on.
Turn the thermostat knob clockwise to the required temperature. The red thermostat indicator light
switches on; when the required cooking temperature is reached it will turn off.
At the end of cooking time:
Turn the knob to
“0”
.
Oven functions table
Function Description of function
0 OVEN OFF
-
LAMP
To switch on the oven light.
STATIC
To cook meat, fish and poultry in the oven.
Preheat the oven to the required cooking temperature and place the food inside as soon
as the red thermostat light turns off.
It is advisable to use the second or third level.
PASTRY/FAN
To cook on max. two levels.
If necessary, switch the position of the dishes in the oven for optimum cooking
performance.
It is not necessary to preheat the oven (except for pizzas and focaccias).
GRILL
Use the grill function to cook sirloin steaks, kebabs, sausages, vegetables au gratin and for
making toast.
Preheat the oven for 3/5 min.
During cooking the door must remain closed.
When cooking meat, to avoid spatters of fat and smoke, pour a little water into the drip
tray.
It is advisable to turn the food during cooking.
TURBOGRILL
This function is ideal for cooking large pieces of meat (roast beef, roast joints).
During cooking the door must remain closed.
When cooking meat, to avoid spatters of fat and smoke, pour a little water into the drip
tray.
Turn the meat during grilling.
DEFROST
Ideal for thawing frozen food at room temperature.
The food should be placed in the oven in its wrapping to prevent it from drying out.
This symbol is not linked to any of the hob functions; the heating element is off.
HOW TO USE THE HOB
The oven control panel features 4 adjustable knobs that control hob operation. They are marked with a
graduated scale that corresponds to different power levels and different symbols related to each function.
Turn the control knob of the required hot plate clockwise to the desired position (refer to the instructions
supplied with the hob).
The yellow led lights up, indicating operation.
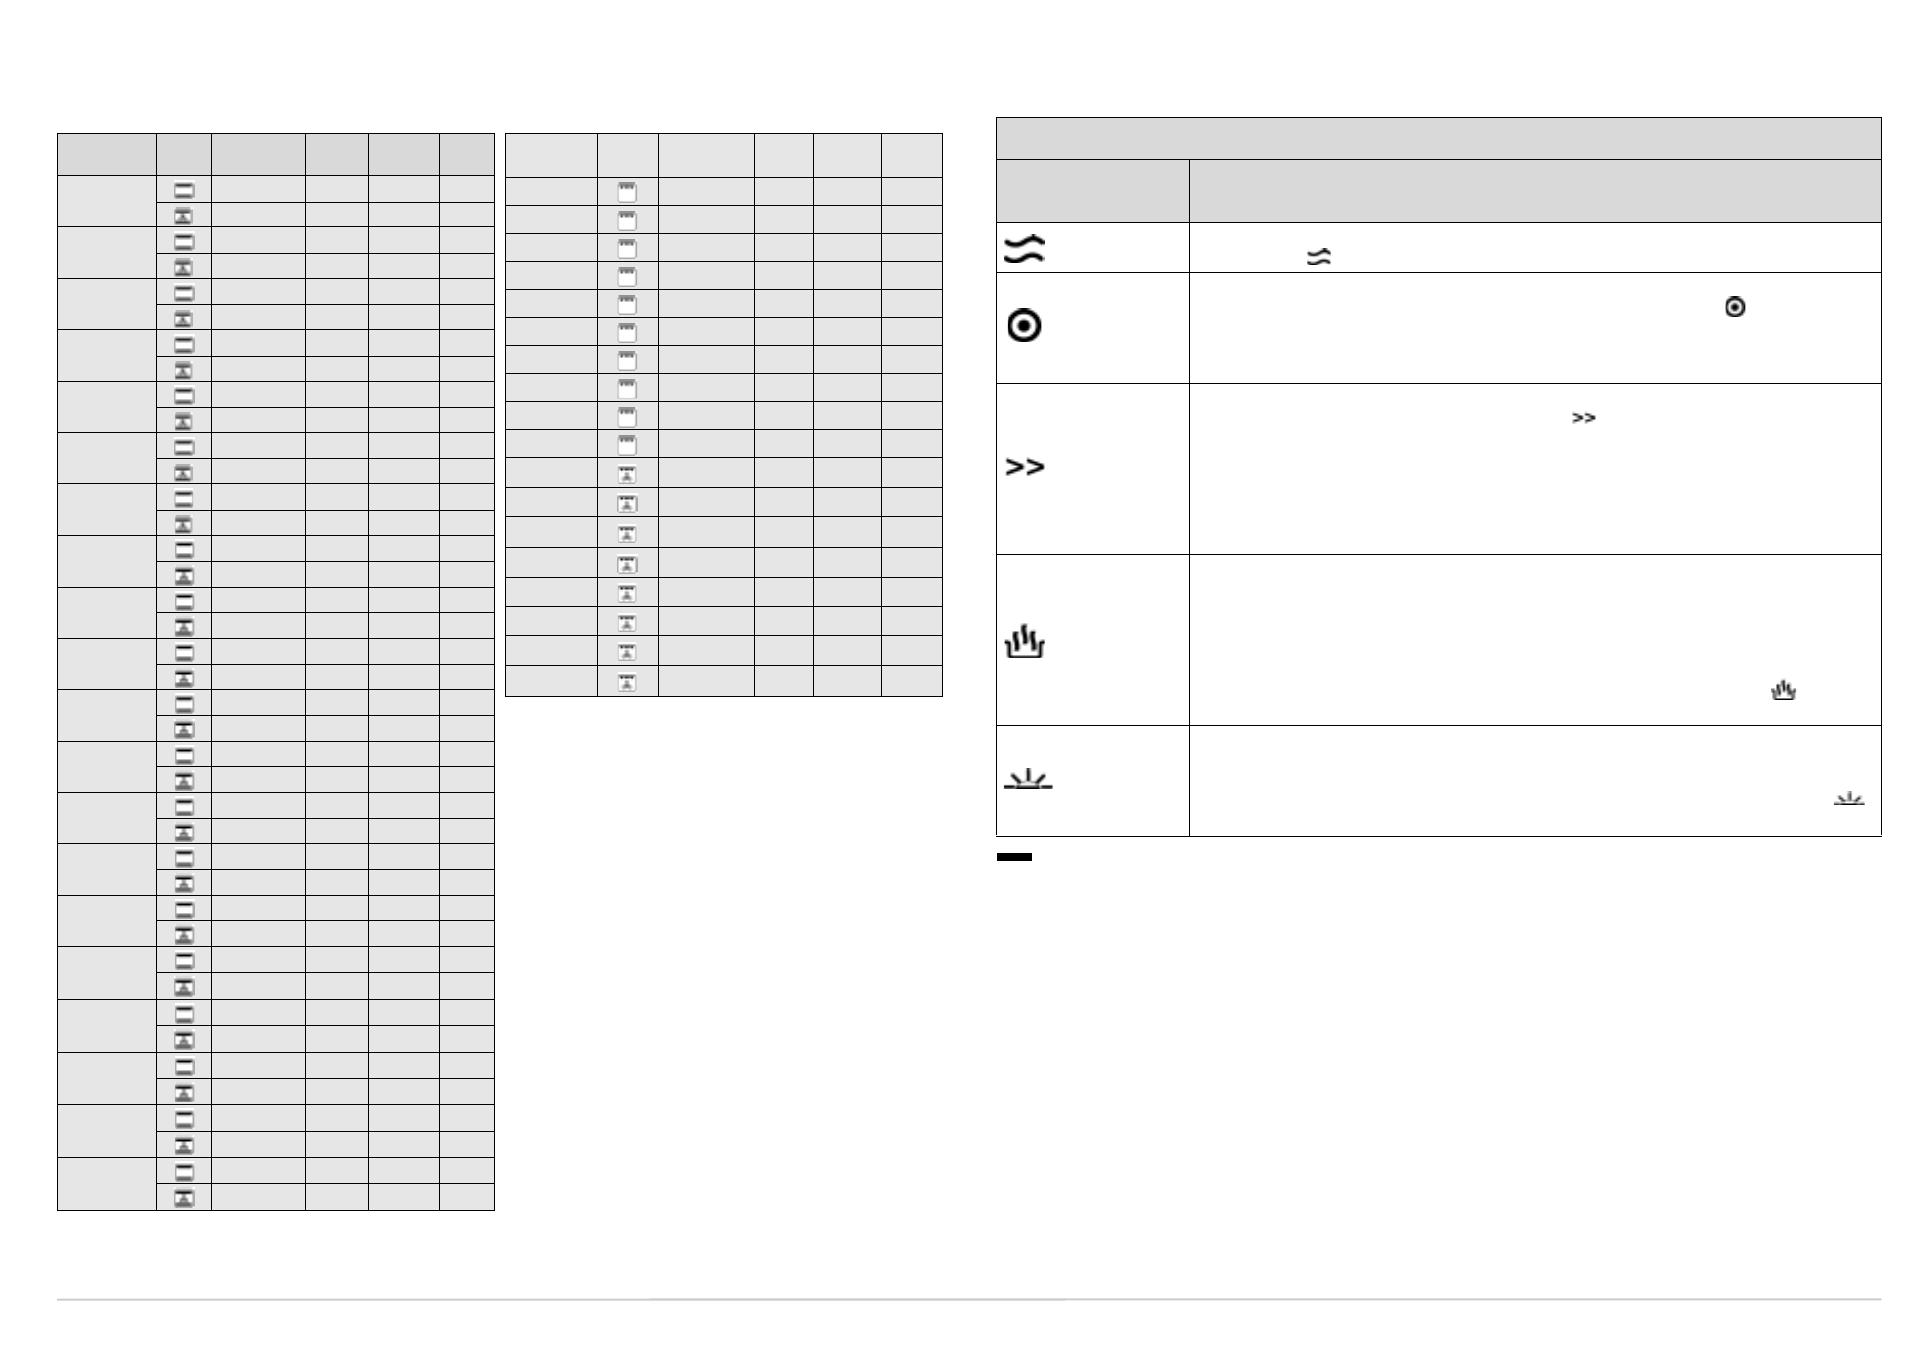
Hob Functions Table (depending on model)
Function Description of function
KEEP WARM
This function keeps the temperature at 60°C until the end of the cooking cycle. To activate this function,
turn the knob to .
DOUBLE ZONE
This function can be used for the left front hot plate and left rear hot plate. It extends the heating zone in order
to suit large oval or rectangular pots. To activate the double zone: turn the knob to and wait for the
residual heat indicator corresponding to the hot plate to start blinking. Select the required power level by
turning the knob anti-clockwise. The residual heat indicator will remain alight to indicate that the hob is on.
To deactivate the double zone function, turn the knob to “0”.
ICP (Initial
cooking phase)
This is a boosting function which speeds up the initial heating up of the cooking element for a specified
amount of time. To activate this function, turn the knob to . Wait until the residual heat indicator starts
blinking, then turn the knob anti-clockwise to the required power level. E.g.: If the level is “1”, the cooking
zone will operate at full power for 1 minute, then continue at power level “1” until the end of the cooking
cycle, unless the knob setting is adjusted in the meantime. If the level is “6”, the cooking zone will operate
at full power for 6 minutes, then continue at power level “6” until the end of the cooking cycle, unless the
knob setting is adjusted in the meantime. This function can be used for all power levels, except for level
”10”.
FAST BOILING
This function gives you adequate power for those occasions where you may need to bring water to boiling
point in the shortest possible time. It remains activated for a specific period of time. Once the set time has
elapsed, the cooking zone will automatically return to the maximum power level. The Fast Boiling function
can also be activated during cooking. Attention: Before activating this function, make sure that you have
placed the pot on the required cooking zone in order to avoid damaging the hob surface. The performance
values indicated for this function are guaranteed for all glass-ceramic cooktops.
To activate the function, place the pot on the required cooking zone and turn the knob to . Deactivate
by changing the knob setting.
GENTLE HEAT
Ideal for raising dough, softening butter taken out of the refrigerator, keeping baby's bottles and food warm,
making yoghurt, melting chocolate, etc.
This function can be used only when the residual heat indicator is alight. Before activating the function,
make sure that the residual heat indicator of the required cooking zone is alight. Turn the knob to .
Deactivate by changing the knob setting.
COOKING TABLES COOKING TABLE FOR GRILL FUNCTION
Note:
Cooking times and temperatures are approximate only.
FOOD Function Preheating
Level
(from the
bottom)
Te m p e r a t u r
e
(°C)
Cooking
time
min
MEAT
Lamb, Kid, Mutton
X 2 200 90 - 110
X 2 200 100 - 110
Veal, Beef, Pork
X 2 200 90 - 110
X 2 200 90 - 110
Chicken,
Rabbit,
Duck
X 2 200 70 - 80
X 2 200 70 - 80
Tu r ke y
(3-5 kg)
X 2 210 160 - 180
X 2 200 170 - 180
Goose
(2 kg)
X 2 210 100 - 130
X 2 200 100 - 130
FISH
(1 kg)
Gilt-head, Bass,
Tuna, Salmon, Cod
X 2 200 60 - 80
X 2 190 60 - 80
FISH
(<1 kg - cutlets)
Sword fish, Tuna
X 2 190 50 - 60
X 2 190 50 - 60
VEGETABLES
Peppers, tomatoes,
roast potatoes
X 2
190
50 - 60
X 2
190
50 - 60
SWEETS,
PASTRIES, ETC.
Raising cakes
X 2
180 40 - 50
X 2
180 40 - 50
Filled pies
(with cheese)
X 2
190 60 - 90
X 2
180 60 - 90
Tarts
X 2
190 40 - 50
X 2
180 40 - 50
Apple strudel,
crèpes
X 2
200 50 - 60
X 2
190 50 - 60
Biscuits, sponge
rings, shortbread
X 2
180 20 - 30
X 2
180 30 - 40
Choux buns, sweet
sponge rolls
X 2
180 35 - 45
X 2
180 35 - 45
Savoury pies, filled
fruit pies, e.g.
Pineapple, Peach
X 2
200 50 - 60
X 2
190 45 - 55
Lasagna, potatoes
au gratin,
cannelloni, pasta
timbales
X 2
200 40 - 50
X 2
190 40 - 50
Bread
X 2
210 30 - 40
X 2
210 30 - 40
Pizza
X 2
225 15 - 20
X 2
210 20 - 30
Vol-au-vents
X 2
210 20 - 30
X 2
200 30 - 40
Soufflés
X 2
200 40 - 50
X 2
190 50 - 60
FOOD Function Preheating
Level
(from the
bottom)
Te m p e r a t u
re
(°C)
Cooking
time
min
To a s t X 3-4 200-225 10 - 15
Sirloin steak X 3-4 200-225 30 - 40
Cutlets X 3-4 200-225 30 - 40
Sausages X 3 200-225 30 - 40
Pork chops X 3 200-225 30 - 40
Fish (cutlets) X 3 200-225 30 - 40
Chicken legs X 3 200-225 40 - 50
Kebabs X 3 200-225 40 - 50
Spare ribs X 3 200-225 40 - 50
Chicken halves X 3 200-225 40 - 50
Chicken halves - 3 200-225 40 - 50
Whole chicken - 2-3 200-225 60 - 70
Roast
(pork, beef)
- 2-3 200-225 60 - 80
Duck - 1-2 200-225 60 - 80
Leg of lamb - 1-2 200-225 80 - 100
Roast beef - 2 200-225 60 - 70
Baked potatoes - 2-3 200-225 40 - 50
Fish, e.g.: Gilt-
head, Trout
- 3 190-200 40 - 50
Display & button description
1. Minute Minder with acoustic signal selection button
2. Cooking duration selection button
3. End of cooking time selection button
4. Manual operation selection button
5. Data settings or change button
6. Data settings or change button
Setting the clock and selecting the Manual Mode
Upon installation or after a power failure digits
-0:00
and
AUTO
both blink.
Keep buttons
2
and
3
pressed simultaneously while setting the clock through the usage
of buttons
5
and
6
.
Press button
4
Manual operation selection button to proceed with the Manual
operating mode.
will light up.
Setting the Minute Minder with acoustic signal
Operates independently from oven functions.
Press button
1
digits
-0:00
are displayed.
Press button
5
or
6
to display the desired cooking time.
12:00
and light up a few seconds after buttons release.
The acoustic signal will start upon elapsing of cooking time.
Press button
1
to silence the acoustic signal.
Programming the Cooking Time
Press button
2
digits
-0:00
are displayed.
Press button
5
or
6
to set the desired cooking time.
12:00
and
AUTO +
seconds after buttons release.
Set the oven by turning the Oven thermostat knob to the desired temperature, the
oven will immediately come into operation. The acoustic signal will start to indicate
elapsing of cooking time and that the oven has switched off.
Set the oven by turning the Selector knob to
“0”
, then press button
4
to silence the
acoustic signal.
Press button
2
to check or to change the remaining cooking time.
Press button
3
to display the remaining cooking time when desired.
Programming Duration and End of Cooking Time
Press button
2
digits
-0:00
are displayed.
Press button
5
or
6
to set the desired cooking time.
Actual time of the day and
AUTO
+ light up a few seconds after buttons release.
Press button
3
and consequently press button
5
or
6
to set the desired cooking
time. The symbol will turn off and reappear when oven goes into automatic
operation at the start of the previously programmed duration.
Set the oven by turning the Oven thermostat knob to the desired temperature and
choose the desidered function by turning Selector knob. The acoustic signal will
start to indicate elapsing of cooking time and that the oven has switched off.
Set the oven by turning the Selector knob to
“0”
, then press button
4
to silence the
acoustic signal.
AUTO lights up and stays
lit to indicate Automatic
Mode, blinks to confirm
end of cooking time.
Manual operation when
lit indicates Manual Mode
is operating
Minute Minder when lit
indicates Minute Minder
is operating
  • Page 1 1
  • Page 2 2
  • Page 3 3
  • Page 4 4

Bauknecht EMZD 5265 BR Program Chart

Type
Program Chart
This manual is also suitable for

Ask a question and I''ll find the answer in the document

Finding information in a document is now easier with AI