Page is loading ...

ZUMMESH-PIR-OCCUPANCY-BATT/ZUMMESH-PIR-VACANCY-BATT
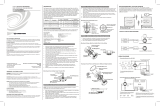
Zūm™ Occupancy Sensor and Vacancy Sensor
Installation Guide
Description
The Crestron® Zūm™ occupancy and vacancy sensors detect when a person enters and
exits a space. They communicate wirelessly with Zūm™ wireless devices to turn the
lights on and off based on room occupancy and vacancy.
Featuring passive infrared (PIR) technology, the ZUMMESH-PIR-OCCUPANCY-BATT
(occupancy sensor) and ZUMMESH-PIR-OCCUPANCY-BATT (vacancy sensor) reliably
detect when a person enters and exits the space.
Install up to 8 occupancy or vacancy sensors to ensure coverage in a large room.
NOTE: Do not mix occupancy and vacancy sensors in the same room.
NOTE: When using the ZUMMESH-AVBRIDGE with an AM-200 or AM-300:
• To install, refer to the “Installation,” “Calibration and Testing,” and
“Mounting and Masking Locations” sections that follow.
• To configure, refer to the AM-200/AM-300 Product Manual (Doc. 8254) at
www.crestron.com/manuals for wireless connections, setup, and operation.
Zūm Overview
A Zūm space consists of one space, such as a board room or conference room, that
is equipped with Zūm mesh devices. The Zūm mesh devices (i.e., dimmers, switches,
keypads, and sensors) in the space provide control and communicate directly with
each other without the need for a centralized gateway or processor.
To expand the functionality of the Zūm space, a ZUMMESH-NETBRIDGE (not
included) can be added which provides centralized control and monitoring from a
Crestron control system (not included).
NOTE: The ZUMMESH-NETBRIDGE requires a compatible J-box device (not
included) to provide power.
Select the Mounting Location
Use the following diagrams to determine the mounting location for the occupancy or
vacancy sensor. Ensure a vibration-free mounting surface.
Sensor Coverage Areas - Side View 8-12 ft (~2.5-3.5 m)
15 ft
(~5 m)
15 ft
(~5 m)
20 ft
(~6 m)
20 ft
(~6 m)
10 ft
(~3 m)
10 ft
(~3 m)
10 ft
(~3 m)
8 ft
(~2.5 m)
12 ft
(~3.5 m)
5 ft
(~2 m)
5 ft
(~2 m)
0 ft
(0 m)
0 ft
(0 m)
Side View - 8-12 ft
(~2.5-3.5 m)
Sensor Coverage Areas - Top View (8 ft (~2.5 m)
C
L
C
L
15 ft
(~5 m)
15 ft
(~5 m)
10 ft
(~3 m)
10 ft
(~3 m)
5 ft
(~2 m)
5 ft
(~2 m)
0 ft
(0 m)
Top View - 8 ft (~2.5 m)
NOTE:
• The occupancy and vacancy sensors must have a clear view of the entire
room. The device should not be blocked by furniture or fixtures.
• Avoid false triggering by mounting it away from air vents, fans, windows,
and other devices that create air movement in the room.
Install the Sensor
To complete the installation, the occupancy and vacancy sensors ship with (2) Plastic
wall anchors, (2) Phillips head screws, and (1) Ultralife 9 volt lithium battery. A Phillips
tip screwdriver and a pencil are required for installation (not included).
If desired, the sensor may be painted to match the ceiling color. However, do not paint
over the dome as this significantly hinders sensing capabilities.
NOTE: Install and use this product in accordance with appropriate electrical codes
and regulations.
Mount the sensor to the ceiling.
1. Mark the location for the two plastic wall anchors. The marks should be 3 in
(76 mm) apart.
2. Install the plastic wall anchors.
NOTE: For surfaces other than drywall and drop-ceiling tiles, pre-drill the
mounting location for the plastic wall anchors.
3. Twist the sensor cover counterclockwise to separate the cover from the base.
Hold the sensor base in the palm of your
hand and twist the cover counterclockwise
to separate the base from the sensor cover.
4. Secure the base to the plastic wall anchors using the provided Phillips head
screws.
5. Connect the battery to the two terminals in the sensor and secure the battery to
the base.
6. Place the cover on the base and then twist the cover clockwise to secure it to the
base. The assembly clicks when secured.
Rotate to secure
the cover.
Operate the Occupancy or Vacancy Sensor
Occupancy and vacancy sensors toggle the lights and plug controllers in the room
based on the room status.
Up to 8 Occupancy or Vacancy sensors can be installed in the same space. When
multiple sensors are installed, the space is considered occupied when any sensor
detects motion and the space is considered vacant after all sensors detect vacancy.
NOTE: After an occupancy or vacancy sensor stops detecting motion, a timeout
period occurs and then it turns off the lights (recalls scene 16 from the load
controller). Refer to the “Timeout Settings” section to set the timeout.
Occupancy Sensor Control
The occupancy sensor controls the lights and the plug controller based on occupancy or
vacancy. Refer to the chart below for details.
Occupied Vacant
Lights Turn On (scene 1) Turn Off
Plug Controller Turn On Turn Off
Vacancy Sensor Control
The vacancy sensor controls the lights and the plug controller based on occupancy or
vacancy. If the vacancy sensor detects motion within 30 seconds of turning off the
lights, the vacancy sensor switches the lights back on.
Refer to the chart below for details.
Occupied Vacant
Lights No Action Turn Off
Plug Controller Turn On Turn Off
NOTE:
• Sensors may not work as expected if occupancy is detected, the lights turn
on, and then the user manually turns off the lights from a local switch and
decides to re-enter the room before the timeout has completed. In this
situation, the lights will not turn on automatically. The sensor is reliant on
a full completion of cycles (vacancy, then occupancy, then vacancy) to work
correctly.
• Rooms can be programmed to be occupied while the lights are off by utilizing
scenes or sensor-disabling buttons.
Calibrate and Test the Sensor
Adjust the settings that are available under the sensor cover and then test the
operation.
Timeout Settings
The time that the sensor takes to declare the room vacant after motion is no longer
detected is determined by the timeout setting. The timeout knob inside the sensor can
be set between 30 seconds and 30 minutes.
If no motion is detected during the timeout period, the lights turn off. If motion is
detected during the timeout period, the sensor waits until it no longer detects motion
and then begins a new timeout period.
A timeout of 15 minutes would be typical for a conference room application.
Sensitivity Settings
Set the sensitivity of the sensor to high for normal use. If false triggers occur, turn
down the sensitivity until false triggers no longer occur.
Test Button
Press the TEST button to verify that the sensor is connected to the system. The lights in
the space toggle to indicate that the device is connected.
Mask the Sensor
To prevent unwanted motion from triggering the lights, install a mask in the sensor to
conceal the lens and to block the view of certain areas in the space. Use the
PIR 1/2 mask to block half of the detection range or the perforated PIR 360-degree
(12-section, 30-degree per section) mask to provide custom masking.
NOTE: The half mask comes preinstalled. If the perforated mask is to be used, it
should be installed in the same manner as the half mask.
Refer to the following illustrations for typical masking applications. The first
illustration shows a PIR 360-degree mask, the second shows a PIR 1/2 mask.
Test Mode
Test mode allows the installation location of the occupancy or vacancy sensor to be
verified. Test mode exits automatically after 2 minutes.
To enter Test mode, press and hold the TEST button until the LED lights. While in test
mode, the green LED flashes slowly.
Press and hold 2 sec.
Walk around the room and in front of windows and open doorways to verify
operation. The red LED lights when motion is detected.

How to Set Up a Zūm Space and Add Zūm Devices
Once all devices are physically installed in a board room or conference space, a new
Zūm space can be created and devices added.
NOTE:
• Only set up one Zūm space at a time.
• For simplified setup of a Zūm space, use the Zūm app on a mobile device.
Step 1 Create a New Zūm Space
Creating a Zūm space defines the area where the devices are located, such as a board
room or conference room. A Zūm space is created with a keypad, dimmer or switch, a
J-box device, or an AV Bridge.
NOTE:
• Creating a Zūm space can only be performed by one device in the space.
• A Zūm space cannot be created from a battery-powered keypad.
To create a new Zūm space using an AC powered keypad, dimmer, or switch:
1. Press the bottom button 5 times.
2. Press and hold the bottom button until the LED on the device lights. After
approximately 3 seconds, the device LED begins slowly flashing. This indicates
that the Zūm space is now created and in Joining mode, allowing you to add
devices.
Press and hold until LED lights
Press 5x
then
To create a new Zūm space using a J-box device or an AV Bridge:
1. Press the Setup button 5 times.
2. Press and hold the Setup button until the LED on the device lights. After
approximately 3 seconds, the device LED begins slowly flashing. This indicates
that the Zūm space is now created and in Joining mode, allowing you to add
devices.
TEST
SETUP
TEST
SETUP
Press and hold until LED lights
Press 5x
then
PWR
TX
RX
ERR
NET
SETUP
PWR
TX
RX
ERR
NET
SETUP
Press and hold until LED lights
Press 5x
then
NOTE: The device that is used to create the Zūm space is automatically added to
the space and does not need to be added in Step 2.
Step 2 Add the Occupancy or Vacancy Sensor to the Zūm Space
After a new Zūm space is created, add the occupancy or vacancy sensor while the
space is in Joining mode.
NOTE:
• A Zūm mesh device can belong to only one space.
• Joining mode ends automatically after 4 minutes.
To add the occupancy or vacancy sensor:
1. Press the TEST button 3 times.
2. Press and hold the TEST button until the LED on the sensor lights to indicate that
it has joined the space.
Press and hold until LED lights
Press 3x
then
Step 3 Complete Zūm Space Setup
To finish creating a Zūm space, press any button on an AC-powered device that is part
of the Zūm space to exit Joining mode.
Add the Occupancy or Vacancy Sensor to an Existing Zūm Space
Add new Zūm devices to an existing Zūm space by placing the Zūm space in Joining
mode.
Add the Occupancy or Vacancy sensor using an AC powered keypad, dimmer,
or switch:
1. Enter Joining mode.
a. Press and hold both the top and bottom buttons until the LED lights.
b. Press the top button once.
c. Press the bottom button once. The LEDs on all devices in the space (except
battery powered devices) flash slowly to indicate that the devices are part of
the space and that the space is in Joining mode.
Press and hold until LED lights
Press and hold until LED lights
then then
Press 1x
Press 1x
2. Add the occupancy or vacancy sensor.
a. Press the TEST button 3 times.
b. Press and hold the TEST button until the LED on the sensor lights to indicate
that it has joined the space.
Press and hold until LED lights
Press 3x
then
3. Press any button on an AC-powered device that is part of the Zūm space to exit
Joining mode.
Add the Occupancy or Vacancy sensor using a J-box device:
1. Enter Joining mode.
a. Press the SETUP button 2 times.
b. Press the TEST button once. The LEDs on all devices in the space (except
battery powered devices) flash slowly to indicate that the devices are part of
the space and that the space is in Joining mode.
TEST
SETUP
TEST
SETUP
TEST
SETUP
Press SETUP 2x
Press TEST 1x
then
2. Add the occupancy or vacancy sensor.
a. Press the TEST button 3 times.
b. Press and hold the TEST button until the LED on the sensor lights to indicate
that it has joined the space.
Press and hold until LED lights
Press 3x
then
3. Press any button on an AC-powered device that is part of the Zūm space to exit
Joining mode.
Add the Occupancy or Vacancy sensor using an AV Bridge:
1. Enter Joining mode.
a. Press and hold the SETUP button for 2 seconds. The LEDs on all devices in
the space (except battery powered devices) flash slowly to indicate that the
devices are part of the space and that the space is in Joining mode.
PWR
TX
RX
ERR
NET
SETUP
PWR
TX
RX
ERR
NET
SETUP
Press and hold 2 sec.
2. Add the occupancy or vacancy sensor.
a. Press the TEST button 3 times.
b. Press and hold the TEST button until the LED on the sensor lights to indicate
that it has joined the space.
Press and hold until LED lights
Press 3x
then
3. Press any button on an AC-powered device that is part of the Zūm space to exit
Joining mode.
Replace the Battery
The red LED under the dome flashes to indicate that the battery needs to be
replaced. Actual battery life depends on device usage. Use the following procedure to
replace the battery in the occupancy or vacancy sensor.
CAUTION: The battery used in this device may present a risk of fire or chemical
burn if mistreated. Do not recharge, disassemble, heat above 212 °F (100 °C), or
incinerate. Replace the battery with an Ultralife 9 volt lithium battery only. Use of
another battery may present a risk of fire or explosion.
1. Rotate the cover of the sensor counterclockwise to remove the cover.
2. Remove the battery from the sensor.
3. Disconnect the battery from the two terminals in the sensor.
4. Connect the new battery to the two terminals in the sensor and secure the
battery into the housing.
5. Rotate the cover of the sensor clockwise onto the installed base until it is
secured in place. The assembly clicks when secured.
NOTE: Dispose of a used battery promptly. Keep away from children. Do not
disassemble and do not dispose of in fire.
Factory Reset
Perform a factory reset when the device is removed from the Zūm space or to remove
the configuration settings. The device must also be factory reset if the device is being
moved to a different Zūm space.
NOTE: New-in-box devices do not need to be factory reset before joining a system.
To factory reset the occupancy or vacancy sensor, press and hold the TEST button
until the LED flashes 3 times.
Press and hold 10 sec.
Specifications
SPECIFICATION DETAILS
Power
Battery
Battery Life
(1) Ultralife U9VL-J-P 9 Volt 1200 mAh lithium
disposable battery (included)
10 years under normal operating conditions
Sensing
Sensor Technology
Coverage Area
Coverage Pattern
Major Motion Area
Minor Motion Area
Passive infrared
500 square feet (46.5 square meters)
360 degrees (half mask and perforated mask
included)
150 to 500 square feet (13.9 to 46.4 square meters)
0 to 150 square feet (0 to 13.9 square meters)
Timeout (1) Knob (behind cover), adjusts timeout from
30 seconds to 30 minutes;
Factory default time delay is 15 minutes
Environmental
Temperature
Humidity
32° to 104 °F (0° to 40 °C)
10% to 95% RH (non-condensing)
This product is Listed to applicable UL
®
Standards and requirements tested by Underwriters
Laboratories Inc.
Ce produit est homologué selon les normes et les exigences UL applicables par Underwriters
Laboratories Inc.
Federal Communications Commission (FCC) Compliance Statement
This device complies with part 15 of the FCC Rules. Operation is subject to the following
conditions: (1) This device may not cause harmful interference and (2) this device must accept
any interference received, including interference that may cause undesired operation.
CAUTION: Changes or modifications not expressly approved by the manufacturer responsible for
compliance could void the user’s authority to operate the equipment.
NOTE: This equipment has been tested and found to comply with the limits for a Class B digital
device, pursuant to part 15 of the FCC Rules. These limits are designed to provide reasonable
protection against harmful interference in a residential installation. This equipment generates,
uses and can radiate radio frequency energy and, if not installed and used in accordance with
the instructions, may cause harmful interference to radio communications. However, there is
no guarantee that interference will not occur in a particular installation. If this equipment does
cause harmful interference to radio or television reception, which can be determined by turning
the equipment off and on, the user is encouraged to try to correct the interference by one or
more of the following measures:
• Reorient or relocate the receiving antenna.
• Increase the separation between the equipment and receiver.
• Connect the equipment into an outlet on a circuit different from that to which the receiver
is connected.
• Consult the dealer or an experienced radio/TV technician for help.
Industry Canada (IC) Compliance Statement
This Class B digital apparatus complies with Canadian ICES-003.
Cet appareil numérique de la classe B est conforme à la norme NMB-003 du Canada.
For indoor use only.
The product warranty can be found at www.crestron.com/warranty.
The specific patents that cover Crestron products are listed at www.crestron.com/legal/patents.
Certain Crestron products contain open source software. For specific information, please visit
www.crestron.com/opensource.
Crestron, the Crestron logo, and Zūm are either trademarks or registered trademarks of
Crestron Electronics, Inc. in the United States and/or other countries. UL and the UL logo are
either trademarks or registered trademarks of Underwriters Laboratories, Inc. in the United
States and/or other countries. Other trademarks, registered trademarks, and trade names
may be used in this document to refer to either the entities claiming the marks and names or
their products. Crestron disclaims any proprietary interest in the marks and names of others.
Crestron is not responsible for errors in typography or photography.
This document was written by the Technical Publications department at Crestron.
©2018 Crestron Electronics, Inc.
Crestron Electronics, Inc. Installation Guide - DOC. 7867D
15 Volvo Drive, Rockleigh, NJ 07647 (2047763)
Tel: 888.CRESTRON 07.18
Fax: 201.767.7576 Specications subject to
www.crestron.com change without notice.
/