
hp
hp
LaserJet 9055 mfp
LaserJet 9065 mfp
service manual


service manual
hp LaserJet 9055mfp (Q3631A)
hp LaserJet 9065mfp (Q3632A)

Copyright Information
© 2003 Copyright Hewlett-Packard Development
Company, L.P.
Reproduction, adaptation or translation without
prior written permission is prohibited, except as
allowed under the copyright laws.
The information contained herein is subject to
change without notice.
The only warranties for HP products and services
are set forth in the express warranty statements
accompanying such products and services.
Nothing herein should be construed as
constituting an additional warranty. HP shall not be
liable for technical or editorial errors or omissions
contained herein.
Part number: Q3631-90908
Edition 1, 11/2003
Trademark Credits
Microsoft
®
, Windows
®
, and Windows NT
®
are
U.S. registered trademarks of Microsoft
Corporation.

ENWW iii
Contents
1 How to use this manual
Manual contents . . . . . . . . . . . . . . . . . . . . . . . . .2
Manual organization . . . . . . . . . . . . . . . . . . . . . . 2
2 Safety
Safety and important warning items . . . . . . . . . . 4
Important notices. . . . . . . . . . . . . . . . . . . . . 4
Description items for Warning, Caution,
and Note . . . . . . . . . . . . . . . . . . . . . . . 4
Safety warnings. . . . . . . . . . . . . . . . . . . . . . . . . . 5
Modifications not authorized by hp . . . . . . . 5
Power supply. . . . . . . . . . . . . . . . . . . . . . . . 7
Installation requirements. . . . . . . . . . . . . . 10
Measures to take in case of an accident. . 15
Conclusion . . . . . . . . . . . . . . . . . . . . . . . . 15
Regulatory statements . . . . . . . . . . . . . . . . . . .16
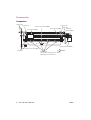
Safety information . . . . . . . . . . . . . . . . . . . . . . . 16
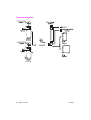
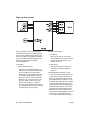
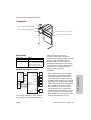
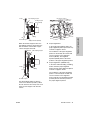
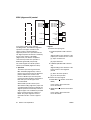
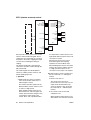
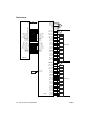
Safety circuits . . . . . . . . . . . . . . . . . . . . . . 16
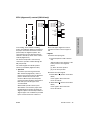
Overall protection circuit . . . . . . . . . . . . . . 16
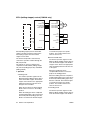
Safety labels on the MFPs . . . . . . . . . . . . . . . . 19
Scanner section . . . . . . . . . . . . . . . . . . . . 21
Laser/scanner assembly . . . . . . . . . . . . . . 21
Rear cover. . . . . . . . . . . . . . . . . . . . . . . . .21
3 MFP overview
Overview of system. . . . . . . . . . . . . . . . . . . . . .24
hp LaserJet 9055mfp/9065mfp product
specifications. . . . . . . . . . . . . . . . . . . . . . . 25
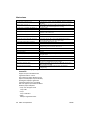
Type . . . . . . . . . . . . . . . . . . . . . . . . . . . . . 25
Functions. . . . . . . . . . . . . . . . . . . . . . . . . . 25
Applicable copy paper. . . . . . . . . . . . . . . . 26
Options . . . . . . . . . . . . . . . . . . . . . . . . . . . 26
Particulars of machine. . . . . . . . . . . . . . . . 26
Maintenance and life. . . . . . . . . . . . . . . . . 26
Environmental conditions . . . . . . . . . . . . . 26
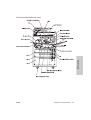
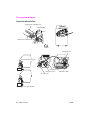
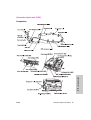
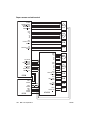
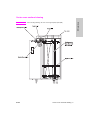
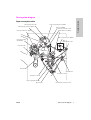
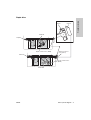
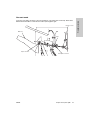
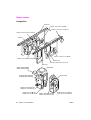
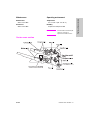
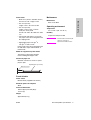
Central cross-sectional view . . . . . . . . . . . . . . . 27
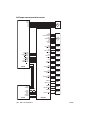
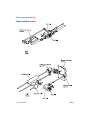
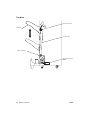
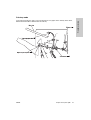
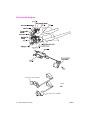
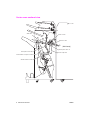
Drive system diagram . . . . . . . . . . . . . . . . . . . . 28
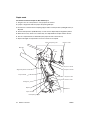
Fuser/web drive section . . . . . . . . . . . . . . 28
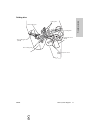
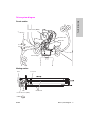
Drum drive section . . . . . . . . . . . . . . . . . . 29
Developing drive section . . . . . . . . . . . . . . 29
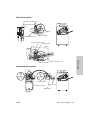
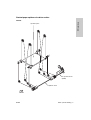
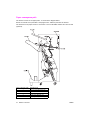
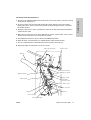
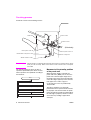
Paper feed/vertical conveyance/tray
up drive sections . . . . . . . . . . . . . . . . 30
Tray 1 paper feed/automatic duplex
unit (ADU) pre-registration
drive section . . . . . . . . . . . . . . . . . . . 31
Charging and transfer/separation wire
cleaning drive section . . . . . . . . . . . . 32
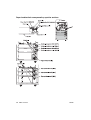
Automatic Duplex Unit (ADU)
conveyance drive section . . . . . . . . . 33
Paper exit drive section . . . . . . . . . . . . . . 34
Toner supply drive section . . . . . . . . . . . . 34
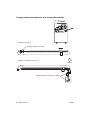
Optics drive section . . . . . . . . . . . . . . . . . 35
4 MFP unit explanation
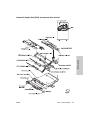
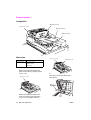
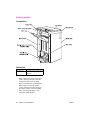
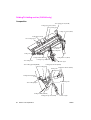
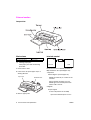
External section . . . . . . . . . . . . . . . . . . . . . . . . 40
Composition . . . . . . . . . . . . . . . . . . . . . . . 40
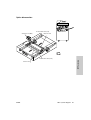
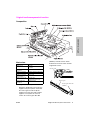
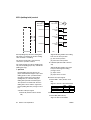
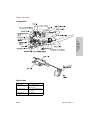
Drive section . . . . . . . . . . . . . . . . . . . . . . . . . . . 41
Composition . . . . . . . . . . . . . . . . . . . . . . . 41
Mechanisms . . . . . . . . . . . . . . . . . . . . . . . 41
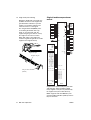
M2 (drum) control . . . . . . . . . . . . . . . . . . . 42
M4 (fuser) control . . . . . . . . . . . . . . . . . . . 42
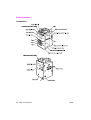
Scanner section . . . . . . . . . . . . . . . . . . . . . . . . 44
Composition . . . . . . . . . . . . . . . . . . . . . . . 44
Mechanisms . . . . . . . . . . . . . . . . . . . . . . . 44
M11 (scanner) control. . . . . . . . . . . . . . . . 45
Exposure control. . . . . . . . . . . . . . . . . . . . 48
Original read control . . . . . . . . . . . . . . . . . 48
APS control. . . . . . . . . . . . . . . . . . . . . . . . 49
AE control . . . . . . . . . . . . . . . . . . . . . . . . . 51
Laser scanner unit . . . . . . . . . . . . . . . . . . . . . . 52
Composition . . . . . . . . . . . . . . . . . . . . . . . 52
Mechanisms . . . . . . . . . . . . . . . . . . . . . . . 52
M15 (polygon) control . . . . . . . . . . . . . . . . 53
Image write control . . . . . . . . . . . . . . . . . . 53
Drum unit . . . . . . . . . . . . . . . . . . . . . . . . . . . . . 56
Composition . . . . . . . . . . . . . . . . . . . . . . . 56
Mechanisms . . . . . . . . . . . . . . . . . . . . . . . 56
Separation claw control . . . . . . . . . . . . . . 57
Paper guide plate control . . . . . . . . . . . . . 57
Corona unit section. . . . . . . . . . . . . . . . . . . . . . 58
Composition . . . . . . . . . . . . . . . . . . . . . . . 58
Mechanisms . . . . . . . . . . . . . . . . . . . . . . . 58
Charging control . . . . . . . . . . . . . . . . . . . . 58
Transfer/separation control. . . . . . . . . . . . 59
Contents

iv ENWW
M14 (charger cleaning) control . . . . . . . . . 60
M10 (transfer/separation cleaning)
control . . . . . . . . . . . . . . . . . . . . . . . . 61
PCL/TSL control . . . . . . . . . . . . . . . . . . . . 62
Developing unit . . . . . . . . . . . . . . . . . . . . . . . . . 63
Composition . . . . . . . . . . . . . . . . . . . . . . .63
Mechanisms . . . . . . . . . . . . . . . . . . . . . . .63
M3 (developing) control. . . . . . . . . . . . . . . 63
Developing bias control. . . . . . . . . . . . . . . 64
Dmax (maximum contrast) control . . . . . . 65
Gradation correction control . . . . . . . . . . . 67
Dot diameter correction control . . . . . . . . . 68
Toner density control. . . . . . . . . . . . . . . . . 69
FM4 (developing suction) control . . . . . . . 69
Toner supply unit. . . . . . . . . . . . . . . . . . . . . . . . 70
Composition . . . . . . . . . . . . . . . . . . . . . . .70
Mechanisms . . . . . . . . . . . . . . . . . . . . . . .70
Toner level detection control. . . . . . . . . . . 71
M12 (toner supply) control . . . . . . . . . . . . 72
Cleaning/toner recycle unit . . . . . . . . . . . . . . . . 73
Composition . . . . . . . . . . . . . . . . . . . . . . .73
Mechanisms . . . . . . . . . . . . . . . . . . . . . . .73
Toner guide roller (TGR) control . . . . . . . . 74
Other control . . . . . . . . . . . . . . . . . . . . . . . 74
Tray 2/3 paper feed unit . . . . . . . . . . . . . . . . . . 75
Composition . . . . . . . . . . . . . . . . . . . . . . .75
Mechanisms . . . . . . . . . . . . . . . . . . . . . . .75
First paper feed control . . . . . . . . . . . . . . . 77
Paper up drive control. . . . . . . . . . . . . . . . 79
Paper size detection control . . . . . . . . . . . 80
No paper detection control . . . . . . . . . . . . 81
Tray 4 paper feed unit . . . . . . . . . . . . . . . . . . . . 82
Composition . . . . . . . . . . . . . . . . . . . . . . .82
Mechanisms . . . . . . . . . . . . . . . . . . . . . . .82
First paper feed control . . . . . . . . . . . . . . . 84
Paper up drive control. . . . . . . . . . . . . . . . 86
Paper size detection control . . . . . . . . . . . 87
No paper detection control . . . . . . . . . . . . 87
Tray 1 (bypass tray) . . . . . . . . . . . . . . . . . . . . . 89
Composition . . . . . . . . . . . . . . . . . . . . . . .89
Mechanisms . . . . . . . . . . . . . . . . . . . . . . .89
First paper feed control . . . . . . . . . . . . . . . 90
Paper up/down control . . . . . . . . . . . . . . . 90
Paper size detection control . . . . . . . . . . . 91
No paper detection control . . . . . . . . . . . . 92
Vertical conveyance section . . . . . . . . . . . . . . . 93
Composition . . . . . . . . . . . . . . . . . . . . . . .93
Mechanisms . . . . . . . . . . . . . . . . . . . . . . .93
Vertical conveyance control . . . . . . . . . . . 93
Automatic duplex unit (ADU). . . . . . . . . . . . . . . 95
Composition . . . . . . . . . . . . . . . . . . . . . . .95
Mechanisms . . . . . . . . . . . . . . . . . . . . . . .96
Loop/second paper feed control . . . . . . . 101
Paper conveyance control. . . . . . . . . . . . 103
Paper reverse and exit control . . . . . . . . 104
ADF paper conveyance/feed control . . . 108
Fuser unit . . . . . . . . . . . . . . . . . . . . . . . . . . . . 111
Composition . . . . . . . . . . . . . . . . . . . . . . 111
Mechanisms . . . . . . . . . . . . . . . . . . . . . . 111
M16 (web drive) control . . . . . . . . . . . . . 113
Fuser temperature control . . . . . . . . . . . 114
Other kinds of control . . . . . . . . . . . . . . . . . . . 116
Parts energized when SW1 (main
power) is off . . . . . . . . . . . . . . . . . . 116
Parts that operate when SW1 (main
power)/SW2 (secondary power)
is on . . . . . . . . . . . . . . . . . . . . . . . . 117
Cooling fan control . . . . . . . . . . . . . . . . . 118
Control panel control. . . . . . . . . . . . . . . . 122
Counter control . . . . . . . . . . . . . . . . . . . . 124
Option control . . . . . . . . . . . . . . . . . . . . . 126
5 MFP disassembly/assembly
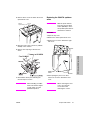
External section . . . . . . . . . . . . . . . . . . . . . . . 132
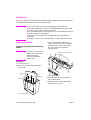
Replacing the ozone filter . . . . . . . . . . . . 132
Replacing the developing suction filter . . 133
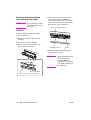
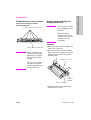
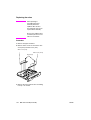
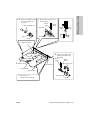
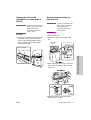
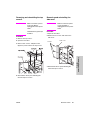
Removing and reinstalling the
external covers . . . . . . . . . . . . . . . . 133
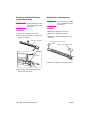
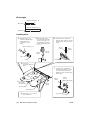
Changing the control panel
attachment angle and
removing/reinstalling. . . . . . . . . . . . 136
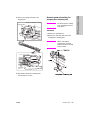
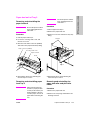
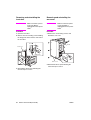
Resetting the circuit breaker . . . . . . . . . . 137
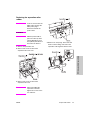
Drive section . . . . . . . . . . . . . . . . . . . . . . . . . . 138
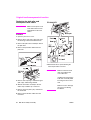
Removing and reinstalling the drum
motor (M2) . . . . . . . . . . . . . . . . . . . 138
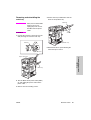
Removing and reinstalling the fusing
input gear . . . . . . . . . . . . . . . . . . . . 140
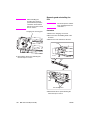
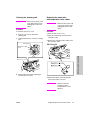
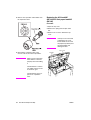
Scanner section . . . . . . . . . . . . . . . . . . . . . . . 141
Screws that must not be removed . . . . . 141
Removing and reinstalling the CCD
unit . . . . . . . . . . . . . . . . . . . . . . . . . 141
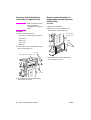
Replacing the exposure lamp . . . . . . . . . 142
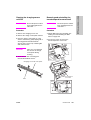
Removing and reinstalling the
exposure unit . . . . . . . . . . . . . . . . . 143
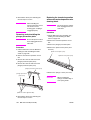
Installing the optics wire . . . . . . . . . . . . . 145
Cleaning the ADF glass and scanner
glass . . . . . . . . . . . . . . . . . . . . . . . . 147
Replacing the scanner motor (M11) . . . 148
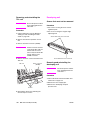
Laser scanner unit . . . . . . . . . . . . . . . . . . . . . 150
Removing and reinstalling the laser/
scanner assembly. . . . . . . . . . . . . . 150
Cleaning the dust-proof glass. . . . . . . . . 151
Drum unit . . . . . . . . . . . . . . . . . . . . . . . . . . . . 152
Removing and reinstalling the drum
unit . . . . . . . . . . . . . . . . . . . . . . . . . 152
Installing the coupling . . . . . . . . . . . . . . . 154

ENWW v
Contents
Removing, cleaning, and reinstalling
the drum . . . . . . . . . . . . . . . . . . . . .155
Removing and reinstalling the
separation claws and separation
claw solenoid . . . . . . . . . . . . . . . . .156
Removing and reinstalling the toner
control sensor board . . . . . . . . . . . . 158
Corona unit . . . . . . . . . . . . . . . . . . . . . . . . . . .159
Screws that must not be removed. . . . . . 159
Removing and reinstalling the charging
corona unit . . . . . . . . . . . . . . . . . . . 159
Removing and reinstalling the charge
control plate . . . . . . . . . . . . . . . . . . 160
Replacing the charging wires . . . . . . . . . 160
Removing and reinstalling the
charging wire cleaning unit . . . . . . . 161
Removing and reinstalling the PCL. . . . . 162
Cleaning the charging corona unit/PCL . 163
Removing and reinstalling the
transfer/separation corona unit . . . . 163
Removing and reinstalling the plunger
prevention plate . . . . . . . . . . . . . . . 164
Replacing the transfer/separation
wires and transfer/separation
wire cleaning block . . . . . . . . . . . . .164
Removing and reinstalling the TSL unit . 166
Developing unit . . . . . . . . . . . . . . . . . . . . . . . . 166
Screws that must not be removed. . . . . . 166
Removing and reinstalling the
developing unit . . . . . . . . . . . . . . . . 166
Replacing the developer . . . . . . . . . . . . . 167
Cleaning the developing unit bias shaft . 168
Toner supply unit. . . . . . . . . . . . . . . . . . . . . . . 169
Replacing and cleaning the toner
bottle . . . . . . . . . . . . . . . . . . . . . . . . 169
Cleaning/toner recycle unit . . . . . . . . . . . . . . . 170
Removing and reinstalling the
cleaning blade. . . . . . . . . . . . . . . . . 170
Removing and reinstalling the toner
guide roller (TGR) . . . . . . . . . . . . . . 171
Paper feed units of Trays 2 and 3 . . . . . . . . . . 173
Removing and reinstalling the paper
feed unit . . . . . . . . . . . . . . . . . . . . . 173
Removing and reinstalling the paper
feed Trays 2 and 3 . . . . . . . . . . . . . 173
Removing and reinstalling the paper
pick roller and pick roller rubber . . . 174
Removing and reinstalling the
separation roller rubber. . . . . . . . . . 174
Replacing the pre-registration and feed
clutches (MCs) . . . . . . . . . . . . . . . . 175
Replacing the wires. . . . . . . . . . . . . . . . . 176
Wire lengths . . . . . . . . . . . . . . . . . . . . . . 178
Installing wires. . . . . . . . . . . . . . . . . . . . . 178
Paper feed unit of Tray 3 . . . . . . . . . . . . . . . . 179
Removing and reinstalling the paper
feed unit . . . . . . . . . . . . . . . . . . . . . 179
Removing and reinstalling paper feed
Tray 3 . . . . . . . . . . . . . . . . . . . . . . . 179
Removing and reinstalling the paper
pick roller and pick roller rubber . . . 179
Removing and reinstalling the
separation roller rubber. . . . . . . . . . 180
Replacing the pre-registration and feed
clutches (MCs) . . . . . . . . . . . . . . . . 181
Replacing the wires . . . . . . . . . . . . . . . . 182
Wire lengths . . . . . . . . . . . . . . . . . . . . . . 183
Installing wires . . . . . . . . . . . . . . . . . . . . 184
Tray 1 . . . . . . . . . . . . . . . . . . . . . . . . . . . . . . . 185
Removing and reinstalling Tray 1 . . . . . . 185
Replacing the paper pick roller/paper
pick roller rubber. . . . . . . . . . . . . . . 185
Replacing the separation roller rubber . . 186
Vertical conveyance section . . . . . . . . . . . . . . 187
Removing and reinstalling the vertical
conveyance section . . . . . . . . . . . . 187
Removing and reinstalling the vertical
conveyance MC (MC11, MC12) . . . 187
ADF unit . . . . . . . . . . . . . . . . . . . . . . . . . . . . . 188
Pulling out and reinstalling the ADU
stand. . . . . . . . . . . . . . . . . . . . . . . . 188
Cleaning the paper mis-centering PS
(PS70)/leading edge PS (PS43). . . 189
Removing and reinstalling the
registration MC (MC1) . . . . . . . . . . 190
Removing and reinstalling the
second paper feed unit
(registration assembly) . . . . . . . . . . 191
Cleaning the registration PS (PS44). . . . 192
Removing and reinstalling the
registration roller . . . . . . . . . . . . . . . 193
Removing and reinstalling the
pre-transfer roller . . . . . . . . . . . . . . 194
Cleaning the automatic document
feeder paper reverse PS (PS45)/
Reverse/Exit PS (PS46) . . . . . . . . . 195
Removing and reinstalling the ADF
reverse roller. . . . . . . . . . . . . . . . . . 198
Removing and reinstalling the ADU
stand. . . . . . . . . . . . . . . . . . . . . . . . 199
Removing and reinstalling the
pre-registration roller. . . . . . . . . . . . 201
Removing and reinstalling the ADU
conveyance roller 3 and 4. . . . . . . . 202
Removing and reinstalling the ADU
conveyance roller 1 and 2. . . . . . . . 205
Removing and reinstalling the paper
reverse/exit roller . . . . . . . . . . . . . . 207

vi ENWW
Fuser . . . . . . . . . . . . . . . . . . . . . . . . . . . . . . . . 208
Removing and reinstalling the fuser . . . . 208
Removing and reinstalling the fuser
(top). . . . . . . . . . . . . . . . . . . . . . . . . 208
Removing and reinstalling the web
cover . . . . . . . . . . . . . . . . . . . . . . . . 209
Removing and reinstalling the
cleaning web . . . . . . . . . . . . . . . . . . 210
Replacing the fusing heater lamps
(L2, L3) . . . . . . . . . . . . . . . . . . . . . .210
Replacing the fusing heater lamp (L4) . . 212
Removing and reinstalling the fusing
separation claw (upper) unit and
fusing separation claws (upper) . . . 213
Removing and reinstalling the fusing
separation claw (lower) unit and
fusing separation claws (lower). . . . 214
Removing and reinstalling the fusing
upper roller . . . . . . . . . . . . . . . . . . . 214
Removing and reinstalling the fusing
lower roller . . . . . . . . . . . . . . . . . . . 215
Removing and reinstalling the
decurler roller . . . . . . . . . . . . . . . . . 216
Removing and reinstalling the fusing
temperature sensors 1 and 2 . . . . . 217
Removing and reinstalling the
thermostat/U (TS1) . . . . . . . . . . . . . 218
Removing and reinstalling the
thermostat/L (TS2) . . . . . . . . . . . . . 220
6 Product comparison
hp LaserJet 9055mfp/9065mfp list of
differences. . . . . . . . . . . . . . . . . . . . . . . . 224
A Environmental Product
Stewardship Program
Environmental Product Stewardship
Program . . . . . . . . . . . . . . . . . . . . . . . . . 226
Protecting the environment . . . . . . . . . . .226
B Terminology cross-reference
Terminology cross-reference for the MFP. . . . 228
Index


2 How to use this manual ENWW
Manual contents
The HP LaserJet 9055mfp/9065mfp Service Manual contains six separate documents. Each
document provides specific service information for one of the components that make up the
HP LaserJet 9055mfp/9065mfp. The following are the component documents, listed in the order
that they appear in the manual:
● HP LaserJet 9055mfp/9065mfp (main engine)
● Automatic document feeder
● 4000-sheet high capacity input
● Post insertion kit
● Punch kit
● Stapler/stacker and multifunction finisher
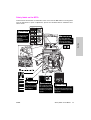
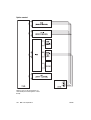
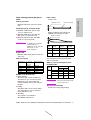
Manual organization
Each separate document contains its own table of contents and index. The tabs on the
right-hand pages help you identify the sections of the manual. The tab for the table of contents
in each document appears in magenta. The tabs for the remaining chapters in each document
appear in gray.

ENWW 3
Safety
2Safety
Safety and important warning items. . . . . . . . . . . . . . . . . . . . . . . . . . . . . . . . . 4
Important notices . . . . . . . . . . . . . . . . . . . . . . . . . . . . . . . . . . . . . . . . . . . 4
Description items for Warning, Caution, and Note. . . . . . . . . . . . . . . . . . 4
Safety warnings . . . . . . . . . . . . . . . . . . . . . . . . . . . . . . . . . . . . . . . . . . . . . . . . 5
Modifications not authorized by hp. . . . . . . . . . . . . . . . . . . . . . . . . . . . . . 5
Power supply . . . . . . . . . . . . . . . . . . . . . . . . . . . . . . . . . . . . . . . . . . . . . . 7
Installation requirements . . . . . . . . . . . . . . . . . . . . . . . . . . . . . . . . . . . . 10
Measures to take in case of an accident . . . . . . . . . . . . . . . . . . . . . . . . 15
Conclusion . . . . . . . . . . . . . . . . . . . . . . . . . . . . . . . . . . . . . . . . . . . . . . . 15
Regulatory statements . . . . . . . . . . . . . . . . . . . . . . . . . . . . . . . . . . . . . . . . . . 16
Safety information . . . . . . . . . . . . . . . . . . . . . . . . . . . . . . . . . . . . . . . . . . . . . 16
Safety circuits. . . . . . . . . . . . . . . . . . . . . . . . . . . . . . . . . . . . . . . . . . . . . 16
Overall protection circuit. . . . . . . . . . . . . . . . . . . . . . . . . . . . . . . . . . . . . 16
Safety labels on the MFPs . . . . . . . . . . . . . . . . . . . . . . . . . . . . . . . . . . . . . . . 19
Scanner section . . . . . . . . . . . . . . . . . . . . . . . . . . . . . . . . . . . . . . . . . . . 21
Laser/scanner assembly . . . . . . . . . . . . . . . . . . . . . . . . . . . . . . . . . . . . 21
Rear cover . . . . . . . . . . . . . . . . . . . . . . . . . . . . . . . . . . . . . . . . . . . . . . . 21

4Safety ENWW
Safety and important warning items
Read carefully the safety and important warning items described below to understand them
before doing service work.
Important notices
Because of possible hazards to an inexperienced person servicing this MFP as well as the risk
of damage to the MFP, HP strongly recommends that all servicing be performed only by
HP-trained service technicians.
Changes may have been made to this MFP to improve its performance after this service
handbook was printed. Accordingly, HP does not warrant, either explicitly or implicitly, that the
information contained in this service handbook is complete and accurate.
The user of this service handbook must assume all risks of personal injury and/or damage to
the MFP while servicing the MFP for which this service handbook is intended.
Therefore, this service handbook must be carefully read before doing service work both in the
course of technical training and even after that, for performing maintenance and control of the
MFP properly.
Keep this service handbook also for future service.
When it is impossible to read the description about safety and warnings (due to contamination
or tear), the relevant page should be replaced.
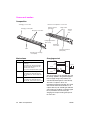
Description items for Warning, Caution, and Note
In this service handbook, Warning, Caution, and Note are defined as follows together with a
symbol mark to be used in a limited meaning.
When servicing the MFP, the relevant works (disassembling, reassembling, adjustment, repair,
maintenance, and so forth) need to be conducted with utmost care.
WARNING! Warning messages alert the reader to a specific procedure or practice which,
if not followed correctly, could cause personal injury or catastrophic loss of data
or equipment.
CAUTION Caution messages appear before procedures which, if not observed, could
result in loss of data or damage to equipment
Note Notes contain important information.

ENWW Safety warnings 5
Safety
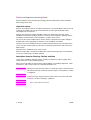
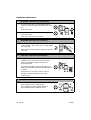
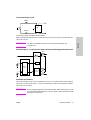
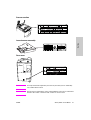
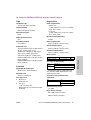
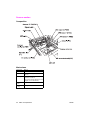
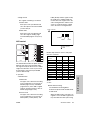
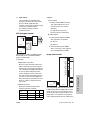
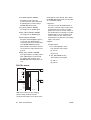
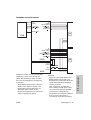
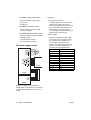
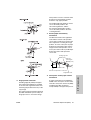
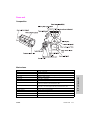
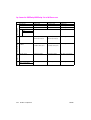
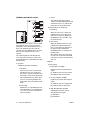
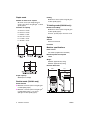
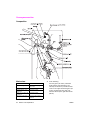
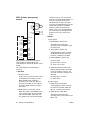
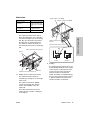
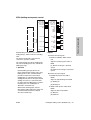
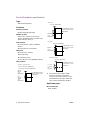
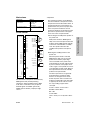
Symbols used for safety and important warning items are defined as follows
Safety warnings
Modifications not authorized by hp
HP MFPs are renowned for their high reliability. This reliability is achieved through high-quality
design and a solid service network.
MFP design is a highly complicated and delicate process where numerous mechanical,
physical, and electrical aspects have to be taken into consideration, with the aim of arriving at
proper tolerances and safety factors. For this reason, unauthorized modifications involve a high
risk of degradation in performance and safety. Such modifications are therefore strictly
prohibited. The points listed below are not exhaustive, but they illustrate the reasoning behind
this policy.
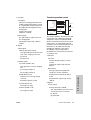
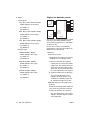
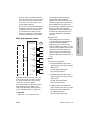
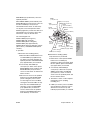
Precaution when
using the MFP
General precaution Electric hazard High temperature
Prohibition when
using the MFP
General prohibition Do not touch with wet hand Do not disassemble
Direction when
using the MFP
General instruction Unplug Ground/Earth
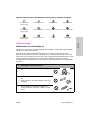
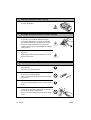
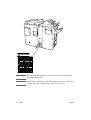
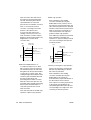
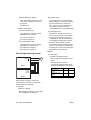
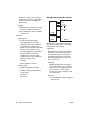
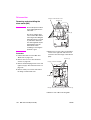
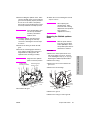
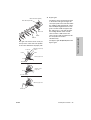
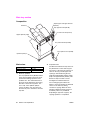
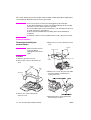
WARNING: Prohibited actions
● Do not use any cables or power cord not specified by
HP.
● Do not use any fuse or thermostat not specified by
HP.
● Safety will not be assured, leading to a risk of fire
and injury.
● Do not disable fuse functions or bridge fuse
terminals with wire, metal clips, solder, or similar
object.

6Safety ENWW
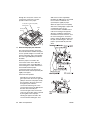
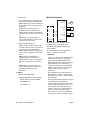
Note Only qualified service personnel should disable relay functions and safety functions
when it is necessary to solve problems.
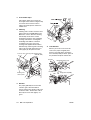
Checkpoints when performing on-site service
HP MFPs are extensively tested before shipping to ensure that all applicable safety standards
are met, and to protect the customer and customer engineer (hereafter called the CE) from the
risk of injury. However, in daily use, any electrical equipment may be subject to parts wear and
eventual failure. In order to maintain safety and reliability, the CE must perform regular safety
checks.
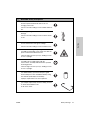
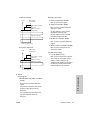
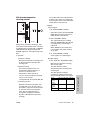
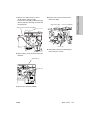
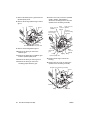
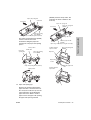
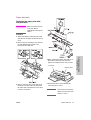
● Do not disable relay functions (such as wedging
paper between relay contacts).
● Do not disable safety functions (interlocks, safety
circuits, and so forth). Safety will not be assured,
leading to a risk of fire and injury.
● Do not make any modification to the MFP unless
instructed by HP.
● Do not use parts not specified by HP.
WARNING: Prohibited actions

ENWW Safety warnings 7
Safety
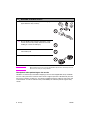
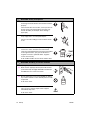
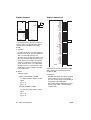
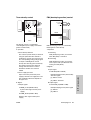
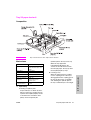
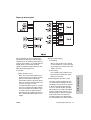
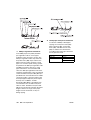
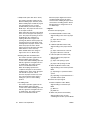
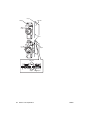
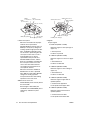
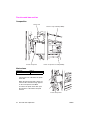
Power supply
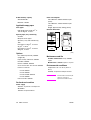
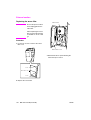
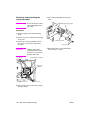
WARNING: Wall outlet
● Check that main voltage is as specified. Plug the
power cord into the dedicated wall outlet with a
capacity greater than the maximum power
consumption.
● If excessive current flows in the wall outlet, fire may
result.
● If two or more power cords are plugged into the wall
outlet, the total load must not exceed the rating of
the wall outlet.
● If excessive current flows in the wall outlet, fire may
result.
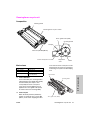
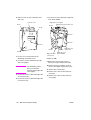
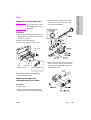
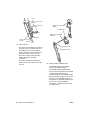
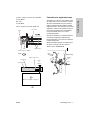
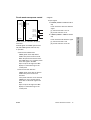
WARNING: Power plug and cord
● Make sure the power cord is plugged in the wall
outlet securely.
Contact problems may lead to increased resistance,
overheating, and the risk of fire.
● Check whether the power cord is damaged. Check
whether the sheath is damaged.
If the power plug, cord, or sheath is damaged,
replace with a new power cord (with plugs on both
ends) specified by HP. Using the damaged power
cord may result in fire or electric shock.
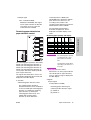
● When using the power cord (inlet type) that came
with this MFP, be sure to observe the following
precautions:
a Make sure the MFP-side power plug is securely
inserted in the socket on the rear panel of the
MFP.
Secure the cord with a fixture properly.
b If the power cord or sheath is damaged, replace
with a new power cord (with plugs on both ends)
specified by HP.
If the power cord (inlet type) is not connected to
the MFP securely, a contact problem may lead to
increased resistance, overheating, and risk of
fire.
kw

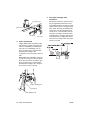
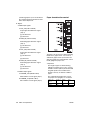
8Safety ENWW
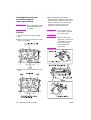
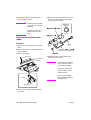
●
Check whether the power cord is not stepped on or
pinched by a table and so on.
● Overheating may occur there, leading to a risk of
fire.
● Do not bundle or tie the power cord.
Overheating may occur there, leading to a risk of
fire.
● Check whether dust has collected around the power
plug and wall outlet.
Using the power plug and wall outlet without
removing dust may result in fire.
● Do not insert the power plug into the wall outlet with
a wet hand.
The risk of electric shock exists.
● When unplugging the power cord, grasp the plug,
not the cable.
The cable may be broken, leading to a risk of fire
and electric shock.
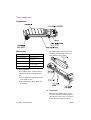
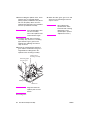
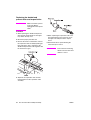
WARNING: Wiring
● Never use multi-plug adapters to plug multiple power
cords in the same outlet.
If used, the risk of fire exists.
WARNING: Power plug and cord

ENWW Safety warnings 9
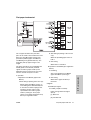
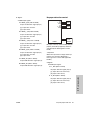
Safety
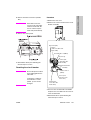
● When an extension cord is required, use a specified
one.
Current that can flow in the extension cord is limited,
so using an extension cord that is too long may
result in fire.
Do not use an extension cable reel with the cable
taken up. Fire may result.
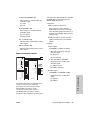
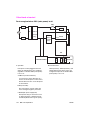
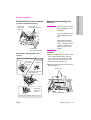
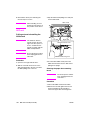
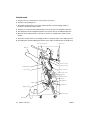
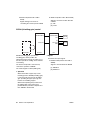
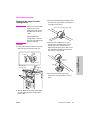
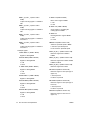
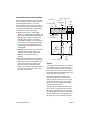
WARNING: Ground lead
● Check whether the MFP is grounded properly.
If current leakage occurs in an ungrounded MFP,
you may suffer electric shock while operating the
MFP. Connect the ground lead to one of the
following points:
a Ground terminal of wall outlet
b Ground terminal for which Class D work has been
done
● Pay attention to the point where the ground lead is
connected.
Connecting the ground lead to an improper point as
listed below results in a risk of explosion and electric
shock:
a Gas pipe (A risk of explosion or fire exists.)
b Lightning rod (A risk of electric shock or fire
exists.)
c Telephone line ground (A risk of electric shock or
fire exists in the case of lightning.)
d Water pipe or faucet (It may include a plastic
portion.)
WARNING: Wiring

10 Safety ENWW
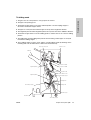
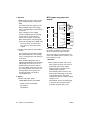
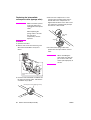
Installation requirements
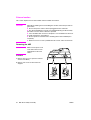
WARNING: Prohibited installation place
● Do not place the MFP near flammable materials
such as curtains or volatile materials that may catch
fire.
A risk of fire exists.
● Do not place the MFP in a place exposed to water
such as rain water.
A risk of fire and electric shock exists.
WARNING: Non-operational handling
● When the MFP is not used over an extended period
of time (holidays, and so forth), turn it off and unplug
the power cord.
Dust collected around the power plug and outlet may
cause fire.
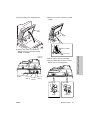
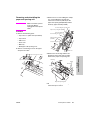
CAUTION: Temperature and humidity
● Do not place the MFP in a place exposed to direct
sunlight or near a heat source such as a heater.
A risk of degradation in MFP performance or
deformation exists.
Do not place the MFP in a place exposed to cool
wind. Recommended temperature and humidity are
as follows:
Temperature: 10
° C to 30° C (50° F to 86° F)
Humidity: 10 percent to 80 percent (no dew
condensation)
CAUTION: Ventilation
● Do not place the MFP in a place where there is much
dust, cigarette smoke, or ammonia gas.
Place the MFP in a well-ventilated location to
prevent MFP problems and image issues.

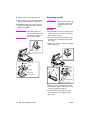
ENWW Safety warnings 11
Safety
● The MFP generates ozone gas during operation, but
it is not sufficient to be harmful to the human body.
If a bad smell of ozone is present in the following
cases, ventilate the room.
● When the MFP is used in a poorly ventilated
room
● When making a lot of copies
● When using multiple MFPs at the same time
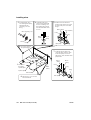
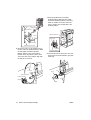
CAUTION: Vibration
● When installing the MFP, read the installation guide
thoroughly. Be sure to install the MFP on a level and
sturdy surface.
Constant vibration will cause problems.
● Be sure to lock the caster stoppers.
In the case of an earthquake and so on, the MFP
may slide, leading to a injury.
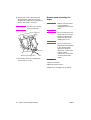
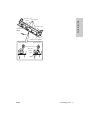
CAUTION: Inspection before servicing
● Before conducting an inspection, read all relevant
documentation (service handbook, technical notices,
and so forth) and proceed with the inspection
following the prescribed procedure in safety clothes,
using only the prescribed tools. Do not make any
adjustment not described in the documentation.
If the prescribed procedure or tool is not used, the
MFP may break and a risk of injury or fire exists.
● Before conducting an inspection, be sure to
disconnect the power cords from the MFP and
optional accessories.
When the power plug is inserted in the wall outlet,
some units are still powered even if the power switch
is turned off. A risk of electric shock exists.
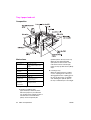
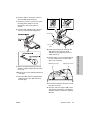
CAUTION: Ventilation

12 Safety ENWW
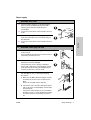
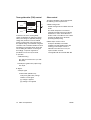
●
The area around the fuser unit is hot.
You may get burned.
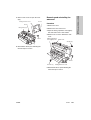
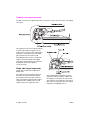
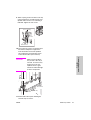
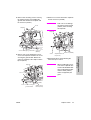
WARNING: Work performed with the MFP powered
● Be careful when making adjustments or performing
an operation check with the MFP powered on.
If you make adjustments or perform an operation
check with the external cover detached, you may
touch live or high-voltage parts or you may be
caught in moving gears or the timing belt, leading to
a risk of injury.
● Be careful when servicing with the external cover
detached.
High-voltage exists around the drum unit. A risk of
electric shock exists.
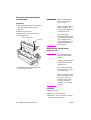
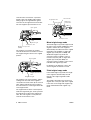
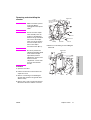
WARNING: Safety checkpoints
● Check the exterior and frame for edges, burrs, and
other damage.
The user or CE may be injured.
● Do not allow any metal parts such as clips, staples,
and screws to fall into the MFP.
They can short internal circuits and cause electric
shock or fire.
● Check wiring for squeezing and any other damage.
Current can leak, leading to a risk of electric shock
or fire.
● When disconnecting connectors, grasp the
connector, not the cable. (Specifically, connectors of
the AC line and high-voltage parts.)
Current can leak, leading to a risk of electric shock
or fire.
CAUTION: Inspection before servicing
Page is loading ...
Page is loading ...
Page is loading ...
Page is loading ...
Page is loading ...
Page is loading ...
Page is loading ...
Page is loading ...
Page is loading ...
Page is loading ...
Page is loading ...
Page is loading ...
Page is loading ...
Page is loading ...
Page is loading ...
Page is loading ...
Page is loading ...
Page is loading ...
Page is loading ...
Page is loading ...
Page is loading ...
Page is loading ...
Page is loading ...
Page is loading ...
Page is loading ...
Page is loading ...
Page is loading ...
Page is loading ...
Page is loading ...
Page is loading ...
Page is loading ...
Page is loading ...
Page is loading ...
Page is loading ...
Page is loading ...
Page is loading ...
Page is loading ...
Page is loading ...
Page is loading ...
Page is loading ...
Page is loading ...
Page is loading ...
Page is loading ...
Page is loading ...
Page is loading ...
Page is loading ...
Page is loading ...
Page is loading ...
Page is loading ...
Page is loading ...
Page is loading ...
Page is loading ...
Page is loading ...
Page is loading ...
Page is loading ...
Page is loading ...
Page is loading ...
Page is loading ...
Page is loading ...
Page is loading ...
Page is loading ...
Page is loading ...
Page is loading ...
Page is loading ...
Page is loading ...
Page is loading ...
Page is loading ...
Page is loading ...
Page is loading ...
Page is loading ...
Page is loading ...
Page is loading ...
Page is loading ...
Page is loading ...
Page is loading ...
Page is loading ...
Page is loading ...
Page is loading ...
Page is loading ...
Page is loading ...
Page is loading ...
Page is loading ...
Page is loading ...
Page is loading ...
Page is loading ...
Page is loading ...
Page is loading ...
Page is loading ...
Page is loading ...
Page is loading ...
Page is loading ...
Page is loading ...
Page is loading ...
Page is loading ...
Page is loading ...
Page is loading ...
Page is loading ...
Page is loading ...
Page is loading ...
Page is loading ...
Page is loading ...
Page is loading ...
Page is loading ...
Page is loading ...
Page is loading ...
Page is loading ...
Page is loading ...
Page is loading ...
Page is loading ...
Page is loading ...
Page is loading ...
Page is loading ...
Page is loading ...
Page is loading ...
Page is loading ...
Page is loading ...
Page is loading ...
Page is loading ...
Page is loading ...
Page is loading ...
Page is loading ...
Page is loading ...
Page is loading ...
Page is loading ...
Page is loading ...
Page is loading ...
Page is loading ...
Page is loading ...
Page is loading ...
Page is loading ...
Page is loading ...
Page is loading ...
Page is loading ...
Page is loading ...
Page is loading ...
Page is loading ...
Page is loading ...
Page is loading ...
Page is loading ...
Page is loading ...
Page is loading ...
Page is loading ...
Page is loading ...
Page is loading ...
Page is loading ...
Page is loading ...
Page is loading ...
Page is loading ...
Page is loading ...
Page is loading ...
Page is loading ...
Page is loading ...
Page is loading ...
Page is loading ...
Page is loading ...
Page is loading ...
Page is loading ...
Page is loading ...
Page is loading ...
Page is loading ...
Page is loading ...
Page is loading ...
Page is loading ...
Page is loading ...
Page is loading ...
Page is loading ...
Page is loading ...
Page is loading ...
Page is loading ...
Page is loading ...
Page is loading ...
Page is loading ...
Page is loading ...
Page is loading ...
Page is loading ...
Page is loading ...
Page is loading ...
Page is loading ...
Page is loading ...
Page is loading ...
Page is loading ...
Page is loading ...
Page is loading ...
Page is loading ...
Page is loading ...
Page is loading ...
Page is loading ...
Page is loading ...
Page is loading ...
Page is loading ...
Page is loading ...
Page is loading ...
Page is loading ...
Page is loading ...
Page is loading ...
Page is loading ...
Page is loading ...
Page is loading ...
Page is loading ...
Page is loading ...
Page is loading ...
Page is loading ...
Page is loading ...
Page is loading ...
Page is loading ...
Page is loading ...
Page is loading ...
Page is loading ...
Page is loading ...
Page is loading ...
Page is loading ...
Page is loading ...
Page is loading ...
Page is loading ...
Page is loading ...
Page is loading ...
Page is loading ...
Page is loading ...
Page is loading ...
Page is loading ...
Page is loading ...
Page is loading ...
Page is loading ...
Page is loading ...
Page is loading ...
Page is loading ...
Page is loading ...
Page is loading ...
Page is loading ...
Page is loading ...
Page is loading ...
Page is loading ...
Page is loading ...
Page is loading ...
Page is loading ...
Page is loading ...
Page is loading ...
Page is loading ...
Page is loading ...
Page is loading ...
Page is loading ...
Page is loading ...
Page is loading ...
Page is loading ...
Page is loading ...
Page is loading ...
Page is loading ...
Page is loading ...
Page is loading ...
Page is loading ...
Page is loading ...
Page is loading ...
Page is loading ...
Page is loading ...
Page is loading ...
Page is loading ...
Page is loading ...
Page is loading ...
Page is loading ...
Page is loading ...
Page is loading ...
Page is loading ...
Page is loading ...
Page is loading ...
Page is loading ...
Page is loading ...
Page is loading ...
Page is loading ...
Page is loading ...
Page is loading ...
Page is loading ...
Page is loading ...
Page is loading ...
Page is loading ...
Page is loading ...
Page is loading ...
Page is loading ...
Page is loading ...
Page is loading ...
Page is loading ...
Page is loading ...
Page is loading ...
Page is loading ...
Page is loading ...
Page is loading ...
Page is loading ...
Page is loading ...
Page is loading ...
Page is loading ...
Page is loading ...
Page is loading ...
Page is loading ...
Page is loading ...
Page is loading ...
Page is loading ...
Page is loading ...
Page is loading ...
Page is loading ...
Page is loading ...
Page is loading ...
Page is loading ...
Page is loading ...
Page is loading ...
Page is loading ...
Page is loading ...
Page is loading ...
Page is loading ...
Page is loading ...
Page is loading ...
Page is loading ...
Page is loading ...
Page is loading ...
Page is loading ...
Page is loading ...
Page is loading ...
Page is loading ...
Page is loading ...
Page is loading ...
Page is loading ...
Page is loading ...
Page is loading ...
Page is loading ...
Page is loading ...
Page is loading ...
Page is loading ...
Page is loading ...
Page is loading ...
Page is loading ...
Page is loading ...
Page is loading ...
Page is loading ...
Page is loading ...
Page is loading ...
Page is loading ...
Page is loading ...
Page is loading ...
Page is loading ...
Page is loading ...
Page is loading ...
Page is loading ...
Page is loading ...
Page is loading ...
Page is loading ...
Page is loading ...
Page is loading ...
Page is loading ...
Page is loading ...
Page is loading ...
Page is loading ...
Page is loading ...
Page is loading ...
Page is loading ...
Page is loading ...
Page is loading ...
Page is loading ...
Page is loading ...
Page is loading ...
Page is loading ...
Page is loading ...
Page is loading ...
Page is loading ...
Page is loading ...
Page is loading ...
Page is loading ...
Page is loading ...
Page is loading ...
Page is loading ...
Page is loading ...
Page is loading ...
Page is loading ...
Page is loading ...
Page is loading ...
Page is loading ...
Page is loading ...
Page is loading ...
Page is loading ...
Page is loading ...
Page is loading ...
Page is loading ...
Page is loading ...
Page is loading ...
Page is loading ...
Page is loading ...
Page is loading ...
Page is loading ...
Page is loading ...
Page is loading ...
Page is loading ...
Page is loading ...
Page is loading ...
Page is loading ...
Page is loading ...
Page is loading ...
Page is loading ...
Page is loading ...
Page is loading ...
Page is loading ...
Page is loading ...
Page is loading ...
Page is loading ...
Page is loading ...
Page is loading ...
Page is loading ...
Page is loading ...
Page is loading ...
Page is loading ...
Page is loading ...
Page is loading ...
Page is loading ...
Page is loading ...
Page is loading ...
Page is loading ...
Page is loading ...
Page is loading ...
Page is loading ...
Page is loading ...
Page is loading ...
Page is loading ...
Page is loading ...
Page is loading ...
Page is loading ...
Page is loading ...
Page is loading ...
Page is loading ...
Page is loading ...
Page is loading ...
Page is loading ...
Page is loading ...
Page is loading ...
Page is loading ...
Page is loading ...
Page is loading ...
Page is loading ...
Page is loading ...
Page is loading ...
Page is loading ...
-
 1
1
-
 2
2
-
 3
3
-
 4
4
-
 5
5
-
 6
6
-
 7
7
-
 8
8
-
 9
9
-
 10
10
-
 11
11
-
 12
12
-
 13
13
-
 14
14
-
 15
15
-
 16
16
-
 17
17
-
 18
18
-
 19
19
-
 20
20
-
 21
21
-
 22
22
-
 23
23
-
 24
24
-
 25
25
-
 26
26
-
 27
27
-
 28
28
-
 29
29
-
 30
30
-
 31
31
-
 32
32
-
 33
33
-
 34
34
-
 35
35
-
 36
36
-
 37
37
-
 38
38
-
 39
39
-
 40
40
-
 41
41
-
 42
42
-
 43
43
-
 44
44
-
 45
45
-
 46
46
-
 47
47
-
 48
48
-
 49
49
-
 50
50
-
 51
51
-
 52
52
-
 53
53
-
 54
54
-
 55
55
-
 56
56
-
 57
57
-
 58
58
-
 59
59
-
 60
60
-
 61
61
-
 62
62
-
 63
63
-
 64
64
-
 65
65
-
 66
66
-
 67
67
-
 68
68
-
 69
69
-
 70
70
-
 71
71
-
 72
72
-
 73
73
-
 74
74
-
 75
75
-
 76
76
-
 77
77
-
 78
78
-
 79
79
-
 80
80
-
 81
81
-
 82
82
-
 83
83
-
 84
84
-
 85
85
-
 86
86
-
 87
87
-
 88
88
-
 89
89
-
 90
90
-
 91
91
-
 92
92
-
 93
93
-
 94
94
-
 95
95
-
 96
96
-
 97
97
-
 98
98
-
 99
99
-
 100
100
-
 101
101
-
 102
102
-
 103
103
-
 104
104
-
 105
105
-
 106
106
-
 107
107
-
 108
108
-
 109
109
-
 110
110
-
 111
111
-
 112
112
-
 113
113
-
 114
114
-
 115
115
-
 116
116
-
 117
117
-
 118
118
-
 119
119
-
 120
120
-
 121
121
-
 122
122
-
 123
123
-
 124
124
-
 125
125
-
 126
126
-
 127
127
-
 128
128
-
 129
129
-
 130
130
-
 131
131
-
 132
132
-
 133
133
-
 134
134
-
 135
135
-
 136
136
-
 137
137
-
 138
138
-
 139
139
-
 140
140
-
 141
141
-
 142
142
-
 143
143
-
 144
144
-
 145
145
-
 146
146
-
 147
147
-
 148
148
-
 149
149
-
 150
150
-
 151
151
-
 152
152
-
 153
153
-
 154
154
-
 155
155
-
 156
156
-
 157
157
-
 158
158
-
 159
159
-
 160
160
-
 161
161
-
 162
162
-
 163
163
-
 164
164
-
 165
165
-
 166
166
-
 167
167
-
 168
168
-
 169
169
-
 170
170
-
 171
171
-
 172
172
-
 173
173
-
 174
174
-
 175
175
-
 176
176
-
 177
177
-
 178
178
-
 179
179
-
 180
180
-
 181
181
-
 182
182
-
 183
183
-
 184
184
-
 185
185
-
 186
186
-
 187
187
-
 188
188
-
 189
189
-
 190
190
-
 191
191
-
 192
192
-
 193
193
-
 194
194
-
 195
195
-
 196
196
-
 197
197
-
 198
198
-
 199
199
-
 200
200
-
 201
201
-
 202
202
-
 203
203
-
 204
204
-
 205
205
-
 206
206
-
 207
207
-
 208
208
-
 209
209
-
 210
210
-
 211
211
-
 212
212
-
 213
213
-
 214
214
-
 215
215
-
 216
216
-
 217
217
-
 218
218
-
 219
219
-
 220
220
-
 221
221
-
 222
222
-
 223
223
-
 224
224
-
 225
225
-
 226
226
-
 227
227
-
 228
228
-
 229
229
-
 230
230
-
 231
231
-
 232
232
-
 233
233
-
 234
234
-
 235
235
-
 236
236
-
 237
237
-
 238
238
-
 239
239
-
 240
240
-
 241
241
-
 242
242
-
 243
243
-
 244
244
-
 245
245
-
 246
246
-
 247
247
-
 248
248
-
 249
249
-
 250
250
-
 251
251
-
 252
252
-
 253
253
-
 254
254
-
 255
255
-
 256
256
-
 257
257
-
 258
258
-
 259
259
-
 260
260
-
 261
261
-
 262
262
-
 263
263
-
 264
264
-
 265
265
-
 266
266
-
 267
267
-
 268
268
-
 269
269
-
 270
270
-
 271
271
-
 272
272
-
 273
273
-
 274
274
-
 275
275
-
 276
276
-
 277
277
-
 278
278
-
 279
279
-
 280
280
-
 281
281
-
 282
282
-
 283
283
-
 284
284
-
 285
285
-
 286
286
-
 287
287
-
 288
288
-
 289
289
-
 290
290
-
 291
291
-
 292
292
-
 293
293
-
 294
294
-
 295
295
-
 296
296
-
 297
297
-
 298
298
-
 299
299
-
 300
300
-
 301
301
-
 302
302
-
 303
303
-
 304
304
-
 305
305
-
 306
306
-
 307
307
-
 308
308
-
 309
309
-
 310
310
-
 311
311
-
 312
312
-
 313
313
-
 314
314
-
 315
315
-
 316
316
-
 317
317
-
 318
318
-
 319
319
-
 320
320
-
 321
321
-
 322
322
-
 323
323
-
 324
324
-
 325
325
-
 326
326
-
 327
327
-
 328
328
-
 329
329
-
 330
330
-
 331
331
-
 332
332
-
 333
333
-
 334
334
-
 335
335
-
 336
336
-
 337
337
-
 338
338
-
 339
339
-
 340
340
-
 341
341
-
 342
342
-
 343
343
-
 344
344
-
 345
345
-
 346
346
-
 347
347
-
 348
348
-
 349
349
-
 350
350
-
 351
351
-
 352
352
-
 353
353
-
 354
354
-
 355
355
-
 356
356
-
 357
357
-
 358
358
-
 359
359
-
 360
360
-
 361
361
-
 362
362
-
 363
363
-
 364
364
-
 365
365
-
 366
366
-
 367
367
-
 368
368
-
 369
369
-
 370
370
-
 371
371
-
 372
372
-
 373
373
-
 374
374
-
 375
375
-
 376
376
-
 377
377
-
 378
378
-
 379
379
-
 380
380
-
 381
381
-
 382
382
-
 383
383
-
 384
384
-
 385
385
-
 386
386
-
 387
387
-
 388
388
-
 389
389
-
 390
390
-
 391
391
-
 392
392
-
 393
393
-
 394
394
-
 395
395
-
 396
396
-
 397
397
-
 398
398
-
 399
399
-
 400
400
-
 401
401
-
 402
402
-
 403
403
-
 404
404
-
 405
405
-
 406
406
-
 407
407
-
 408
408
-
 409
409
-
 410
410
-
 411
411
-
 412
412
-
 413
413
-
 414
414
-
 415
415
-
 416
416
-
 417
417
-
 418
418
-
 419
419
-
 420
420
-
 421
421
-
 422
422
-
 423
423
-
 424
424
-
 425
425
-
 426
426
-
 427
427
-
 428
428
-
 429
429
-
 430
430
-
 431
431
-
 432
432
-
 433
433
-
 434
434
-
 435
435
-
 436
436
-
 437
437
-
 438
438
-
 439
439
-
 440
440
-
 441
441
-
 442
442
-
 443
443
-
 444
444
-
 445
445
-
 446
446
-
 447
447
-
 448
448
-
 449
449
-
 450
450
-
 451
451
-
 452
452
-
 453
453
-
 454
454
-
 455
455
-
 456
456


HP LASERJET 9065 User manual
- Category
- Multifunctionals
- Type
- User manual
Ask a question and I''ll find the answer in the document
Finding information in a document is now easier with AI
Related papers
-
HP LASERJET 9065MFP User guide
-
-
HP LaserJet 9000 Printer series User guide
-
HP LaserJet 9040 Printer series User guide
-
-
-
Atek Secure Password Organizer LG10B User guide
-
HP LASERJET 9500MFP User manual
-
-
Other documents
-
MartinYale 1217a Datasheet
-
Duplo DF-920 User manual
-
MyBinding Duplo DF-915 User manual
-
-
Ricoh AFICIO MP W2400 Owner's manual
-
OKI Hole Punch Kit 58372901 User manual
-
Magnum MFM-PS User manual
-
KYOCERA TASK/CS 9600 User guide
-
BakkerElkhuizen Space-arm Beam User manual
-
OKI C7 Cyan User manual