Page is loading ...

Catalog No.: 5000.51J
Effective: 10-14-05
Replaces: 06-15-03
B6000
BOILER
MANAGEMENT
SYSTEM
Installation and Operating Manual
Part No. 240564
TM
SYSTEM CONTROL BOILER MONITOR

Page 2
is a registered trademark of UnderWriters Laboratories Inc. ®
is a registered trademark of UnderWriters Laboratories-Canada Inc.®
______________________________________________________________________________________
Before operating this product, please read these instructions completely.

B6000 BOILER MANAGEMENT SYSTEM (BMS)
Contents
Equipment Quantity
B6000 System Control 1
B6000 Boiler Monitor, Installed on Boiler(s) As Ordered
Outdoor Temperature Sensor Assy. (064140) 1
Water Temperature Sensor Assy. (064139) 1
Optional Equipment As Ordered
Check packaging for damage or missing components.
IMPORTANT NOTICE: These instructions are intended for the use by qualified personnel only,
specifically trained and experienced in the installation of this type of equipment and related system
components. Installation and service personnel may be required by some states to be licensed. If your state
is such, be sure your contractor bears the appropriate license. Only qualified persons shall attempt to repair
this equipment. Repair must be according to these instructions.
WARNING: Improper installation, adjustment, alteration, service or maintenance may damage the
equipment, create a hazard resulting in asphyxiation, explosion, fire, electric shock, personal injury or property
damage and will void the warranty.
CAUTION: MORE THAN ONE (1) SUPPLY SOURCE. THIS CONTROL HAS THE POTENTIAL TO BE
CONNECTED TO MORE THAN ONE (1) ELECTRICAL SUPPLY SOURCE. TO REDUCE THE RISK OF
ELECTRIC SHOCK, DISCONNECT ALL CONNECTIONS BEFORE SERVICING.
CAUTION: RISK OF ELECTRIC SHOCK. MORE THAN ONE (1) DISCONNECT SWITCH MAY BE
REQUIRED TO DE-ENERGIZE THE EQUIPMENT BEFORE SERVICING.
Page 3
PLEASE REGISTER
Before proceeding any further, please take a moment to complete the enclosed user registration form and
mail to Raypak, Inc., 2151 Eastman Avenue, Oxnard, CA 93030.

Page 4
TABLE OF CONTENTS
PAGE
Contents 3
Getting Started 5
Foreword 5
Installation and Mounting 7
Mechanical Installation 7
Electrical Installation 8
Check Your Power Source 8
Air Temperature Sensor 9
Water Temperature Sensor 10
Important Configuration Note 12
Wiring - Air and Water Sensors 12
Communication (RS485) Wiring 13
Wiring: Power Source to Control and Boiler Modules 14
Power Test 15
Boiler Monitor Select Switch 16
Boiler Monitor Communications Jumper W1 17
Optional Boiler Monitor Control 18
Field Wiring - Single Boiler 18
Field Wiring - Multiple Boilers 19
Installation Verification Procedure 20
System Control/Display Familiarization 21
Power Up - Boiler Monitor 22
Power Up - System Control Module 23
Displays 23
Important (Start Alternate) 35
System Control Box 39
System Control Board Pictorial 40
Replacement Parts List 42
Boiler Monitor Control Box 44
System Settings 46
Troubleshooting Guide 47

Page 5
Thank you for selecting the Raypak B6000 Boiler Management System (BMS). It is our sincere hope that
you will enjoy its power, ease of use and energy saving features.
GETTING STARTED
To learn about the B6000 BMS, simply install it and start using it. The following steps will outline the
things you will need for installation and to prepare it for use.
FOREWORD
The B6000 Boiler Management System is comprised of a Boiler Monitor for each
boiler, one System Control for each system, an Outdoor Air Temperature Sensor and
a Water Temperature Sensor. The system is a microprocessor-based energy manage-
ment hot water control system that controls single or multiple boiler installations used for
hydronic heating and/or domestic hot water supply.
The B6000 BMS is designed to provide the ultimate in personal comfort, efficiency and
operation. The system requires minimal attention after initial setup. The system control to
boiler can be separated by up to 2000 feet. It is capable of being monitored from a remote
location, with an optional modem package and a Personal Computer (PC) equipped with
a modem. The Raypak Boiler Management System minimizes boiler operator attendance
and increases system reliability and cost effectiveness.
The System Control Module has
• A screen that displays the different operating characteristics of the system.
• A green light, to the left of the screen, that indicates normal system operating conditions.
• A red light, to the right of the screen, that flashes when a fault occurs.
• An alarm buzzer with a silencing switch. If the buzzer is silenced the red light will continue
to flash until the diagnosed fault is corrected.
• Buttons which are used to monitor and program the selectable system features.
• On board relays designed to control primary system pumps, combustion vent louvers
and/or other boiler accessories.

Page 6
Each Boiler Monitor Module contains
• The boiler on-off power switch.
• The boiler manual override switch, which allows the boiler to operate independently
in the event of asystem control failure.
• Standard indicator lights:
"Power On" - green, indicates the boiler is powered.
"Manual Override" - red, indicates boiler is in manual override mode.
"Call for Heat" - amber, indicates there is a call for heat.
"Pump" - green, indicates pump circuit is energized.
"High Limit" - red, indicates boiler is off on high limit.
"Aqua Stat" or "Thermostat" - red, indicates boiler is off on operating control (may not
appear on all models).
"Flow" - red, indicates boiler fault - no flow.
"Ignition" - red, indicates ignition failure.
"Pilot" - yellow or amber, indicates pilot is lit.
"Safety Fault" - red, indicates fault in safety valve or safety circuit.
"Main Gas" - green, indicates modulating valve is energized.
• Boiler identification dip switch.
B6000/A Illustrated

INSTALLATION AND MOUNTING
The System Control module should be mounted on a permanent base not subject to
vibrations, moisture or dust. It should be mounted with the display screen at a convenient
height for reading and for access to the alarm silence button located on the top of the cabinet.
Dimensions & Weight
Boiler Monitor System Control
18-3/4" W 12-1/2" W
5-1/2" D 4-3/4" D
17-1/2" L 15-3/16" L
21-1/4 lbs. 20 lbs.
MECHANICAL INSTALLATION
Install the B6000 System Control Module at a convenient place within 2000 feet of the
boiler(s). The B6000 System Control Module must be mounted vertically with conduit holes
facing downward. Conduit holes are provided to accommodate standard conduit fittings.
Additional or larger conduit fittings that may be required should be located on the bottom of
the module.
Mount the B6000 System Control with 3/8" or 1/4" hardware in four (4) places.
A minimum of six (6) inches clearance on all sides is required and a minimum of eighteen
(18) inches clearance from the front is required for service access. The hinged side of the
box is to the right and the clearance (minimum 3" from bolt hole on the right side) should be
sufficient to open the cover.
Page 7

CB
WHITE
GROUND
BLACK
GREEN
A
B
C
PIDOMA
VOM
A sub-panel containing the disconnect switches and surge suppressors is required at or
near the equipment location(s).
For accessibility remove the lower interior panel, by removing the four (4) access screws.
INSTALL CONDUIT AS APPROPRIATE.
NOTE: Shielded cable, Belden #8132 or #9842 or equivalent, must be used to connect the
sensors to the System Control Module.
DIMENSIONS AND WEIGHT
System Control Module 19 1/2 lbs Boiler Monitor Module 21 1/4 lbs
15 3/16 L 17 1/2 L
12 1/2 W 18 3/4 W
4 3/4 D 5 1/2 D
ELECTRICAL CHARACTERISTICS
Control Module - 120 VAC, 0.5A; 60 Hz
Boiler Monitor Module - 120 VAC, 2.0A; 60 Hz
ELECTRICAL INSTALLATION
115 VAC FEEDER CIRCUITS
Install surge protection device(s) sized appropriately for your installation.
Install separate disconnect means for each load. Pull in appropriately sized wire for
equipment as defined by NEC and/or local code. All primary wiring will be 125% of minimum
rating.
It is strongly recommended that the System Control Module and the Boiler Control Module
be supplied from the same source power.
CHECK YOUR POWER SOURCE
Using a volt-ohm meter, check the following
voltages at the circuit breaker
Neutral (Return)
Hot
AC = 108 Volts AC Minimum, 132 Volts MAX
Hot to Ground
AB = 108 Volts AC Minimum, 132 Volts MAX
Hot to Neutral
BC = Must be less than 1.0 Volts AC
Neutral to Ground
Page 8

Page 9
AIR TEMPERATURE SENSOR
• INSTALLATION
Fig. #9040
TYPICAL AIR TEMPERATURE SENSOR
Air Temperature Sensor Installation Notes:
• Locate on coldest side of building, usually (North or West) side.
• Install the sensor in a shaded area, out of direct sunlight.
• Locate no higher than 2/3 way up side of building or between 2nd and 3rd floor if building
is more than 3 stories tall.
• Shielded cable length not to exceed 4000 feet.
• Do not locate under an overhang, near wall corners, near drafts from stacks, air
moving devices, windows, doors, or balconies.
• Assure cable length does not exceed 4000 ft. Use larger gauge (Belden #9842)
cable if run is in excess of 100 ft.
• Install in conduit with no other wiring.
• Observe proper wire colors. Sensor is polarity sensitive.

WATER TEMPERATURE SENSOR
• INSTALLATION
The water sensor
should be installed
in the system supply.
Multiple Boilers
Single Boiler
Water Sensor
TYPICAL WATER SENSOR
Water Temperature Sensor Installation Notes:
• Locate sensor in system piping within a minimum of three (3) feet or prior to the first
take off connection, on the downstream side of the System Supply Loop.
• Assure cable length does not exceed 4000 ft. Use larger gauge (Belden #9842) wire
if run is in excess of 100 ft.
• Install in conduit with no other wiring.
• Observe proper wire colors. Sensor is ploarity sensitive.
Page 10
Return
Supply

WATER TEMPERATURE SENSOR INSTALLATION (Domestic Hot Water Supply)
Page 11
SIMPLIFIED DIAGRAM OF TYPICAL PIPING
(PIPING LAYOUT MAY VARY PER SPECIFIC APPLICATION)
AIR TEMPERATURE SENSOR MUST BE INSTALLED ACROSS AIR TEMPERATURE
SENSOR CONTACTS. THE SENSOR IS NOT ACTIVATED AND CAN BE LEFT
STORED IN B6000 ENCLOSURE.
BOILER
HOT
WATER
SUPPLY
IMMERSION WELL
WATER SENSOR
1/2 NPT
OUTLET
INLET
COLD
WATER
STORAGE
TANK
INLET
OUTLET
B6000

Page 12
IMPORTANT
Configuration Note:
If your System Control Module is supplied with a single Field Wiring
Teminal Strip use "Alternate" wiring. (See page 36-38)
WIRING - AIR AND WATER SENSORS
TO THE SYSTEM CONTROL MODULE
WATER
SENSOR
OUTDOOR
SENSOR
SYSTEM CONTROL
TERMINAL TB 2
BELDEN #8132
OR BELDEN #9842
NOTE: Tighten terminal strip
clamping screws 20 lbs - In
(2.26N.m) Breakage from over
torquing is not covered under
warranty.
Use copper conductors only.
For supply connections use
wires sized on the basis of 60°C
Ampacity and rated Min. 90°C
(194°F).

COMMUNICATION (RS 485) WIRING
System Control
Boiler Monitor
• Use Belden #9842 Cable Or Equivalent (See Note). Polarity must be observed. Make
use of wire color coding to ensure proper polarity.
• The shielding foil wrapper - bare wire (drain) - MUST be grounded.
Grounding is done at the System Control Module only. DO NOT ground at Boiler
Monitor.
•
Note: Equivalent shielded cable must be suitable for RS 485 communication
applications; must have 100-140 ohm impedance; and less than 30 picofarad per foot
capacitance.
• Install in conduit with no other wiring.
RS 485 Communications Cable Schematic
Page 13
NOTE: Tighten terminal strip
clamping screws 20 lbs - In
(2.26N.m) Breakage from over
torquing is not covered under
warranty.
Use copper conductors only.
For supply connections use
wires sized on the basis of 60°C
Ampacity and rated Min. 90°C
(194°F).
BELDEN #9842
BOILER MONITOR SYSTEM CONTROL
TERMINAL TB 3 TERMINAL TB2

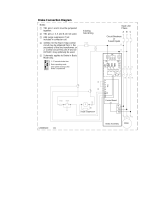
WIRING:WIRING:
WIRING:WIRING:
WIRING:
P P
P P
P
oo
oo
o
ww
ww
w
er Sourer Sour
er Sourer Sour
er Sour
ce to System Contrce to System Contr
ce to System Contrce to System Contr
ce to System Contr
ol and Boiler Mod-ol and Boiler Mod-
ol and Boiler Mod-ol and Boiler Mod-
ol and Boiler Mod-
ules.ules.
ules.ules.
ules.
Page 14
• Observe proper Polarity.
• Observe proper wire colors.
• Provide external surge suppressor capable of maintaining system integrity.
• Provide overload protection and disconnect means as required by code and for
equipment serviceability.
• Conduit can not be used as the ground. (Must be "WIRED" ground).
• Very Important: Grounding electrode conductor - shall be used to connect the
equipment grounding conductors, the equipment enclosures, and where the system
is grounded, the grounded service conductor to the grounding electrode.
Dia. #9
NOTE: Tighten terminal strip
clamping screws 20 lbs - In
(2.26N.m) Breakage from over
torquing is not covered under
warranty.
Use copper conductors only.
For supply connections use
wires sized on the basis of 60°C
Ampacity and rated Min. 90°C
(194°F).

POWER TEST
CHECK POWER
Utilizing a Volt-Ohm-Meter (VOM) monitor the following on the "System Control Module"
and "Boiler Monitor(s)" for proper voltage levels.
POWER TEST TABLE
Module Test Points Indication
System Control TB1-1- TB1-2 108 VAC to 132 VAC
System Control TB1-1- TB1-3 108 VAC to 132 VAC
System Control TB1-2- TB1-3 LESS THAN 1 VAC
System Control TB1-1 - I 108 VAC to 132 VAC
System Control TB1-2 - I LESS THAN 1 VAC
System Control TB1-3 - I LESS THAN 0.5 VAC
Module Test Points Indication
Boiler Monitor TB1-1- TB1-2 108 VAC to 132 VAC
Boiler Monitor TB1-1- TB1-3 108 VAC to 132 VAC
Boiler Monitor TB2-2- TB2-3 LESS THAN 1 VAC
Boiler Monitor TB1 -1 - I 108 VAC to 132 VAC
Boiler Monitor TB2 -2 - I LESS THAN 1 VAC
Boiler Monitor TB3 -3 - I LESS THAN 0.5 VAC
FROM: BOILER MONITOR to SYSTEM CONTROL
Boiler Monitor System Control Indication
TB1 - 1 TB1 - 1 LESS THAN 0.5 VAC
TB1 - 2 TB1 - 2 LESS THAN 0.5 VAC
TB1 - 3 TB1 - 3 LESS THAN 0.5 VAC
TB1 - 2 TB1 - 3 LESS THAN 0.5 VAC
Page 15

SWITCH POSITION
BOILER NUMBER
SWITCH 1234 5678
8 OOOO OOOO
7 OOOO OOOO
6 OOOO OOOO
5 OOOO OOOO
4 OOOO OOOO
3 OOOO XXXX
2 O O X X O O X X
1 O X O X O X O X
IMPORTANT: The Boiler Monitor control board has a series of dip switches which iden-
tify the boiler(s) (SW2). It is required that the switches be set as shown in the switch
position table shown below.
BOILER MONITOR CARD PICTORIAL
SWITCH O = Open X = Closed
Page 16
BOILER MONITOR SELECT SWITCH

BOILER MONITOR COMMUNICATIONS JUMPER W1
• Located in the upper left hand corner of the "LAST" Boiler Monitor board.
• NOTE: The jumper indicates to the System Controller logic that the "Last" wired
boiler has been communicated with over the RS485 BUSS Link.
• Definition: The "LAST" wired boiler is physically wired with the greatest wire
length from the "System Control" or is the last wired boiler for a single or multiple
boiler installation.
• On a single boiler make sure the W1 Jumper has been installed.
W1
BOILER MONITOR CARD PICTORIAL
On boiler systems the jumper (W1) MUST BE installed on the "Last" wired boiler. This
is located on the Boiler Monitor board in the upper left hand corner, adjacent to the
RS485 terminals.
On Multiple boiler systems the W1 jumper must be removed from all Boiler Monitor
boards except on the "Last" wired boiler.
For normal boiler operation the dip switch settings can be utilized to define any of the
boilers as #1 thru # (maximum), independent of the "Last" wired boiler position.
Page 17

OPTIONAL BOILER MONITOR
• Wiring
• Contact Authorized Raypak representative for other wiring options
Dia. #2
Page 18
NOTE: Tighten terminal strip
clamping screws 20 lbs - In
(2.26N.m) Breakage from over
torquing is not covered under
warranty.
Use copper conductors only.
For supply connections use
wires sized on the basis of 60°C
Ampacity and rated Min. 90°C
(194°F).
Field Wiring - Single Boiler
Dia. #7

Page 19
Field Wiring - Multiple Boilers
Dia. #7

INSTALLATION VERIFICATION PROCEDURE
REGISTER
Before proceeding any further, please verify that the user registration form has been
completed and mailed (reference: Registration Card ).
MECHANICAL INSTALLATION
Verify installation has been completed (reference: Mechanical Installation ).
AIR TEMPERATURE SENSOR
Verify installation parameters have been met (reference: Air Temperature Sensor).
WATER TEMPERATURE SENSOR
Verify installation parameters have been met (reference: Water Temperature Sensor).
Verify System Control/Boiler Monitor power wiring connections.
Verify Torque Requirements.
Verify Air Temperature Sensor wiring, must be Belden #8132, #9842 or equivalent.
Verify Water Temperature Sensor wiring, must be Belden #8132, #9842 or equivalent.
Verify Power Test has been completed successfully.
Verify RS485 Communications Cable, must be Belden #9842 or equivalent.
Verify Boiler Monitor Select Switch (SW2) settings.
Verify Installation/Removal of Boiler Monitor Communications Jumper(s) [W1].
Verify Optional Boiler Monitor Control Wiring.
MODEM (Optional)
Perform and/or verify modem installation and hook-up per Raypak Add/On Options
P/N 240596 and B6000 BMS Optional Modem Software Documentation P/N 240595.
Page 20
/