Page is loading ...


Copyright Information
The copyright in this manual, the software and firmware in the printer described therein are
owned by the company.
Copyright © 2016-2017 All rights reserved
This product is manufactured, distributed, and sold by All ID Asia Pte Ltd. 67, Ayer Rajah
Crescent, #02-18, Singapore 139950
Product features, specifications and appearances are subject to change without notice.
CG Triumvirate is a trademark of Agfa Corporation. CG Triumvirate Bold Condensed font is
under license from the Monotype Corporation. Windows is a registered trademark of Microsoft
Corporation.
All other trademarks are the property of their respective owners.
PLR IP Holdings, LLC, its licensees and affiliates, fully supports all electronic waste initiatives.
As responsible stewards of the environment, and to avoid violating established laws, you should
properly dispose of this product in compliance with all applicable regulations, directives or other
governances in the area where you reside. Please check with local authorities or the retailer
where you purchased this product to determine a location where you can appropriately dispose
of the product.
You may also go to www.polaroid.com and reference Social Responsibility
http://www.polaroid.com/social-responsibility to learn more about the specific laws in your area
and to locate a collection facility near your home.
If your electronic device has internal memory on which personal or other confidential data may
be stored, you may want to perform a data sanitization process before you dispose of your
device to assure another party cannot access your personal data. Data sanitization varies by
the type of product and its software, and you may want to research the best sanitization process
for your device before disposal. You may also check with your local recycling facility to
determine their data sanitization procedures during the recycling process.
Polaroid, Polaroid & Pixel, Polaroid Classic Border Logo, and Polaroid Color Spectrum are
trademarks of PLR IP Holdings, LLC, used under license. All other trademarks are the property
of the respective owner, who has not sponsored, endorsed or approved this product. PLR IP
Holdings, LLC does not manufacture this product or provide any Manufacturer’s Warranty or
support.
For warranty information and technical support, please call +65-6778-0075 or visit
www.polaroid.com.
Information in this document is subject to change without notice and does not represent a
commitment on the part of the company. No part of this manual may be reproduced or
transmitted in any form or by any means, for any purpose other than the purchaser’s personal
use, without the expressed written permission of thecompany.

Agency Compliance and Approvals
CE CLASS A
EN 55022
EN 55024
FCC CFR Title 47 Part 15Subpart B
ICES-003 Class A
GB-4953
GB9254 (CLASS A)
GB27625
此为 A 级产品,在生活环境中,该产品可能会造成无线电干扰,在这种
情况下,可能需要用户对干扰采取切实可行的措施。
IEC 60950-1


1. Introduction
1.1 Product Introduction
Congratulations on your purchase of a Polaroid P420T Barcode Printer.
This printer features two durable gear-driven motors that are capable of handling large
capacity 300 meter ribbons and large rolls of media within its sleek design. If the 5” interior
label capacity is not enough, simply add an external media roll mount and it can easily
handle 8.4” OD rolls of labels designed for expensive industrial label printers.
The adjustable sensor design accepts wide range of label media. Most of the frequently
used barcode formats are included. Fonts and barcodes can be printed in any one of the
four directions.
This series of printer is built with the high quality, high performance MONOTYPE IMAGING
®
True Type font engine and one CG Triumvirate Bold Condensed smooth font. With flexible
firmware design, you may download any True Type Font to the printer’s memory. Other than
the scalable font, the printer also offers a choice of five different sizes of alphanumeric
bitmap font, OCR-A and OCR-B fonts. With its rich features, the P420T is the most cost-
effective and high performance printer in its class!
To print label formats, please refer to the instructions provided with your labeling software;
if you need to write custom programs, please refer to the programming manual that can be
found in the CD-ROM.
Applications
o Manufacturing & Warehousing
Work inProgress
ItemLabels
Instructionlabels
Agencylabels
o Healthcare
PatientIdentification
Pharmacy
SpecimenIdentification
o ParcelPost
Shipping/ Receiving
Labels
o Small Office/ Home Office
o RetailMarking
Pricetags
Shelflabels
Jewelrytags
1

Standard Features
P420T
Thermal transferprinting ○
Direct thermalprinting ○
ABS plasticenclosure ○
Position adjustable gap sensor ○
Position adjustable black mark sensor ○
Ribbonsensor ○
Head opensensor ○
USB 2.0 (full speed)interface ○
8 MB SDRAM memory ○
4 MB FLASHmemory ○
micro SD memory card readerfor memoryexpansion up to 4 GB
○
Real timeclock ○
One power switch, one feed button and LED ○
Standard industry emulations right out of the box including Eltron
®
and Zebra
®
languagesupport
○
Internal 8 alpha-numeric bitmapfonts ○
Fonts and barcodes can be printed in any one of the four directions (0, 90,180,
270 degree)
○
Internal Monotype Imaging® true type font engine with one
CG Triumvirate Bold Condensed scalablefont
○
Downloadable fonts from PC to printer memory ○
Downloadable firmwareupgrades ○
Text, barcode, graphics/image printing (Please refer to the TSPL/TSPL2
programming manual for supportingcode page)
○
Supported barcode Supportedimage
1D barcode 2D barcode
BITMAP, BMP,
PCX
(Max. 256colors
graphics)
Code39,
Code 93,
Code128UCC,
Code128 subsets
A,B,C, Codabar, Interleaved
2 of 5, EAN-8, EAN-13,
EAN-128,
UPC-A, UPC-E, EAN and
UPC2(5)
digits add-on, MSI, PLESSEY,
POSTNET,
China POST, GS1
DataBar, Code11
PDF-417,
Maxicode,
DataMatrix, QR
code, Aztec,
GS1 DataBar Composite
code
2
1.2 Product Features
1.2.1 Standard Features
The printer offers the following standardfeatures.

1.2.2 Optional Features
The printer offers the following optionalfeatures.
Optional Features
User
options
Dealer
options
Factory
options
LCD display (graphic type, 128x64 pixel) with back light
- - ○
Internal Ethernet print server (10/100 Mbps) interface - - ○
Serial RS-232C (2400-115200 bps) interface - - ○
Centronicsinterface - - ○
Peel-offmodule - ○ -
Guillotine cutter module (Full cut and partial cut)
Paper thickness: 0.06~ 0.19mm, 500,000 cuts
0.20~ 0.25mm, 200,000 cuts
Note:
Except for the linerless cutter, all regular/heavy duty/care
label cutters DO NOT cut on media withglue.
- ○ -
External roll mount with 3” core (8.4 OD) label spindle ○
Extended plate for external roll mount ○
Bluetooth module (RS-232C interface) ○ - -
KP-200 Plus keyboard displayunit ○ - -
KU-007 Plus programmable smart keyboard display unit
○ - -
HCS-200 long range CCD scanner ○ - -
3

1.3 General Specifications
General Specifications
Physicaldimensions
224 mm
(W) x 186 mm (H) x 294 mm(D)
Weight
2.45
kg
Electrical
External universal
switching powersupply
Input:
AC 100-240V
Output:
DC 24V 2.5A,
60W
Environmentalcondition
Operation:
5 ~ 40˚C (41 ~ 104˚F), 25~85% non-condensing
Storage:
-40 ~ 60 ˚C (-40 ~ 140˚F), 10~90% non-condensing
1.4 Print Specifications
Print Specifications
Print headresolution 203 dots/inch (8 dots/mm)
Printingmethod Thermal transfer and directthermal
Dotsize (width xlength) 0.125 x 0.125mm (1 mm = 8dots)
Printspeed (inches persecond) 5ips
Print speed forpeel
mode & cuttermode
2, 3ips
Max. printwidth 108 mm(4.25”)
Max. printlength 2,794 mm(110”)
1.5 Ribbon Specifications
Ribbon Specifications
Ribbon outsidediameter
Max. 67
mm
Ribbonlength
300
meter
Ribbon core insidediameter
1 inch
(25.4mm)
Ribbonwidth
Max. 110
mm
Min. 40
mm
Ribbon wound type
Outside
wound
4

1.6 Media Specifications
Media Specifications
Label rollcapacity
127 mm (5”)
OD
Mediatype Continuous, die-cut, black mark, fan-fold, notch
Media woundtype
Printing
face outside wound & Printing face inside wound
Media width
(label+ liner)
Max. 118 mm
(4.6”)
Min. 25.4 mm
(1.0”)
Media thickness
(label +liner)
Max.
0.254 mm (10mil)
Min. 0.06 mm (2.36
mil)
Media corediameter
25.4 mm~38 mm
(1”~1.5”)
Labellength
10~2,794 mm
(0.39”~110”)
Note:
If your label length
is less than 25.4mm (1”), we
recommend
you to use the perforation at the gap for
easier
tearaway.
Label length
(peeler mode)
Max.
152.4 mm(6”)
Min. 25.4 mm
(1”)
Label length
(cutter mode)
Max.
2,794 mm(110”)
Min. 25.4 mm
(1”)
Gapheight
Min.
2 mm(0.09”)
Black markheight
Min.
2 mm(0.09”)
Black markwidth
Min.
8 mm(0.31”)
5

2. Operations Overview
2.1 Unpacking and Inspection
This printer has been specially packaged to be protected from damage during shipping. Upon
receiving, please inspect the packaging and printer carefully. Please retain the packaging
materials, in case you need to re-ship the printer.
The following items are included in thecarton:
One P420T printer
One Windows labeling software/Windows driver CD
One quick installationguide
One powercord
One auto switching power supply
One USB interfacecable
Two ribbonspindles
One ribbon paper core
One labelspindle
If any items are missing, please contact the Customer Service department of the
reseller/distributor that you purchased the printer from.
6

1. LEDindicator
2. FEED Button
3. LCD display(Option)
4. Paper exitchute
5. Top cover opentab
6. Powerswitch
2.2 Printer Overview
2.2.1 FrontView
1
2
3
4
6
5
7

2.2.2 InteriorView
1. Printer top cover
2. Media supplyspindle
3. Ribbon rewind hub
4. Print head releasebutton
5. Ribbon rewind spindle
6. Fixingtab
7. Ribbon supplyhub
8. Platenroller
9. Black marksensor
10. Gapsensor
11. Mediaguide
12. Mediabar
13. Ribbon supplyspindle
14. Printhead
13
9
5
6
4
OPEN
10
12
8
11
1
2
3
14
7
8

2.2.3 RearView
1. Power jacksocket
2. *micro SD cardslot
3. Internal Ethernet interface (Option)
4. RS-232C interface(Option)
5. USB interface (USB 2.0/ Full speedmode)
6. Centronics interface (Option)
7. Rear external label entrancechute
Note:
The above interface is only for reference. Please refer to the product specificationsfor
the interface options.
* Recommended micro SD card specification
SD cardspec
SD
cardcapacity
Approved
SD card manufacturer
V1.0,V1.1
microSD 128
MB
Transcend,
Panasonic
V1.0,V1.1
microSD 256
MB
Transcend,
Panasonic
V1.0,V1.1
microSD 512
MB
Panasonic
V1.0,V1.1
microSD 1
GB
Transcend,
Panasonic
V2.0 SDHC CLASS4
microSD 4
GB
Panasonic
V2.0 SDHC CLASS6
microSD 4
GB
Transcend
- The DOS FAT file system is supported for the SD card.
- Folders/files stored in the SD card should be in the 8.3 filename format.
2
1
6
4
5
3
7
9

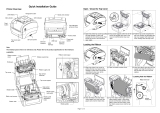
3. Setup
3.1 Setting up the Printer
1. Place the printer on a flat surface.
2. Ensure that the power is switched off.
3. Connect the printer to the computer with
the provided USB cable.
4. Insert the power cord into theAC power
cord socket of the printer. Then, insert
the other end of the cord into a properly
grounded AC electrical outlet.
Note:
* The printer power should be turned off before connecting or disconnecting the communications and power cables.
* The above interface is only for reference. Please refer to the product specifications for the interface options.
10

3.2 Loading the Ribbon
1. Open the printer‘s top cover by
pulling the latches located on each
side of the printer.
2. Insert the paper core into the ribbon
rewindspindle.
3. Insert the left side of the spindle into
the ribbon rewind hub first. Then, insert
the right side into the hole at the right
side of ribbon mechanism.
11

4. Push the release button to lift up the
print headmechanism.
5. Insert the ribbon into the ribbon spindle.
6. Insert the left side of ribbon supply
spindle into the ribbon supply hub first.
Then, insert the right side of ribbon
supply spindle into the hole at theright
side of ribbon mechanism.
12

7
. Lead the ribbonthrough the print
head
and
stick the ribbon’s clear front onto
the
r
ibbon rewind paper core.
8.
Wind up the ribbon rewind hub until
t
he clear front part is thoroughly wound
up
and the black ribbon covers the print
head.
9.
Close the print head mechanismwith
both
hands and ensurethat it is latched
securely
.
13

Ribbon loading path
Print head
Ribbon
rewind hub
Ribbon
Paper core
14

3.3 Loading the Media
3.3.1 Loading the Roll Labels
1. Open the printer‘s top cover by
pulling the latches located on each side
of the printer.
2. Insert the label roll into the media
supply spindle and use the two fixing
tabs to centralise the paper roll onto the
spindle. (If the width of your label is 4",
you can remove the fixing tabs from the
supplyspindle.)
3. Place the label roll ontothe media
rollmount.
15
15
/