Page is loading ...

CF1223
End Bench Pair
Please check contents before assembly. If any items are missing or damaged, do not take the unit back to the
store. Call 1-800-427-5136 for customer service, we will save you time by correcting any problems directly for you.
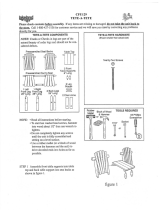
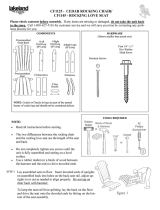
4 - Leg Supports
2-Leg Spreaders
Bench
Components
(Quantities for 2 Benches)
or
8 - Legs
NOTE: Cracks or Checks in logs are part of the natu-
ral beauty of cedar logs and should not be considered
defects.
2 Bench Tops
Hardware & Tools
(Quantities for 2 Benches)
Rubber Hammer
Mallet or w/ block of wood
NOTE: Using a battery
Or electric power drill will make
assembly easier and faster.
20- Screws
#2 Phillips Screw-
driver
NOTE: Read all instructions before starting.
Helpful Tips:
Use a rubber mallet (or a block of wood between the hammer and the unit) to drive doweled
ends into holes as far as possible.
If you have hardware left over after completing your unit, it most likely has been assembled
incorrectly, and may not be safe to use. Please call Customer Service at 800-427-5136 for
assistance.
Use a good quality penetrating oil or wood deck sealer with a UV inhibitor and an anti-fungal.
If staining or finishing before assembling, tape off all dowel ends. (Finishes will cause the
dowels to swell, making assembly difficult.)
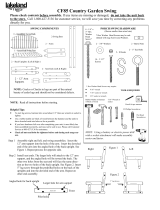
Insert a leg support into the hole of two of the legs. Next insert the leg support into
the hole on the two remaining legs. Insert leg spreader into the hole on each of the
leg supports. Use a rubber mallet to drive the leg assembly together. See figure 1.
STEP 1
STEP 2
STEP 3
Place the bench top on a clean flat surface. Align the doweled ends of the leg assem-
bly with the holes in the bench top as shown in figure 2.
Secure dowel joints in place with screws perpendicular to the doweled end as shown
in figure 3. Attach a screw in the areas indicated by arrows, on both ends.
Factory: 1 Lakeland Place, Edmore, Michigan 48829, Phone: 800-427-5136 Fax: 989-427-5824
www.lakelandmills.com
https://www.youtube.com/watch?v=2alRcC09o2Q
Look for assembly videos on
Figure 1
Figure 2
Your bench is now assembled and ready to use immediately, or
a quality exterior penetrating finish can be applied.
Figure 3
/