
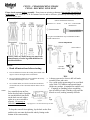
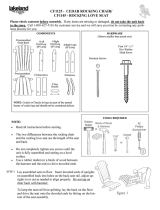
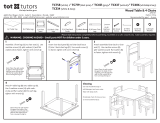
CF1125 - CEDAR ROCKING CHAIR/
CF1145 - ROCKING LOVE SEAT
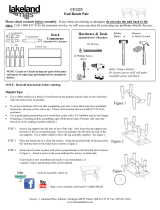
Please check contents before assembly. If any items are missing or damaged, do not take the unit back
to the store. Call 1-800-427-5136 for customer service and we will save you time by correcting any prob-
lems directly for you.
NOTE:
Read all instructions before starting.
The two differences between the rocking chair and the rock-
ing love seat are the length of the seat and back.
Do not completely tighten any screws until the unit is fully
assembled and setting on a level surface.
Use a rubber mallet (or a block of wood between the ham-
mer and the unit) to drive doweled ends into holes as far as
possible.
COMPONENTS HARDWARE
(Shown smaller than actual size)
NOTE: Cracks or Checks in logs are part of the
natural beauty of cedar logs and should not be
considered defects.
TOOLS REQUIRED
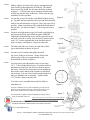
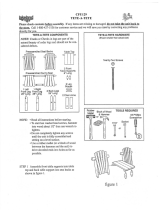
Lay assembled seat on floor.
Insert doweled ends of uprights
on assembled back into holes
on the back seat rail, adjust up-
rights in or out as needed to align
properly. Do not tap on
chair back with hammer.
To keep the seat rail from splitting, lay the back on the floor
and drive the seat onto the doweled ends by hitting on the
bottom of the seat assembly.
STEP 1
Four 1/4” x 3” Hex Washer
Head Screw*
Fourteen 2 1/2” Screws
* Lag Screws and Washers may be substituted for Hex
Washer Head Screws
#2 Screwdriver
Optional
Power drill
TIPS
A battery operated or electric drill will make
assembly faster and easier.
Use a good quality penetrating oil or wood deck
sealer with a UV inhibitor and an anti-fungal.
(Make sure product is intended for outdoor use.)
If staining or finishing before assembling,
tape off all dowel ends. (Finishes will cause the
dowels to swell, making assembly difficult.
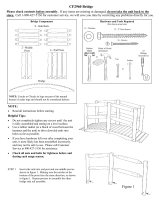
Uprights
Tap uprights in or out until dowel drops into hole.

Make a right leg set and a left leg set by inserting doweled
end of back leg into angled hole of front leg. The drilled
holes on each leg should face the same direction as shown
in figure 2. Put arms onto legs by inserting doweled ends
of front legs into the holes in the arms. Drive arms onto leg
assemblies as far as possible.
Lay one leg set on a flat surface with drilled leg holes facing
up. Lay back and seat assembly on its side and insert doweled
ends of seat rails into holes on leg sets. Drive legs on as far as
possible. Align second leg set holes with the doweled ends of
the seat rails. (As shown in figure 3.) Drive legs on as far as
possible.
Set chair in upright position on a level surface and when legs
are in proper position, bring ARM in against UPRIGHT.
Tighten the preinstalled lag screws into the pilot hole in the
arm with a wrench or socket. Secure doweled joints in place
with 2 1/2” screws perpendicular to the doweled ends as
shown in figure 4 and figure 6. Repeat on other side.
Tilt chair back and screw a brace on each side of front
leg to chair bottom as shown in figure 5.
Set unit on a level surface and tighten down all
lag screws firmly to secure unit. Secure all doweled
joints in place with screws perpendicular to the
doweled ends as shown in figure 6.
Factory: 1 Lakeland Place, Edmore, Michigan 48829, Phone: 800-427-5136 Fax: 989 -427-5824
www.lakelandmlls.com
Check all joints for tightness before and during each usage season.
If you have hardware left over after completing your unit, it most
likely has been assembled incorrectly, and may not be safe to use.
Please call Customer Service at 800-427-5136 for assistance.
STEP 2
STEP 3
STEP 4
STEP 5
STEP 6
Lay chair on its side and attach a rocker to legs using
1/4” x 3” Hex Washer Head Screws. Position rockers so
the bottom of each leg is just above the bottom edge of
the rocker. Push the hex washer head screw through the
holes in the rocker and tap with a hammer to start them
into each leg. You may wish to drill a small pilot hole in
the leg to facilitate ease of assembly. Tighten with a
7/16” wrench. Repeat on other side.
Your chair is now assembled and ready for finish or
immediate use.
STEP 7
figure 2
figure 3
figure 5
figure 4
figure 6
1/4” x 3” Hex Washer
Head Screw
figure 7
Look for assembly videos on:
Upright
2 1/2”
https://www.youtube.com/watch?v=uknixbsgHOw
https://www.youtube.com/watch?v=zg0MRx5HHw0
Lakeland Mills recommends:
WeatherSeal Premium Oil-Based Exterior Wood Stain & Sealant
www.ContinentalProd.com
-
 1
1
-
 2
2


Ask a question and I''ll find the answer in the document
Finding information in a document is now easier with AI
Related papers
-
 Lakeland Mills CF1125 Operating instructions
-
 Lakeland Mills CF4730 Installation guide
-
Lakeland Mills CF75 Installation guide
-
 Lakeland Mills CF1223 Installation guide
-
 Lakeland Mills CFU129 Installation guide
-
 Lakeland Mills 370273 Operating instructions
-
 Lakeland Mills CFU28 User guide
-
-
 Lakeland Mills CF500 Installation guide
-
 Lakeland Mills CF2960 Installation guide


Other documents
-
Humble Crew TC541 Owner's manual
-
 Tot Tutors TC437 Installation guide
-
 Tot Tutors TC787 Installation guide
-
 Walker Edison Furniture Company HDW485PCSG Operating instructions
-
 Walker Edison Furniture Company HDR4RWSCGY Installation guide
-
KidKraft F23870 Operating instructions
-
-
 AuthenTeak Kingsley-Bate NT18 Assembly Instructions
-
-


