
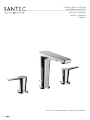
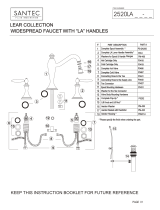
E-SERIES: EBIS COLLECTION
WIDESPREAD LAVATORY
WITH “HY” HANDLES
MODEL: 3720HY10
3720HY75
K EEP THIS INST R U CTION BOO KLE T FOR FU T U R E REFER ENC E
0 1

0 2
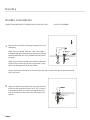
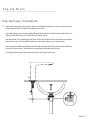
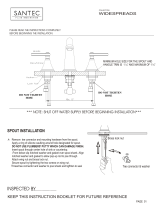
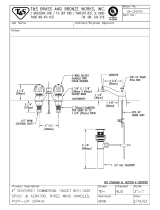
S p out
Spout Installation
Remove tee connector, tee connector washer, lift rod,
and spout mounting hardware from bottom of spout
assembly. Apply a ring of silicone caulking around the
center hole on the top of the sink (do not use plumber’s
putty which can damage the spout nish).
From the top of the deck, drop in the spout
through the center hole of the sink or
counter surface.
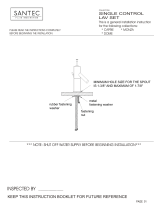
Hole size for the spout and handle trim is a minimum of 1¼” and a maximum of 1½”.
Flush both supply lines before installation. After ushing, shut o both supply lines.
Lift Rod
Notched rubber washer
Tee connector
& Washer
Notched metal washer
Wing nut
Brass lock nut
Rubber
washer
A
Slip the spout mounting hardware back onto the spout.
First the notched rubber washer, then the notched metal
washer, (making sure the notch faces towards the back)
wing nut, and brass lock nut. Insert lift rod and make sure
it operates smoothly.
Adjust if necessary and remove the lift rod from the spout.
Hand tighten the nut.
washer, (making sure the notch faces towards the back)
wing nut, and brass lock nut. Insert lift rod and make sure
it operates smoothly.
Adjust if necessary and remove the lift rod from the spout.
Hand tighten the nut.
B
Wing nut
Align spout and secure to the sink or counter surface by
tightening the 2 screws on the wing nut with a Phillips
head screwdriver.
Place the tee connector washer into the tee connector
and thread the tee connector onto the end of the spout
shank. Hand tighten to seal.
C
(PLACE LIFT ROD ASIDE UNTIL POP-UP INSTALLATION)

0 3
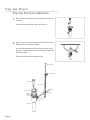
HANDLE TRIMS ARE READY FOR SIMPLE DROP-IN INSTALLATION. DO NOT DISASSEMBLE.
H a ndl e
Handle Installation
Remove the valve body mounting hardware from the
valve body.
Make sure the handle with the “cold” blue label is
installed at the right side of the spout (looking from front)
and the handle with the “hot” red label at the left side of
the spout.
Apply a ring of silicone caulking around the handle hole
on the sink or counter top (do not use plumber’s putty
which can damage the nish of your faucet).
Slip the valve body’s exible hoses from the top of the sink or counter through the appropriate hole
next to the spout.
Rubber washer
Fiber washer
Brass lock nut
A
Align the handle lever properly with respect to the spout
(make sure the respective handle is in its “OFF” position)
From under the basin or counter, hand tighten the brass
lock nut and ber washer to the valve body against the
counter.
B
SANTEC
S
ANTEC

0 4
Secure the valve body by tightening the screws
attached to the lock nuts with a philliips head screwdriver.
C
SANTEC
H a n dle
Handle Installation
Tighten the nuts provided at the of the hose to avoid
Loop and connect the exible hoses to the tee.
leakage.
Connect and tighten the Inlet hoses to the supply lines.
Use 1/2” IPS faucet connections, or 3/8” copper pipe
using the compression tting system.
D
SANTEC

0 5
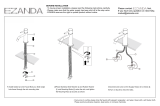
Pop -Up Drai n
Pop-Up Drain Installation
Remove the drain ange and drain plug from the pop-up
assembly.
Do not remove the gasket, washer and lock nut.
A
B
Apply a ring of silicone caulking underneath the drain
ange (do not use plumber’s putty).
Insert the threaded end of the assembly up from under
the sink. Completely thread the drain ange onto the top
of the drain tube.
Tighten the lock nut from under the sink.
Drain Plug
Drain Flange
Lift Rod Strap
Ball Rod
Drain Tube
Ball Rod Nut
Ball Rod Clip
Thumb Screw
Lock Nut
Washer
Gasket
Side hole
Lift Rod & Knob

0 6
Pop -Up Drai n
Pop-Up Drain Installation
Insert ball rod washer into drain body followed by the ball rod, 2nd washer and ball rod nut.
Insert drain plug into drain ange. Make sure the adjustable eye-screw of the drain plug is
facing back so that the ball rod will properly t into it.
Tighten the ball rod nut so that the ball rod moves freely.
Slip the faucet’s lift rod through the holes at the top of the lift rod strap and hand tighten
the thumb screw. Push the ball rod down so the drain plug is in the up position.
Slip one leg of the ball rod clip onto the ball rod and slide the lift rod strap onto the ball rod
using the nearest hole. Then slide the second leg of the clip onto the rod.
Test pop-up for smooth operation and adjust the strap if necessary.
C

0 7
F l ush t he Line
Flush the Line Instruction
After all the connections have been made, remove the
hidden aerator with the provided key.
Turn both both hot and cold water on and ush the
lines for 45 seconds.
Turn o the water and reinsert the aerator.
Turn on the water and check for leakages at all joints. If water
leaks from any of the connections tighten the connection
until the leakage stops.
Inlet Hoses

WARNING
: Do not clean your SANTEC product with ammonia (window cleaner), bleach, soaps, acids,
abrasives, harsh polishes, harsh cleaners, a coarse surfaced cloth, coarse sponge, or any type of scouring pad.
Doing so may ruin your faucet nish and/or void the warranty.
Thank you for making SANTEC a part of your lifestyle and luxury spa experience. Our products have been created as
works of enduring quality and sophisticated design. Luxurious nishes need proper care and attention, so in order to understand
how to properly clean your distinctive luxury nish, please refer to the nish care information below:
Your SANTEC product can be identied in one of two categories: clear coated nishes or non-clear coated nishes. Clear coated
nishes are more scratch-sensitive and are more reactant to harsh cleaning chemicals than non-clear coated nishes. Once you
have identied the specic luxury nish of your SANTEC product, please follow the important corresponding care instructions.
CLE AR CO ATED F I N ISHES
N O N-CLE AR COATED FINISHE S
F INISH C ARE INFORMA TIO N
Please read ‘WHAT IS COVERED BY OUR WARRANTY’ and ‘EXCLUSIONS AND LIMITATIONS OF WARRANTY’ sections to
understand what is and what is not covered. Please have ready the proof of purchase (original sales receipt), description of t
he
problem, and carefully package the product or defective part with postage prepaid. Then, please contact your local
SANTEC
Showroom or write to
SANTEC
Technical Services.
T O OB TAIN WARRAN TY SER VICE
Eective: 05/01/2015
We recommend that all faucets, drains, etc., be gently wiped dry with a soft cloth after use to avoid water spotting
and water deposit build-up. A mild liquid hand soap may be used occasionally if desired. Use of a non-abrasive
carnauba wax will add protection to the nish and should be used if the faucets will not be dried after use. Santec
Orobrass kitchen products are clear coated. For clear coated nishes, it is recommened to clean your product weekly
with a soft moist cloth.
We recommend that all faucets, drains, etc., be gently wiped dry with a soft cloth after use to avoid water spotting
and water deposit build-up. A mild liquid hand soap may be used occasionally if desired. Use of a non-abrasive
carnauba wax is occasionally required and will add protection to the nish if the faucets will not be dried after use.
Clear Coated Finishes are as Follows:
Living finishes are unique, are intended to change over time and are exluded from the finish warranty. Any product
outdoors or in a marine environment are excluded from the finish warranty.

This warranty does not cover:
Crystals and/or glass
Drains
Damage due to negligence, accident, abuse, improper installation, or improper maintenance such as, but not limited to: heat
from soldering during installation, the use of plumber’s putty, damage from tools used during installation, the use or exposure
to chemicals or cleaning products either abrasive or non-abrasive, or the use of any cleaning tool or product other than a
soft, clean cloth. Reverse osmosis may also shorten the life of the nish.
which have been altered or used in a manner not typical for the product.
Loss, damages, or expense, incidental or consequential whatsoever, originating from the purchase,
installation, use, repair,
failure, or replacement of any
SANTEC pro
duct or part, allowed by law.
Commercial and/or Industrial installations and use of the product.
This warranty does not include labor, travel charges, or any costs incurred for repair, removal, installation, servicing,
diagnosing, or handling of either defective or replacement parts.
1.
2.
3.
4
Changes in the nish or in the product due to normal wear or aging does not cover any products or parts
5.
6.
7.
SANTEC is committed to enhancing your bathroom experience by creating luxury products that will provide
enduring satisfaction. Every effort has been made to satisfy the highest standards of design and production to create
lasting peace of mind for our customers. Proof of purchase must be provided for all warranty claims, SANTEC provides the
f
ollowing limited warranties on our product.
This warranty only extends to the original consumer purchaser.
L IFET I ME LIMITE D WARRANTY
L ENGTH OF WA RRAN TY & WHO IS COVE RED BY O U R WARRANTY
WHA T IS COVERED BY OUR WA RRANTY
E X C LUSIO NS AND LI MITATIONS OF WARRANTY
1.
2.
3.
Limited warranty against manufactur ing defects a nd tarn ish to the or igin al purchaser. Custom nishes carry
a ten (10) years limited warranty against manufacturin g defects and tarnish to the original purch aser only.
Kitchen pr oducts carry a three (3) year limited warranty.
Parts: San tec parts carr y a ten (10) year limited warranty against manufactu rin g defects, to the
original purchaser. Kitchen products carry a ve (5) year limited warranty.
Cartridges: Santec cartridges carry a lifetime limited warranty, with the exception of thermostatic and
pressure balanced cartridges, which carry a three (3) year limited warranty against manufacturing defects to
the original purchaser.
Finishes: SANTEC Polished Chrome, Polished Nickel and Satin Nickel nishes carry a Lifetime
Eective: 05/01/2015
This warranty does not cover: damage due to negligence, accident, abuse, improper installation, or improper
maintenence such as, (but not limited to): heat from soldering during installation, the use of plumbers putty, damage
from tools used during installation, the use or exposure to chemical or cleaning products, abrasive or non-abrasive, or
the use of any cleaning tool or product other than a soft, clean cloth.
This warranty does not cover: changes in the
finish or in the product due to normal wear or again and does not cover any product or parts which have been
altered or used in a manner not typical for the product.
Santec will not be held liable for damage to products caused by
the freight carrier, any such claims should be made immediately with the freight carrier. This warranty does not cover any
cost involved in the installation, repair, or replacement of any SANTEC product or parts. This warranty does not cover
and SANTEC will not be held liable for any loss, damages, or expenses, incidental or consequential whatsoever,
originating from the purchase, installation, use, repair, failure, or replacement of any SANTEC product or part, as
allowed by law. The product of components of the covered product will either be repaired, renished or replaced at the
sole discretion of SANTEC. SANTEC reserves the right to examine any product claimed defective prior to any warranty
claim being accepted or processed, at its sole discretion. This warranty gives you specic legal rights and you may
have other rights which may vary from state to state.
9.
8.
Access should be provided to the roman tub valves for future service or repair to valves and piping. Under no circumstances will Santec
Faucet, Inc. be liable for any costs associated with the removal of materials for future
access to the tub valves or piping for service or repair.
-
 1
1
-
 2
2
-
 3
3
-
 4
4
-
 5
5
-
 6
6
-
 7
7
-
 8
8
-
 9
9


Santec 3720HY10 Operating instructions
- Category
- Sanitary ware
- Type
- Operating instructions
Ask a question and I''ll find the answer in the document
Finding information in a document is now easier with AI
Related papers
-
Santec 9220ED75 Installation guide
-
 Santec 2780EL10 Installation guide
-
 Santec Widespread 9220ED Installation guide
-
 Santec 2520LA45 Installation guide
-
 Santec Monza Series General Installation Instructions
-
 Santec E-Series Operating instructions
-
 Santec CIRC CZ Operating instructions
-
 Santec 1434DD Series Installation guide
-
 Santec PB-3950 Installation guide
-
 Santec VOGUE Series Operating instructions


Other documents
-
 EZANDA Brass Single Handle Bathroom Faucet Installation guide
-
 T & S Brass & Bronze Works B-2970 Datasheet
-
 EZANDA 2-Handle Widespread Waterfall Bathroom Lavatory Faucet Installation guide
-
 Phiestina 3 Hole Lavatory 2 Handles Oil Rubbed Bronze Widespread Bathroom Faucet By Phiestina,Hot and Cold Water Vessel Faucets Installation guide
-
Barclay Products 5599-CP Installation guide
-
ALFI BRAND AB1295-PC Installation guide
-
-
-
Watts 649033BA-8 Installation guide
-
Novatto NBF-112CH Operating instructions


