Page is loading ...

· To insure proper installation, please read the following instructions carefully.
· Please make sure that the water supply has been shut off at the stop valve.
· EZANDA reserves the right to update product without notice.
· Every once in a while, please rinse the faucet with lukewarm soapwater, and wipe it clean with a soft duster cloth.
Please avoid any abrasive cleaners, steel wools, or corrosive chemicals.
BEFORE INSTALLATION
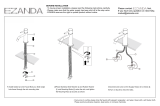
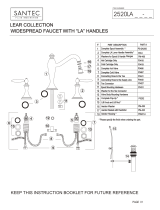
1. Place the Spout in center hole of sink.
Secure it with washers and lock nut.
2. Connect the RED striped supply line with the
Hot water handle labeled “H” while the blue
one with the Cold water handle labeled “C”.
H
H
C
C
3. Attach each handle with a washer and a threaded ring.
Ensure the handles are in the OFF position Align the
handles as shown.
4. Align spout tube outlet tubes on quick connect
hose . Push quick connect hose firmly upward
and snap onto tubes . Pull down moderately to
ensure each connection has been made.
5. Connect to water supplies. 6. Turn on the water supplies.
Check all connections for leaks.
2
2
1
3
3
If you have any question or need help.
H
H C

1. Unscrew components A & B. to the seal.
4. Connect the rear end of the drain to the Drain Pipe.
2. Slide the drain body(C) through the hole
in the sink.
5. Push to activate.
3. Screw components A & B back on as shown.
· Please avoid using plumber's putty. The seal on top is leak-free. Plumber's putty might cause damage.
A
B
If you have any question or need help.
/