Page is loading ...

VOGUE COLLECTION
30”, 24”, & 18” TOWEL BAR
MODEL: (30”) 6560VO10, 6560VO__
(24”) 6561VO10, 6561VO__
(18”) 6562VO10, 6562VO__
KEEP THIS INSTRUCTION BOOKLET FOR FUTURE REFERENCE
Important : Please register your product online at www.santecfaucet.com within
30 days of purchase. Santec reserves the right to request additional documents
before servicing warranty requests.
01
02
Ø2
3
8
"
Ø2
3
8
"
Ø2
3
8
"
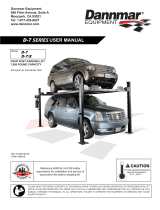
#
DESCRIPTION
PART #
1
3
4
* Please specify the nish when ordering the part.
30” Towel Bar *
24” Towel Bar *
18” Towel Bar *
Towel Bar Post- Right *
Accessories Bell * PA-2200
PA-2925R
Towel Bar Post- Left * PA-2925L
2
PA-2918-U
PA-2924-U
PA-2930-U
#
DESCRIPTION
PART #
5
6
7
9
10
#10-24 Set Screw
Flange *
Mounting Post
Toggle
Allen Key PM-033
PM-026
Drywall Screw PM-016
8
PM-960
P00076
PM-027
PARTS BREAKDOWN

03
04
Place the trim parts against the assigned wall location. Make sure the bar is leveled and the bar post
positions are correct. Mark with pencil the bar post ange positions and remove the trims.
1.
Using the Allen key provided, remove the mounting posts from the bar posts. Press the mounting
posts against bar post ange position on the wall and mark the screw hole positions.
INSTALLING ON WOODEN SURFACE
For wooden surface, the mounting posts can be
secured by screwing the screws directly into the wall.
INSTALLING ONTO DRYWALL SURFACE
Using a drill, pre-drill holes for the anchors. Insert the
anchors into the wall. The mounting posts can be
secured by screwing the screws into the anchors.
INSTALLING ONTO A SOLID SURFACE
Measure the dimensions carefully. Using a drill,
pre-drill the holes. Secure the mounting posts by
screwing the screws into the wall.
2.
WALL
Press the left bar post against the mounting post. Align the bar post and secure it by tightening the set
screw.
3.
Insert the towel bar into the secured bar post. Press the right bar post onto the right mounting post.
Insert the right side of the towel bar into the right bar post. Align the right bar post and tighten the set
screw rmly.
4.
Check both bar posts to make sure they are rmly secured. If not, tighten the set screws with the Allen
key.
5.
INSTALLATION INSTRUCTIONS INSTALLATION INSTRUCTIONS

Effective 01/01/09 - Replaces and supersedes any previously issued warranty
FINISH CARE INFORMATION
SANTEC LIFETIME LIMITED WARRANTY
PLEASE REGISTER YOUR PRODUCT ONLINE FOR WARRANTY SERVICES
www.santecfaucet.com/registration
1.
2.
3.
4.
Finishes: Santec Polished Chrome, Polished Nickel and Satin Nickel nishes carry a Lifetime
Limited warranty against manufacturing defects and tarnish to the original purchaser with the
exclusion of kitchen drain assemblies which, due to the nature of their use, are not warranted.
Santec recommended custom nishes carry a ten (10) years limited warranty against
manufacturing defects and tarnish to the original purchaser with the exclusion of kitchen and
pop-up drain assemblies which, due to the nature of their use, are not warranted. Kitchen
products carry a three (3) year limited warranty.
Cartridges: Santec Cartridges carry a lifetime limited warranty against manufacturing defects for
the life of the product to the original purchaser.
Parts: Santec parts carry a ten (10) year limited warranty against manufacturing defects, to the
original purchaser. Kitchen products carry a ve (5) year limited warranty.
Warranty exclusions and limitations: This warranty does not cover: damage due to negligence,
accident, abuse, improper installation, or improper maintenance such as, but not limited to: heat
from soldering during installation, the use of plumbers putty, damage from tools used during
installation, the use or exposure to chemicals or cleaning products either abrasive or non
abrasive or the use of any cleaning tool or product other than a soft, clean cloth. Pop-up
assemblies are not covered under warranty. This warranty does not cover: changes in the nish
or in the product due to normal wear or aging and does not cover any products or parts which
have been altered or used in a manner not typical for the product. This warranty does not cover
and Santec will not be held liable for damage to products caused by the freight carrier and a
claim should be made immediately to the freight carrier should this occur. This warranty does
not cover any cost involved in the installation, repair, or replacement of any Santec product or
part. This warranty does not cover and Santec will not be held liable for any loss, damages, or
expenses, incidental or consequential whatsoever, originating from the purchase, installation,
use, repair, failure, or replacement of any Santec product or part, as allowed by law. The
product or components of the covered product will either be repaired, renished or replaced, at
the sole discretion of Santec. Santec reserves the right to examine any product claimed
defective prior to any warranty claim being accepted or processed, at its sole discretion. This
warranty gives you specic legal rights and you may have other rights which may vary from state
to state.
For clear coated or enamel color nishes:
We recommend that all faucets, drains, etc
be gently wiped dry with a soft cloth after use
to avoid water spotting and water deposit
buildup. A mild liquid hand soap, such as
Ivory may be used occasionally if desired.
Use of non-abrasive carnauba wax will add
protection to the nish and should be used if
the faucets will not be dried after use.
For non-clear coated and specialty nishes:
We recommend that all faucets, drains, etc be
gently wiped dry with a soft cloth after use to
avoid water spotting and water deposit
buildup. Use of a non-abrasive carnauba wax
is required occasionally.
05
/