Page is loading ...

1
M
o
d
e
d
’
e
m
p
l
o
i
w
w
w
.
l
e
x
i
b
o
o
k
.
c
o
m
Radio réveil veilleuse Barbie™
Barbie™ night light radio alarm clock
I
n
s
t
r
u
c
t
i
o
n
M
a
n
u
a
l
RPB060

2
3
A
1
2
3
4
5
6
7
8
9
10
11
B

8
9
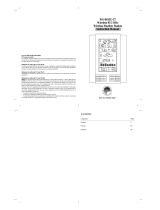
PRODUCT DESCRIPTION
Product description
Refer to images A & B
1. SNOOZE/LIGHT key
2. LCD screen
3. Volume control button
4. MODE key
5. SET key
6. UP key
7. DOWN key
8. Antenna.
9. RESET button
10. DC IN 5V 300mA jack
11. Battery compartment
LCD display description
Refer to image C
1. Alarm icon
2. SNOOZE icon
3. Clock (AM-PM) / Year
4. Preset radio station number
5. Weekday
6. Month / date / radio station frequency
UNPACKING
ALIMENTATION
When unpacking, ensure that the following elements are included:
1 x Barbie™ radio alarm clock
1 x adapter
1 x instruction manual
WARNING: All packaging materials, such as tape, plastic sheets, wire ties and tags are not part of
this product and should be discarded.
The Barbie™ radio alarm clock operates on AC 230V ~ 50Hz (adapter included) or ~with
3 x 1,5V LR6/AA type batteries (not included).
AC/DC adapter
1. Check that the unit is switched off.
2. Flip up the DC IN jack’s rubber cover at the back of the unit then plug
one end of the AC/DC adapter (included) into the DC IN jack.
3. Plug the other end of the adapter into any convenient AC 230V ~ 50Hz power outlet.
‘NOTE:
• Only use the adapter supplied with the product. Do not use other adapter.
• The socket-outlet shall be installed near the equipment and shall be easily accessible.
English

8
9
CLOCK AND DATE SETTING
1. In clock mode (time and date display), press and hold the SET key until the hour’s digits start ashing.
2. Use the UP and DOWN keys to increase or reduce the values, then press SET to conrm and
adjust the next setting.
3. The setting sequence is displayed in the following order:
Hours Minutes Year Month Date 24hr/12hr display
4. Press the SET key to conrm your settings. The unit goes back to clock mode.
Note:
• When setting the date, the weekday is selected automatically.
• When adjusting the hours and the minutes, if you do not press any key for 10 seconds, the unit will
automatically go back to clock mode.
• When adjusting the year, the month, the date and the 24hr/12hr display, you need to press SET to
conrm the values and go to the next setting.
Non-rechargeable batteries are not to be recharged. Rechargeable batteries are to be
removed from the product before being charged. Rechargeable batteries are only to be
charged under adult supervision. Different types of batteries or new and used batteries are not
to be mixed. Only batteries of the same or equivalent type as recommended are to be used.
Batteries are to be inserted with the correct polarity. Exhausted batteries are to be removed
from the product. The supply terminals are not to be short circuited. Do not throw batteries into
a re. Remove the batteries if you are not going to use the product for a long period of time.
WARNING: Mal-function or loss of memory may be caused by strong frequency interference or
electrostatic discharge. Should any abnormal function occur, reset the unit or remove the batteries
and insert them again, or unplug the AC/DC adapter from the mains socket then plug it back.
Battery installation
1. Open the battery door located under the unit.
2. Insert 3 x 1,5V LR6/AA type batteries (not included) observing
the polarity indicated in the battery compartment.
3. Replace the battery compartment.
English
ALARM SETTING
1. In clock mode, press the SET key once to go to the alarm setting.
2. Press and hold the SET key until the hour’s digits start ashing.
3. Use the UP and DOWN keys to adjust the hour, then press SET to conrm and adjust the minutes.
4. Use the UP and DOWN keys to adjust the minutes, then press SET to conrm and go to the next
setting.
5. Use the UP and DOWN keys to select the alarm type. You can wake up with one of the 20 preset radio
stations from “01” to “20. Or if you select “BEEP”, you will wake up with the regular alarm ringtone.
6. Press the SET key to conrm the new settings and go back to the alarm time display.
7. Use the UP and DOWN keys to switch on or switch off the alarm then, press the SET key to
conrm and go back to clock mode. When the alarm is switched on, the icon is displayed on
the LCD screen.
8. When the alarm rings, press the MODE, SET, UP or DOWN keys to stop it. The alarm will ring
again the next day at the same time.

10
11
RADIO MODE
Snooze function
When the alarm rings, press the SNOOZE/LIGHT key to switch on the snooze function. The icon
ashes on the LCD screen and the alarm will ring again
7 minutes later. To switch off the snooze function and stop the alarm, press and hold the MODE, SET,
UP or DOWN keys for 2 seconds. The icon disappears from the LCD screen. The alarm will ring
again the next day at the same time.
Note:
• If you have selected the regular alarm ringtone, if you don’t press any key when the alarm goes
off, it will ring for 10 minutes. If you have selected a preset radio station to wake up, the radio will be
turned on for 1 hour.
• In alarm time setting mode, if you do not press any key for 10 seconds, the unit will automatically go
back to clock mode.
Radio stations preset manual setting
1. In clock mode, press the MODE key once to switch on the radio.
2. Press the UP or DOWN keys to select a preset number between the 20 numbers available (from
01 to 20).
3. Press and hold the SET key until the frequency’s digits start ashing.
4. Use the UP or DOWN keys to scan the radio frequencies up or down. Press once to scan in 0.1
increments. Press and hold the same keys to auto-scan to the next or the previous radio station.
5. Once the desired station is assigned to the selected preset number, press the SET key to conrm
and save the change.
6. Repeat the above process from step 2 until all the preset numbers are assigned to a radio station.
Radio stations preset automatic setting
1. In radio mode, press and hold the SET key until the frequency’s digits start ashing.
2. Press and hold the SET key once again to start the automatic setting of the stations preset.
3. The unit automatically assigns a frequency of a received radio station to a preset number.
4. When the automatic setting is completed, the unit will automatically broadcast the rst preset radio
station (“01”).
Listening to the radio
1. In clock mode, press the MODE key once to switch on the radio.
2. Press the UP or DOWN keys to toggle between the 20 preset radio stations.
3. Press and hold the UP or DOWN keys to scan the radio frequencies up or down.
Note: When the radio is not set on a radio frequency, there is no sound coming out of the speaker.
Sleep mode
1. When the radio is turned on, press the SET key once to enter the “Sleep” function setting mode.
2. Press the UP or DOWN keys to select the time delay before the radio automatically switched itself
off. You can choose from “00” to “90” (minutes).
Note: if you select “00”, the “Sleep” function will be disabled.
3. Press the SET key to save your settings and switch on the “Sleep” function.
4. The radio will operate during the selected time delay, and then it will automatically switch off.
Note:
• While the sleep timer is activated the stations can be changed. During the time delay setting, if you
don’t press any key for 5 seconds, the unit will automatically exit the “Sleep” function setting mode.
• If you press the MODE key, the radio and the sleep timer will be switched off, the unit goes back to
clock mode.
English

10
11
NIGHT LIGHT MODE
Press and hold the SNOOZE/LIGHT key for 2 seconds to turn on or turn off the night light. The heart
shape lights up steadily when the night light is turned on.
NOTE: The night light will ash when the alarm rings.
English
MAINTENANCE
Only use a soft, slightly damp cloth to clean the unit. Do not use detergent. Do not expose the unit to
direct sunlight or any other heat source. Do not immerse the unit in water. Do not dismantle or drop
the unit. Do not try to twist or bend the unit.
NOTE: Please keep this instruction manual, it contains important information.
Choking hazard.In a bid to keep improving our services, we could implement modication on the
colours and the details of the product shown on the packaging.
Reference: RPB060
Designed and developed in Europe – Made in China
©2009 LEXIBOOK®
©2009 Mattel, Inc. All Rights Reserved
Lexibook UK Ltd
Wimbledon Village
Business Centre Ltd
Thornton House
Thornton Road
Wimbledon
London SW19 4NG
United Kingdom
www.lexibook.com
This product is not a toy
Environmental Protection
Unwanted electrical appliances can be recycled and should not be discarded along with regular
household waste! Please actively support the conservation of resources and help protect the
environment by returning this appliance to a collection centre (if available).

26
27
Nederlands
NACHTLAMPMODUS
Druk en houd de SNOOZE/LIGHT (SLUIMER/LAMP) toets 2 seconden ingedrukt om het nachtlampje
aan of uit te zetten. Het hartje blijft branden als het nachtlampje ingeschakeld is.
OPMERKING: Het nachtlicht knippert als het alarm afgaat.
2. Druk op de UP (OMHOOG) of DOWN (OMLAAG) toets om de tijdvertraging te selecteren alvorens
de radio zelf uitschakelt. U kunt een keuze maken van “00” tot “90” (minuten).
Opmerking: als u “00” selecteert, zal de “Slaap” functie uitgeschakeld zijn.
3. Druk op de SET (INSTELLEN) toets om uw instellingen te bewaren en de “Slaap” functie in te
schakelen.
4. De radio zal spelen gedurende de geselecteerde tijdvertraging en zal vervolgens automatisch
uitschakelen.
Opmerking:
• Als de slaaptimer geactiveerd is, kunnen de zenders gewijzigd worden.
Als u op geen enkele toets drukt gedurende 5 seconden tijdens het instellen van de tijdvertraging,
zal het apparaat automatisch het instellen van de “slaap” functie verlaten.
• Als u op de MODE (MODUS) toets drukt, zullen de radio en de slaaptimer uitgeschakeld worden,
het apparaat gaat opnieuw in klokmodus.
ONDERHOUD
Ter voorkoming van brand of elektrische schokken, trek de stekker uit het stopcontact voordat u
het apparaat schoonmaakt. De afwerking van uw apparaat kan schoongemaakt worden met een
stofdoek en behandeld worden als andere meubelstukken. Gebruik een zachte doek, licht bevochtigd
in lauw water, voor het schoonmaken van de buitenkant van het apparaat. Wees voorzichtig bij het
schoonmaken van de plastic onderdelen. Een zacht schoonmaakmiddel en een vochtige doek mag
alleen op het frontpaneel gebruikt worden.
Ter verbetering van onze service kunnen productkleuren en -details zoals getoond op de verpakking,
gewijzigd worden.
OPMERKING: Bewaar deze gebruiksaanwijzing, deze bevat belangrijke informatie.
Referentie: RPB060
Ontworpen en ontwikkeld in Europa - Gemaakt in China
©2009 LEXIBOOK®
©2009 Barbie, Inc. All rights Reserved.
http://www.lexibook.com
Dit product is geen speelgoed.
Milieubescherming
Ongewenste elektrische apparaten kunnen hergebruikt worden en dienen niet met het normaal
huishoudelijk afval weggegooid te worden. Help bij de bescherming van natuurlijke hulpbronnen
en het milieu door dit apparaat bij een inzamelcentrum in te leveren (indien beschikbaar).
RPB060IM0329


LEXIBOOK S.A,
Mon avis compte,
2, avenue de Scandinavie,
91953 Courtaboeuf Cedex
FRANCE
A ffranchir
ici
/