Page is loading ...

16
English
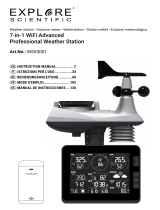
Main unit LCD display description
A1. Indoor temperature (°C/°F) and humidity (%)
A2. Outdoor temperature (°C/°F) and humidity (%), main unit low battery indicator ( ), remote
sensor reception channel (1, 2 or3), remote sensor signal ( is displayed
briey during the automatic synchronization of the main unit and the remote sensor)
A3. Animated weather forecast symbols
A4. Absolute and relative barometric pressure reading (inHg/hPa)
A5. Barometric pressure historical graph
A6. Sunrise /sunset time display and moon phases indicator
A7. Clock and DTS (Daylight Saving Time) icon
INTRODUCTION
PRODUCT DESCRIPTION
Congratulations on your purchase of this weather station, MeteoClock® Silver SM1670. Please
take the time to read and understand this manual so you can begin to enjoy the convenience and
features this product has to offer.
What exactly is a Weather Station?
Lexibook digital stations measure not only the time in progress – thanks to their built-in-clock but
also the actual and upcoming weather.
The MeteoClock® PURE SM1670 incorporates the following functions:
- Thermometer:
The temperature is displayed in real time to the nearest tenth of a degree Celsius. Thanks to its
wireless sensor, the station can detect from a distance the outdoor temperature or that of another
room.
- Hygrometer:
Outdoor or indoor hygrometry is expressed in percentage of humidity in the ambient air. The ideal
‘Comfort Zone’ for the human body ranges from 35 to 65% hygrometry for a given temperature
between 18 and 24°C.
- Barometer:
The station also monitors the atmospheric pressure in real time. It displays the weather forecast by
means of animated icons (sun, clouds, rain...) and for the next 12 to 24 hours.

17
English
A8. Alarm icons
A9. Day of the week
A10. Date and month
A11. City
Main unit description
B1. “SNOOZE/LIGHT” key
B2. “CENTIGRADE/FAHRENHEIT” key
B3. “MIN/MAX” key (indoor/outdoor temperature and humidity maximum/minimum readings)
B4. “CHANNEL” key
B5. “MODE/SET” key
B6. “SUN HOURS/RISE” key
B7. “ /(12-24)” key
B8. “ /ALARM ON-OFF” key
B9. “REL/ABS WEATHER” key (relative and absolute barometric pressure)
B10. “inHg/hPa” key (barometric pressure in inHg/hPa)
B11. “+” key
B12. “-“key
B13. “RESET” key
C1. Wall-mount holder
C2. Battery compartment
C3. Table stand
Remote sensor description
D1. LED (indicates that the main unit and the remote sensor are connected)
D2. Outdoor temperature °C/°F and humidity (%), reception channel (CH1/2/3), remote sensor low
battery indicator ( )
D3. Wall-mount holder
D4. 3-position channel selector (channel 1, 2 or 3)
D5. Battery compartment
D6. “°C/°F” key
D7. “TX” button: press this button and the sensor will send the temperature and humidity readings
to the main unit.
D8. Stand

18
English
Remote sensor battery installation
1. Use a screwdriver to open the battery compartment located at the back of the
remote sensor.
2. Insert 2 x 1.5V LR03/AAA type batteries (not included) according to the polarity
indicated inside the compartment and as per the diagram shown opposite.
3. Close the battery compartment and tighten the screw.
Note: When the remote sensor’s batteries are low, the “low battery” indicator is
displayed on the LCD screen of the sensor.
Main unit battery installation
1. Open the battery compartment located at the back of the main unit.
2. Insert 3 x 1.5V LR6/AA type batteries (not included) observing
the polarity indicated at the bottom of the battery compartment, and
as per the diagram shown opposite.
3. Close the battery compartment.
Note:
• When the main unit and remote sensor’s batteries are low, the “low battery” indicator is
displayed on the LCD screen of the main unit.
• When the main unit’s LCD display becomes dim, it indicates that the batteries are low and need
to be changed.
• If the sensor is exposed to very low temperatures for an extended period of time, the batteries
may lose power which may cause the transmission range to be limited. High temperatures also
reduce the battery performance.
SETTINGS
Non-rechargeable batteries are not to be recharged. Remove the storage batteries before
recharging. Recharge storage batteries under adult supervision. Do not mix different types of
battery and storage battery, or new and old batteries or storage batteries. Insert batteries and
storage batteries according to the polarity. Remove used storage batteries from product. Do not
short-circuit the battery or storage battery terminals. Keep batteries away from re. If the product
remains unused for an extended period, remove batteries.

19
English
WARNING: Mal-function or loss of memory may be caused by strong frequency interference or
electrostatic discharge. Should any abnormal function occur, press the RESET button or remove
the batteries and insert them again.
Weather forecast symbols and barometric pressure settings
1. When you install or change the unit’s batteries (or if you press and hold the “REL/ABS
WEATHER” key), the weather forecast symbol ashes on the LCD screen to indicate that you
need to set the current weather status.
2. Enter the current weather using the “+” and “–” keys to choose among the 5 weather forecast
symbols available.
Note : The icon will be displayed when the weather forecast is “Rainy” or “Cloudburst”
and the outdoor temperature is under 0°C.
3. Press the “REL/ABS WEATHER” key to conrm the setting. The barometric pressure digits will
start ashing.
4. Using the “+” and “–” keys to indicate the barometric pressure at sea level then press the
“REL/ABS WEATHER” key to conrm the setting.
Note: Please refer to your local weather station to get information about the barometric pressure at
your location.
5. If you need to change the settings, press and hold the “REL/ABS WEATHER” key until the
weather forecast icon start ashing on the LCD screen then repeat 2, 3 and 4 above.
Note:
• If you do not set the current weather status or if the weather symbol selected is incorrect, the
unit’s weather forecast may not be accurate.
• If the weather station is moved to another location signicantly higher or lower than its initial
standing point (e.g from ground oor to 1st oor of a house), the current weather status must be
changed as well.
Sunny Slightly cloudy Cloudy Rainy Cloudburst

20
English
• The weather station will start the rst forecast 6 hours after the current weather status has been
set. After setting up the weather status, reading for weather forecasts should be discarded for the
next 6 hours. This will allow sufcient time for the weather station to operate at a constant
altitude and therefore result in a more accurate forecast.
• Absolute accuracy cannot be guaranteed regarding weather forecasting. The weather forecasting
feature is estimated to have an accuracy level of about 75% due to the varying areas the weather
station has been designed to be used in.
• If there is any inconsistency of weather forecast between your local weather station and this unit,
the local weather station’s forecast should prevail.
Automatic synchronization of the main unit and the remote sensor
1. When you change or insert new batteries in the main unit, the synchronization is launched
automatically and runs for approximately 2 minutes.
2. Within these 2 minutes, the main unit (receiver) picks up the temperature & humidity signals
from the remote sensor and displays the readings.
3. If the main unit does not display the readings after 2 minutes, open the remote sensor and press
the “TX” key to synchronize manually the remote sensor and the main unit.
Note: it may take up to 1 minute before the main unit displays the readings.
Channel setting
The SM1670 comes with one remote sensor. The sensor’s default channel is channel 1. You do
not need to change it. However, if the sensor (or the main unit) is too close to other electrical
devices, interference may cause malfunction. In that case:
1. Use the channel selector located inside the sensor’s battery compartment to change the channel.
2. Press and hold the “CHANNEL” key for a few seconds to reset the temperature and humidity
readings of the remote sensor. The main unit will resynchronize with the new channel selected
for the remote sensor.
Note:
• If the sensor is exposed to very low temperatures for an extended period of time, the batteries
may lose power which may cause the transmission range to be limited. High temperatures also
reduce the battery performance.
• If the main unit doesn’t receive readings from the remote sensor, “- -. –” is displayed on the LCD
screen.
CHANNEL SELECTION

21
English
Multiple sensor use
The channel function allows you to use up to 3 additional sensors. The main unit can identify
each remote sensor thanks to their assigned channel (channel 1, 2 or 3). If you have one or two
additional sensors, you can place them in a different location in your house; in a bedroom, for
example. Your main unit can collect the temperature and humidity data of up to three remote
sensors.
1. Make sure you set each sensor to a different channel.
2. Press the TX key inside the remote sensors to synchronize them manually with the main unit.
The weather station will detect automatically the new sensors.
Note: it may take up to 1 minute before the main unit displays the readings.
3. Press the “CHANNEL” key repeatedly to select the desired outdoor channel between the
3 available channels ( ).
4. The data of the corresponding remote sensor will be displayed on the main unit’s LCD screen.
To display successively the readings from all 3 remote sensors, press the “CHANNEL” key
repeatedly until the icon is displayed on screen.
1. Press and hold the “MODE/SET” key until the weather station plays a “beep” sound and the
hour’s digits start ashing.
2. Use the “ /(12-24)” and “ /ALARM ON-OFF” keys to increase or reduce the values, then
press “MODE/SET” to conrm and adjust the next setting.
3. The setting sequence is displayed in the following order:
Hours Minutes Seconds Year Month Date Day-of-week
language Country City Time zone
4. Press the “MODE/SET” key to conrm your selection and go back to time display.
5. Use the “ /(12-24)” key to toggle between 24hr or 12hr display.
Note:
• The time zone is set on “0” by default. You can change this setting when traveling in a city located
in a different time zone from yours.
• The day of the week can be displayed in 8 different languages: English (EN), French (FR), Italian
(IT), Spanish (ES), German (GE), Danish (DA), Dutch (NL) or Russian (RU).
• You need to set the time after replacing the batteries.
• After a few seconds of inactivity, the unit will go back to time display mode.
CLOCK AND DATE SETTING

22
English
Once you have set up the hour and date, your weather station will automatically calculate the time
of the sunrise and the sunset according to the day of the year and the latitude of your home town
(the sunrise/ sunset time digits ash during the calculation).
1. If you want to change the setting of the sunrise/ sunset time, press and hold the “SUN HOURS/
RISE” key until the weather station plays a “beep” sound and the city’s code start ashing.
2. Use the “ /(12-24)” and “ /ALARM ON-OFF” keys to increase or decreasr the values, then
press “SUN HOURS/RISE” to conrm and adjust the next setting.
3. The setting sequence is displayed in the following order:
Country City Year Month Date
4. Once the new settings have been done, the weather station will calculate the time of the sunrise
and the sunset according to the new parameters.
5. In clock mode, press the “SUN HOURS/RISE” key once to display the total number of sun hours
for the current day.
1. You can set 2 different alarms. In clock mode, press the “MODE/SET” key once to display the
alarm time 1 ( icon) or twice to display the alarm time 2 ( icon).
2. When alarm time 1 or 2 is displayed, press and hold the “MODE/SET” key until the hour’s digits
start ashing.
3. Use the “ /(12-24)” and “ /ALARM ON-OFF” keys to set the hours, then press “MODE/SET”
to adjust the minutes.
4. Use the “ /(12-24)” and “ /ALARM ON-OFF” keys to set the minutes, then press “MODE/
SET” to conrm.
5. Once the alarm time has been set, press the “ /ALARM ON-OFF” key to switch on or switch off
the alarm.
Note: When the alarm is switched on, the or icon is displayed on the LCD screen.
6. When the alarm rings, press the “SNOOZE/LIGHT” key to switch on the snooze function. The
alarm icon ashes and the alarm will ring again 5 minutes later. Press the “MODE/SET”, “SUN
HOURS/RISE”, “ /(12-24)” or “ /ALARM ON-OFF” keys to stop it. The alarm will ring again
the next day at the same time. If you wish to switch off the alarm completely, go to alarm time
mode then press the “ /ALARM ON-OFF” key until the or icon disappear from the
LCD screen.
Note: After a few seconds of inactivity, the unit will go back to time display mode.
ALARM SETTING
SUNRISE AND SUNSET TIME

23
English
Your weather station displays the existing atmospheric pressure in inHg (inches of mercury) and
hectopascal (hPa).
Barometric pressure historical graph
The bar graph lets you see the pressure trend over the past 30 hours.
Barometric pressure trend
The trend pointer displayed indicates the trend of the barometric pressure. Generally, bad weather
is associated with low pressure and ne weather with high pressure.
Indicates that the barometric pressure trend is increasing.
Indicates that the barometric pressure trend is steady.
Indicates the barometric pressure trend is decreasing.
Barometric pressure display
Press the “REL/ABS WEATHER” key to display the absolute barometric pressure (“Abs” is
displayed on the LCD screen) or the relative barometric pressure (“Rel” is displayed on the LCD
screen).
Note: Absolute barometric pressure is the actual atmospheric air pressure at a particular location
that profoundly depends upon the location altitude. Relative or sea level pressure is the corrected
barometric pressure calculated for the sea or zero level, and usually used to refer atmospheric
conditions.
ATMOSPHERIC PRESSURE DISPLAY

24
English
MOON PHASES
BACKLIGHT
TROUBLESHOOTING
Throughout the 28 days of the lunar month, the aspect of the moon changes. Indeed, the moon,
being spherical, is always half lightened up by the sun. As the moon rotates around the Earth, the
appearance of its lightened side changes continuously. This phenomenon creates moon phases.
The moon phase on your MeteoClock® is automatically updated according to the year / month /
day.
Moon phases
Press the “SNOOZE/LIGHT” key once to switch on the backlight for a few seconds.
Problem:
1. Temperature reading of outdoor remote sensor seems too high.
2. Main unit is no longer receiving remote sensor signals or display.
3. An abnormal operation has been observed and certain functions do not work.
1. New Moon
2. Young Crescent
3. First Quarter
4. Waxing Gibbous
5. Full Moon
6. Waning Gibbous
7. Last Quarter
8. Old Crescent

25
English
SPECIFICATIONS
MAINTENANCE
SM1670 main unit
Dimensions: 250 x 155 x 32 mm
Battery type: 3 X 1.5V AA/LR6 batteries
Indoor Temperature range: 0°C to 50°C
Indoor Humidity range: 20% to 99%
Remote sensor
Dimensions: 60 x 25 x 95 mm
Battery type: 2 X 1.5V AAA/LR03 batteries
Temperature range: -20°C to +50°C
Transmission frequency: 433 MHz
Transmission Range: 30m (open space)
In order to clean the unit, use only a soft cloth moistened with water; do not use any detergent
product. Do not dismantle or drop the unit. Remove the batteries if the unit is not going to be used
for an extended period of time.
Solution:
1. Ensure the remote sensor is out of direct sunlight, and away from sources of heat.
2.
• Press the TX key inside the remote sensor’s battery compartment to synchronize manually
the remote sensor and the main unit.
• There may be some interference caused by electrical devices: change the sensor’s channel.
• Batteries in remote sensor may need to be replaced.
• Move the remote sensor closer to the main unit.
• Make sure the remote sensor is away from sources of electrical disturbance.
3. Reset the unit. If this proves to be ineffective, remove and replace the batteries in both the
remote sensor and main unit.

26
English
NOTE: Please keep this instruction manual, it contains important information. This product is
covered by our two-year warranty.
To make use of the warranty or the after-sales service, please contact your retailer and supply
proof of purchase. Our warranty covers material or installation-related defects attributable to the
manufacturer, with the exception of wear caused by failure to respect the instructions for use or
any unauthorised work on the equipment (such as dismantling, exposure to heat or damp, etc.). It
is recommended to keep the packaging for any further reference.
In a bid to keep improving our services, we could implement modication on the colours and the
details of the product shown on the packaging.
Reference: SM1670
Designed and developed in Europe – Made in China
©2010 LEXIBOOK®
United Kingdom & Ireland
For any further information, please call 0808 100 3015
www.lexibook.com
WARRANTY
Environmental Protection:
Unwanted electrical appliances can be recycled and should not be discarded along with regular
household waste! Please actively support the conservation of resources and help protect the
environment by returning this appliance to a collection centre (if available).

27
English
We, Lexibook® S.A.
2, avenue de Scandinavie
91953 Courtaboeuf Cedex, France
hereby declare under our full and sole responsibility, that the product:
Name: MeteoClock® PURE
Reference / type: SM1670
Maker: Lexibook®
to which this declaration refers, complies with the essential requirements and any other provisions
stated in Directive R&TTE (1999/5/EC) for all that applies to:
EN 301 489-1 V1.8.1
EN 301 489-3 V1.4.1
EN 300 220-1 V2.1.1
EN 300 220-2 V2.1.2
EN 60950-1 :2006+A11 :2009 :A1 :2010
EN 50371 :2002
Additional information:
Certied laboratory being consulted: Ke Mei Ou/Intertek
Technical report available from:
Lexibook, 2 avenue de Scandinavie, 91953 Courtaboeuf cedex dated the 29th of March 2006 is
suitable for use within the European Union member states.
Wai Man Yiu
Product Development Manager
DECLARATION OF CONFORMITY
Copyright © 2010 LEXIBOOK®
Issue date: 15/06/2010
/