Page is loading ...

B
2
35
4
B
1
3
4
5
A
A
CC
WARNING !
USE LONG BOLT M6 x 40mm
WARNING !
USE SHORT BOLT M6 x 35mm
A
B
ARROW MARKING - UP
**BACK VIEW
A
ARROW MARKING - UP
MODEL : B1334-050/60
DRESSER & MIRROR
HARDWARE LIST
NO ITEM QTY
1
JCBC BOLT M6 x 35MM
BLK 4 PCS
2
JCBC BOLT M6 x 40MM
BLK 4 PCS
3
SPRING WASHER 1/4"
RBW 8 PCS
4
FLAT WASHER 1/4" ID x
19mmOD BLK
8 PCS
5
ALLEN KEY m4 x 65mm
BLK
1 PC
(B1334-50)
BOX OF DRESSER
NO ITEM QTY
DRESSER
1 PC
(B1334-60)
BOX OF MIRROR
NO ITEM QTY
A
MIRROR
1 PC
B
MIRROR SUPPORT RAIL
WITH ARROW MARKING
2 PCS
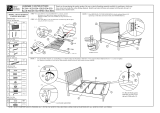
Place mirror (A) on top of dresser (C). Align & fasten mirror support (B) to the back of
dresser (C) using long JCBC bolt (2) , spring washer (3) & flat washer (4) THEN
FULLY TIGHTEN ALL THE BOLTS AT STEP 2 & 3 WITH ALLEN KEY ( 5).
C
A
B
Align & fasten mirror support (B) to the back of mirror (A) using short JCBC
bolt(1),spring washer (3) & flat washer (4). DO NOT FULLY TIGHTEN AT THIS
STEP.
Note : Make sure arrow marking of the mirror support (B) is aligned up.
Draw out mirror support (B) from the carton box.
COMPLETED
ASSEMBLY
NOTE : MUST TIGHTEN SCREWS PERIODCALLY WITH USE SCREW WILL BECOME LOOSE CHECK TIGHTNESS OF ALL SCREW EVERY 6-8 WEEKS.
STEP 3 :
STEP 2 :STEP 1 :
F
D
CFix Slat (D) flush against
Side Rail (F) using screw
driver & CSK screw (7).
E
D
D
F
7
Fix the Bed Slats Support ( E ) to Bed Slats ( D ) as Shown and fix the Bed Slats to Side Rail ( F ) by using Flat Head Chipboard Screw ( 7 ). Loosen or Tighten
the Adjuster as necessary to level the bed. Bed assembly should be done in final location to ensure stability.
Hook SIDE RAIL (F) TO HEAD BOARD (A) closely and push down to fit.
repeat step 2 with other end of rail to hook onto FOOTBOARD (C).
BLeft
Right
A
STEP 3 :
STEP 2 :
MODEL : B1334-110/120/330
EASTERN KING BED
NO ITEM QTY
C
Footboard
1
D
Slat
4
E
Slat support
8
(B1334-110)
BOX OF HEADBOARD
(B1334-120)
BOX OF FOOTBOARD
NO ITEM QTY
F
Side Rail
2
(B1334-330)
BOX OF SIDE RAIL
NO ITEM QTY
1
JCBC BOLT M6 x 40MM
4 PCS
2
JCBC BOLT M6 x 80MM
2 PCS
3
SPRING WASHER 1/4" RBW
4 PCS
4
FLAT WASHER 1/4" ID x
19mmOD BLK 4 PCS
5
WOOD DOWEL
10mmx30mm 2 PCS
6
ALLEN KEY M4 x 110MM
1 PCS
(B1334-110)
HARDWARE LIST
NAIL LEG
E
1.1
1.2
1.3
E
D
LEVELER ADJUSTER
1
3
4
6
B
5
2
6
B
A
3.1
3.2
3.3
C:\Users\Azim\Downloads\NCF Logo.JPG
C:\Users\Azim\Downloads\NCF Logo.JPG
C
E
D
D
F
Fix the Bed Slats Support ( E ) to Bed Slats ( D ) as Shown and fix the Bed Slats to Side Rail ( F ) by using L bracket (7) and Pan Head Chipboard Screw ( 8 ). Loosen or Tighten
the Adjuster as necessary to level the bed. Bed assembly should be done in final location to ensure stability.
Hook SIDE RAIL (F) TO HEAD BOARD (A) closely and push down to fit.
repeat step 2 with other end of rail to hook onto FOOTBOARD (C).
BLeft
Right
A
STEP 3 :
STEP 2 :
MODEL : B1334-110/120/230
CALIFORNIA KING BED
NO ITEM QTY
C
Footboard
1
D
Slat
4
E
Slat support
8
BOX OF HEADBOARD
BOX OF FOOTBOARD
NO ITEM QTY
F
Side Rail
2
BOX OF SIDE RAIL
NO ITEM QTY
1
JCBC BOLT M6 x 40MM
4 PCS
2
JCBC BOLT M6 x 80MM
2 PCS
3
SPRING WASHER 1/4" RBW
4 PCS
4
FLAT WASHER 1/4" ID x
19mmOD BLK 4 PCS
5
WOOD DOWEL
10mmx30mm 2 PCS
6
ALLEN KEY M4 x 110MM
1 PCS
HARDWARE LIST
NAIL LEG
E
1.1
1.1
1.2
E
D
1
3
4
6
B
5
2
6
B
A
3.1
3.2
C:\Users\Azim\Downloads\NCF Logo.JPG
19
68
175
185
NO ITEM QTY
5005 2 Hole L Bracket
18mmx20mmx1.2mm
HARDWARE LIST
2X
X4 X4
(B1334-110)
(B1334-120)
(B1334-230)
(B1334-110)
(B1334-120)
C
(B1334-60)
B
STEP 1-1: Insert DOWELS (5) into HEADBOARD (A), as shown, and slide
HB PANEL (A) to HB LEG (B). Tighten with JCBC BOLT (1),
SPRING WASHER (3) & FLAT WASHER (4), using ALLEN KEY (6),
as shown.
STEP 1-2 : Screw JCBC BOLT (2) into pre-drilled hole on headboard leg (B) and tighten,
using ALLEN KEY (6) as shown.
HARDWARE LIST
NO ITEM QTY
CSK SCREW M4 x 32MM
NO ITEM QTY
A
Headboard
1
B
Headboard Leg (L&R)
2
Nail Leg
STEP 1-1: Insert DOWELS (5) into HEADBOARD (A), as shown, and slide
HB PANEL (A) to HB LEG (B). Tighten with JCBC BOLT (1),
SPRING WASHER (3) & FLAT WASHER (4), using ALLEN KEY (6),
as shown.
STEP 1-2 : Screw JCBC BOLT (2) into pre-drilled hole on headboard leg (B) and tighten,
using ALLEN KEY (6) as shown.
B
ASSEMBLY INSTRUCTIONS
B1334-110,B1334-120,B1334-330
BLUE RIDGE EASTERN KING BED
Thank you for purchasing this quality product. Be sure to check all packing materials carefully for small parts, which may
have come loose inside the carton during shipment. Identify and count all items and compare with the parts list and / or
hardware list as shown below.
NO ITEM QTY
A
Headboard
1
B
Headboard Leg (L&R)
2
Nail Leg
ASSEMBLY INSTRUCTIONS
B1334-110,B1334-120,B1334-230
BLUE RIDGE CALIFORNIA KING BED
Thank you for purchasing this quality product. Be sure to check all packing materials carefully for small parts, which may
have come loose inside the carton during shipment. Identify and count all items and compare with the parts list and / or
hardware list as shown below.
(B1334-120)
ASSEMBLY INSTRUCTIONS
B1334-050,B1334-060
BLUE RIDGE DRESSER & MIRROR
Thank you for purchasing this quality product. Be sure to check all packing materials carefully for small parts, which may
have come loose inside the carton during shipment. Identify and count all items and compare with the parts list and / or
hardware list as shown below.
A
RUBBER MALLET
C
F
2X
NAIL LEG
8X
A
RUBBER MALLET
C
F
2X
2X
3.3
D
7
8
8X
F
D
3.4
87
8X
NAIL LEG
/