Electrolux EQBM120HAS User manual

Category
Barbecues & grills
Type
User manual

This manual is also suitable for

user manual
Electrolux E:Volution
barbecue
EQBM120HAS, EQBM120LAS,
EQBM75HAS, EQBM75LAS
2 contents electrolux e:volution barbecue electrolux e:volution barbecue important safety instructions 3
environmental tip
Information on disposal for users
Most of the packing materials are recyclable. Please
dispose of those materials through your local recycling
depot or by placing them in appropriate collection
containers.
If you wish to discard this product, please contact your
local authorities and ask for the correct method of disposal.
Congratulations
Congratulations and thank you for choosing our Electrolux
E:Volution barbecue. We are sure you will nd your new
barbecue a pleasure to use. Before you use the barbecue,
we recommend that you read through the entire user
manual, which provides the description of the barbecue
and its functions.
To avoid the risks that are always present when you use
a gas appliance, it is important that it is installed correctly
and that you read the safety instructions carefully to avoid
misuse and hazards.
We recommend that you keep this instruction booklet for
future reference and pass it on to any future owners.
After unpacking the barbecue please check it is not
damaged. If in doubt, do not use the appliance but contact
your local Electrolux Customer Care Centre.
Conditions of Use
This appliance is intended to be used in household and
similar applications such as:
• Farm houses
By clients in holiday apartments and other residential
type environments.
Contents







 
 
 
 
 
 
 
 
 
 
 
 
 
 
 
 
 
 
 
 
 
Please read the user manual carefully and store in a handy
place for later reference.
Meanings of the symbols used in this manual are shown
below:
warning


caution


tips and information


environmental tip





warning






THIS MANUAL MUST REMAIN WITH THE OWNER FOR
FUTURE REFERENCE
Important safety instructions
warning





warning




















caution








4 EQBM120HAS description electrolux e:volution barbecue electrolux e:volution barbecue EQBM120HAS dimensions 5
EQBM120HAS EQBM120HAS dimensions
 Roasting hood
Temperature indicator
 Slimline lid cover
 Burner controls
 Swivel wheels with brake
Pivoting safety leg
Warming racks
Grill
 Hotplate
 Ribbed hotplate
 Fold down side tables
 Storage compartment
 Gas connection point
 Gas hose with universal LPG connection
 Slide-out gas bottle tray
 Match holder for manual lighting (not illustrated)
 Removable oil reservoirs located at front of cooking
surface (not illustrated)
 Flame tamers located under grills (not illustrated)








525
363
637
1200
1126
683
922
203
35
Dimensions are in millimetres.
6 EQBM120LAS description electrolux e:volution barbecue electrolux e:volution barbecue EQBM120LAS dimensions 7
EQBM120LAS EQBM120LAS dimensions
 Slimline lid cover
 Slimline lid cover
 Burner controls
 Swivel wheels with brake
Pivoting safety leg
Grill
 Hotplate
 Ribbed hotplate
 Fold down side tables
 Storage compartment
 Gas connection point
 Gas hose with universal LPG connection
 Slide-out gas bottle tray
 Match holder for manual lighting (not illustrated)
 Removable oil reservoirs located at front of cooking
surface (not illustrated)
 Flame tamers located under grills (not illustrated)




532
363653
1200
957
683
922
35
Dimensions are in millimetres.

8 EQBM75HAS description electrolux e:volution barbecue electrolux e:volution barbecue EQBM75HAS dimensions 9
EQBM75HAS EQBM75HAS dimensions
 Roasting hood
 Temperature indicator
 Burner controls
 Swivel wheels with brake
Warming racks
 Hotplate
 Grills
 Fold down side tables
 Gas connection point
 Gas hose with universal LPG connection
 Slide-out gas bottle tray
 Match holder for manual lighting (not illustrated)
 Removable oil reservoirs located at front of cooking
surface (not illustrated)
 Flame tamers located under grills (not illustrated)


525
637
750
1126
684
922
203
Dimensions are in millimetres.

10 EQBM75LAS description electrolux e:volution barbecue electrolux e:volution barbecue EQBM75LAS dimensions 11
EQBM75LAS EQBM75LAS dimensions
 Slimline lid
 Burner controls
 Swivel wheels with brake
 Hotplate
 Grills
 Fold down side tables
 Gas connection point
 Gas hose with universal LPG connection
 Slide-out gas bottle tray
 Match holder for manual lighting (not illustrated)
 Removable oil reservoirs located at front of cooking
surface (not illustrated)
 Flame tamers located under grills (not illustrated)
532
653
750
957
684
922
35
Dimensions are in millimetres.

1. Remove packaging & remove all components from
inside of burner box. Remove cooking plates fastened
to pallet under cabinet.
2. Unfasten bolts securing unit to the pallet base and
remove unit from base.
12 barbecue parts electrolux e:volution barbecue electrolux e:volution barbecue assembling the barbecue 13
3. 
– Unpack the roasting hood.
Remove necessary screws to enable assembly of hood.
Some screws have been removed to facilitate assembly
and are included in bag with instruction manual.
Due to the size of the roasting hood, it is
recommended that two people place the roasting
hood into position.
When tting the roasting hood assembly, take
particular care to avoid scratching of the external trim.
Once in position, x hood assembly to trim surround
with screws provided.


– Unpack the slimline lid.
Remove necessary screws from barbecue trim
surround to enable assembly of brackets.
Fit brackets to trim surround with screws removed
and additional screws in plastic bag. Fit additional
screws provided to trim where missing.
– Fit lid to brackets.
4. Fit small slimline lid (if required) in the same manner as
larger lid above.
Assembling the barbecue75cm barbecue parts120cm barbecue parts
 
EQBM12AS –
120cm mobile
barbecue base
1
EQB6HAS –
Roasting hood and
warming racks

EQB6LAS –
Flat lid with
mounting brackets
1
EQB3LAS –
Small at lid with
mounting brackets
1
Grills 2
Hotplate 1
Ribbed hotplate 1
Flame tamers 2
1 plastic bag containing this instruction book and trim xing
screws
 
EQBM75AS –
75cm mobile
barbecue base
1
EQB6HAS –
Roasting hood and
warming racks

EQB6LAS –
Flat lid with
mounting brackets
1
Grills 2
Hotplate 1
Flame tamers 2
1 plastic bag containing this instruction book and trim xing
screws
Tools you will need for assembly:
– Phillips head screwdriver
Contents of your 120cm barbecue pack: Contents of your 75cm barbecue pack:
 
bracket orientation for at lid
continued over
polystyrene.
remove by lifting barbecue to release
polystyrene
cooking plates.
cut strap at rear to remove
pallet bolt.
unscrew to release from pallet

polystyrene.
remove by lifting barbecue to release
polystyrene
cooking plates.
cut strap at rear to remove
pallet bolt.
unscrew to release from pallet

14 assembling the barbecue / gas specications / gas bottle safety information electrolux e:volution barbecue
5. Position ame tamers into desired locations (under
where grill sections will be tted) and x back edge of
ame tamer into rear of barbecue body.
6. Place hotplate and grill sections into desired positions
ensuring that the ame tamers are under grill sections.
NOTE: ensure that grill assemblies are orientated
correctly so that the surface of the grill is sloping
forward to allow oil to drain into oil reservoirs.
7. Fit warming racks to splashguard at rear (roasting hood
models only).

 
  
Maximum gas consumption 50 MJ/h 57.5 MJ/h
Injector orice diameter (mm)
0.90 1.50
Number of injectors 5 5
Regulator pressure 2.75 kPa 1.00 kPa*

 
  
Maximum gas consumption 40 MJ/h 46 MJ/h
Injector orice diameter (mm)
0.90 1.50
Number of injectors 4 4
Regulator pressure 2.75 kPa 1.00 kPa*
NOTES
This appliance MUST be serviced only by a qualied
licensed person.
This product is intended for outdoor use only.
Ventilation holes in the unit must not be obscured by
the installation.
* The outlet pressure at the Natual Gas regulator will be
lower when all burners are operating. Burner pressure
should read 1.0kPa with one burner operating and
approximately 0.93kPa with four burners operating.
For conversion to Natural Gas a conversion kit will need to
be purchased from Electrolux Spare Parts.
Assembling the barbecue (cont.) Gas specications
electrolux e:volution barbecue installing the gas cylinder / leak test procedure / conversion to natural gas 15
Installing the gas cylinder
To install bottle:
1. Open both gas bottle compartment doors and pull out
sliding tray.
2. Wind out clamp screw to allow base of bottle to t.
3. Place gas bottle into tray and tighten clamp to secure
bottle.
4. Make connection of gas hose to gas bottle.
Gas bottles vary in size and there may be some variations
that do not t into the space provided. As an alternative to
mounting the gas bottle in slide out tray, the bottle can be
placed on the ground and hose placed through hole in rear
panel for connection to inlet.
This appliance is designed to use a Universal LPG 9kg
(20 lbs) gas cylinder.
The gas cylinder must be made and marked in
accordance with specications for LPG cylinders
The isolation valve must be turned off when the
appliance is not in use.
Gas cylinders must be stored in an approved housing
out of reach of children.
When disconnecting the gas bottle ensure that all the
control valves are in the ‘OFF’ position.
Remove the bottle from any housing in which it may be
stored before disconnection.
When reconnecting the hose to the bottle, ensure that
all connections are tight before replacing in the storage
compartment.
Carry out a leakage check as detailed below after each
reconnection.
Gas bottle safety information
clamp screw
Ensure all gas valves are in the ‘OFF’ position.
In a small container, mix a solution of water and
detergent or soap.
After connection of the hose, turn on the valve at the
gas bottle or mains as appropriate.
Using a brush apply the solution to the gas connection
points and look for bubbles forming.
Bubbling will indicate a leak.
Turn off the valve and re-tighten the joint. Repeat the
leak test.
If the leak persists, turn off the gas at the isolation valve
and contact a licensed gas tter to correct.
Leak test procedure (Universal LPG)
leak test points
check hose for
signs of abrasions,
cracks or leaks

This barbecue is supplied set up for Universal LPG and is
labelled accordingly. A Natural Gas conversion kit can be
purchased from Electrolux Spare Parts to enable conversion
to Natural Gas use.
NOTE: Conversion of this unit to Natural Gas must be
carried out by a qualied licensed person and a Certicate
of Compliance must be issued to the owner on completion
of the installation and conversion.
The conversion kit consists of:
• Regulator
• Hose with quick connect bayonet tting one end
• Socket tool to remove injectors
• Natural Gas sticker

 
• Remove the hotplates & grills
• Remove the ame tamers
Remove rear heat shield (push up and then forward to
release)
• Remove front heat shield panel
• Remove screws securing burner at rear
Conversion to Natural Gas
rear heat shield
remove screws to remove front heat shield
remove screws securing burners
16 conversion to natural gas electrolux e:volution barbecue electrolux e:volution barbecue choosing a location / installation warnings 17
Manoeuvre rear of burner to release front of burner
from injector
Using socket tool provided remove rst stage of
injector
Ensure second stage of injector is not loose – tighten
if necessary
Ret burners ensuring the injector is located in burner
inlet
• Ret front heat shield panel and rear heat shield panel
• Ret ame tamers, grills and hotplates
 

 
• Place threaded end of hose through hole in rear panel
Apply thread tape or sealant to the male thread on the
hose and screw into the regulator.
 
Fit the regulator ensuring the blue sealing washer is in
place and the arrow is pointing in the right direction
 
Locate the ‘Universal LPG’ sticker located on the
barbecue gas inlet and remove it. Put the ‘Natural
Gas’ sticker in its place.
 
• Ensure all gas valves are in the ‘OFF’ position.
In a small container, mix a solution of water and
detergent or soap.
After connection of the hose, turn on the valve at the
gas bottle or mains as appropriate.
Using a brush apply the solution to the gas
connection points and look for bubbles forming.
• Bubbling will indicate a leak
Turn off the valve and re-tighten the joint. Repeat the
leak test.
If the leak persists, turn off the gas at the isolation
valves and contact a licensed gas tter to correct.
 
When converting to natural gas the turndown setting
will need to be adjusted to give satisfactory ame on
low setting.
• Remove all knobs from valve shafts of main barbecue
• Remove rubber grommets from control panel holes
Using a Philips head screw driver, fully screw in
clockwise the valve rotation limit screw. When this is
done the valve rotation will be limited to less than 180°.
Following connection of the gas and leak testing as
per previous steps, light all burners and set to high.
One burner at a time turn the valve shaft to lowest
setting, observe the ame to ensure a small steady
ame is achieved.
Turn burners off and replace rubber grommets and
control knobs.
Conversion to Natural Gas (cont.)
hose with tapered
thread – thread tape
required
natural gas regulator
barbecue gas inlet
leak test points
check hose for
signs of abrasions,
cracks or leaks
valve rotation
limit screw
The vertical clearance above the cooking surface to any
combustible materials must be at least 1000mm.
Cooking with roasting hood closed vents the hot
ue gases out the rear of the appliance. A minimum
clearance of 450mm to any combustible materials is
required.
The appliance requires clearance on both sides and at
rear for ventilation, ensure at least 100mm clearance.
Avoid windy conditions as this will affect cooking
performance and burner efciency. If this situation
cannot be avoided some shielding may be necessary.
The barbecue grills and hotplates are slightly sloped
to enable grease & oil drainage into front receptacles.
When choosing a location ensure that the slope
towards the front is maintained.
This appliance must be installed in accordance with
Australian Standards AS4557 and AS5601 and in
accordance with your local authority.
Choosing a location
warning
This appliance shall only be used in an above ground,
open air situation with natural ventilation without
stagnant areas, where gas leakage and products of
combustion are rapidly dispersed by wind or natural
convection. This barbecue has been designed for
outdoor use only. Refer to diagrams below.
Never install this barbecue inside any building, garage,
shed or breezeway or inside a boat, caravan or
recreational vehicle. This is to prevent the possibility of
re, carbon monoxide poisoning or asphyxiation.
Any enclosure in which this appliance is installed shall
comply with one of the following:
An enclosure with walls on all sides, but at least
one permanent opening at the ground level and no
overhead covering.
Within a partial enclosure that includes an overhead
cover and no more than 2 walls.
Within a partial enclosure that includes an overhead
cover and more than 2 walls, the following shall apply:
at least 25% of the total wall area is completely
open and at least 30% of the remaining wall area
is open and unrestricted
In the case of balconies, at least 20% of the total of
the side, back and front wall areas shall be and remain
open and unrestricted.
Outdoor area example 1
Outdoor area example 2
Outdoor area example 3
Outdoor area example 4
Outdoor area example 5
Installation warnings
both ends
open
open side at
least 25% of
total wall area
30% or more
in total of the
remaining wall
area is open and
unrestricted
open side at
least 25% of
total wall area
30% or more
in total of the
remaining wall
area is open and
unrestricted
spark plug
injector second stage
injector rst stage
18 activating the wheel brake / conguration of hotplates electrolux e:volution barbecue electrolux e:volution barbecue operating instructions / using the roasting hood 19
For safety, the wheel brake should be activated to prevent
any movement of the barbecue.
There are 2 wheel brakes.
To activate:
Push down until it locks.
important

grills
flame tamers
Grills can be placed together on one side and hotplate on
the other.
Grills can be placed either side of hotplate. This is the
preferred option for roasting.
Activating the wheel brake
Options for conguration of hotplates and
grills
wheel brakes

Before lighting the barbecue:
Check that all hoses and gas ttings are tight.
Open the roasting hood or slimline lid
NOTE the slimline lid is designed as a cover for weather
protection. The lid is not designed to be used as a cooking
hood
Check all control knobs are in the ‘OFF’ position
Ensure that the cooking surfaces are clean
Turn the gas isolation valve ‘ON’

Do not attempt to light burners with cooking surfaces
covered
Read instructions before lighting
To light a burner, depress the knob and rotate to ‘HIGH’
A spark is generated to light the ame thrower along
side the burner. The ame thrower makes an audible
noise and only operates when the knob is depressed to
light the burner. Release the knob and check if burner
is lit. The audible noise from the ame thrower will stop
when knob released.
If the burner did not light, turn the knob to the ‘OFF’ position.
Allow gas to disperse, then repeat lighting procedure.

If, in the event of the automatic ignition system not
working, the barbecue can be lit manually
A match holder with attached chain is xed to the panel
behind top of door. For the 3 door model, it is near the
hinge of the centre door. For the 2 door model it is near
the hinge of the left door. It is accessible from inside the
cabinet.
match holder with
attaching chain located
inside channel formed
by this panel
To light manually, t a 40mm match to the holder and
light. Pass match through viewing slots below the front
cooking plate down towards the burner, then rotate
knob to HIGH to ignite. If ignition fails, turn the control
valve OFF and allow several minutes for the gas to
disperse before attempting to light again.
pass match holder
through viewing slot
at front under cooking
plates
Once alight, repeat for other burners as required.

This barbecue is tted with high power burners. In
most conditions it will only be necessary to preheat the
barbecue for 5 minutes before cooking can commence
As with most things, experience will familiarise you with
the effectiveness of and the time required to achieve the
desired preheating time to obtain the desired cooking
temperature
Testing has shown that the burners can be turned to
low position for satisfactory cooking
If the unit does not operate correctly refer to the
troubleshooting section on page 22
If the burners are left to run too hot there will be excessive
smoking during the cooking process and subsequent
burning of the food being prepared. This may also result
in excessive aring of the fat being emitted from the food
Roasting with the hood closed only requires the 2
outermost burners on low setting for satisfactory cooking.

When cooking is complete, rotate the knob fully
clockwise so the pointer on the knob is positioned at
the ‘OFF’ position
Turn gas bottle isolation valve off after turning all knobs
to ‘OFF’ position when appliance not in use
Cooking with the hood closed only requires 2 burners to
be on low setting. Setting is to be adjusted depending on
conditions and using the temperature indicator as a guide.
It is recommended when roasting to place the solid
hot plate in the centre with one grill on each side of the
plate. Use the two outer burners under the grills.
To achieve even cooking of the food, place the food
onto a wire rack above the hot plate to allow air to
circulate under the food.
Food can also be placed on the warming racks for
cooking with hood closed
warning
Do not use more than 2 burners when hood closed and
do not allow the temperature to exceed the ‘Ready’
zone of the temperature indicator. These conditions
create excessive heat and may cause damage to the
barbecue and roasting hood.
When cooking with the hood closed the hot ue
gases ow out the rear of the appliance between the
splashguard and the hood. Ensure the barbecue is
suitably located to avoid damage or injury.
warning


Operating instructions Using the roasting hood
20 using the side table / lid safety leg electrolux e:volution barbecue electrolux e:volution barbecue cleaning and care 21

Lift upwards until it locks

1. Lift upwards slightly to unlock
2. Slide support arms upwards and table should fall into
place.
To ensure that the user remembers to turn off the gas
before closing the lid, a pivoting safety leg has been tted
(both small and large lids).
When closing the lid the safety leg will pivot forward and
rest against the trim surface to prevent the lid closing. After
ensuring the gas has been turned off, to fully close the lid,
the leg needs to be rotated backwards.
warning


Closing the lid during burner operation can cause
discolouration and damage to the lid and barbecue unit.
Using the side table Lid safety leg – slimline lid only
lift upwards
lift upwards
pivoting safety leg
pivoting safety leg
This Electrolux barbecue has been constructed from select
grade stainless steel which, if not cared for, may discolour
over time. To keep your barbecue looking its best we
recommend that the cooking surfaces are cleaned after
every use.
warning




The cooking plates and grills have a porcelain enamelled
coating.
NOTE: Many food acids, juices, marinades and sauces
contain highly acidic elements that will slowly attack the
surface of the cast iron if not removed immediately after
cooking.
After use remove all solid material from the cooking surface
using a brass bristled barbecue brush or plastic bristled
scourer. Wipe off the remaining grease with paper towelling.
Gently wash the surfaces with a cloth or sponge and a mild
detergent and hot water. Dry components immediately and
coat the cooking surface with a light layer of cooking oil.
This protects the surface when not in use. Do not clean the
cooking surface in a dishwasher

caution
Do not use abrasive or caustic cleaners, scourers or
metal scrapers on stainless steel surfaces as they may
permanently scratch and damage your barbecue.
Wash all stainless steel components, including the
slimline lid, the roasting hood, tubular frame and control
knobs with a soft dishcloth using hot soapy water
The barbecue interior can be wiped down with a soft
cloth in hot soapy water. The rear panel of the interior is
removable for easy cleaning
Ensure that all surfaces are dried with a clean dry cloth
tips and information
Sometimes stainless steel surfaces are affected by a brown
discolouration called tea staining. This usually occurs in
areas which use high heat and can be removed using
specialised stainless steel cleaners. For best results, we
recommend that specialised cleaners be used regularly on
all stainless steel components. You will nd these cleaners
at the Electrolux spare parts outlets.
caution
Take extra care (particularly when cleaning on and around
the control knobs) to ensure that water and soapy residue
do not enter the control panel.
Care should also be taken not to disturb the spark
electrode.

The inside of the burner box should be regularly cleaned to
prevent any build up of food residues.
To access the burner box remove cooking plates and heat
distributors. To remove rear heat shield lift to disengage
clips. To remove burners undo screws securing burners at
rear, and lift out carefully to prevent scratching. The base
heat shields can also be lifted out.
Ensure that all oil and food residues are removed.
After cleaning complete, re-assemble ensuring burner is
correctly located over the injector.

The barbecue has a unique oil management system which
drains oil to the front into easily removed reservoirs which
should be cleaned after each use.
To remove reservoirs, pull upwards from the front of the
barbecue and dispose of the contents of the catchment
responsibly. Rinse oil reservoirs in warm soapy water. The
reservoirs can be placed in the dishwasher if desired.

Do not use abrasive or caustic cleaners, scourers or metal
scrapers as they may permanently damage your barbecue.
Wash all powder coated panels with a soft dishcloth using
warm soapy water. Ensure that all surfaces are dried with a
clean dry cloth.

The hardwood used on the lift up side tables has been
treated with a light coating of protection oil. Clean surface
using a soft sponge and a solution of mild soapy water.
Wash down afterwards with clean water.
To maintain strength, avoid discolouration and fading, the
timber must be protected using a suitable outdoor timber
furniture oil. Re-oiling of timber will need to be conducted at
regular intervals depending upon the amount of exposure to
the sun and rain.
Minor scuffs and scratches can easily be covered with a
coat of oil. Deep scratches need to be sanded out and
oiling concentrated in that area until the lustre is uniform.
Use of a weatherproof cover will help to minimise the
maintenance required.
tips and information
The stainless steel panels may distort while in use but will
return to normal when cold.
When the barbecue is not being used it is recommended to
keep it covered.
If the barbecue is to be stored indoors, remove the gas
cylinder and store the cylinder in a ventilated outdoor area.
Cleaning and care
rear heat shield
base heat shield
screws securing burners
22 maintenance / troubleshooting electrolux e:volution barbecue
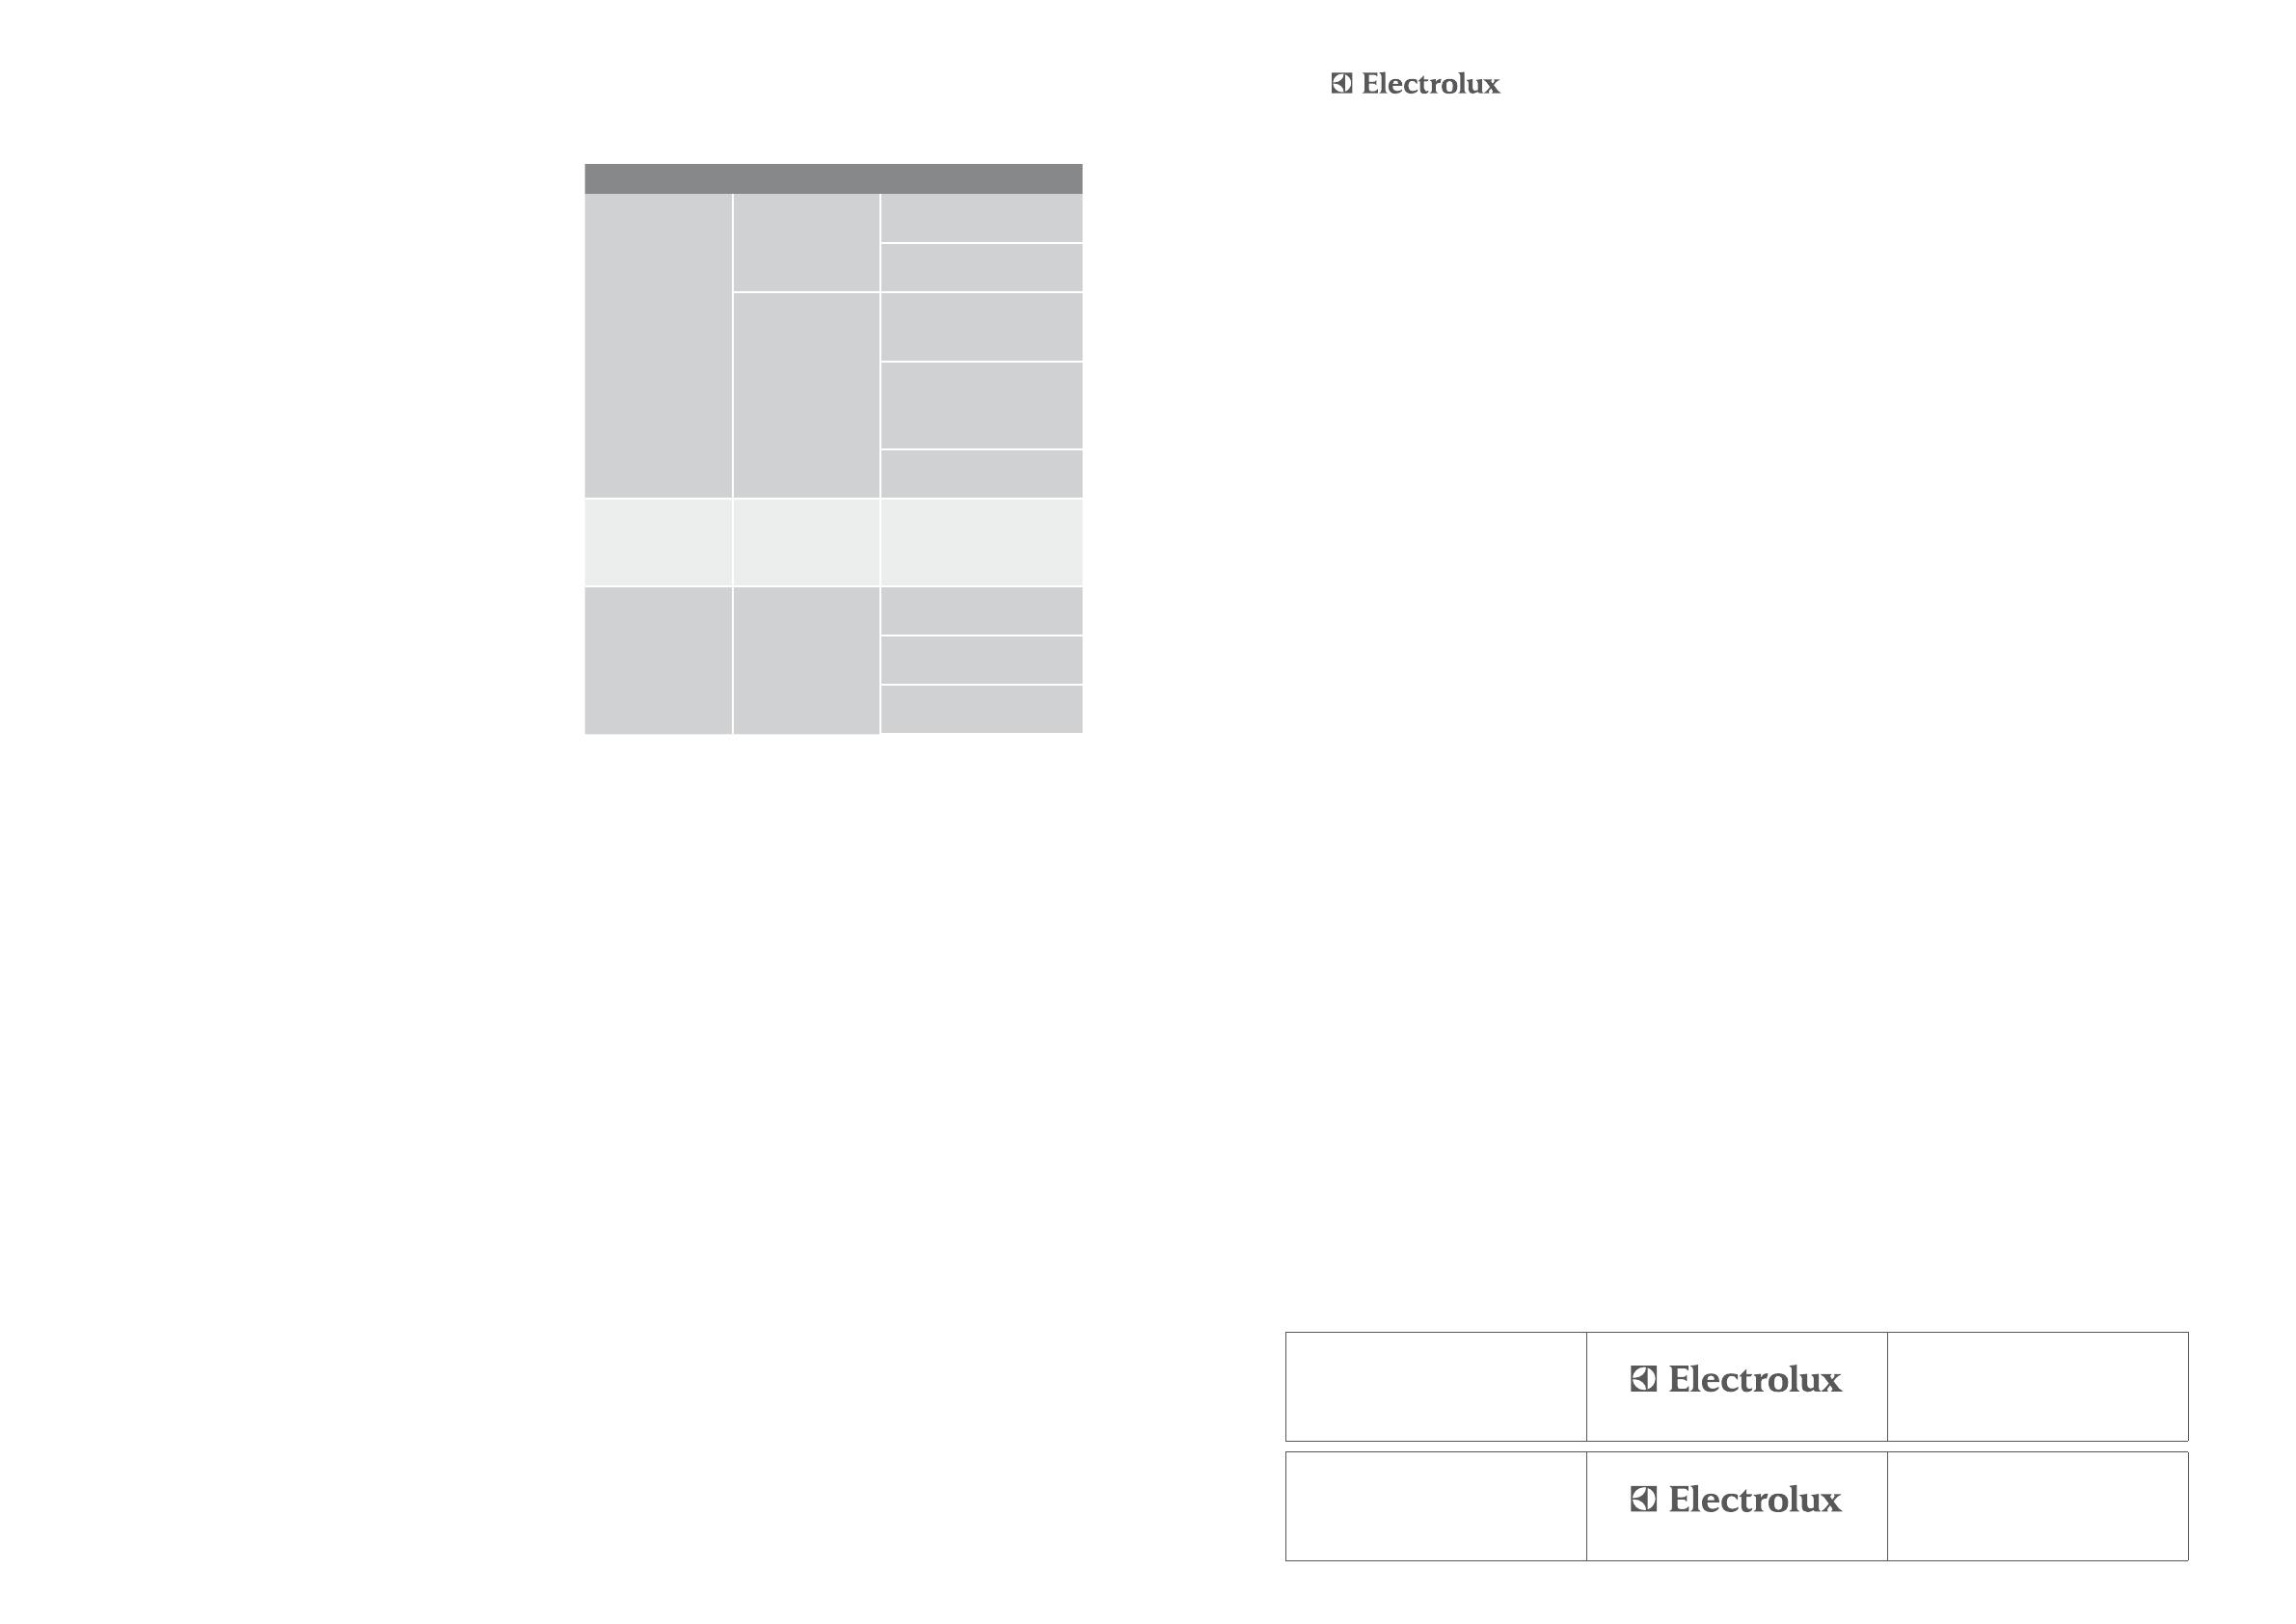
Stainless steel burners
Burners should be checked at least once per year and
cleaned as necessary. Inspect burners to ensure no
residues have been deposited and gas ports are clear.
  
Barbecue won’t
light
No gas Check isolation valve
is ON
Gas bottle empty – rell
or change gas bottle
Ignition system
not working
Check there is a spark
being generated when
knob rotated
Ignition electrode wet or
dirty, gently clean and
dry electrode, ensuring
position is unchanged
Manually light the
barbecue
Excess smoke
being emitted
from the cooking
area
Too much heat Turn down gas valve or
turn off selected burners
Smell of gas
DO NOT
ATTEMPT TO
LIGHT THE
APPLIANCE
Gas leak Turn off gas at the
isolation valves
Check for leaks, tighten
joints
If problem persists, call
Electrolux Service
Maintenance Troubleshooting
This document sets out the terms and conditions of the product
warranties for Electrolux Appliances. It is an important document.
Please keep it with your proof of purchase documents in a safe place
for future reference should you require service for your Appliance.
1. Inthiswarranty
(a) ‘acceptablequality’asreferredtoinclause10ofthiswarrantyhas
thesamemeaningreferredtointheACL;
(b) ‘ACLmeansTradePracticesAmendment(AustralianConsumer
Law)Act(No.2)2010;
(c) ‘Appliance’meansanyElectroluxproductpurchasedbyyou
accompaniedbythisdocument;
(d) ‘ASC’meansElectrolux’authorisedservicedcentres;
(e) ‘Electrolux’meansElectroluxHomeProductsPtyLtdof163
O’RiordanStreet,Mascot,NSW2020,ABN51004762341in
respectofAppliancespurchasedinAustraliaandElectrolux(NZ)
Limitedof3-5NiallBurgessRoad,MountWellington,inrespect
ofAppliancespurchasedinNewZealand;
(f) ‘majorfailure’asreferredtoinclause10ofthiswarrantyhasthe
samemeaningreferredtointheACLandincludesasituationwhen
anAppliancecannotberepairedoritisuneconomicforElectrolux,at
itsdiscretion,torepairanApplianceduringtheWarrantyPeriod;
(g) ‘WarrantyPeriod’means:
(i) wheretheApplianceisusedforpersonal,domesticorhousehold
use(i.e.normalsinglefamilyuse)assetoutintheinstruction
manual,theApplianceiswarrantedagainstmanufacturing
defectsinAustraliafor24monthsandinNewZealandfor24
months,followingthedateoforiginalpurchaseoftheAppliance;
(ii) wheretheApplianceisusedforcommercialpurposes(including
beingusedtodirectlyassistabusinessorwheretheApplianceis
usedinamulti-familycommunalorsharetypeenvironment),the
Appliancewillthenbewarrantedagainstmanufacturingdefects
inAustraliafor3monthsandinNewZealandfor3months,
followingthedateoforiginalpurchaseoftheAppliance.
(h) ‘you’meansthepurchaseroftheAppliancenothavingpurchased
theApplianceforre-sale,and‘your’hasacorrespondingmeaning.
2. ThiswarrantyonlyappliestoAppliancespurchasedandusedinAustralia
orNewZealandandisinadditionto(anddoesnotexclude,restrict,or
modifyinanyway)anynon-excludablestatutorywarrantiesinAustralia
orNewZealand
3. DuringtheWarrantyPeriodElectroluxoritsASCwill,atnoextracharge
ifyourApplianceisreadilyaccessibleforservice,withoutspecial
equipmentandsubjecttothesetermsandconditions,repairorreplace
anypartswhichitconsiderstobedefective.ElectroluxoritsASCmay
useremanufacturedpartstorepairyourAppliance.Youagreethat
anyreplacedAppliancesorpartsbecomethepropertyofElectrolux.
Thiswarrantydoesnotapplytolightglobes,batteries,
ltersorsimilar
perishableparts.
4. PartsandAppliancesnotsuppliedbyElectroluxarenotcoveredbythis
warranty.
5. Youwillbearthecostoftransportation,travelanddeliveryofthe
AppliancetoandfromElectroluxoritsASC.Ifyouresideoutsideofthe
servicearea,youwillbearthecostof:
(a) travelofanauthorisedrepresentative;
(b) transportationanddeliveryoftheAppliancetoandfromElectrolux
oritsASC,
Inallinstances,unlesstheApplianceistransportedbyElectroluxoran
Electroluxauthorisedrepresentative,theApplianceistransportedatthe
owner’scostandriskwhileintransittoandfromElectroluxoritsASC.
6. Proofofpurchaseisrequiredbeforeyoucanmakeaclaimunder
thiswarranty.
7. Youmaynotmakeaclaimunderthiswarrantyunlessthedefectclaimed
isduetofaultyordefectivepartsorworkmanship.Electroluxisnotliable
inthefollowingsituations(whicharenotexhaustive):
(a) theApplianceisdamagedby:
(i) accident
(ii) misuseorabuse,includingfailuretoproperlymaintainorservice
(iii) normalwearandtear
(iv) powersurges,electricalstormdamageorincorrectpowersupply
(v) incompleteorimproperinstallation
(vi) incorrect,improperorinappropriateoperation
(vii)insectorvermininfestation
(viii)failuretocomplywithany
additionalinstructionssuppliedwiththe
Appliance;
(b) theApplianceismodiedwithoutauthorityfromElectroluxinwriting;
(c) theAppliance’sserialnumberorwarrantysealhasbeenremoved
ordefaced;
(d) theAppliancewasservicedorrepairedbyanyoneotherthan
Electrolux,anauthorisedrepairerorASC.
8. Thiswarranty,thecontracttowhichitrelatesandtherelationship
betweenyouandElectroluxaregovernedbythelawapplicablewhere
theAppliancewaspurchased.WheretheAppliancewaspurchasedin
NewZealandforbusinesspurposestheConsumerGuaranteeActdoes
notapply.
9. Totheextentpermittedbylaw,Electroluxexcludesallwarrantiesand
liabilities(otherthanascontainedinthisdocument)includingliabilityfor
anylossordamagewhetherdirectorindirectarisingfromyourpurchase,
useornonuseoftheAppliance.
10.ForAppliancesandservicesprovidedbyElectroluxinAustralia,the
AppliancescomewithaguaranteebyElectroluxthatcannotbe
excludedundertheAustralianConsumerLaw.You areentitledtoa
replacementorrefundforamajorfailureandforcompensationforany
otherreasonablyforeseeablelossordamage.Youarealsoentitledto
havetheAppliancerepairedorreplacediftheAppliancefailstobeof
acceptable
qualityandthefailuredoesnotamounttoamajorfailure.
Thebenetstoyougivenbythiswarrantyareinadditiontoyourother
rightsandremediesunderalawinrelationtotheAppliancesorservices
towhichwarrantyrelates.
11.AtalltimesduringtheWarrantyPeriod,Electroluxshall,atitsdiscretion,
determinewhetherrepair,replacementorrefundwillapplyifan
Appliancehasavalidwarrantyclaimapplicabletoit.
12.ForAppliancesandservicesprovidedbyElectroluxinNewZealand,
theAppliancescomewithaguaranteebyElectroluxpursuanttothe
provisionsoftheConsumerGuaranteesAct,theSaleofGoodsActand
theFairTradingAct.
13.Toenquireaboutclaimingunderthiswarranty,pleasefollowthesesteps:
(a) carefullychecktheoperatinginstructions,usermanualandtheterms
ofthiswarranty;
(b) havethemodelandserialnumberoftheApplianceavailable;
(c) havetheproofofpurchase(eganinvoice)available;
(d) telephonethenumbersshownbelow.
14.Youacceptthatifyoumakeawarrantyclaim,ElectroluxanditsASC
mayexchangeinformationinrelationtoyoutoenableElectroluxtomeet
itsobligationsunderthiswarranty.
Warranty
FORSALESINAUSTRALIAANDNEWZEALAND
APPLIANCE:ELECTROLUXBARBECUE
Important Notice
Beforecallingforservice,pleaseensurethatthestepslistedinpoint13abovehavebeenfollowed.
FOR SERVICE
ortondtheaddressofyournearest
stateservicecentreinAustralia
PLEASE CALL 13 13 49
Forthecostofalocalcall(Australiaonly)
SERVICE AUSTRALIA
ELECTROLUXHOMEPRODUCTS
www.electrolux.com.au
FOR SPARE PARTS
ortondtheaddressofyournearest
statesparepartscentreinAustralia
PLEASE CALL 13 13 50
Forthecostofalocalcall(Australiaonly)
FOR SERVICE
ortondtheaddressofyournearest
authorisedservicecentreinNewZealand
FREE CALL 0800 10 66 10
(NewZealandonly)
SERVICE NEW ZEALAND
ELECTROLUXHOMEPRODUCTS
www.electrolux.co.nz
FOR SPARE PARTS
ortondtheaddressofyournearest
statesparepartscentreinNewZealand
FREE CALL 0800 10 66 20
(NewZealandonly)
EBBQ_Warr_Apr11

telephone: 1300 363 640
fax: 1800 350 067
email: customercare@electrolux.com.au
web: www.electrolux.com.au

telephone: 09 573 2384
fax: 09 573 2221
email: customercare@electrolux.co.nz
web: www.electrolux.co.nz

© 2011 Electrolux Home Products Pty Ltd
ABN 51 004 762 341
Print code: EMAN_EVOBBQ_JUN11

Do you remember the last time you opened a gift that made you say
“Oh! How did you know? That’s exactly what I wanted!” That’s the kind of
feeling that the designers at Electrolux seek to evoke in everyone who
chooses or uses one of our products. We devote time, knowledge, and a
great deal of thought to anticipating and creating the kind of appliances that
our customers really need and want.
This kind of thoughtful care means innovating with insight. Not design for
design’s sake, but design for the user’s sake. For us, thoughtful design means
making appliances easier to use and tasks more enjoyable to perform, freeing
our customers to experience that ultimate 21st century luxury, ease of mind.
Our aim is to make this ease of mind more available to more people in more
parts of their everyday lives, all over the world. So when we say we’re thinking
of you, you know we mean just that.
The “Thinking of you” promise from Electrolux goes beyond meeting the needs
of today’s consumers. It also means we’re committed to making appliances
safe for the environment—now and for future generations.

Share more of our thinking at www.electrolux.com.au or www.electrolux.co.nz
1 / 1

Electrolux EQBM120HAS User manual

Category
Barbecues & grills
Type
User manual
This manual is also suitable for

Ask a question and I''ll find the answer in the document

Finding information in a document is now easier with AI

Ask the document