Page is loading ...

Insta Lights
™
Quickstart Guide
English ( 3 – 9 )
Guía de inicio rápido Español ( 10 – 15 )
Guide d'utilisation rapide Français ( 16 – 22 )

3
Quickstart Guide (English)
Introduction
Make sure all items listed in the Box Contents are included in the box.
Box Contents
Insta Lights
Flat Surface Stand
Remote Control
Quickstart Guide
Safety & Warranty Manual
Support
For the latest information about this product (system requirements, compatibility information,
etc.) and product registration, visit ionaudio.com.
For safety/warranty information, visit ionaudio.com/warranty.

4
Safety Instructions
• Not recommended for set-up or installation by children. As with all electrical products,
exercise caution during handling and use to reduce the risk of electric shock. If the
power cord is damaged, it must be replaced by the manufacturer, its service agent or
similarly qualified persons in order to avoid a hazard.
• Do not secure the wiring of the product with staples or nails, and do not place the wiring
on sharp hooks or nails.
• Do not place or immerse in water or other liquids. Not for use in heavy rain.
• The light is very bright. Do not look directly into the dome light.
• Do not sit, stand, or apply pressure on the dome light.
• Place the power cord away from driveways or walkways to prevent tripping and damage
to the power cord.
• It is safe to operate the unit in snow and rain.
• If using this product in wet environments, we strongly recommend using Ground Fault
Circuit Interrupter (GFCI) protection on the circuit(s) or outlet(s).
• Remove Insta Lights from the lawn before mowing or weedwhacking.
• Never operate this product if it has a damaged cord or plug, if it is not working properly,
if it has been dropped or damaged, or if it has been dropped into water. Contact ION
Audio to return the product to a service center for examination and repair.
• Do not close doors or windows on the power cord as this may damage the wire
insulation.
• Do not shake.
• Keep the light and power cord away from heaters or other heat sources.
Correct Disposal of This Product: This marking indicates that this product
should not be disposed with other household wastes throughout the EU. To
prevent possible harm to the environment or human health from uncontrolled
waste disposal, recycle it responsibly to promote the sustainable reuse of
material resources. To return your used device, please use the return and
collection systems or contact the retailer where the product was purchased. They
can take this product for environmentally safe recycling.

5
Quick Setup
1. For optimal coverage, place the light at 15 feet (4.5 m) from the distance you are trying to
illuminate. This will provide coverage for an area 60’ (20 m) wide by 50' (15 m) high.
2. Grasp the stake to insert Insta Lights into the ground. Alternatively, if using Insta Lights
on a flat surface, unscrew the thumbscrew to remove the stake, and attach the stand in
its place.
Caution: Be careful when inserting the stake into frozen or rocky ground. For best
results, do not use too much force when placing the stake into the ground.
3. Connect the power cord into a standard wall socket or extension cord rated for outdoor
use. Unplug when not in use.
4. Turn the thumbscrew to loosen, angle the fixture either up or down, and tighten the
thumbscrew at the desired projection angle/area. If the lights are spilling onto a
neighboring house or structure, try placing the light closer to the object you want to
illuminate.
5. Press and release the Power button on the top of Insta Lights to power on. Press and
hold the Power button for 2 seconds to power off.
Note: In the event the remote control is lost, the Power button allows for cycling through the
light modes FX 1 – 4 by quickly pressing and releasing the Power button. However, individual
color selection must be performed with the remote.
Note: The darker the area the light is being used in, the brighter the projection. Try to stay
away from areas with street lights and other bright lights.

6
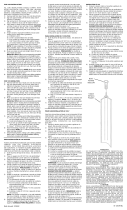
Features
1. Remote Sensor: Aim the remote here to adjust the
options.
2. Thumbscrew: Loosen and tighten this at the angle you
want the light to be projected.
3. Stake: Place this into the ground to secure Insta Lights.
Caution: Be careful when inserting the stake into frozen
or rocky ground. For best results, do not use too much
force when placing the stake into the ground.
4. Flat Surface Stand: Attach this by unscrewing the
thumbscrew, remove the stake, and replace the stake
with the stand.
5. Dome: This projects the different colored lights.
6. Power Button: Press and release to power on. Press
and hold for 2 seconds to power off. In the event the
remote control is lost, the Power button allows for
cycling through the light modes 1 – 4 by quickly pressing
and releasing the Power button. However, individual
color selection must be performed with the remote.

7
Remote Instructions
Use the remote to select individual colors, and power the unit on/off. Point the remote at the
front receptacle on the dome light and press the button of the option you would like to select.
See the diagram for button descriptions.
Note: Before using the remote control for the first time, pull out the tab attached to the battery
compartment. To change the remote battery, follow the diagram located on the back of the
remote. Use a 3V DC CR2025 lithium button cell battery for replacement.
• ALL ON/OFF = Switches the colors on or off.
• R On/Off = Switches the Red color on or off.
• G On/Off = Switches the Green color on or off.
• B On/Off = Switches the Blue color on or off.
• R Only = Switches only the Red color on.
• G Only = Switches only the Green color on.
• B Only = Switches only the Blue color on.
• FX 1 – 4 = See the Light Modes section for Mode details.
• TIMER = Selects how long the lights will stay on (2, 4, 6, 8
hours or always on). When selecting a time, you will see
confirmation in blinking lights that correspond with the
hours selected. For example, press '4 HR' and you will see
4 blinks for confirmation.
• POWER ON/OFF = Puts the unit to sleep (all lights are off).
• ALWAYS ON = No timer is set, and the LEDs will remain
ON until the unit is powered OFF or unplugged.

8
Light Modes
Select from one of the 4 FX modes using the remote control. At any time, individual color
buttons can be used to interrupt the mode, and the selected color will not change or move. To
begin the mode again, press the corresponding FX button.
FX 1: In this mode, all 3 colors are on, and the lights do not move.
FX 2: In this mode, the colors will fade slowly from one color to the next in the order of blue,
green, and red.
FX 3: In this mode, a sequence will continuously cycle through different pairs of colors.
FX 4: In this mode, a sequence will continuously cycle through one color at a time.
Tip: To select a combination of colors, press the R On/Off, G On/Off, or B On/Off buttons to
select what you'd like to see.
Tip: To quickly select only one color, press the R Only, G Only, or B Only button.
For example, if you only want to select the Red color, press R Only.

9
Technical Specifications
Specifications are subject to change without notice.
Trademarks and Licenses
ION Audio is a trademark of ION Audio, LLC, registered in the U.S. and other countries.
All other product or company names are trademarks or registered trademarks of their respective owners.
Dimensions
(Depth x Width x Height)
6.2” x 3.7” x 10.8”
158 mm x 93 mm x 275 mm
Weight
1.7 lbs.
0.53 kg
Power
100-240V~50/60Hz 12W
Remote Batter
y
3V DC CR2025 lithium button cell battery
Remote Range
32 feet
10 m
Operating Temperature
Range
-4°F – 113°F (-20°C – 45°C)
Water Resistance Class IPX 4
LEDs (6) 3-watt LEDs (2 red, 2 green, 2 blue)
LED Coverage Area
Up to 3000 sq. ft. from 15 ft. distance
Up to 300 sq. m from 4.5 m distance

ionaudio.com
Manual Version 1.1
/