Page is loading ...

D
.....1
I
.....5
N
.....9
GR
.....13
TR
.....17
BG
.....21
RO
.....25
GB
.....2
NL
.....6
FIN
.....10
CZ
.....14
SK
.....18
EST
.....22
CN
.....26
F
.....3
S
.....7
PL
.....11
H
.....15
SLO
.....19
LV
.....23
RUS
.....27
E
.....4
DK
.....8
UAE
.....12
P
.....16
HR
.....20
LT
.....24
Design & Quality Engineering GROHE Germany
Euphoria System
Euphoria System
96.810.331/ÄM 229442/10.13
D
.......1
I
.......5
N
.......9
GR
.....13
TR
.....17
BG
.....21
RO
.....25
GB
.......2
NL
.......6
FIN
.....10
CZ
.....14
SK
.....18
EST
.....22
CN
.....26
F
.......3
S
.......7
PL
.....11
H
.....15
SLO
.....19
LV
.....23
USA
.....27
E
.......4
DK
.......8
UAE
.....12
P
.....16
HR
.....20
LT
.....24
RUS
.....28
26 075
26 128
27 296
27 420
27 615
27 964
Design + Engineering GROHE Germany

I
A
Please pass these instructions on to the end user of the fitting!
S.v.p remettre cette instruction à l'utilisateur de la robinetterie!
Bitte diese Anleitung an den Benutzer der Armatur weitergeben!

2
GB
Application
Thermostatic mixers are designed for hot water supplies from
pressurised storage heaters and offer the highest temperature
accuracy when used in this way. With sufficient power output
(from 18 kW or 250 kcal/min), electric or gas instantaneous
heaters are also suitable.
Thermostats cannot be used in connection with unpressurised
storage heaters (displacement water heaters).
All thermostats are adjusted in the factory at a flow pressure
of 3 bar on both sides.
Should temperature deviations occur on account of special
installation conditions, the thermostat must be adapted to local
conditions (see Adjusting, Calibration.
Technical Data
• Minimum flow pressure: 0.5 bar
• Max. operating pressure: 10 bar
• Recommended flow pressure: 1 - 5 bar
• Test pressure: 16 bar
• Flow rate at 3 bar flow pressure:
- 27 615 / 26 128 approx. 8 l/min
- head shower
26 075 / 27 296 / 27 420 / 27 964 approx. 14 l/min
- hand shower
26 075 / 27 296 / 27 420 / 27 964 approx. 12 l/min
• Max. water temperature at hot water supply: 80 °C
• Recommended max. flow temperature
(energy economy): 60 °C
• Safety stop: 38 °C
• Hot water temperature at supply connection min. 2 °C higher
than mixed water temperature
• Cold water connection: right
• Hot water connection: left
• Minimum flow rate: = 5 l/min
If static pressure exceeds 5 bar, a pressure reducing valve
must be fitted.
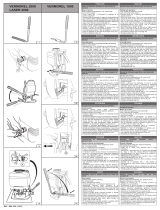
Installation
Flush piping system prior and after installation of fitting
thoroughly (Consider EN 806)!
Required dimensions, see dimensional drawings on fold-out
page I and Fig. [1] on fold-out page II.
Install S-unions and screw-mount the mixer, see fold-out
page II, Fig. [2].
Open cold and hot-water supply and check connections
for water-tightness.
Reversed connection (hot on right - cold on left). Replace
thermostatic compact cartridge (A), see Replacement Parts,
fold-out page I, Prod. no. 47 175 (1/2”).
Adjusting
For temperature adjustment (calibration), see fold-out
page II, Figs. [3] and [4].
1. Open the shut-off handle (B) by turning towards the hand
shower and measure the temperature of the running water
using a thermometer, see Fig. [3].
2. Remove the temperature control handle (C), see Fig. [4].
3. Turn regulating nut (D) until the water temperature
reaches 38 °C.
4. Fit temperature control handle (C) so that the 38 °C marking
coincides with the marking (C1), see Fig. [3].
Temperature limitation
The safety stop limits the temperature range to 38 °C. The 38 °C
limit can be overridden by pressing the button (E), see Fig. [3].
Shut-off handle (B) operation, see Fig. [3].
Hand shower = Turn the shut-off handle
Head shower = Press button (B1) and turn the
shut-off handle
Installation of the shower rail, see fold-out page II, Figs. [5]
to [9].
When installing e.g. on plasterboard walls (not solid walls) it
must be assured that an appropriate reinforcement is in place
to ensure sufficient strength.
1. Insert pipe (F) in the mixer body, see Fig. [5].
2. Align pipe (F) and mark position of bores.
3. Drill holes and insert plugs, see Fig. [6].
4. Pull O-ring (G1) onto backplate (G) and fasten with
screws (H) using seal (I), see Fig. [7].
5. Push escutcheon (J) onto bracket (K) and insert pipe (F) into
mixer body, see Fig. [8].
6. Push bracket (K) onto backplate (G), align, and fasten with
set screw (G1).
7. Push the escutcheon (J) against the wall.
8. Push the shower arm (L) onto the pipe connection from
above and secure with set screw (L1), see Fig. [9].
9. Attach hand shower (M) to hose (N) using the supplied
filter (M1) and connect to mixer.
Installation of the head shower, see fold-out page III, Fig. [10].
Prevention of frost damage
When the domestic water system is drained, thermostats must
be drained separately, since non-return valves are installed in
the hot and cold water connections. For this purpose, the
mixer must be removed from the wall.
Maintenance
Inspect and clean all parts, replace if necessary and lubricate
with special grease.
Shut off the hf the SpeedClean nozzles is guaranteed for a
period of five years.
Thanks to thot and cold water supply.
I. Non-return valve (Q) or (R), see fold-out page III, Fig. [11].
• Remove connection nipple (P) by turning clockwise (left-hand
thread) using a 12mm allen key.
Install in reverse order.
II. Thermostatic compact cartridge (A), see fold-out
page III, Fig. [12].
• Remove O-ring (S).
• Loosen screw ring (T) using a 34mm tool.
• If necessary, lever out thermostatic compact cartridge (A)
via recess (A1).
• Remove screw ring (T).
Install in reverse order.
Observe the correct installation position of the
thermostatic compact cartridge (A), see details, Fig. [12].
Readjustment is necessary after every maintenance
operation on the thermostatic compact cartridge
(see Adjusting).
III. Aquadimmer (U), see fold-out page III, Figs. [13] and [14].
Install in reverse order.
Observe correct installation position of individual
components, see details.
IV. Shower, see fold-out page III, Fig. [15].
26 075 and 27 964, see fold-out page III, Figs. [15] and [16].
Install in reverse order.
The function of the SpeedClean nozzles is guaranteed for a
period of five years. Thanks to the SpeedClean nozzles, which
must be regularly cleaned, limescale deposits on the rose can
be removed by simply rubbing with the fingers.
Replacement parts, see fold-out page I ( * = special
accessories).
Care
For directions on care, refer to the accompanying Care
Instructions.

27
USA
Application
Thermostatic mixers are designed for hot water supplies from
pressurised storage heaters and offer the highest temperature
accuracy when used in this way. With sufficient power output
(from 18 kW or 250 kcal/min), electric or gas instantaneous
heaters are also suitable.
Thermostats cannot be used in connection with unpressurised
storage heaters (displacement water heaters).
All thermostats are adjusted in the factory at a flow pressure
of 3 bar on both sides.
Should temperature deviations occur on account of special
installation conditions, the thermostat must be adapted to local
conditions (see Adjusting, Calibration.
Specifications
• Minimum flow pressure: 7.25 psi
• Max. operating pressure: 145 psi
• Recommended flow pressure: 14.5 psi - 72.5 psi
• Test pressure: 232 psi
• Flow rate at 43.5 psi flow pressure:
- 26 128 approx. 8 L/min or 2.1 gpm
• Max. water temperature at hot water supply: 176 °F
• Recommended max. flow temperature
(energy economy): 140 °F
• Safety stop: 100 °F
• Hot water temperature at supply connection 4 °F higher than
mixed water temperature.
• Cold water connection: right
• Hot water connection: left
• Minimum flow rate: 1.3 gpm
If static pressure exceeds 72.5 psi, a pressure-reducing valve
must be fitted.
Installation
Flush piping system prior and after installation of fitting
thoroughly (Consider EN 806)!
Required dimensions, see dimensional drawings on fold-out
page I and Fig. [1] on fold-out page II.
Install S-unions and screw-mount the mixer, see fold-out
page II, Fig. [2].
Open cold and hot-water supply and check connections
for water-tightness.
Reversed connection (hot on right - cold on left). Replace
thermostatic compact cartridge (A), see Replacement Parts,
fold-out page I, Prod. no. 47 175 (1/2”).
Adjusting
For temperature adjustment (calibration), see fold-out
page II, Figs. [3] and [4].
1. Open the shut-off handle (B) by turning towards the hand
shower and measure the temperature of the running water
using a thermometer, see Fig. [3].
2. Remove the temperature control handle (C), see Fig. [4].
3. Turn regulating nut (D) until the water temperature
reaches 100 °F.
4. Fit temperature control handle (C) so that the 38 °C marking
coincides with the marking (C1), see Fig. [3].
Temperature limitation
The safety stop limits the temperature range to 100 °F.
The 100 °F limit can be overridden by pressing the button (E),
see Fig. [3].
Shut-off handle (B) operation, see Fig. [3].
Hand shower = Turn the shut-off handle
Head shower = Press button (B1) and turn the
shut-off handle
Installation of the shower rail, see fold-out page II, Figs. [5]
to [9].
When installing e.g. on plasterboard walls (not solid walls) it
must be assured that an appropriate reinforcement is in place
to ensure sufficient strength.
1. Insert pipe (F) in the mixer body, see Fig. [5].
2. Align pipe (F) and mark position of bores.
3. Drill holes and insert plugs, see Fig. [6].
4. Pull O-ring (G1) onto backplate (G) and fasten with
screws (H) using seal (I), see Fig. [7].
5. Push escutcheon (J) onto bracket (K) and insert pipe (F) into
mixer body, see Fig. [8].
6. Push bracket (K) onto backplate (G), align, and fasten with
set screw (G1).
7. Push the escutcheon (J) against the wall.
8. Push the shower arm (L) onto the pipe connection from
above and secure with set screw (L1), see Fig. [9].
9. Attach hand shower (M) to hose (N) using the supplied
filter (M1) and connect to mixer.
Installation of the head shower, see fold-out page III, Fig. [10].
Prevention of frost damage
When the domestic water system is drained, thermostats must
be drained separately, since non-return valves are installed in
the hot and cold water connections. For this purpose, the
mixer must be removed from the wall.
Maintenance
Inspect and clean all parts, replace if necessary and lubricate
with special grease.
Shut off the hf the SpeedClean nozzles is guaranteed for a
period of five years.
Thanks to thot and cold water supply.
I. Non-return valve (Q) or (R), see fold-out page III, Fig. [11].
• Remove connection nipple (P) by turning clockwise (left-hand
thread) using a 12mm allen key.
Install in reverse order.
II. Thermostatic compact cartridge (A), see fold-out
page III, Fig. [12].
• Remove O-ring (S).
• Loosen screw ring (T) using a 34mm tool.
• If necessary, lever out thermostatic compact cartridge (A)
via recess (A1).
• Remove screw ring (T).
Install in reverse order.
Observe the correct installation position of the
thermostatic compact cartridge (A), see details, Fig. [12].
Readjustment is necessary after every maintenance
operation on the thermostatic compact cartridge
(see Adjusting).
III. Aquadimmer (U), see fold-out page III, Figs. [13] and [14].
Install in reverse order.
Observe correct installation position of individual
components, see details.
IV. Shower, see fold-out page III, Fig. [15].
26 075 and 27 964, see fold-out page III, Figs. [15] and [16].
Install in reverse order.
The function of the SpeedClean nozzles is guaranteed for a
period of five years. Thanks to the SpeedClean nozzles, which
must be regularly cleaned, limescale deposits on the rose can
be removed by simply rubbing with the fingers.
Replacement parts, see fold-out page I ( * = special
accessories).
Care
For directions on care, refer to the accompanying Care
Instructions.

www.grohe.com
2013 / 03 / 26
D
✆
+49 571 3989 333
A
✆
+43 1 68060
AUS
Argent Sydney
✆
+(02) 8394 5800
Argent Melbourne
✆
+(03) 9682 1231
B
✆
+32 16 230660
BG
✆
+359 2 9719959
grohe-bulgaria@grohe.com
CAU
✆
+99 412 497 09 74
CDN
✆
+1 888 6447643
CH
✆
+41 448777300
CN
✆
+86 21 63758878
CY
✆
+357 22 465200
CZ
✆
+420 22509 1082
grohe-cz@grohe.com
DK
✆
+45 44 656800
E
✆
+34 93 3368850
EST
✆
+372 6616354
F
✆
+33 1 49972900
FIN
✆
+358 10 8201100
teknocalor@teknocalor.fi
GB
✆
+44 871 200 3414
GR
✆
+30 210 2712908
[email protected]rthnet.gr
H
✆
+36 1 2388045
HK
✆
+852 2969 7067
I
✆
+39 2 959401
IND
✆
+91 124 4933000
IS
✆
+354 515 4000
J
✆
+81 3 32989730
KZ
✆
+7 727 311 07 39
LT
✆
+372 6616354
LV
✆
+372 6616354
MAL
✆
+1 800 80 6570
N
✆
+47 22 072070
NL
✆
+31 79 3680133
NZ
✆
+09/373 4324
P
✆
+351 234 529620
PL
✆
+48 22 5432640
RI
✆
+62 21 2358 4751
info-singapore@grohe.com
RO
✆
+40 21 2125050
ROK
✆
+82 2 559 0790
info-singapore@grohe.com
RP
✆
+63 2 8041617
RUS
✆
+7 495 9819510
info@grohe.ru
S
✆
+46 771 141314
SGP
✆
+65 6 7385585
info-singapore@grohe.com
SK
✆
+420 22509 1082
T
✆
+66 2610 3685
info-singapore@grohe.com
TR
✆
+90 216 441 23 70
UA
✆
+38 44 5375273
USA
✆
+1 800 4447643
us-customerservice@grohe.com
VN
✆
+84 8 5413 6840
info-singapore@grohe.com
BiH
AL
HR KS
ME
MK
SLO
SRB
✆
+385 1 2911470
Eastern Mediterranean,
Middle East - Africa
Area Sales Office:
✆
+357 22 465200
IR
OM
UAE YEM
✆
+971 4 3318070
Far East Area Sales Office:
✆
+65 6311 3600
/