Page is loading ...

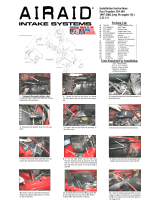
Packing List:
#1 721-472 Airaid Premium Filter 1
#2 KIT912T Airaid Intake Tube 1
#3 KIT247CABC Cool Air Box 1
#4 KIT11
21MAFADA Air Filter Adapter 1
#5 KITHUMPHS02 Urethane Hump Hose 1
#6 KITCOUPLER02 Coupler W/ #68 Clamp 1
#7 KITWSTRIP03 Weather Strip 25” 1
KIT247HPS Hardware & Instructions 1
#8 KIT15DHC3050 ¼-20 x ½” Button Head Bolt 3
#9 KIT25C75HCSS 1/4-20x 3/4” Hex Bolt 1
#10 KIT25CNNES 1/4” Nylock Nut 1
#11 KIT09FWZ019 ¼” Flat Washer 8
#12 KIT60C250HCS M6-1x25 Hex Bolt 3
#13 KITHS60 #60 Hose Clamp 2
#14 KIT247B Bracket 1
Tools Required For Installation:
Flat Blade Screwdriver, 5/32” Allen Wrench
5/16”, 7/16”, 10mm,13mm Sockets
Ratchet & Extension
7/16” Wrench
Installation Instructions
Part Number 201-247
1999-06 GM Full Size SUVs and Trucks
2007 GMC Sierra “Classic” Truck
4.8L, 5.3L, 6.0L
With Mechanical Cooling
Fan and Low Profile Hood
1. Disconnect the negative battery cable.
Loosen the bolt that secures the beauty cover to the en-
gine and remove it and the cover from the vehicle.
Loosen the hose clamp that secures the factory air intake
tube to the throttlebody.
2. Loosen two hose clamps. One on each side of the
Mass Air Flow (MAF) sensor.
Using a flat blade screwdriver, disconnect the factory
intake tube from the plastic clamp on the radiator hose
by prying them apart.
3. Remove the factory intake tube from the vehicle.
Next, remove the MAF sensor and coupler from the
factory airbox and set them out of the way without dis-
connecting the wiring harness.
4. Rock the factory air box back and forth and then lift
straight up remove it from the vehicle. There are only
grommets holding it in, no bolts.
5. Using a 10mm socket, remove the bolts that secure
the factory air filter housing platform and remove it
from the vehicle.
6. Install the filter adapter (#4) into the Cool Air Box
(#3) as shown using three 1/4” Button head bolts (#8)
and three 1/4” flat washers (#11). Next, fasten the
bracket to the front of the CAB as shown using one 1/4-
20 hex bolt (#9) two flat washers (#10), and one 1/4”
Nylock nut. Refer to the drawing above for reference.
7. Remove the factory bolt that secures the right front
fender to the radiator support. It will be reused in step
#8.
8. Install the CAB assembly into the vehicle where the
factory airbox used to be using three 6mm hex bolts
(#12) and three flat washers (#11) thru the bottom. Now
reinstall the factory fender bolt thru the bracket and into
the fender. Adjust the assembly for fit and tighten all
bolts and nuts at this time.
9. Reinstall the MAF sensor and coupler onto the filter
adapter and tighten the clamp.
Next install the hump hose (#5) onto the MAF using
two #60 hose clamps (#13). Leave these two clamps
loose for now.
MAF Sensor

13. Double check your work!
Make sure there is no foreign material in the intake path. Make sure all clamps, hoses, bolts, and screws are tight. Double check the hood clearance.
Reconnect the negative battery cable!
Airaid Filter Co. 2688 E Rose Garden Ln. Phoenix AZ 85050 (800) 498-6951 [email protected]om www.airaid.com
Synthamax Air Filters do not require oil. Service air
filter as needed b y cleaning w ith common non-
petroleum all-purpose househo ld cleaner and w ater.
Simple Green®, Formula 409® or equivalent w orks
great. Apply cleaner to outside of air filter and allow
to soak. Then flush filter clean fr om the inside out
with a garden hose and r epeat steps if necessary. Do
not apply high pr essure water or air to clean filter .
Allow filter to air dry and reinstall.
Rev.07/15/13
Thank you for purchasing the Airaid Intake System. Contact Airaid @ (800) 498-6951 8:00 AM - 5:00 PM MST weekdays for question s
regarding fit or instructions th at are not clear to you. Your Airaid Intake System was carefully inspected and packaged. Chec k that no parts are
missing, or were damaged during shipping. If any parts are missing, contact Airaid. The air filter element is protected from direct exposure to wa-
ter and debris; care should be taken not to drive through deep water. WATER INGESTION IS THE DRIVERS RESPONSIBILITY!
10. Install the provided coupler with clamp (#6) onto
the large end of the Airaid Intake tube (#2). Do not
tighten the clamp at this time.
11. Install the small end of the intake tube into the
hump hose first and then rotate it slightly to slide the
other end onto the throttlebody. Adjust for fit, and then
tighten all three hose clamps.
12. Install the provided weather strip (#7) along the top
edge of the Airaid Cool Air Dam starting at the right
fender working your way around towards the radiator.
Install the Airaid Premium Filter (#1) onto the air filter
adapter and tighten the hose clamp. Reinstall the factory
beauty cover removed in step #1.
Note
: Provisions have been made to mount the factory filter minder if you choose. A 17mm hole must be drilled on the back side of the tube. A circular impression on the
rear of the tube indicates the correct location for the hole. Use the factory grommet to mount the filter minder.
Before!
After!
/