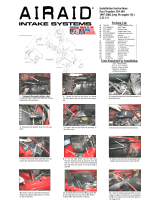
Installation Instructions
For Part Numbers:
450-328 700-495 Airaid Oiled Media Filter
451-328 701-495 SynthaMax Dry Media Filter - Red
452-328 702-495 SynthaMax Dry Media Filter - Black
453-328 703-495 SynthaMax Dry Media Filter - Blue
2015 Ford Mustang
5.0L GT V8
2. Remove the strut tower brace is so equipped. Lift up
on the engine cover to unseat it from it’s mounting
grommets and set it aside.
3. Disconnect the 3 breather lines and resonator tube from
the intake tube. Loosen the hose clamps and remove the
factory intake tube.
4. Gently pry the harness anchor out of the airbox and
disconnect the mass air flow meter.
5. Remove the 6mm airbox mounting bolt in the inner
fender and lift the entire airbox assembly out of the
vehicle. Set the bolt aside for now. It is to be reused.
6. Be sure the speed clip and the airbox grommet remain
inside the vehicle. They will be reused.
9. Slide the Hump Hose and Clamps onto the Filter
Adapter as shown. Do not tighten the clamps at this time.
7. Install the Filter Adapter onto the Cold Air Box as
shown, using the three 1/4-20 Button Head Screws and
1/4” Flat Washers
8. Place the Airaid Airbox assembly into the engine
compartment as shown, with the locator pin on the bot-
tom of the box inside the fender grommet. Secure the
Airbox by reusing the 6mm bolt removed in step # 5.
Component Identification
1 Airaid Premium Filter 1
2 Cold Air Box 1
3 Airaid Intake Tube 1
4 Reducing Coupler 1
5 Hump Hose 1
6 Filter Adapter 1
7 Air Box Lid 1
8 Air Box Window 1
9 1" Hose 1
Hardware and Instructions 1
10 ¼" Flat Washer 9
11 ¼"-20 x ½" Button Head Screw 9
12 Button Head Screw 2
13 Aluminum Fitting 2
14 5/8 Aluminum Fitting 1
15 1/2" Grommet 2
16 3/16" Grommet 1
17 Resonator Cap, (Not Shown) 1
18 #56 Hose Clamp 1
19 #64 Hose Clamp 1
20 #68 Hose Clamp 2
21 Speed Clamp 2
22 Firewall Plug, (Not Shown) 1
1. Remove the battery box cover in the cowl and discon-
nect the negative battery terminal.
Full color instructions can be viewed on our web site at Airaid.com. Use the Product Search function to find your part number, and click View Details.
Bolt
Pin
FILTER IDENTIFICATION
700-495 Airaid Oiled Media 701-495 Airaid SynthaMax Dry Media - Red
702-495 Airaid SynthaMax Dry Media - Black 703-495 Airaid SynthaMax Dry Media - Blue
1
2
3
Resonator
Anchor
MAF

Airaid Filter Co. 2688 E Rose Garden Ln. Phoenix AZ 85050 (800) 498-6951 [email protected]m www.airaid.com
Thank you for purchasing the Airaid Intake System. Contact Airaid @ (800) 498-6951 8:00 AM - 5:00 PM MST weekdays for questions
regarding fit or instructions that are not clear to you. Your Airaid Intake System was carefully inspected and packaged. Check that no parts are
missing, or were damaged during shipping. If any parts are missing, contact Airaid. The air filter element is protected from direct exposure to wa-
ter and debris; care should be taken not to drive through deep water. WATER INGESTION IS THE DRIVERS RESPONSIBILITY! The air filter
is reusable and should be cleaned periodically.
13. Insert the remaining Grommet and Fitting into the
Intake tube as shown.
11. Using a standard screwdriver, carefully pry open the
clamp on the resonator diaphragm and remove the for-
ward half of the resonator.
12. Insert the Grommets and Aluminum Fittings into
the Airaid Intake tube as shown.
14. Insert the Mass Airflow sensor into the Airaid intake
tube as shown and secure it suing the #8 Button Head
Screws. Do Not Use the OEM hardware.
15. Insert the Intake Tube into the Hump Hose and
Reducer then tighten all 4 Intake Clamps.
Synthamax Air Filters do not require
oil. Service air filter as needed by
cleaning with common non-petroleum
all-purpose household cleaner and wa-
ter. Simple Green®, Formula 409® or
equivalent works great. Apply cleaner
to outside of air filter and allow to soak.
Then flush filter clean from the inside
out with a garden hose and repeat steps
if necessary. Do not apply high pres-
sure water or air to clean filter. Allow
filter to air dry and reinstall.
For your Oiled
media filter we
suggest using the
AIRAID Filter
Tune-Up Kit!
16. Reconnect the breather hoses to the Fittings in the
Airaid Intake Tube.
17. Connect the resonator to the Intake Tube as shown
using the supplied 1” Hose and the Speed clamps on both
ends.
18. Install the Airaid Premium Filter onto the Filter
Adapter inside of the Airbox.
19. Remove the protective film from the Lid and Win-
dow before installation. Install the Airbox lid and Win-
dow onto the Airbox, with the Window on top, using 6
sets of 1/4” Button Heads. and Washers.
20. Reconnect air flow meter and plug the wire harness
anchor into the Airbox wall.
10. Slide the Reducer and Clamps onto the throttle body
as shown.
Diaphragm
Fitting
Grommet
21. Double check your work. Make sure all clamps,
hoses, bolts, and screws are tight. Double check the hood
clearance. Reconnect the negative battery cable and rein-
stall the cover.
REV. 04.14.15
#64
#56
Forward Half
Grommets
Fittings
Airaid Screws
Resonator Delete Option: The resonator can be safely deleted if
so desired by capping off the Intake Tube with the supplied Cap
and Speed clamp. After removing the resonator assembly from the
firewall, insert the included Firewall plug to prevent debris from
entering the cabin.
/