Page is loading ...

EcoCut is a trademark of Avery Dennison Corporation. Classification: Avery Dennison - Public
TCADTP2ECOI Rev. AE 8/20 ©2018 Avery Dennison Corporation. All Rights Reserved.
MONARCH
®
ADTP2 ECOCUT™ INSTRUCTIONS
Use these instructions for the Avery Dennison® Monarch® EcoCut™ Tabletop Printer 2. EcoCut
is designed to cut through the label material, but not the liner.
EcoCut supplies are continuous, they do not have black marks or die cuts;
set the printer’s Supply Type to continuous. Set the printer’s Feed
Mode to continuous (non-peel), on-demand (peel) mode, or liner take-
up (peel with liner take-up) mode.
♦ The peel chute is already installed to operate in peel mode. The
printer separates the label from the liner and the liner feeds out the
front of the printer.
♦ Remove the peel chute to operate in peel mode with liner take-up.
The printer separates the label from the liner and the liner is
collected on a take-up reel near the supply roll.
♦ Install the tear edge to operate in continuous (non-peel) mode.
♦ The feed length for each print job may vary, depending on the
length set in the format or at the printer’s menu. See “
Setting
Supply Options” for more information.
Information in this document supersedes information in previous versions. Check our Web site
(www.printers.averydennison.com
) for any updates.
CAUTION: Do not place your fingers or any other objects into the cutter.
EcoCut Tips
♦ When removing printed labels, always lift up, using the cutter cover as a guide. Do not pull
the label to remove; doing so may cause the label to tear or the printer to lose registration.
♦ With 6.0 inch (or longer) labels in on-demand mode, static build-up may cause the label to
stick to the printer’s peel door. Keep a finger below the printed label and lift up to remove,
using the cutter cover as a guide.
♦ Follow the cleaning instructions provided in this document for optimal performance.
♦ The EcoCut printer is only warranted with use of Avery Dennison-approved supplies.
♦ Standard die cut supplies (non-EcoCut) may be used with this printer, but you may need to
remove the cutter cartridge. See “Removing the Cutter Cartridge
” for more information.
Peel Door
The dotted lines
indicate where the
label is cut. The
liner is not cut.
F
E
E
D

2 Classification: Avery Dennison - Public
Overview
1
Cutter Cover
2
Motor Cover
1
Cutter Cartridge Release
2
Cutter ‘Home’ Position Screw
3
Cutter Cartridge (dark gray)
4
Cut Depth Dial (red)

Classification: Avery Dennison - Public 3
Setting Supply Options
Set the printer for the expected operation before
loading supply/ribbon and sending print jobs.
Option Choices Recommendation
Supply Type Continuous/ C Aperture/C Die Cut/C Tag Edge
Continuous
Ribbon
No/Yes/High Energy
See below.
Feed Mode
Continuous/On-Demand/Liner Takeup
On-Demand
Cut Mode
Disabled/Cut Each Tag
Cut Each Tag
Non Indexed Length
Use Fmt Length/Use Image Len. Use Fmt Length
Batch Feed
Manual/Auto Auto
Setting the Supply Type
Set the supply type to match the loaded supply. Continuous is the default setting for EcoCut
supply. Using any other setting causes improper operation and/or supply faults.
Setting the Ribbon
For thermal direct supplies, no ribbon is required. For thermal transfer supplies, load a ribbon.
See “Loading a Ribbon
” for more information.
Setting the Feed Mode
Feed mode sets the operation for printed supply as continuous, on-demand, or liner take-up.
On-Demand (peel mode) is the default setting, see “
Loading Supply for On-Demand (Peel)
Mode.” To use Continuous (non-peel) mode, see “Loading Supply for Continuous (Non-Peel)
Mode.” To use Liner Take-up mode, remove the peel chute, see “Loading Supply for Liner Take-
up (Peel with Liner Take-Up) Mode.”
Setting the Cut Mode
Set how the printer cuts supply. This printer has a rotary (pizza cutter) blade. For information
about cutter maintenance, see “Cleaning Adhesive from the Supply Path
.” The printer does not
have a cut button – select the appropriate cut mode for your application.
Select To
Disabled Do not cut.
Cut each tag Cut after each tag in the batch. This is the default setting.
Setting the Non-Indexed Length
The supply is cut based on the feed length in the format header’s
length parameter or on the last printed image length.
Select To
Use Fmt Len.
(Use format
length)
Uses the length specified in the format header
to determine where to cut the supply. Refer to “Defining the Format
Header” in the Packet Reference Manual for more information.
Use Image Len.
(Use image
length)
Uses the last printed actual image length to determine where to cut the
supply. For example, if the last printed image was 375 dots long, the cut
is made at 395 dots. This option removes any blank lines before and after
the image.

4 Classification: Avery Dennison - Public
Setting the Batch Feed Mode
Batch feed mode sets the operation of printed batches as automatic or manual. Only set batch
feed mode for EcoCut printers using Continuous feed mode and cutting each tag.
Select To
Auto Batch feed mode feeds and cuts a blank label after batches finish printing
for easy removal. This is the default setting. If multiple batches are sent
at once, a blank label feeds only after the last batch prints. If batches are
sent one at time, a blank label feeds after each batch.
Manual
The user must press Feed to manually advance the printed and cut batch
for easy removal. Recommended for 1.2-inch long cut lengths.
Loading Supply for On-Demand (Peel) Mode
Set the printer for the expected operation before loading supply/ribbon and sending print jobs.
See “Setting Supply Options
” for more information. Standard die cut supplies (non-EcoCut) may
be used with this printer, but you may need to remove the cutter cartridge. See “Removing the
Cutter Cartridge” for more information.
1. Open the cover.
2. Turn the printhead latch to unlock the printhead.
3. Lift the printhead assembly until it locks into place.
4. Adjust the roll guides to fit your supply roll. The supply roll must move freely.
5. Place rolled supply on the supply holder. Continuous supply unrolls from the top.
6. Turn the supply lever to unlock the supply guides.
7. Feed the supply through the supply path and cutter. Tuck the supply under the nibs and die
cut sensor.
8. Adjust the supply guides so they barely touch the supply. Turn the supply lever up to lock it
in place.
Printhead Latch
Printhead Assembly
Roll Guides
Supply Lever
Supply Guides

Classification: Avery Dennison - Public 5
9. Using your fingers/thumbs, press the peel door tabs to open the printer’s peel door.
10. Feed the supply through the opening at the bottom of the peel door.
11. Close the peel door.
12. Push the printhead release.
13. Close the printhead assembly until you
hear it click into place.
14. Press FEED to position the supply under
the printhead.
When removing printed labels, always lift up,
using the cutter cover as a guide. Do not
pull the label to remove; doing so may cause
the label to tear or the printer to lose
registration.
Printhead Release
Liner

6 Classification: Avery Dennison - Public
Loading Supply for Continuous (Non-Peel) Mode
Install the tear edge to use non-peel mode. Set the printer’s feed mode to Continuous and the
cut mode to Cut each tag. Batch separators are not supported.
How does the printer operate in non-peel mode?
♦ The printer cuts the supply in between each label and after the last label in the batch.
♦ When no more print jobs are in queue, the printer feeds the supply out for removal. Tear the
supply (label and liner) down and across the tear edge.
Installing the Tear Edge
The tear edge is included with the printer’s manual.
1. Follow steps 1 through 8 from “Loading Supply for
On-Demand Mode (Peel Mode).”
2. Make sure the supply extends past the peel door.
3. Partially open the peel door by using
your fingers/thumbs to press the peel
door tabs.
4. With teeth facing up, hook the back of
the tear edge into the peel door.
5. Rotate the tear edge down and snap
the support clips into place.
Tear Edge

Classification: Avery Dennison - Public 7
6. Close the peel door.
7. Push the printhead release.
8. Close the printhead assembly until you hear it click into place.
9. Press FEED to position the supply under the printhead.
10. Remove the strip of printed labels by tearing down and across the tear edge.

8 Classification: Avery Dennison - Public
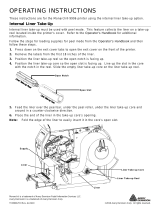
Removing the Peel Chute for Liner Take-Up
To use Internal Liner Take Up, remove the Peel Chute. The peel chute is installed for use
with peel mode. It guides the
liner out the bottom of the exit
door. For internal liner take up,
the liner needs to pass under
the peel roller. The peel chute
blocks this opening.
1. Using your fingers/thumbs,
press the peel door tabs to
open the printer’s peel
door.
2. Press in on the peel door
hinges to remove it. DO
NOT detach the cable.
3. Use your fingernail or flat
head screwdriver to push in
on the right side of the peel
chute. Slide that end out
and remove the chute.
4. Reattach the peel door.
Remove the Peel Chute
Pinch Roller

Classification: Avery Dennison - Public 9
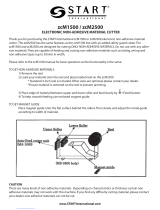
Loading Supply for Liner Take-up (Peel with Liner Take-Up) Mode
Remove the peel chute (if installed). See “Removing the Peel Chute for Liner Take-Up” for
more information.
Set the printer for the expected operation before loading supply/ribbon and sending print jobs.
See “Setting Supply Options
” for more information.
Load supplies for peel mode, leaving
at least 18 inches of supply
extending past the printhead.
1. Unlock and lift the printhead
assembly until it locks into place.
2. Feed the supply under the peel
roller.
3. Remove the bail.
4. Wrap the supply around the take-
up reel in a counter-clockwise
direction.
5. Hold the supply while placing one
end of the bail in a groove in the
liner take-up reel. Gently rotate
the bail counter-clockwise until
the other end snaps into the
corresponding groove.

10 Classification: Avery Dennison - Public
6. Gently slide the bail all the way onto the reel.
7. Turn the reel counter-clockwise to remove
any slack in the liner.
8. Close the printhead assembly until you hear it
click in to place.
9. Close the peel door.
10. Press FEED to position the supply under the
printhead.
When removing printed labels, always lift up,
using the cutter cover as a guide.
Removing a Full Liner Take-Up Roll
The printer alerts you when the liner take-up reel
is full. The liner take-up reel holds approximately
half of a roll of liner.
Note: The liner can be removed before the take-up reel is full.
1. Open the cover.
2. Turn the printhead latch to unlock the printhead. Lift the printhead assembly until it locks
into place.
3. Open the peel door.
4. Gently pull the liner take-up bail off the liner take-up reel.
5. Use scissors to cut the liner in front of the take-up reel.
6. Remove the liner from the take-up reel.
7. Reload supply and continue printing.

Classification: Avery Dennison - Public 11
Loading a Ribbon
Note the ribbon loading as shown.
Rotate the take-up reel until any wrinkles are past the printhead. The ribbon must be straight
and centered throughout the path.
Moving the Cutter to the Home Position
Check to see if the cutter is at the “home” position (near the printhead latch).
If it is not, there are two ways to move it to
the “home” position:
♦ Close the printhead (with supply loaded)
and press FEED. The cutter moves to the
home position.
♦ Using a small flat-head screwdriver, turn
the cutter home position screw clockwise
until it stops. The cutter cartridge moves
slightly as the screw turns until it stops at
home.
If the cutter cannot be moved, contact
Technical Support.
Take-up Reel
Turn the screw

12 Classification: Avery Dennison - Public
Clearing a Cutter Jam
If supply jams in the cutter, the display turns red and you see error 759.
1. Press Escape to clear the error. If supply is jammed under the cutter cartridge, manually
move the cutter: Using a small flat-head screwdriver, turn the cutter cartridge’s screw
clockwise or counter-clockwise until it is away from the jammed supply.
2. Clear the supply path to remove jammed supply out of the cutter.
Caution: Do not place your fingers near the cutter’s blade.
3. Clean the supply path if you notice adhesive build-up. See “
Cleaning Adhesive from the
Supply Path” for more information.
Cleaning Adhesive from the Supply Path
Clean the printer’s supply path regularly (approximately every 60,000 inches) or whenever
adhesive build-up is present. The printer prompts every 60,000 inches as a reminder to clean
the supply path. Only clean the cutter while the printer is idle (no active print jobs).
Adhesive build-up occurs on the
♦ edges of the inner supply guides
♦ sensors
♦ peel bar/cutting anvil
♦ bottom of the ribbon deflector.
♦ cutter blade and depth control roller
To clean the printer’s supply path:
1. Open and remove the adhesive
remover wand (132839) from
the package. Do not touch the
foam end of the wand.
2. Use the foam end of the wand
to dampen the inner edges of
the supply guides, sensor, and
underneath the ribbon
deflector.
Adhesive build-up area

Classification: Avery Dennison - Public 13
3. Use the plastic end of the adhesive remover wand to scrape off the loosened adhesive.
Collect the adhesive with a cotton cloth and discard.
4. Let the printer dry and reload supplies.
Cleaning the Anvil
Use the foam end of the adhesive wand to dampen the outer edges of the anvil. Make sure the
entire anvil is clean. Using a small flat-head screwdriver, turn the cutter cartridge’s screw
clockwise or counter-clockwise to move the cutter cartridge out of the way and clean the anvil’s
other side.
Turn the screw

14 Classification: Avery Dennison - Public
Removing the Cutter Cartridge
To remove the cutter cartridge:
1. Open the printer’s cover.
2. Make sure the cutter is at the home
position. If it is not, see “
Moving the
Cutter to the Home Position,” for
more information.
3. Turn the printhead latch to unlock the
printhead.
4. Lift the printhead assembly until it
locks into place.
5. Press and hold the cartridge release
button while pulling out the cutter
cartridge.
Cleaning the Cutter’s Blade and
Depth Roller
Adhesive build-up (shown in brown) may occur between the cutter’s blade (shown in white) and
depth roller (shown in light gray). Label fragments (shown in brown) may stick to the depth
roller and may cause uneven cuts or skips in the cut. Clean the cutter’s blade and depth roller
when prompted to clean the sensor.
Remove the cutter cartridge to clean the cutter’s blade and depth roller. See “
Removing the
Cutter Cartridge” for more information.
Use isopropyl alcohol on a cotton swab to clean any adhesive on the cutter’s blade, depth roller,
and in between the blade and depth roller. Carefully turn the blade and depth roller with your
finger to make sure they are clean all the way around.
After Cleaning
Adhesive Build-up and Label Fragments
Depth Roller
Cutter Blade
Label Fragments
Depth Roller
Cutter Blade
Adhesive Build-up
Press cartridge release
button

Classification: Avery Dennison - Public 15
Adjusting the Cut Depth
If the cutter is cutting too deep or not deep enough, adjust the cut depth. Adjust for clean cuts
without cutting into or through the liner. Make small adjustments, then print and cut a few
labels. If the cutter cuts through the liner, make further adjustments.
1. Open the printer’s cover.
2. Check to see if the cutter is at
the home position. If it is not,
see “
Moving the Cutter to the
Home Position,” for more
information.
3. Turn the printhead latch to
unlock the printhead.
4. Lift the printhead assembly until
it locks into place.
5. Use a flat-head screwdriver to
adjust the cut depth dial:
♦ Turn the dial counter-
clockwise to decrease the cut depth.
♦ Turn the dial clockwise to increase the cut depth.
6. Adjust one “click” at a time and test the cut. Make further adjustments if necessary.
Replacing the Cutter Cartridge
When the cutter is not getting a clean cut or is not cutting deep enough it may need to be
replaced. Before replacing, review the recommended cleaning procedures and/or adjust the cut
depth. If those solutions do not solve the problem, replace the cutter cartridge (part number
132643).
We recommend replacing the cutter cartridge every one million cuts. Contact your Avery
Dennison Representative to purchase a new cutter cartridge.
To replace the cutter’s cartridge:
1. Open the printer’s cover.
2. Check to see if the cutter is at the
home position. If it is not, see
“
Moving the Cutter to the Home
Position,” for more information.
3. Turn the printhead latch to unlock the
printhead.
4. Lift the printhead assembly until it
locks into place.
5. Press and hold the cartridge release
button while pulling out the cutter
cartridge.
To insert a new cutter cartridge:
Press and hold the cartridge release
button while inserting the cutter cartridge.
Press cartridge release
button

16 Classification: Avery Dennison - Public
Troubleshooting
Contact your System Administrator if you cannot clear an error.
Error Action
758 Check for a label jam, clear the supply path, or reload supplies. This error may
occur if you remove a label too quickly in the on-demand mode. The on-demand
sensor may not be connected or needs to be replaced. Call Technical Support.
759 Cutter is not moving. Call Technical Support.
760 Check cutter. Call Technical Support.
785 The internal liner take-up reel is full. Remove the liner take-up reel and dispose of
the liner. Reload supplies and press ENTER to continue printing.
Supply Specifications
The limited warranty on the cutter cartridge is one (1) year from the date of shipment or one
million cuts, whichever occurs first. The 1,000,000 cuts is only warranted with use of Avery
Dennison-approved supplies. Contact your Avery Dennison Representative for more information
about EcoCut supplies.
Supply Widths: 0.75 inches (19 mm) minimum
4.0 inches (101.6 mm) maximum
Cut Lengths: 1.20 inch (30.5 mm) minimum
6.0 inches (152 mm) maximum
Supply Thickness: Liner: 1.5 mils to 2.5 mils
Label: 2.0 mils to 3.5 mils
/