Page is loading ...

Avery Dennison® and Monarch® are registered trademarks of Avery Dennison Corporation.
TC9419CIG Rev. AA 9/16 ©2016 Avery Dennison Corp. All Rights Reserved.
9419 CUTTER INSTALLATION GUIDE
Use these instructions to install the cutter on the Avery Dennison® Monarch® 9419 Printer. The
9419 cutter is designed to cut tag supply; do not cut label adhesive. For information about the
cutter, including specifications, refer to the Equipment Manual.
You need a small Phillips screwdriver to install the cutter.
Caution: Electrostatic discharge can damage or destroy the printhead or electronic components.
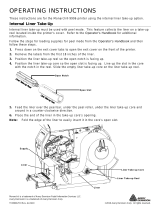
1. Turn the cover latches and lift the cover.
2. Press down and completely open the peel door.
3. Remove the peel bar. Press against the left side (with the spring) of the peel bar and lift up to
remove.

2
4. Remove the peel door.
5. Gently turn the printer on its side. Remove the access cover.

3
6. Unplug the peel cable (red co nnector) from the main board. Remove the peel cable from the
channel.
7. Feed the cutter’s cable through the lower opening in the front cover.
8. Plug the cutter’s cable (white connector) into the 8-pin connector on the main board.

4
9. Place the cutter cable in the channel.
10. Replace the access cover, secure it with the screw.
11. Return the printer to an upright position.
12. Slide the cutter into the lower cover.
13. Push down on the cutter until you hear it click into place.
/