Page is loading ...

© 2023 Gold Medal Products Co.
Part No. 110315
Model 2784-00-010
Model 2784-00-070
Instruction Manual
10700 Medallion Drive, Cincinnati, Ohio 45241-4807 USA
ReadyServe® One and Base
ReadyServe® One Cashless
Model No. 2784 Series Unit and 2776 Series Base

ReadyServe® One Unit and Base Model No. 2784 Series Unit and
ReadyServe® One Cashless 2776 Series Base
Page 2
gmpopcorn.com
Table of Contents
SAFETY PRECAUTIONS ................................................................................................................................... 3
INSTALLATION INSTRUCTIONS ................................................................................................................... 5
Inspection of Shipment ....................................................................................................................................... 5
Manual ....................................................................................................................................................................... 5
Model Description ................................................................................................................................................. 5
Items Included with Unit .................................................................................................................................... 5
Initial Setup.............................................................................................................................................................. 6
Coil and Corn Tray Removal (Installation) .................................................................................................. 7
Cup Installation ...................................................................................................................................................... 8
Optional Mounting – Countertop or Base (for ReadyServe One unit with legs) .............................. 8
Electrical Requirements .................................................................................................................................. 10
Before You Plug In Machine ........................................................................................................................... 10
OPERATING INSTRUCTIONS ...................................................................................................................... 11
Controls and Their Functions ........................................................................................................................ 11
Cashless Payment System (if equipped) .......................................................................................... 12
Operating Instructions ........................................................................................................................... 13
Adjusting the Set Temperature ..................................................................................................................... 13
ReadyServe One Operating Instructions ................................................................................................... 13
ReadyServe One Cashless Operating Instructions ................................................................................ 14
Care and Cleaning .................................................................................................................................... 15
Troubleshooting ....................................................................................................................................... 17
THE FOLLOWING SECTIONS ARE FOR QUALIFIED SERVICE PERSONNEL ONLY ............ 18
MAINTENANCE INSTRUCTIONS ................................................................................................................ 18
ORDERING SPARE PARTS ............................................................................................................................ 19
Replacing Broken Glass .................................................................................................................................... 20
Cabinet Exterior – Front View ....................................................................................................................... 20
Cabinet Exterior – Rear View – Parts Breakdown ................................................................................. 22
Cabinet Interior – Corn Tray .......................................................................................................................... 24
Crisper Blower Assembly ................................................................................................................................ 25
ReadyServe One Dome – Electrical, Controls, Lighting ....................................................................... 26
ReadyServe One Cashless Dome – Electrical, Controls, Lighting ..................................................... 27
Safety Labels and Accessories ....................................................................................................................... 28
Base Parts .............................................................................................................................................................. 28
Wiring Diagram ........................................................................................................................................ 30
NAYAX CASHLESS PAYMENT SYSTEM QUICK REFERENCE GUIDE .......... 33
WARRANTY ...................................................................................................................................................... 47

ReadyServe® One Unit and Base Model No. 2784 Series Unit and
ReadyServe® One Cashless 2776 Series Base
Page 3
gmpopcorn.com
SAFETY PRECAUTIONS
DANGER
Machine must be properly grounded to prevent electrical shock to personnel.
Failure to do so could result in serious injury, or death.
Make sure all machine switches are in the OFF position before plugging the
equipment into the receptacle. Keep cord and plug off the ground and away
from moisture. Always unplug the equipment before cleaning or servicing.
DO NOT immerse any part of this equipment in water.
DO NOT use a water jet or excessive water when cleaning. 008_012221
DANGER
Improper installation, adjustment, alteration, service, or maintenance can
cause property damage, injury, or death. Any alterations to this equipment
will void the warranty and may cause a dangerous condition. This appliance
is not intended to be operated by means of an external timer or separate
remote-control system. NEVER make alterations to this equipment. Read the
Installation, Operating, and Maintenance Instructions thoroughly before
installing, servicing, or operating this equipment.
014_020416
WARNING
To avoid burns, DO NOT touch heated surfaces.
DO NOT place or leave objects in contact with heated surfaces.
009_092414
WARNING
ALWAYS wear safety glasses when servicing this equipment.
010_010914
WARNING
No user serviceable parts inside. Refer servicing to qualified service
personnel.
011_051514
WARNING
Read and understand operator’s manual and all other safety instructions
before using this equipment. To order copies of the operator’s manual go to
gmpopcorn.com or write to Gold Medal Products Co., 10700 Medallion Drive,
Cincinnati, OH 45241 USA 1-(800)-543-0862
022_060215

ReadyServe® One Unit and Base Model No. 2784 Series Unit and
ReadyServe® One Cashless 2776 Series Base
Page 4
gmpopcorn.com
WARNING
Only personnel trained and experienced in the equipment operation may
operate this equipment. 012V_012221
WARNING
This machine is NOT to be operated by minors.
007_010914
CAUTION
If the supply cord is damaged, it must be replaced by Gold Medal Products Co.,
its service agent or similarly qualified persons in order to avoid a hazard.
039_080614
Note: Improvements are always being made to Gold Medal’s equipment. This information
may not be the latest available for your purposes. It is critical that you call Gold Medal’s
Technical Service Department at 1-800-543-0862 for any questions about your
machine operations, replacement parts, or any service questions. (Gold Medal
Products Co. does not assume any liability for injury due to careless handling and/or
reckless operation of this equipment.) General images may be used in manual for
reference only.

ReadyServe® One Unit and Base Model No. 2784 Series Unit and
ReadyServe® One Cashless 2776 Series Base
Page 5
gmpopcorn.com
INSTALLATION INSTRUCTIONS
Inspection of Shipment
After unpacking, check thoroughly for any damage which may have occurred in transit. Claims
should be filed immediately with the transportation company. The warranty does not cover
damage that occurs in transit, or damage caused by abuse, or consequential damage due to the
operation of this machine, since it is beyond our control (reference warranty in back of manual).
Manual
Read and understand the operator’s manual and all other safety instructions before using this
equipment. To order copies of the operator’s manual go to gmpopcorn.com or write to Gold
Medal Products Co., 10700 Medallion Drive, Cincinnati, OH 45241 USA 1-(800)-543-0862.
Model Description
ReadyServe One is a popcorn dispenser, reference model descriptions below.
2784-00-000: ReadyServe One, Front Counter (doors opposite of customer side), countertop
unit on 4” (10.2 cm) legs, base not included.
2784-00-010: ReadyServe One, Back Counter (doors on customer side), countertop unit on 4”
(10.2 cm) legs, base not included.
2784-00-070: ReadyServe One Cashless, with a Nayax payment system; Front Counter (doors
opposite of customer side), unit mounted on a base.
2784-00-080: ReadyServe One Cashless, with a Nayax payment system; Back Counter (doors on
customer side), unit mounted on a base.
2776-00-010: Dispenser Base option for a ReadyServe One unit (fits front counter or back
counter units); has casters and 28 qt. wastebasket for dispense debris.
Items Included with Unit
Dispenser Base (if applicable) includes: 4 Bolts (PN 20051) and 4 Washers (PN 89780) to
attach the ReadyServe One unit.
Cup Option (not included with unit):
Unit is setup at the factory for the default ReadyServe One
44 oz. cup, PN 2133RB (cups sold separately, style may vary).
Aluminum
Scoop (PN 2071)
Instruction Manual and
Registration Warranty Card
ReadyServe One Unit
includes:
Cup Holder
Gaskets

ReadyServe® One Unit and Base Model No. 2784 Series Unit and
ReadyServe® One Cashless 2776 Series Base
Page 6
gmpopcorn.com
Initial Setup
General images shown for reference only.
1. Remove all packaging and tape prior to operation.
2. Place unit on a sturdy, level surface for use.
ReadyServe One: Unit is equipped with (4) 4” (10.2 cm) leg levelers (rotate foot on leg to
level cabinet as needed). Reference the Optional Mounting section to mount
unit directly to a countertop or base.
ReadyServe One Cashless: Position unit in a location where it will receive a good cell signal
and lock the front caster wheels into place.
3. ReadyServe One Cashless: Allow clearance
for antenna on top of unit.
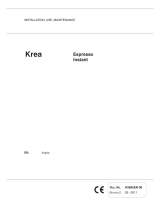
4. The door and drop panel can be locked to help prevent product tampering, see below.
5. Make sure the Corn Tray and Coil Assembly are in position for use (see image below).
To Remove Door and Drop Panel:
Remove door:
a) Unclip both lanyards.
b) While gripping the door handle —open
the door and lift it from the pivot blocks.
Remove drop panel:
c) Open both drop panel latches (no
hinges on back counter unit—lift
panel off to remove).
d) Fold the hinged panel down.
e) Slide panel off hinges.
Reassemble in reverse order.
Drop Panel Latch
(shown unlatched)
Pivot
Block
Lanyard Clip
Turn to
unlock.
Drop Panel Latch
(shown unlatched)
Tabs on both sides of door
pin the drop panel closed.
To Open Door and Drop Panel:
a) Use a flat object—turn lock CW to unlock door.
b) Fold door down to open drop panel—make
sure both lanyard clips are in place to support
the door (see image below).
c) Unlatch both drop panel latches, then fold it
down to open (slide panel off hinges to remove).
Back counter unit—panel lifts off only.
To relock:
d) Close drop panel first—latch it on both sides.
e) Close door—make sure the tabs on
each side of the door pin the drop
panel closed, see image.
Antenna
(Cashless only)

ReadyServe® One Unit and Base Model No. 2784 Series Unit and
ReadyServe® One Cashless 2776 Series Base
Page 7
gmpopcorn.com
6. ReadyServe One Cashless: Route power cord through hole in base. Reference
Electrical Requirements section to plug unit in.
7. ReadyServe One Cashless: The cashless device settings must be customized. When
unit installation is complete, see Operating Instructions for information on the
Controls and Cashless System.
8. After initial setup, the unit should be cleaned (see Care and Cleaning section), then add
cups to the dispenser.
Coil and Corn Tray Removal (Installation)
Tray opening for motor shaft.
1. Remove Coil: Unscrew coil RIGHT to
remove it from the threaded motor shaft.
2. Slide coil down and out from under tray panel.
3. Lift out the corn tray using both handles.
Reinstall Corn Pans
4. Insert corn tray—fit tray over
motor shaft, see image above.
5. Reinstall coil assembly (screw
coil LEFT onto threaded
motor shaft until snug.
Coil Assembly
Threaded Insert
To Install Coil:
Screw coil LEFT onto the threaded
motor shaft until snug.
See next section for tray
removal and installation.
Make sure Coil Assembly
is FULLY threaded onto
motor shaft.
Corn Tray
Tray Panel (coil goes
under the panel)
Front Counter Unit shown for general image reference only.
Handle

ReadyServe® One Unit and Base Model No. 2784 Series Unit and
ReadyServe® One Cashless 2776 Series Base
Page 8
gmpopcorn.com
Cup Installation
The cup dispenser has a gasket preinstalled to fit the default size serving cup (cups sold separately).
General images shown for installation reference only; cup style may vary.
Optional Mounting – Countertop or Base (for ReadyServe One unit with legs)
Mount Unit on Countertop:
The legs may be removed to set unit flush with counter, if desired. Use the 4 leg holes and 3/8-16
bolts and washers to secure unit to the counter (fasteners not included). For NSF compliance, use
silicone caulk to seal the 4 sides where the frame meets the countertop (see illustration below).
3. Lift gasket from ring; then
align new gasket with cover
ring as shown.
4. Reinstall cover ring with gasket (turn clockwise to secure), then load cups for use.
Load Cups for Use
Change Gasket Size for Cups
1. Select a stack of cups.
2. Load cups through gasket as shown.
Number of cups held, varies by cup selected.
1. Test gasket on cup—select
a gasket that fits the cup in
the range indicated .
2. Remove cover ring from
dispenser (turn counter-
clockwise to remove).
Cover Ring
Gasket
Cup
Gasket
Cover Ring and Gasket
removed.
Bottom frame
of Unit
Silicone caulk 4 sides where frame
meets countertop.
Use minimal amount of caulk
under pan opening to avoid
interference with Old Maid Pan.

ReadyServe® One Unit and Base Model No. 2784 Series Unit and
ReadyServe® One Cashless 2776 Series Base
Page 9
gmpopcorn.com
Mount Unit on a Dispenser Base
1. Position base on a level surface and lock the caster wheels into place.
2. Remove wastebasket from base (reference description below).
3. Install ReadyServe One: Remove (4) legs from unit (turn legs CCW to remove).
Position unit on base so debris wastebasket is under dispenser—before final alignment,
feed power cord into base through grommet provided, see illustration below.
4. Use leg holes to secure unit to base with hardware provided (see illustration below).
Insert a bolt and washer up through hole in base and into the leg hole of the
unit until snug. Repeat for each corner, then tighten all 4 bolts to secure.
5. Plug the unit’s power cord into the receptacle in base. Reference the Electrical
Requirements section to plug in the power cord routed from the base.
6. Reinstall wastebasket and insert before use.
Remove insert and
wastebasket to access
mounting locations.
Power Cord location (unit
plugs into receptacle in base.)
Mounting Hardware:
(4) 3/8-16 X 3/4 Hex Head
(4) Flat Washers
Detail A
Install ReadyServe One Unit
General image shown for reference only.
Unit plugs into
receptacle in base.
To Remove Wastebasket:
1. Lift insert off the base.
2. Lift wastebasket out of base.

ReadyServe® One Unit and Base Model No. 2784 Series Unit and
ReadyServe® One Cashless 2776 Series Base
Page 10
gmpopcorn.com
Electrical Requirements
The following power supply must be provided (reference unit Data Plate for Wattage requirement):
120 V~, 60 Hz
DANGER
Machine must be properly grounded to prevent electrical shock to personnel.
Failure to do so could result in serious injury, or death.
Make sure all machine switches are in the OFF position before plugging the
equipment into the receptacle. Keep cord and plug off the ground and away
from moisture. Always unplug the equipment before cleaning or servicing.
DO NOT immerse any part of this equipment in water.
DO NOT use a water jet or excessive water when cleaning. 008_012221
A certified electrician must furnish sufficient power for proper machine operation and install any
supplied receptacle (reference unit Data Plate for model specific Volts AC, Hertz, and Wattage
requirements). We recommend this equipment be on a dedicated and protected circuit. Failure
to wire properly will void the warranty and may result in damage to the machine. It is Gold Medal
Products Co.’s recommendation that this machine be plugged directly into a wall outlet. The use of
extension cords is not recommended due to safety concerns, and may cause sacrificed and/or
reduced performance. Make sure cord is located to prevent a trip hazard or unit upset.
Before You Plug In Machine
1. Make sure all machine switches are OFF before plugging equipment into receptacle.
2. Make sure wall outlet can accept the grounded plugs (where applicable) on the power
supply cord.
3. The wall outlet must have the proper polarity. If in doubt, have a competent
electrician inspect the outlet and correct if necessary.
4. DO NOT use a grounded to un-grounded receptacle adapter (where applicable).
5. Install unit in a level position.
CAUTION
If the supply cord is damaged, it must be replaced by Gold Medal Products Co.,
its service agent or similarly qualified persons in order to avoid a hazard.
039_080614

ReadyServe® One Unit and Base Model No. 2784 Series Unit and
ReadyServe® One Cashless 2776 Series Base
Page 11
gmpopcorn.com
OPERATING INSTRUCTIONS
Controls and Their Functions
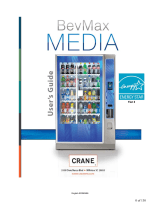
MAIN POWER SWITCH: ON/OFF rocker switch - supplies power to the cabinet lighting and sign, to the
other switches, and to the dispense button (and payment system on Cashless Unit only).
CRISPER SWITCH: ON/OFF rocker switch - supplies power to the blower and to the heat control for the
popcorn crisper.
Note: If the heat control turns off the heat element (or is not working properly), the blower will still
operate with the Crisper Switch ON.
DIGITAL HEAT CONTROL: Digital Heat Control adjusts the temperature of the heating element for the
popcorn crisper and displays the interior cabinet temperature; factory preset to 110°F (43°C).
Heat indicator light will cycle OFF/ON during operation. To adjust (program) the set temperature,
see Adjusting the Set Temperature section.
POPCORN DISPENSE BUTTON
ReadyServe One: Lighted Push Button Switch – powers the coil assembly for dispensing popcorn.
Press and hold button to dispense popcorn; release button to stop dispensing popcorn.
ReadyServe One Cashless: Lighted push button switch is powered by the Payment System
(except when the Bypass Switch is ON). Press and hold button to dispense popcorn during
a transaction cycle; release button to stop dispensing popcorn.
BYPASS PAYMENT SWITCH (ReadyServe One Cashless only)
ON/OFF rocker switch—put switch in Bypass position to dispense product without using the
payment system. Bypass mode is helpful for removing product from the machine at the end of the
day and to prime a newly filled unit for use.
PAYMENT SYSTEM: Payment System is powered by the Main Power Switch—it takes a minute or two to
boot up when powered on. The system requires a cell signal to operate (if the system fails to boot
up, there may be an issue obtaining a cell signal, reference Troubleshooting section). See next
section, Cashless Payment System for additional information.
Dispense
Button
Payment
System
(Cashless
only)
Dispense Chute
Crisper
Switch
Main Power Switch
Heat Control
General images shown for reference only (view varies by model).
Bypass Payment
Switch
(Cashless only)

ReadyServe® One Unit and Base Model No. 2784 Series Unit and
ReadyServe® One Cashless 2776 Series Base
Page 12
gmpopcorn.com
Cashless Payment System (if equipped)
The Nayax Cashless Payment System incorporated in the Gold Medal cashless unit is managed by
a third-party vendor. You must be onboarded to their system and have a Nayax account set
up to use the unit (Serial No. of the Nayax Payment System must be assigned to your account).
Note: If you do not have an account set up, contact Gold Medal Tech Support for assistance.
To program or change device settings (within your Nayax account portal)—see the Device
Settings section in the Nayax Quick Reference Guide at the end of this manual.
How the Payment System Works
1. Select an option on the touch screen.
2. Present payment: Insert/slide/tap card or place device with
mobile payment app near touch screen (device requirements
may vary).
Note: Step 1 and 2 can be interchanged.
3. After payment is processed, the Dispense Button light blinks.
4. Product transaction begins when user initially pushes the
blinking button. Each transaction has a Dispense Time and a
Cycle Time (see descriptions below).
Note: Timers are internal, not indicated on screen.
• Dispense Time—amount of time (min. setting is 5 sec.) the unit
dispenses product within the Cycle Time. Press and release the
blinking or lit button as needed, dispense time is accumulated.
To change the Dispense Time, see the Device Settings
section in Quick Reference Guide at the end of this manual.
• Cycle Time—amount of time the user has to complete the
transaction (1.5 times the set Dispense Time). Count down
begins once blinking dispense button is initially pressed.
• Pressing the blinking button, turns the light solid and
dispenses product—the Dispense Time counter accumulates.
• Releasing the button stops product dispense and pauses the
Dispense Time counter—Cycle Time will continue to count
down. The pushbutton light returns to a blinking state.
5. Transaction is complete when accumulated Dispense Time reaches the set limit, or Cycle Time
counter reaches zero. The unit stops dispensing product and pushbutton light turns OFF.
Dispense Button
(LED blinks to indicate activation)
2 Selections shown
(1–4 selections possible)
Device view may vary.

ReadyServe® One Unit and Base Model No. 2784 Series Unit and
ReadyServe® One Cashless 2776 Series Base
Page 13
gmpopcorn.com
Operating Instructions
Adjusting the Set Temperature
The unit comes from the factory with the Digital Heat Control preset to 110°F (43°C); maximum
setting is 120°F (49°C). Follow the steps below to adjust the preset temperature.
1. Press SET button—“SP” displays.
2. Press SET again—current set temperature displays.
3. Press UP/DOWN arrows to adjust temperature, then press SET to save.
4. To EXIT, press SET and DOWN arrow at the same time (returns to operating mode).
ReadyServe One Operating Instructions
See next page for ReadyServe One Cashless Instructions.
The ReadyServe One unit is easy to use and provides a convenient,
sanitary way for customers to self-serve portions of popcorn.
1. Turn Main Power Switch ON.
2. Turn Crisper Switch ON.
Unit is factory preset to 110°F (43°C); adjust as needed
to maintain desired popcorn temperature for serving (see
Adjusting the Set Temperature section).
3. Load unit with popped popcorn (sift the popcorn in the popper
prior to loading it in the unit).
4. Pull a cup from the cup dispenser and hold it under the dispense chute
to receive popcorn; press Dispense Button for desired amount of corn.
General image shown for
reference only.
SET Button
UP Arrow
DOWN Arrow
Digital Display
°F or °C (Fahrenheit shown)
Heat Indicator Light (Light ON indicates unit is
heating. Light will cycle OFF/ON during operation.)

ReadyServe® One Unit and Base Model No. 2784 Series Unit and
ReadyServe® One Cashless 2776 Series Base
Page 14
gmpopcorn.com
ReadyServe One Cashless Operating Instructions
See previous page for ReadyServe One Instructions.
The ReadyServe One Cashless unit provides a convenient, sanitary
way for customers to self-serve portions of popcorn. General images
shown for reference, actual device view may vary.
Unit Startup
1. Turn the Main Power Switch ON.
2. Allow payment system to boot up (approx. 1 or 2 min.; check
cell signal for boot up failure).
3. Load unit with popped popcorn (sift the popcorn in the popper
prior to loading it in the unit).
Note: After filling an empty unit, prime coil assembly for use.
Turn Bypass Payment Switch ON; press dispense button
until corn starts to dispense, then turn Bypass Switch OFF.
4. Lock cabinet access doors as needed.
User Operation
1. Pull a cup from the cup dispenser.
2. Select an option on the touch screen.
3. Present payment (device requirements may vary):
Note: Step 2 and 3 can be interchanged.
4. After payment is processed, the Dispense Button light blinks.
5. Hold cup under dispenser chute.
6. Press and hold the lit button to dispense product—cycle
count down begins.
• Popcorn dispenses for the pre-set amount of time.
• Press and release the lighted button as needed (to start/
stop dispensing)—the dispense timer pauses when button
is released, but cycle countdown continues.
7. Transaction is complete when accumulated Dispense
Time reaches the set limit, or Cycle Time counter reaches
zero. The unit stops dispensing product and pushbutton
light turns OFF.
OR
Insert, slide
or tap card.
Place device with
mobile payment app
near touch screen.
Select an
option
Dispense Button
(LED blinks to
indicate activation)

ReadyServe® One Unit and Base Model No. 2784 Series Unit and
ReadyServe® One Cashless 2776 Series Base
Page 15
gmpopcorn.com
Care and Cleaning
DANGER
Machine must be properly grounded to prevent electrical shock to personnel.
DO NOT immerse in water. DO NOT clean appliance with a water jet or steam
cleaner. Always unplug the equipment before cleaning or servicing. 025_051321
WARNING
To avoid burns, DO NOT touch heated surfaces.
DO NOT place or leave objects in contact with heated surfaces.
009_092414
Good sanitation practice demands that all food preparation equipment be cleaned regularly (only
use non-toxic, food grade cleaners).
For surfaces needing further cleaning or degreasing, Watchdog Stainless Cleaner (Item No. 2088)
or Watchdog Concession Equipment Degreaser (Item No. 2580) is available for use accordingly.
For any cleaning products used, follow the manufacturer’s instructions on the product. DO NOT
use oven cleaners or abrasive materials as they will damage parts of machine.
Daily Cleaning Instructions for Unit and Base (if equipped)
1. Turn machine OFF, unplug unit and allow it to cool before attempting to clean.
2. Remove any remaining popcorn.
3. Clean all pans/accessories—items may be taken to the sink to clean with soap and
water, then rinse and dry.
To Remove Corn Tray: (reference Coil and Corn Tray Removal section)
A. Remove door and lower or remove drop panel.
B. Unscrew ( ) the coil assembly from the threaded motor shaft, then slide
the coil down and out from under the tray panel.
C. Lift the corn tray out of the unit.
4. Clean under corn pan to remove all popcorn bits and seeds with a vacuum as needed,
then wipe the area with a clean dry cloth to remove any grease.
5. Units with a Base:
• Remove debris from wastebasket and wipe it out to clean (discard any popcorn
from wastebasket). Reference image below to remove wastebasket.
• As needed, use a vacuum to remove any debris from the base interior.

ReadyServe® One Unit and Base Model No. 2784 Series Unit and
ReadyServe® One Cashless 2776 Series Base
Page 16
gmpopcorn.com
6. Wipe clean the area above the corn pans and exterior surfaces using a clean, SLIGHTLY
damp cloth (cloth may be SLIGHTLY dampened with soap and water, then wipe again
with clean water to remove any remaining cleaner).
7. Clean glass panels with glass cleaner. Gold Medal Watchdog Glass Cleaner (Item No.
2588) is recommended.
Ammonia cleaners will damage plastic doors/panels. Only use non-ammonia cleaners,
such as Gold Medal Watchdog Glass Cleaner (Item No. 2588).
8. Reinstall the clean dry pans/accessories, and any parts removed for cleaning.
Clean the Crisper Compartment (Qualified Service Personnel Only)
The blower compartment MUST be inspected/cleaned every 3-4 months by Qualified Service
Personnel to maintain proper operation.
1. Turn machine OFF, unplug unit and allow it to cool before attempting to clean.
2. Remove the coil assembly and lift off the corn pan to view the blower assembly.
3. Remove the blower cover and if required, carefully clean the blower compartment,
and underneath the element with a vacuum only.
4. After cleaning, reassemble blower cover, corn pan, and coil assembly.
To Remove Wastebasket:
1. Lift insert off the base.
2. Lift wastebasket out of base.

ReadyServe® One Unit and Base Model No. 2784 Series Unit and
ReadyServe® One Cashless 2776 Series Base
Page 17
gmpopcorn.com
Troubleshooting
General Unit Issues - see the Troubleshooting table below.
Nayax Cashless Device/Setting Issues – see the Troubleshooting
section in the Nayax Quick Reference Guide at the end of
this manual.
Issue
Possible Cause
Solution
No Power to the Unit
A. No Power to the Unit
A. Make sure the Main Power Switch is ON.
Make sure the unit power cord is securely
plugged into the wall outlet.
ReadyServe One with a base—make sure the
unit power cord is securely plugged into the
base receptacle and the base power cord is
securely plugged into the wall outlet.
B. ReadyServe One Cashless
GFCI tripped
B. ReadyServe One Cashless Unit is equipped
with a GFCI plug. When plugged into a proper
wall outlet for the machine (reference
Electrical requirements section), make sure
the plug LED indicator is ON, see image. If
needed, reset the GFCI. If it trips again, contact
qualified service personnel to inspect the
machine and the power provided to unit.
No Popcorn Dispensed
A. Popcorn Dispense
Button/Motor
A. Make sure the Main Power Switch is ON to
supply power to the Dispense Button.
Check if the Dispense Button LED is ON. If the
LED is ON, but popcorn does not dispense
when the button is pushed, the button or the
motor may be faulty, contact qualified service
personnel for inspection/repair.
B. Coil Assembly not
installed correctly
B. Reference Initial Setup section for instructions
to properly install coil assembly on motor
shaft.
C. Dispense Chute
C. Make sure the dispense chute opens freely to
allow coil assembly to dispense popcorn.
Reset Button
LED Indicator

ReadyServe® One Unit and Base Model No. 2784 Series Unit and
ReadyServe® One Cashless 2776 Series Base
Page 18
gmpopcorn.com
THE FOLLOWING SECTIONS ARE FOR QUALIFIED SERVICE PERSONNEL ONLY
MAINTENANCE INSTRUCTIONS
DANGER
Machine must be properly grounded to prevent electrical shock to personnel.
Failure to do so could result in serious injury, or death.
Make sure all machine switches are in the OFF position before plugging the
equipment into the receptacle. Keep cord and plug off the ground and away
from moisture. Always unplug the equipment before cleaning or servicing.
DO NOT immerse any part of this equipment in water.
DO NOT use a water jet or excessive water when cleaning. 008_012221
DANGER
Improper installation, adjustment, alteration, service, or maintenance can
cause property damage, injury, or death. Any alterations to this equipment
will void the warranty and may cause a dangerous condition. This appliance
is not intended to be operated by means of an external timer or separate
remote-control system. NEVER make alterations to this equipment. Read the
Installation, Operating, and Maintenance Instructions thoroughly before
installing, servicing, or operating this equipment.
014_020416
WARNING
No user serviceable parts inside. Refer servicing to qualified service
personnel.
011_051514
CAUTION
THE FOLLOWING SECTIONS OF THIS MANUAL ARE INTENDED ONLY
FOR QUALIFIED SERVICE PERSONNEL WHO ARE FAMILIAR WITH
ELECTRICAL EQUIPMENT. THESE ARE NOT INTENDED FOR THE
OPERATOR.
027_010914

ReadyServe® One Unit and Base Model No. 2784 Series Unit and
ReadyServe® One Cashless 2776 Series Base
Page 19
gmpopcorn.com
ORDERING SPARE PARTS
1. Identify the needed part by checking it against the photos, illustrations, and/or
parts list. (General images may be used in manual for reference only.)
2. Use only approved replacement parts when servicing this unit.
3. When ordering, please include part number, part name, and quantity needed.
4. Please include your model number, serial number, and date of manufacture (located
on the machine nameplate/data plate) with your order.
5. Address all parts orders to Parts Department, Gold Medal Products Co., 10700
Medallion Drive, Cincinnati, Ohio 45241-4807
or place orders by phone or online:
Phone: (800) 543-0862
(513) 769-7676
Fax: (800) 542-1496
(513) 769-8500

ReadyServe® One Unit and Base Model No. 2784 Series Unit and
ReadyServe® One Cashless 2776 Series Base
Page 20
gmpopcorn.com
Replacing Broken Glass
Broken glass panels can be easily replaced. Gold Medal Products Co. does not ship glass. It can be
obtained from a local glass shop and always purchase tempered glass.
GLASS DIMENSIONS (Height x Width x Thickness)
Front Glass
(Front Counter only)
20.125” x 20.75” x 1/8” (512 mm x 527 mm x 3.2 mm)
Side Glass
(Back Counter uses 3 pieces)
20.625” x 20.75” x 1/8” (549.3 mm x 527 mm x 3.2 mm)
1. Turn machine OFF, unplug unit and allow it to cool before attempting to replace glass.
2. Remove all loose pieces of broken glass.
3. Pull out Magnet/Magnetic Clip located above glass panel in cabinet interior (see image
below). The magnet/clip is used to hold glass in place during shipping.
4. Remove all rigid glass channels from around the glass being replaced; set channels
aside for reuse.
5. Carefully remove the rest of the broken glass.
6. Apply decals (if desired) to new glass panel.
7. Slide rigid glass channels over the exposed sides and bottom of new glass panel.
8. Carefully slide glass panel up under top ridge, then lower into the bottom channel.
As applicable, remove magnet
or magnetic clip from above
glass panel.
Slide glass panel up
under top ridge.
Lower glass panel into
bottom channel.
Magnet or Magnetic Clip
holds glass during transit.
General images shown for reference only.
/