InvisaFlow 6360 Operating instructions

Type
Operating instructions

This manual is also suitable for

Easy to install
Made of galvanized steel with a lasting powder coat
Blends with roof line for less visibility
6” x 36” - Fits all standard K” style gutters
Fine mesh pattern blocks the smallest debris
Available in 25 count & 50 count cartons
Pre-notched end allows for overlapping
Works with spike/ferrule and all hidden hangers
Problem
Solution
Debris accumulates behind
curved guards (hinged)
Hinge flips up allowing
gutter to clog with debris
Lock-In slides
under shingles
Install Lock-In gutter guards to keep leaves and debris out of the gutter system.
Slides under the shingles eliminating debris accumulation.
Metal Lock-In
Gutter Guard
HEAVY DUTY GRADE
amerimax.com | 800-347-2586
© 2017 OmniMax International, Inc.
Easy Installation Instructions
CAUTION: Wear safety glasses and leather gloves while installing this product. Always
exercise appropriate care when working from a ladder. Follow all tool and ladder manufacturers
instructions and safety recommendations.
Downspout
R
Free owing water from your
downspout extension
Fits standard 4 in., 5 in. and 6 in. gutters.
Before installing the rst gutter guard, notch the back edge (A)
and the front edge (B). The front edge may already be pre-notched
depending on the direction you start your installation. Next, bend
the end section down to create an end cap. This will help prevent
birds and other animals from nesting in the gutter.
Using the cleaning
scoop (with exible conforming tip) to
make cleaning easy.
Make sure you clean your gutters and downspouts before installation of the Lock-In Gutter
Guard. You should ush the entire gutter system with a hose, making sure water is owing
freely from the bottom of the downspout without any water backing up in the gutter.
Tools & Safety Equipment Needed:
Safety glasses, leather gloves, tin snips, athead screwdriver and a ladder.
(A)
(B)
End Cap
Metal Lock-In
Gutter Guard
amerimax.com | 800-347-2586
Shingle
Screwdriver
The Lock-In Gutter Guard comes with a pre-notched
end that allows the guards to overlap, eliminating any
gaps that would allow debris through the seams and
into the gutter. As you install each section simply overlap
the end with the previous section.
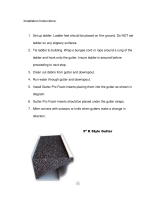
At the end of the gutter, cut the last gutter guard an extra 2 inches longer than the end
of the gutter. Cut a notch on the back edge of the gutter guard (A) and on the front edge
(B). Bend the end section down to create the end cap.
5
Starting at one end of the gutter, install the gutter guard by
slightly lifting the shingles and sliding the gutter guard under
the shingle (A). If the starter row of shingles are fastened to the
roof deck slide the guard between the layers. (Note: Check your
local building codes for any special installation requirements).
Pull the front edge forward to engage with the lip of the gutter.
If necessary a athead screwdriver can be used to help pull
the guard forward (B).
(A)
(B)
Bend down
End Cap
6
For outside corners (A) or inside corners (B),
mitre cut both adjoining sections. Notch the
front edge of one section to create an overlap.
Outside
Corner
Inside
Corner
(A)
(B)
6” Gutter
6 Inch Gutter: Depending on how low the gutter is hung (C)
and how much pitch the gutter has from one end to the other
it may be necessary to install the gutter guard inside the gutter
rather than under the shingles (D).
6” Gutter
(A)
(B)
(C)
(D)
amerimax.com | 800-347-2586
© 2017 OmniMax International, Inc.
  • Page 1 1
  • Page 2 2
  • Page 3 3

InvisaFlow 6360 Operating instructions

Type
Operating instructions
This manual is also suitable for

Ask a question and I''ll find the answer in the document

Finding information in a document is now easier with AI