Page is loading ...

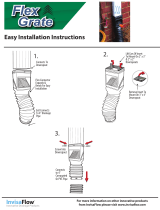
Easy Installation Instructions
CAUTION: Wear safety glasses and leather gloves while installing this product. Always
exercise appropriate care when working from a ladder. Follow all tool and ladder manufacturer’s
instructions and safety recommendations.
Downspout
R
Free owing water from your
downspout extension
Fits standard 4 in., 5 in. and 6 in. gutters.
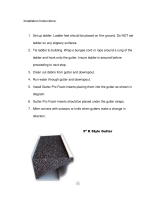
Before installing the rst gutter guard, notch the back edge (A)
and the front edge (B). Next, bend the end section down to create
an end cap. This will help prevent birds and other animals from nesting in the gutter.
Using the cleaning
scoop (with exible conforming tip) to
make cleaning easy.
Make sure you clean your gutters and downspouts before installation of the Solid Vinyl
Gutter Cover. You should ush the entire gutter system with a hose, making sure water is
owing freely from the bottom of the downspout without any water backing up in the gutter.
Tools & Safety Equipment Needed:
Safety glasses, leather gloves, tin snips and a ladder.
End Cap
(A)
Innovative Drainage Products
Solid Vinyl
Gutter Cover
(B)

Shingle
Screwdriver
For more information on the Solid Vinyl Gutter Cover other innovative products
from InvisaFlow please visit www.invisaow.com
To overlap the gutter covers, cut a notch from
the front edge. As you install each section simply
overlap the end with the previous section.
At the end of the gutter, cut the last gutter cover an extra 2 inches longer than the end
of the gutter. Cut a notch on the back edge of the gutter guard (A) and on the front edge
(B). Bend the end section down to create the end cap.
5
Starting at one end of the gutter, install
the gutter guard by slightly lifting the
shingles and sliding the gutter cover
under the shingle. If the starter row of
shingles are fastened to the roof deck
slide the guard between the layers.
(Note: Check your local building codes
for any special installation requirements)
Pull the front edge forward to engage with
the lip of the gutter. If necessary a athead
screwdriver can be used to help pull the
guard forward.
6
For outside corners (A) or inside
corners (B), mitre cut both adjoining
sections. Notch the front edge of one
section to create an overlap.
Outside
Corner
Inside
Corner
(A)
(B)
Notch
End Cap
(A)
(B)
/