Apple LIVETYPE 2 User manual
- Category
- Software manuals
- Type
- User manual

LiveType 2
User Manual

K
Apple Inc.
Copyright © 2005 Apple Inc. All rights reserved.
Your rights to the software are governed by the
accompanying software license agreement. The owner
or authorized user of a valid copy of Final Cut Studio
software may reproduce this publication for the purpose
of learning to use such software. No part of this
publication may be reproduced or transmitted for
commercial purposes, such as selling copies of this
publication or for providing paid for support services.
The Apple logo is a trademark of Apple Inc., registered
in the U.S. and other countries. Use of the “keyboard”
Apple logo (Shift-Option-K) for commercial purposes
without the prior written consent of Apple may
constitute trademark infringement and unfair
competition in violation of federal and state laws.
Every effort has been made to ensure that the
information in this manual is accurate. Apple is not
responsible for printing or clerical errors.
Note:
Because Apple frequently releases new versions
and updates to its system software, applications, and
Internet sites, images shown in this book may be slightly
different from what you see on your screen.
Apple Inc.
1 Infinite Loop
Cupertino, CA 95014–2084
408-996-1010
www.apple.com
Apple, the Apple logo, AppleWorks, Final Cut,
Final Cut Pro, Final Cut Studio, FireWire, Keynote,
LiveType, Mac, Macintosh, and QuickTime are trademarks
of Apple Inc., registered in the U.S. and other countries.
Finder is a trademark of Apple Inc. AppleCare is a
service mark of Apple Inc., registered in the U.S. and
other countries.
Helvetica is a registered trademark of Heidelberger
Druckmaschinen AG, available from Linotype
Library GmbH.
Other company and product names mentioned herein
are trademarks of their respective companies. Mention
of third-party products is for informational purposes
only and constitutes neither an endorsement nor a
recommendation. Apple assumes no responsibility with
regard to the performance or use of these products.

3
1
Contents
Preface 7 An Introduction to LiveType
7
How Does Titling Work?
8
A Realm of Creative Possibilities
9
Workflow for Creating Titles
10
About This Manual
10
LiveType Onscreen User Manual
11
Apple Websites
Chapter 1 13 The LiveType Interface
14
Canvas
20
Inspector
25
Media Browser
26
Timeline
28
LiveType Media Files
Chapter 2 31 Setting Up a Project
31
Templates
33
Starting a New Project and Setting Defaults
34
Setting Project Properties
Chapter 3 41 Adding a Background
41
Setting a Background Color
42
Adding a Background Texture
43
Importing a Background Movie or Still Image
45
Considerations for Rendering the Background
Chapter 4 47 Working With Tracks
48
Positioning Tracks in the Canvas
49
Creating Angles and Curves
51
Linking Endpoints
52
Adding, Copying, and Deleting Tracks
53
Working With Tracks in the Timeline

4
Contents
Chapter 5 57 Working With Text
57
Inserting Text
60
Adjusting the Timing of LiveFonts
62
Formatting Text
68
Enhancing Text With Styles
72
Creating a Matte
77
Modifying Individual Characters
78
Disabling Fonts in Mac OS X
Chapter 6 79 Working With Objects, Textures, and Imported Elements
80
Working With LiveType Objects
81
Working With LiveType Textures
82
Importing Graphics, Images, and Movies
83
Transforming Objects, Textures, and Imported Elements
Chapter 7 87 Working With Effects and Keyframe Animation
88
Preset Effects
88
Applying Preset Effects
90
Adjusting the Timing of an Effect
93
Changing the Order of Effects
93
Duplicating Effects and Tracks
93
Modifying a Preset Effect
103
Creating a New Effect From Scratch
Chapter 8 109 Previewing and Fully Rendering Your Titling Movie
109
Previewing Your Work
11 2
Optimizing Preview Performance
11 3
Rendering, Saving, and Exporting Your Titling Movie
Chapter 9 117 Advanced Design Techniques
11 7
Words Within Words
11 9
Warping Shadows and Glows
121
Track Curves
12 3
Creative Use of Special Characters
12 6
LiveFonts and Layers
12 8
Creating Scrolls and Crawls
UP01103TOC.fm Page 4 Monday, March 7, 2005 7:23 PM

Contents
5
Appendix A 131 Solutions to Common Problems and Customer Support
131
Frequently Asked Questions
133
Apple Applications Page for Pro Apps Developers
13 4
Calling AppleCare Support
Appendix B 135 Creating and Editing EffectScripts
135
Header
135
Default Timing
13 6
Keyframes
140
Sample EffectScripts
Glossary 143
Index 149
UP01103TOC.fm Page 5 Monday, March 7, 2005 7:23 PM

UP01103TOC.fm Page 6 Monday, March 7, 2005 5:05 PM

7
Preface
An Introduction to LiveType
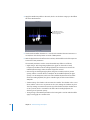
Welcome to LiveType, a special-effects titling application
that’s powerful, easy to use, and completely versatile—
whether you’re creating movie titles and credits,
broadcast ads, or web banners.
Producing dynamic video titles—titles that really pop—can be a painstaking process,
fraught with manual adjustments and keyframe stacks daunting even to experienced
animators. With LiveType, you can create phenomenal results, in the output format you
require, with a fraction of the effort.
How Does Titling Work?
Traditionally, titling was the term for adding text to film. The evolution of digital
graphics and video technologies has expanded the definition, which now includes just
about any combination of text and images you want to add to a movie. Titling is the
process of creating a digital overlay, which is added to edited footage in your nonlinear
editor (NLE), or compositing program. LiveType is the design studio where you
generate titles to import into Final Cut Pro.
Alpha channel technology is the basis of titling. Most compositing and animation
programs allow you to create art with an alpha channel. In addition, most NLEs use
alpha channels they detect in an image or movie to properly lay the element over video.
An alpha channel represents eight bits of grayscale pixel information in a 32-bit file. The
eight grayscale bits determine which portions of the image to superimpose over other
layers. White alpha-channel pixels make the superimposed image completely opaque,
while black pixels make the overlay completely transparent, or invisible. Gray levels
represent varying levels of opacity.
LiveType automatically creates an alpha channel for your project when you render it
with a transparent background.

8 Preface
An Introduction to LiveType
A Realm of Creative Possibilities
LiveType has revolutionized titling in two major ways. First, it introduced 32-bit
LiveFonts, a new approach to text animation in which every character of a font is a
separate, animated movie. Second, LiveType handles effects and animation with greater
ease than any other titling application.
Animated Fonts, Objects, and Textures
Three types of animated media are included in LiveType:
Â
LiveType objects
are animated graphics.
Â
LiveType textures
are moving images used to fill backgrounds, text, or objects.
Â
LiveFonts
are complete, animated character sets.
All of these elements move inherently, even before you apply motion paths and special
effects to them.
LiveType comes with dozens of LiveFonts and hundreds of objects and textures. What’s
more, you can create your own animated fonts using the LiveType FontMaker utility,
building characters using virtually any graphical object—from 3D animations and
images created in Photoshop to video clips—and apply effects to them, just as you
would to words.
Effects Handling
Effects in LiveType are handled as separate entities—“packages” encompassing
movement, transformation, and timing parameters—that can be applied to any
number of elements in the Canvas. You can take advantage of more than 100
customizable effects that come with LiveType, including fades, zooms, rotations, and
motion paths. Or you can create your own styles by adjusting existing effects or
building them from scratch.
From an animation standpoint, LiveType is easier to work with than other titling
applications, since one keyframe marker contains all the parameters for an element at a
point in time, eliminating the complexity of long keyframe stacks.
And powerful timing features allow you to control every aspect of your animation. In
addition to basic functions such as loop, speed, and duration, LiveType allows you to
sequence your effects. Sequencing lets you animate characters in a line of text
individually, with their own timing elements, so you’re not constrained to blocks of text
that fly around the screen as a unit.
Whether you’re combining prebuilt elements or generating all the pieces yourself, you
can create wholly original, eye-catching compositions with surprisingly little effort.

Preface
An Introduction to LiveType
9
Workflow for Creating Titles
Video production is typically approached in layers from back to front, starting with
shooting and editing the footage, then building in effects, then applying titles and
sound. Likewise, your approach to title creation should be loosely approached from
back to front. Of course, because the design process is fluid, there is no hard-and-fast
prescription, but the following steps give you a sense of what’s involved for a
typical project.
Step 1: Configure the working environment
Â
Set the output resolution, frame rate, and other project properties.
Â
Set up the grid, guides, and rulers in the Canvas, according to your working
preferences.
Step 2: Apply a background, if any
Step 3: Create elements (text or objects) in the Canvas, one by one
Â
Position and shape a track for the element.
Â
Add an element to the track.
Â
Select a font.
Â
Adjust attributes and apply styles to the element.
Step 4: Animate the elements
Â
Define the movie duration.
Â
Apply effects and adjust the timing.
Â
Customize the animation with keyframe adjustments.
Step 5: Preview and fine-tune the movie
Step 6: Render the final movie for compositing into your video
Step 7: Export the movie to an alternative format, if needed
You may be able to save considerable time by taking advantage of LiveType
templates—project files provided with the software that offer many examples of titling
formats. One might suit your needs with few changes, or you may find that certain
elements within a template are useful, which you can copy into your own project. More
about templates can be found in Chapter 2, “Setting Up a Project,” on page 31.

10 Preface
An Introduction to LiveType
About This Manual
Because LiveType is a creative tool, documentation can only go so far in describing its
potential. This manual provides a detailed description of the LiveType interface,
features, and functionality, and introduces you to the built-in resources and templates
to give you a sense of the versatility of this product. In the end, you are limited only by
your own creative vision, and the way to push the limits of LiveType is to jump in and
start creating.
This manual begins with a description of the interface, followed by a series of chapters
that explain the tasks you’ll need to perform, as well as advanced techniques.
Note:
This user manual is written for people with a rudimentary understanding of film
or video production. Experienced users will be quite familiar with all such terminology
herein. Others will find that most terms are defined in context, and the glossary at the
end of this manual may be helpful as well.
LiveType Onscreen User Manual
The LiveType onscreen user manual allows you to access information directly onscreen
while you’re working in LiveType. To view the onscreen user manual, choose Help >
LiveType User Manual. The onscreen user manual is a fully hyperlinked version of the
user manual, enhanced with many features that make locating information quick
and easy.
Â
The home page provides quick access to various features, including Late-Breaking
News, the index, and the LiveType website.
Â
A comprehensive bookmark list allows you to quickly choose what you want to see
and takes you there as soon as you click the link.
In addition to these navigational tools, the onscreen user manual gives you other
means to locate information quickly:
Â
All cross-references in the text are linked. You can click any cross-reference and jump
immediately to that location. Then, you can use the navigation bar’s Back button to
return to where you were before you clicked the cross-reference.
Â
The table of contents and index are also linked. If you click an entry in either of these
sections, you jump directly to that section of the user manual.
Â
You can also use the Find dialog to search the text for specific words or a phrase.
LiveType Help also contains information about issues with third-party software and
known bugs. This information is found in the Late-Breaking News section of
LiveType Help.

Preface
An Introduction to LiveType
11
To access Late-Breaking News:
m
Choose Help > Late-Breaking News.
Note:
You must be connected to the Internet to download the Late-Breaking News file.
Additionally, LiveType Help contains a link to the Creating LiveFonts PDF file. This
document details the process of creating custom LiveFonts for use with LiveType.
To access the Creating LiveFonts PDF file:
m
Choose Help > Creating LiveFonts.
Apple Websites
There are a variety of discussion boards, forums, and educational resources related to
LiveType on the web.
LiveType Website
For general information and updates, as well as the latest news on LiveType, go to:
Â
http://www.apple.com/finalcutpro/livetype.html
Apple Service and Support Website
For software updates and answers to the most frequently asked questions for all Apple
products, including LiveType, go to:
Â
http://www.apple.com/support
You’ll also have access to product specifications, reference documentation, and Apple
and third-party product technical articles.
For LiveType support information, go to:
Â
http://www.apple.com/support/livetype/index.html
Other Apple Websites
Start at the Apple homepage to find the latest and greatest information about Apple
products:
Â
http://www.apple.com
QuickTime is industry-standard technology for handling video, sound, animation,
graphics, text, music, and 360-degree virtual reality (VR) scenes. QuickTime provides a
high level of performance, compatibility, and quality for delivering digital video. Go to
the QuickTime website for information on the types of media supported, a tour of the
QuickTime interface, specifications, and more:
Â
http://www.apple.com/quicktime

12 Preface
An Introduction to LiveType
FireWire is one of the fastest peripheral standards ever developed, which makes it great
for use with multimedia peripherals, such as video camcorders and the latest high-
speed hard disk drives. Visit this website for information about FireWire technology and
available third-party FireWire products:
Â
http://www.apple.com/firewire
For information about seminars, events, and third-party tools used in web publishing,
design and print, music and audio, desktop movies, digital imaging, and the media arts,
go to:
Â
http://www.apple.com/pro
For resources, stories, and information about projects developed by users in education
using Apple software, including LiveType, go to:
Â
http://www.apple.com/education
Go to the Apple Store to buy software, hardware, and accessories direct from Apple
and to find special promotions and deals that include third-party hardware and
software products:
Â
http://www.apple.com/store

1
13
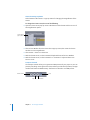
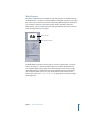
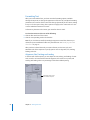
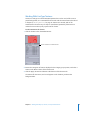
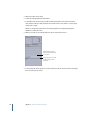
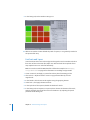
1 The LiveType Interface
The LiveType interface consists of four primary
windows—the Canvas, the Inspector, the Media Browser,
and the Timeline.
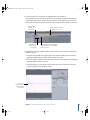
 Canvas: This is where projects take shape. You use it to position text and objects,
create motion paths, and view the results as you design.
 Inspector: A toolbox of settings and parameters, including virtually every option for
building and customizing your titling creations.
 Media Browser: This area provides access to all the fonts, textures, objects, and effects
you’ll use to create your titles.
 Timeline: This is where you manage the frame-by-frame action of your titling
projects. Animation keyframes are created and adjusted in the Timeline, allowing you
to orchestrate the movement of your titling elements.
Canvas
Inspector
Media Browser
Timeline

14 Chapter 1 The LiveType Interface
The four windows float freely, and can be moved and resized to suit your
working preferences.
To restore the default layout of LiveType:
m Choose Window > Apply Default Layout.
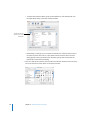
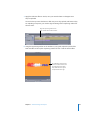
Canvas
The Canvas is your creative working environment, reflecting the output dimensions you
configure in the Project Properties dialog. (See “Setting Project Properties” on page 34.)
Whether you are working in HDTV, NTSC, PAL, or any other format, the Canvas is
designed to help you lay out and view your titling project easily.
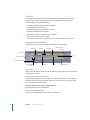
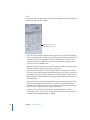
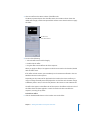
About the Canvas Interface
There are various interface elements and controls in the Canvas, outlined below.
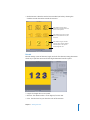
Background
When you first open LiveType, the default checkerboard pattern in the Canvas
represents a transparent background, allowing alpha channel titles to overlay video
footage when composited in a nonlinear editor (NLE) such as Final Cut Pro. You can set
the background as any combination of the following:
 Transparent
 Solid color
 Animated texture or object
 Still image
 Movie
Action safe guidelines
Background (transparent)
Track, showing multiple
lines of text on one track
Zoom pop-up menu
Title safe guidelines
Transport controls

Chapter 1 The LiveType Interface 15
Backgrounds often cover the entire Canvas. However, when used with the matte
feature in the Attributes tab of the Inspector, an element can appear to “punch
through” an underlying element to reveal the background color, image, or movie. See
“Creating a Matte” on page 72 for more about creating mattes.
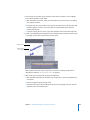
Tracks
The dark blue horizontal line that appears in the default Canvas is a track. Tracks are the
foundation of any LiveType composition. Every element of a project resides on a track.
Tracks define:
 The position of text and objects in the Canvas
 The layering of elements
 In some cases, the path taken by moving elements
Tracks have two endpoints, and can have any number of “control points,” which are
nodes that create angles and curves in the track. When more than one track is in the
Canvas, only the endpoints of the selected, or active, track are visible. This identification
is helpful when you’re applying attributes to a track.
Action Safe and Title Safe Guidelines
The green hairline boxes in the Canvas represent the “action safe” and “title safe” areas.
The action safe area, defined by the outer line, is the extent of the screen where the
image is readily visible, given the curvature of the cathode-ray tube (CRT). The title safe
area, represented by the inner line, is the boundary beyond which text is not easily read.
To turn the action safe and title safe guidelines off or on:
m Choose View > Title Safe.

16 Chapter 1 The LiveType Interface
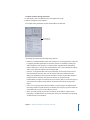
Canvas Zoom Pop-up Menu
At the bottom of the Canvas is a pop-up menu for changing the magnification of the
Canvas.
To change the Canvas zoom, do one of the following:
m Open the Canvas zoom pop-up menu at the bottom of the Canvas and choose one of
the magnification options.
m Choose Fit to Window from the Canvas Zoom pop-up menu, then resize the Canvas
window to a new magnification.
m Choose View > Zoom In or Zoom Out.
m With the Canvas active, use the Command-Z keyboard shortcut for Fit to Window.
m With the Canvas active, use the Command-+ or Command-– keyboard shortcut to
zoom in or out.
Transport Controls
The transport controls allow you to generate a RAM preview of your project so you can
preview your titling movie right in the Canvas. When you click the Play button, LiveType
renders each frame into RAM memory. This feature is referred to as a RAM preview.
Canvas Zoom
pop-up menu
Previous frame
Play
Next Frame
Loop

Chapter 1 The LiveType Interface 17
To render a RAM preview of your project in the Canvas:
1 Click the Play button (or press the Space bar when the Canvas or Timeline is active).
The preview renders each frame, then runs through the preview in real time.
2 Stop the preview by clicking anywhere in the Canvas.
The Play icon turns into a Pause icon when the RAM preview is playing. The Loop
button is a toggle that gives you the choice of a single run-through or repeating the
preview in a continuous loop.
See Chapter 8, “Previewing and Fully Rendering Your Titling Movie,” on page 109 for
more about previewing your work.
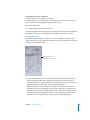
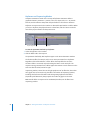
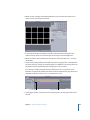
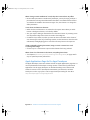
Customizing the Canvas
Most Canvas settings can be customized from the View menu, allowing you to
configure guidelines and magnification, and choose which elements appear in the
Canvas. The grid, rulers, and guides are helpful for precisely aligning and positioning
elements in the Canvas.
To show the rulers or the grid:
m Choose View > Rulers.
m Choose View > Grid.
You can set the number of pixels between each grid line in the Project Properties dialog.
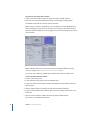
Grid
Ruler for
vertical guides
Ruler for
horizontal guides

18 Chapter 1 The LiveType Interface
To customize the grid:
1 Choose Edit > Project Properties.
2 In the Ruler and Grid Settings area at the bottom, enter a new value in the Grid Width
field.
To add a guide to the Canvas:
m Click inside one of the rulers to insert a guide marked by its horizontal or vertical
pixel position.
To add crosshairs to the Canvas:
m Click inside one of the rulers and drag the pointer onto the Canvas.
To remove guides from the Canvas, do one of the following:
m Drag guide markers off either end of the ruler.
m Choose View > Clear Guides, which removes all guides.
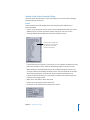
You can isolate a single track and display all other elements as bounding boxes—
rectangles that roughly show the size, position, and orientation of an element. This
option is useful for cleaning up the Canvas as you work on a single track, and it saves
preview-rendering time, because only one item of your composition is being rendered.
Guide marker showing
pixel position
Crosshair guide

Chapter 1 The LiveType Interface 19
To isolate a single track in the Canvas:
m Select the track you want to continue working on, then choose View > Selected Only.
Revert to the normal view by choosing View > Selected Only again.
The Proxy Frame Only option in the View menu–which applies only when you’re using
installed LiveType media—renders LiveFonts, textures, and objects as proxy frames in
the Canvas, essentially freezing their inherent animation.
Particularly when the animated element has highly variable content from frame to
frame (such as Particles objects, which contain few if any pixels in the beginning and
ending frames), the proxy frame is easier to work with, because it shows a more
representative shape of the object regardless of the playhead position.
Bounding boxes show the size
and position of deselected
elements.
Choose View > Selected Only
to view only the contents of
the selected track.

20 Chapter 1 The LiveType Interface
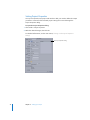
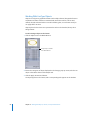
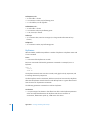
Inspector
The Inspector is your toolbox for transforming elements—text, objects, or images.
There are unlimited combinations of parameters and attributes you can use to make
your titles dynamic and original.
The Inspector consists of a text-entry box and Live Wireframe Preview at the top of the
window, and five tabs of parameters. Inspector settings always apply to the track,
character, or effect that is currently selected in the Canvas or Timeline.
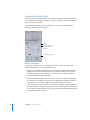
Text-Entry Boxes
There are two areas in the Inspector where you can add text to a track. One of these is
in the upper-left corner of the Inspector. Because this text-entry box is visible no matter
which Inspector tab is selected, it is a convenient way to identify the active track, as
well as to add or change the text on a track, as you can type directly into it. The text-
entry box at the bottom of the Text tab is larger, making it easier to insert and edit
larger amounts of text.
The text-entry boxes also allow you to select individual letters or words on a track.
When you highlight text in the text-entry box, those characters are selected in the
Canvas. This is particularly useful when the text you want to modify is obscured in the
Canvas by other elements.
Text-entry box
Live Wireframe
Preview
Inspector tabs
Text-entry box
(in the Text tab only)
Page is loading ...
Page is loading ...
Page is loading ...
Page is loading ...
Page is loading ...
Page is loading ...
Page is loading ...
Page is loading ...
Page is loading ...
Page is loading ...
Page is loading ...
Page is loading ...
Page is loading ...
Page is loading ...
Page is loading ...
Page is loading ...
Page is loading ...
Page is loading ...
Page is loading ...
Page is loading ...
Page is loading ...
Page is loading ...
Page is loading ...
Page is loading ...
Page is loading ...
Page is loading ...
Page is loading ...
Page is loading ...
Page is loading ...
Page is loading ...
Page is loading ...
Page is loading ...
Page is loading ...
Page is loading ...
Page is loading ...
Page is loading ...
Page is loading ...
Page is loading ...
Page is loading ...
Page is loading ...
Page is loading ...
Page is loading ...
Page is loading ...
Page is loading ...
Page is loading ...
Page is loading ...
Page is loading ...
Page is loading ...
Page is loading ...
Page is loading ...
Page is loading ...
Page is loading ...
Page is loading ...
Page is loading ...
Page is loading ...
Page is loading ...
Page is loading ...
Page is loading ...
Page is loading ...
Page is loading ...
Page is loading ...
Page is loading ...
Page is loading ...
Page is loading ...
Page is loading ...
Page is loading ...
Page is loading ...
Page is loading ...
Page is loading ...
Page is loading ...
Page is loading ...
Page is loading ...
Page is loading ...
Page is loading ...
Page is loading ...
Page is loading ...
Page is loading ...
Page is loading ...
Page is loading ...
Page is loading ...
Page is loading ...
Page is loading ...
Page is loading ...
Page is loading ...
Page is loading ...
Page is loading ...
Page is loading ...
Page is loading ...
Page is loading ...
Page is loading ...
Page is loading ...
Page is loading ...
Page is loading ...
Page is loading ...
Page is loading ...
Page is loading ...
Page is loading ...
Page is loading ...
Page is loading ...
Page is loading ...
Page is loading ...
Page is loading ...
Page is loading ...
Page is loading ...
Page is loading ...
Page is loading ...
Page is loading ...
Page is loading ...
Page is loading ...
Page is loading ...
Page is loading ...
Page is loading ...
Page is loading ...
Page is loading ...
Page is loading ...
Page is loading ...
Page is loading ...
Page is loading ...
Page is loading ...
Page is loading ...
Page is loading ...
Page is loading ...
Page is loading ...
Page is loading ...
Page is loading ...
Page is loading ...
Page is loading ...
Page is loading ...
Page is loading ...
Page is loading ...
Page is loading ...
Page is loading ...
Page is loading ...
Page is loading ...
Page is loading ...
Page is loading ...
Page is loading ...
-
 1
1
-
 2
2
-
 3
3
-
 4
4
-
 5
5
-
 6
6
-
 7
7
-
 8
8
-
 9
9
-
 10
10
-
 11
11
-
 12
12
-
 13
13
-
 14
14
-
 15
15
-
 16
16
-
 17
17
-
 18
18
-
 19
19
-
 20
20
-
 21
21
-
 22
22
-
 23
23
-
 24
24
-
 25
25
-
 26
26
-
 27
27
-
 28
28
-
 29
29
-
 30
30
-
 31
31
-
 32
32
-
 33
33
-
 34
34
-
 35
35
-
 36
36
-
 37
37
-
 38
38
-
 39
39
-
 40
40
-
 41
41
-
 42
42
-
 43
43
-
 44
44
-
 45
45
-
 46
46
-
 47
47
-
 48
48
-
 49
49
-
 50
50
-
 51
51
-
 52
52
-
 53
53
-
 54
54
-
 55
55
-
 56
56
-
 57
57
-
 58
58
-
 59
59
-
 60
60
-
 61
61
-
 62
62
-
 63
63
-
 64
64
-
 65
65
-
 66
66
-
 67
67
-
 68
68
-
 69
69
-
 70
70
-
 71
71
-
 72
72
-
 73
73
-
 74
74
-
 75
75
-
 76
76
-
 77
77
-
 78
78
-
 79
79
-
 80
80
-
 81
81
-
 82
82
-
 83
83
-
 84
84
-
 85
85
-
 86
86
-
 87
87
-
 88
88
-
 89
89
-
 90
90
-
 91
91
-
 92
92
-
 93
93
-
 94
94
-
 95
95
-
 96
96
-
 97
97
-
 98
98
-
 99
99
-
 100
100
-
 101
101
-
 102
102
-
 103
103
-
 104
104
-
 105
105
-
 106
106
-
 107
107
-
 108
108
-
 109
109
-
 110
110
-
 111
111
-
 112
112
-
 113
113
-
 114
114
-
 115
115
-
 116
116
-
 117
117
-
 118
118
-
 119
119
-
 120
120
-
 121
121
-
 122
122
-
 123
123
-
 124
124
-
 125
125
-
 126
126
-
 127
127
-
 128
128
-
 129
129
-
 130
130
-
 131
131
-
 132
132
-
 133
133
-
 134
134
-
 135
135
-
 136
136
-
 137
137
-
 138
138
-
 139
139
-
 140
140
-
 141
141
-
 142
142
-
 143
143
-
 144
144
-
 145
145
-
 146
146
-
 147
147
-
 148
148
-
 149
149
-
 150
150
-
 151
151
-
 152
152
-
 153
153
-
 154
154
-
 155
155
-
 156
156
-
 157
157


Apple LIVETYPE 2 User manual
- Category
- Software manuals
- Type
- User manual
Ask a question and I''ll find the answer in the document
Finding information in a document is now easier with AI
Related papers
-
Apple MAC FINAL CUT EXP MB278Z/A User manual
-
-
-
-
-
-
-
-
-
Other documents
-
Rexel 2101962 Datasheet
-
 Wiley 978-0-470-38760-3 Datasheet
-
Adobe 12070153 Datasheet
-
 ALGE-Timing Display Studio 2011 User guide
-
Adobe 22040201 User manual
-
 Wiley 978-0-470-22450-2 Datasheet
-
Dell Canvas 27 Owner's manual
-
RGBlink FLEX DS1 User manual
-
 Glyph PortaGig 50 SSD 256GB Specification
-
 Glyph Studio Mini Owner's manual


