Mountain Buggy Breeze Operating instructions

Category
Strollers
Type
Operating instructions
English
1
Welcome
Congratulations on your purchase of a Mountain Buggy.
We know how precious and inspiring a new little person can be in your
world. It’s so important to be able to show your baby to the world and
just as important to show the world to your baby.
At Mountain Buggy you and your baby matter to us. Thats why we
have spent years researching and developing a product that is safe,
comfortable and in tune with modern parents’ needs. We want you to be
able to live your new family lifestyle with all the freedom and satisfaction
you have always experienced.
We also know that many parents use strollers incorrectly and as a result
may put their children at risk. Please take the time to read through this
manual carefully. Your Mountain Buggy will provide you with optimum
safety if you follow the instructions as detailed.
If you have any concerns, questions or comments about your Mountain
Buggy or how to use it, please do not hesitate to contact us. We’d love to
hear from you.
2
Important: read instructions carefully, follow them strictly and keep this booklet for
future reference. Your child’s safety is your responsibility.
Capacity
For all models, the seat is suitable for children from newborn up to 4 years old. For use
with a newborn (0-6 months) the seat should be reclined fully. It is recommended that a
newborn headrest or similar is used for babies 0-3 months.
Other newborn options include:
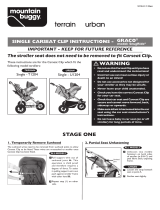
1. Mountain Buggy® Carrycot (available for all models except Swift)
2. Mountain Buggy® Carseat Adapter (available for all single models, except Swift).
Maximum seat loading for all model Single strollers is 35kg/77lb, and 25kg/55lb per seat
on Double and Triple versions. This seat is for a child of 100cm maximum height. Maximum
loading for the storage basket is 5kg/11lb. Maximum loading for the pocket on storage
basket is 300gm/10.5oz (ie only small items such as keys, wallets).
Important Use Information
This stroller is designed for one child in each seat.
Passenger should remain seated (no standing in the stroller).
To prevent the stroller from becoming unstable, do not place parcels or accessory items
anywhere except in the storage basket and pockets provided. Do not hang items such as
shopping bags from the frame.
Overloading and incorrect folding may damage or break this stroller.
Accessories or replacement parts that are not approved by the manufacturer or distributor
should not be used.
Excessive weight may create hazardous unstable conditions.
Do not use near an open fire or exposed flame.
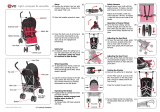
Essential Warnings
WARNING: Never leave your child unattended.
WARNING: Prevent serious injury to your child by using the harness at all
times. Always use the crotch strap in combination with the
waist belt.
WARNING: Do not carry extra children or bags on this stroller.
WARNING: The stroller should not be used unassisted on stairs or
escalators.
WARNING: Take care when folding or unfolding the stroller to prevent
your fingers being entrapped.
WARNING: Any load attached to the handle affects the stability of the stroller.
WARNING: Make sure children are clear of any moving parts when you
adjust this stroller, otherwise they may be injured.
WARNING: Put on all brakes whenever you park the stroller.
WARNING: This product is not suitable for running or skating.
WARNING: Use the safety wrist strap at ALL times the stroller is in use.
WARNING: Avoid serious injury from falling or sliding out. Always use seat belt.
WARNING: (Terrain model only) This seat is not suitable for children under
6 months.
FOR THE SAKE OF YOUR PRECIOUS PASSENGER, PLEASE READ THESE
WARNINGS BEFORE USING YOUR MOUNTAIN BUGGY.
English
3
Erecting and Folding the Stroller
Folding your stroller
1. Fold adjustable handle under
(if applicable).
2. Flick the lock guard out and pull up the
sliding lock on both sides of the heel rest.
NOTE: On Urban and Swift model strollers,
ensure front wheels are unlocked
and rotated forward before folding.
WARNING:
Check that all locking
devices engage correctly
and are not damaged
before use.
Putting up your stroller
When you first receive your stroller,
remove it from the box, remove the
black caps on the rear axles (not on
Urban Single or Swift) and plastic
outer wrapping. Dispose of plastic
wrapping safely to avoid a child
suffocating.
1. Grip stroller near sunhood
joints, and lift.
2. Place pressure on heel rest to ensure
sliding locks are fully engaged.
1.
2.
3.
4.
5.
4
Front Wheel Assembly
1. Holding both knobs at the same time,
unscrew and pull out the front axle.
2. Insert the front wheel.
3. Re-insert the axle and tighten both knobs
by hand to secure wheel in place.
To remove
Repeat above in reverse.
Front Swivel Wheel (Urban and Swift models)
Locking the front wheel swivel(s) is recommended
for use on uneven ground.
To lock: pull knob out and turn it so the ‘locked’
symbol is at the top. Then swivel front
wheel under stroller until it locks into place.
To unlock: pull knob out and turn it 1/4 of a turn
so the ‘unlocked’ symbol is at the top.
Rear Wheel Assembly
1. For Urban and Swift Singles with push-in axle:
• Pushforwardonthegreyaxlerelease
tab and push the axles out slightly
and release the tab.
• Pushtheaxleoutfurtheruntilyouhearaclick.
2. For all buggies:
• Slidewheels(withbrake
cog facing inwards)
onto the axles.
• Pusheachwheelonuntil
it clicks into place. Pull on
the wheel to ensure it is secure.
knob
Wheel Assembly
axle
To remove
Depress quick release clip and
slide wheel off axles. Urban
Single and Swift axles can
be pushed in to reduce the
total folded size. Push the axle
release tab and push the axles
in until they click into place.
spaceraxle
NB: On Terrain Double
remember to insert
the spacer between
the front wheels.
English
5
Safety Harness
To fasten
1. Clip shoulder straps to waist strap buckles.
2. Push both waist buckle ends into crotch strap.
To release the harness
1. Squeeze the tabs on either side of the main
buckle with thumb and forefinger.
To adjust width for a new born
1. Unclip all straps from the main buckle.
2. Thread the main buckle and crotch strap
through the centre fabric slot on the seat.
3. Thread the side straps through the side fabric
slots.
To adjust
1. Adjust sliding buckles so
harness straps fit firmly.
Shoulder Straps
The stroller comes with the shoulder straps set in the newborn
position. Shoulder strap height should be located just below or
level with a child’s shoulders. The older the child, the further up
the seat the straps need to be.
To adjust:
1. Locate buckle by slipping hand up the inside back of the
seat.
2. Push the rectangular shaped buckle through the insertion
slot on an angle, pushing the corner of the buckle first.
3. Re-thread the corner of the buckle through the most
suitable height insertion slot for your child.
4. Once the buckle is through the slot, twist it so it is
flat against the seat back and then check it is secure by
pulling on strap.
NB: Initial adjustment from newborn position requires you to follow
points 1 and 2, then continue to unthread until the shoulder strap
is completely out of the hammock. Then rethread the shoulder
strap at the right height as per the instructions 3 and 4.
NB: Make sure baby is
positioned down as
far as possible in seat.
1
2
3
Centre
fabric
slot
Side
fabric
slot
NB: a separate safety harness
conforming to British Standard
BS6684 may be attached to
the two ‘D’ rings located at the
insertion of the waist harness.
6
Seat Recline
The seat back can be reclined to any position
between the upright and fully reclined positions.
To recline
Pull on the buckles to slide the straps through the
buckles and recline the seat.
To raise
Pull straps through the buckles to raise the seat angle.
buckles
strap
English
7
It is important to put the brake on whenever you park
the stroller. Ensure it is on when putting your child in
or taking your child out of the stroller.
Brake
Safety Wrist Strap
Use the safety wrist strap in all situations. Ensure that
the loop of the strap is located around the wrist of
the person pushing the stroller.
Care should be taken if the stroller is used down hills
or in strong winds.
To release: lift brake lever completely up.
To apply: push brake lever completely down.
wrist strap
brake lever
WARNING: The stroller should not
be used unassisted on
stairs or escalators.
8
Seat removal
1. Unfasten seat
domes from frame
along side tubes
(4 domes each side).
2. Unfasten straps
underneath seat
and those attached
to frame (1 strap
each side).
3. Unfasten the domes
which fasten the
sunhood and seat
together.
Removing Seat and Sunhood
Sunhood removal
1. Pull support wire out of sunhood joint by
pushing against frame and pulling wire
downwards.
Note:
this operation is child proof
and therefore requires a degree of force.
2. Repeat on opposite side.
3. Unfasten sunhood domes that attach the
sunhood to stroller frame and to stroller
seat back.
sunhood
support wire
plastic joint
For Terrain models
only, push seat
forward then slide
fabric up seat
support wire and
remove hammock
wire from stroller
frame.
NB:
To refit seat:
follow removal instructions in reverse.
Ensure fabric is domed OVER frame.
To refit sunhood:
follow removal
instructions in
reverse.
English
9
Regular maintenance is needed to keep the stroller working effectively and safely.
Cleaning
Fabric: The outdoor fabric should be cleaned regularly. Brush off any excessive
dirt or sand and rinse with lukewarm water. Fabric can be removed and
washed by hand using a mild natural soap solution in lukewarm water
(no more than 38°C/100°F). Rinse thoroughly. DO NOT tumble dry or dry
in strong sunlight.
Frame: If the buggy is used in exposed environments such as salt water, salt
spray or beach sand, wash any steel parts of the stroller by hosing the
stroller or use warm soapy water, dry thoroughly and protect by spraying
with light aerosol can oil, eg WD40® or CRC®.
NB: To avoid fabric fading, cover the stroller if it is exposed to direct sunlight through
glass, eg in a car or if stored in exposed areas.
Fabric may fade due to intense exposure to direct sunlight.
Fabric may develop mould or mildew if stored in humid or damp conditions.
Storage
Store stroller inside in a dry place but away from central heating units/radiators and do
not store in airing or hotwater cupboards.
NB: These tyres use natural rubber that may stain some surfaces. Do not park your buggy on a
newly polished or varnished surface as the natural rubber may react with solvents or other
chemicals present in the varnish or polish. When storing your buggy we recommend using
a cloth or mat in between the tyres and hard surfaces such as vinyl, linoleum, polished
flooring or your car’s interior surfaces such as seats and plastic trims.
Wheel Alignment
(Terrain only)
It may be necessary to periodically
adjust wheel alignment if the stroller
steers to one side.
1. Loosen all four nuts holding
struts in position.
2. Slightly tighten outside nut on the opposite side to the direction it is pulling
(eg if its steering to left tighten nut D).
3. Test the stroller by pushing it on a smooth flat surface.
A
B
D
C
Buggy Care
10
4. When the correct steering is achieved, turn the outside nut on the opposite
side so it just touches the side of the tube.
5. Tighten the inside nuts.
Tyres/Tubes
1. If a puncture occurs the inner tube can be repaired with a bicycle repair kit,
or replaced. If tread becomes worn the tyre should be replaced. Contact your
local dealer, or most cycle stores have tubes and repair kits.
2. Inflate tyres to pressure of 20psi (140KPa). Do not exceed 30psi (210KPa).
Handlebar Grip
Take care to protect the handlebar grip from
abrasion or sharp objects. Your authorised dealer
can arrange replacement grips and instructions if
required.
Brake
The brake should be lubricated regularly to maintain optimum operation. It may require
extra lubrication if it is difficult to operate.
lubricate this surface
Buggy Care (continued)
English
11
Transporting your Stroller
A special locking strap is located on the handlebar support bar. Wrap this strap around
the axle and then clip fasteners together to secure stroller closed when folded.
Sunhood
The sunhood can be fastened back by applying the
velcro on the sunhood window flap to the velcro
on the inside edge of the sunhood.
Pump
To use the pump, remove the connection hose and
attach relevant ends to top of pump and wheel valve. Do not overtighten.
Ensure there is no tension on the connection hose while inflating tyre.
Protective Covers (Sun and Storm)
Fasten these accessories to the top and side tubes using the Velcro tabs. The covers fit
over the sunhood and the elastic loops are placed over the lugs beneath the footplate.
Note The Swift suncover zips onto the
front of the stroller sunhood.
Important
Remove the storm or sun cover before
folding the stroller to avoid damage.
Remember not to leave the storm
cover on in warm conditions, and
check your child’s comfort frequently.
Bumper Bar (not supplied with all models)
To attach the Bumper Bar:
1. Pull fabric back above vertical tube
to expose the frame.
2. Fit snap-lock of bumper bar to frame, between
vertical tube joint and sunhood joint.
3. Close locks on both sides to securely
lock onto frame.
WARNING: The Bumper Bar does not replace safety harness. Secure infant
in safety harness at all times. Do not use the Bumper Bar as a
carrying handle.
Top Tips
velcro
lug lug
12
Our warranty & service promise
In the world of Mountain Buggy, parents and children who use our products are the
people that matter most to us. Quality and safety are two of our most valued attributes.
For this reason, we offer a warranty programme that will give you total confidence in the
quality of our products.
A three year warranty is applied to the frame and fabric of all Mountain Buggy strollers.
A one year warranty also applies on any authorized Mountain Buggy product
accessories. The warranty is valid in any country where Mountain Buggy has an
approved distributor (please see the back of this instruction manual for details of the
location of regional distributors).
If during the warranty period our product has a manufacturing fault we will repair it free
of charge. If it is not practical to repair it then we will, at our sole option, replace the part
in question.*
Key Benefits
Is it transferable?
YES! Mountain Buggy products are built to last, so the balance of our stroller warranty is
fully transferable to a second user as long as they reregister the product. Registration
is via the warranty card included in the back of this instruction manual or online
at www.mountainbuggy.com
What is covered?
This warranty covers all defects in workmanship and materials, as long as the product
has been used and stored in normal conditions, in accordance with the instructions
and has been properly maintained.
What is not covered?
We have taken great care in this manual to outline how your product needs to be looked
after and used and therefore we cannot be responsible for anything that you choose to
do that is not in line with these instructions. Excluded from the warranty
is any product:
That has been incorrectly assembled
That has been modified or repaired by an unauthorized source
That has been damaged by misuse, accident, abuse or neglect
That has been damaged by corrosion, rust or fabric damage due to storage in
extreme environmental conditions, including without limitation high humidity,
salt spray, ice or snow.
Mountain Buggy
World Warranty
English
13
Mountain Buggy
World Warranty
(continued)
That has not been cleaned and maintained according to our specifications
That has failed due to normal wear and tear, including without limitation wear
and tear to handlegrips and fabric and fading of fabric and components.
Our warranty also does not cover tyres and inner tubes.
Are there any extra charges?
The customer is always responsible for any freight charges to send the faulty product to
a Mountain Buggy Customer Care Centre. Mountain Buggy will cover all return freight
costs to you for warranty items but may charge a fee if the product is not covered
under the warranty conditions.
Anything else you should know?
Loan strollers may be available and will be allocated on a case by case basis.
If you have a general repair requirement please call our Customer Care Centre to discuss
how we may be able to assist.
Is anything excluded?
Unless we have agreed specifically in writing, we will have no liability to you or any
other person for any damage of any kind caused to you or any other person as a result
of using any Mountain Buggy branded product.
Who should you contact?
To have a chat about any concerns related to any of our products or about the full
terms of the Mountain Buggy World Warranty or if you would like to make a claim,
please contact one of our Customer Care Centres in your area as outlined on the
back page of this booklet.
*The customer may have additional rights or remedies under consumer protection legislation in some countries or states.
14
Parts of the Stroller Frame
Handlebar
Handle Adjuster
Sunhood Support Wire
Side Tube
Sunhood Joint*
Down Tube
Under-Carriage Tube
Heel Rest
Sliding
Lock*
Sliding Lock*
Accessory Lug
Front Wheel
Front Wheel Swivel*
(Urban Only)
Foot
Plate
Swivel Knob
Brake Lever
Brake Cog
Brake Cam*
Rear Axle
Quick Release Clip
Rear Wheel
Fastener
Note: Diagram is Urban Single Model
*Points to lubricate periodically
Secondary
Lock
  • Page 1 1
  • Page 2 2
  • Page 3 3
  • Page 4 4
  • Page 5 5
  • Page 6 6
  • Page 7 7
  • Page 8 8
  • Page 9 9
  • Page 10 10
  • Page 11 11
  • Page 12 12
  • Page 13 13
  • Page 14 14

Mountain Buggy Breeze Operating instructions

Category
Strollers
Type
Operating instructions

Ask a question and I''ll find the answer in the document

Finding information in a document is now easier with AI