- 9 -
There is a risk of explosion if the battery is replaced by an
incorrect type of battery.
Powering on the V2201
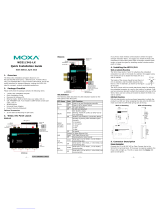
To power on the V2201, connect the “terminal block to power jack
converter” to the V2201’s DC terminal block (located on the side panel),
and then connect the 9 to 36 VDC power adapter. Press the Power Button
to turn on the computer. Note that the Shielded Ground wire should be
connected to the top pin of the terminal block. It takes about 30 seconds
for the system to boot up. Once the system is ready, the Power LED will
light up.
Connecting the V2201 to a PC
Power on the V2201 computer after connecting a monitor, keyboard, and
mouse, and verifying that the power source is ready. Once the operating
system boots up, the first step is to configure the Ethernet interface. The
factory default settings for the V2201’s LANs are show below (W7E uses
DHCP).
Configuring the Ethernet Interface
Linux users should follow these steps:
If you use the console cable to configure network settings for the first
time, use the following commands to edit the interfaces file:
#ifdown –a
//Disable LAN1~LAN2 interface first, before you
reconfigure the LAN settings. LAN1 = eth0, LAN2 = eth1//
#vi /etc/network/interfaces
//check the LAN interface first//
After the boot setting of the LAN interface has been modified, use the
following commands to immediately activate the LAN settings:
#sync; ifup –a
W7E users should follow these steps:
View
network status and tasks
Change adapter setting.
In the Local Area Connection Properties screen, click Internet
Protocol (TCP/IP) and then select Properties. Select Internet
Protocol Version 4, and then click Properties.
Click OK after inputting the proper IP address and netmask.