Work Sharp E5 User manual

Category
Knife sharpeners
Type
User manual

Work Sharp E5 is a versatile electric sharpener that provides three sharpening stages: SHAPE, SHARPEN, and REFINE. It features a dual-grit ceramic honing rod for maintaining a sharp blade between sharpenings and a MicroForge feature for cold forging micro-facets along the cutting edge, extending the blade's life and improving its cutting performance. The E5 also has expandable sharpening capabilities with the E5 Upgrade Kit, which includes additional sharpening guides and a master belt kit.

Work Sharp E5 is a versatile electric sharpener that provides three sharpening stages: SHAPE, SHARPEN, and REFINE. It features a dual-grit ceramic honing rod for maintaining a sharp blade between sharpenings and a MicroForge feature for cold forging micro-facets along the cutting edge, extending the blade's life and improving its cutting performance. The E5 also has expandable sharpening capabilities with the E5 Upgrade Kit, which includes additional sharpening guides and a master belt kit.

USER’S
GUIDE
Safety ............................................................................................... 3
Tour Your Sharpener ............................................................................. 5
Sharpening Basics ............................................................................... 6
Ceramic Honing Rod ............................................................................ 7
MicroForge ........................................................................................ 8
Serrated Knives ................................................................................... 9
Scissors/Shears .................................................................................. 9
Changing/Replacing Belts ................................................................... 10
Removing Guides .............................................................................. 10
Sharpening Belt Information ................................................................. 11
Belts and Accessories ......................................................................... 11
TABLE OF CONTENTS
THANK YOU FOR PURCHASING THIS SHARPENER.
Your purchase supports our fourth generation family owned business. All of our
products are designed, hand assembled, quality checked and shipped from our
headquarters in Ashland, Oregon. We are confident you will be pleased with
your purchase, but if not, please get in touch so we can make it right. We aim
to surprise and delight the people who buy and use our products and would
love to hear how we are doing. Let us know what you are slicing and dicing on
Facebook and Instagram (#worksharpculinary). Until then, enjoy your delicious
homemade meals, prepped by your sharp knife.
TEAM DAREX
PHONE: 1.800.418.1439
WEB: www.worksharpculinary.com
WARRANTY
REGISTER ONLINE AT: www.worksharpculinary.com
3-year warranty on all Work Sharp Culinary components; excludes abrasives.
Warranty for consumer use, not commercial or industrial use.
For tips and tricks, instructional videos,
and frequently asked questions, visit
WorkSharpCulinary.com
3
IMPORTANT SAFEGUARDS
WARNING! READ all safety warnings and all instructions. When using electrical
appliances, basic safety precautions should always be followed. Every user should read
these instructions.
WARNING! You will be creating incredibly sharp knives and tools with this sharpener.
Please handle them with care. Use caution to avoid cutting yourself.
FOR HOUSEHOLD USE ONLY
Close supervision is necessary when any appliance is used by or near children.
Children should not play with appliance.
Do not let the power cord hang over edge of table or counter.
The appliance is only to be used with the power supply unit provided with the appliance.
It must be supplied at safety extra low voltage corresponding to the marking on the
appliance.
For US market, this appliance is to be supplied with a UL-approved “class 2 power
supply”.
For Canadian market, this appliance is to be supplied with CSA22.2 No. 223 approved
power supply.
Do not abuse the cord. Never use the cord for carrying, pulling or unplugging the
appliance. Keep cord away from heat, oil, sharp edges and moving parts. Damaged or
entangled cords increase the risk of electric shock.
Carefully route the power cord to avoid damage from the knife blades while sharpening.
The ON and OFF indicators for the appliance are designated by the illumination of LEDs
on the appliance Power Switch .
Do not use appliance with a damaged cord or plug or after the appliance malfunctions or
is dropped or damaged in any manner. Return appliance to the nearest qualied service
center for examination, repair or electrical or mechanical adjustment. (Type X attachment).
Unplug from outlet when not in use, before putting on or taking off parts, and before
cleaning.
Stay alert. This appliance is not to be used by persons (including children) with reduced
physical, sensory or mental capabilities, or lack of experience and knowledge, unless they
have been given supervision or instruction.
To protect against electrical hazards, do not immerse in water or other liquid. Do not
expose to rain or wet conditions.
SAFETY
4
Avoid contact with moving parts.
Only use replacement parts or attachments recommended or sold by the manufacturer.
Use of unauthorized parts may cause re, electric shock or injury.
Only insert clean knife blades into the appliance. Do not attempt to sharpen axes or other
tools, or any blade that does not t properly into the sharpening slots.
Do not use oils, water or any other lubricant with appliance.
Do not operate appliance if the switch does not turn it on and off.
Do not use outdoors.
WARNING! This product contains chemicals known to the State of California to cause
cancer, birth defects or other reproductive harm. Some dust created by power sanding,
sawing, grinding, drilling and other such activities contains chemicals or particulates harmful
to humans. Your risk from these exposures varies, depending on how often you do this type
of work. To reduce your exposure to these chemicals, work in a well ventilated area, and
work with approved safety equipment, such as dust masks that are specically designed to
lter out airborne microscopic debris.
SAVE THESE INSTRUCTIONS
— Original Instructions —
SERVICE
Please contact Darex Customer Support:
DAREX, LLC
210 E. Hersey St.
Ashland, OR 97520 USA
WEB: www.worksharpculinary.com
PHONE: 1.800.418.1439
FAX: 1.541.552.1377
V .......................Volt A ............ amperes
Hz .....................Hertz W ........... watts
min ....................minutes ......... alternating current
..................direct current
n
o ........... no load speed
....................Class III Construction .......... earthing terminal
.....................safety alert symbol rpm ......... revolutions or
reciprocations per minute
THE APPLIANCE LABEL MAY INCLUDE THE FOLLOWING SYMBOLS:
5
ELECTRIC
SHARPENER
CERAMIC
HONING ROD
Edge Rollers
One Touch Programming
Belt Storage
Sharpening Guides
MicroForge
Dual Grit Ceramic Rod
17° Sharpening Guides
SHAPE* Triple Click 90 sec Cycle
SHARPEN Double Click 90 sec Cycle
REFINE Single Click 45 sec Cycle
STOP Single Click Stops Cycle
TOUR YOUR SHARPENER
ONE TOUCH PROGRAMMING
The E5 includes One Touch Programming, providing 3 stages:
*Also runs as untimed cycle with the REPAIR AND RESTORE recipe in the E5
UPGRADE KIT (sold separately).
The E5 has expandable sharpening capabilities with the E5 UPGRADE KIT:
15° EAST GUIDES — For Asian style knives.
20° WEST GUIDES — For European style knives.
MASTER BELT KIT — For more sharpening applications.
E5 Upgrade Kit sold serparately at retailers or worksharpculinary.com.
6
17° STANDARD RECIPE
All purpose recipe for any knife style.
SHARPEN STAGE | DOUBLE CLICK | 90 SECOND CYCLE
For best results, complete the full timed cycle.
MAINTAIN
TIP: Maintain once or twice per week
Use CERAMIC HONING ROD or cycle through REFINE stage.
REFINE STAGE | SINGLE CLICK | 45 SECOND CYCLE
Use this stage to maintain a sharp blade between sharpenings. For best results,
complete the full timed cycle, alternating sides.
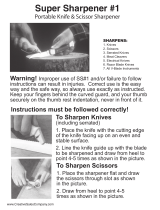
SHARPENING BASICS
1. Insert the heel of the knife into the left
sharpening guide, keeping it up against the
leather lining and softly resting on the front
edge roller.
2. Using light pressure, slowly pull your knife
blade through the sharpening guide
(8” knife = 8 seconds per side).
3. Repeat on the right guide. Continue
alternating sides until the machine
automatically shuts off.
TIP: The sharpener will automatically
decrease in speed as it switches from the
SHARPEN stage to the REFINE stage. The
front light will flash letting you know when
it will change speed, and when the cycle
is almost complete.
4. Test for sharpness by slicing a tomato or bell
pepper.
a. If the blade slices well, proceed to
step 6 in the CERAMIC HONING ROD
section.
b. If your blade doesn’t slice easily, repeat
steps 1 – 4 using SHAPE stage (triple
click).
TIP: If you have repeated SHAPE stage 3
times through and blade still doesn’t slice
easily, we recommend the REPAIR AND
RESTORE recipe in the E5 UPGRADE KIT
(sold separately) for faster results.
Keep the knife lightly resting against
the leather lining and on rollers as
you pull through slowly.
7
The ceramic honing rod included with the E5 Electric Sharpener was designed to
work in combination with the E5’s 17° STANDARD GUIDES.
CERAMIC HONING ROD
Sharpening Guide
Sharpening Guide
MicroForge
For best results, use built-in
angle guides.
Coarse
Fine
CERAMIC ROD
CROSS SECTION
1. Insert the ceramic rod into the handle.
Twist a quarter turn to set.
2. Continue to twist until the coarse (ribbed)
side lines up with the guides.
3. Hold the handle vertically with the rubber
tip of the honing rod resting on a cutting
board.
4. Place the heel of your knife against one
of the guides to establish the proper
sharpening angle. While maintaining the
angle established by the guide, slowly
draw the entire length of blade, from heel
to tip, along the full length of the ceramic
rod with light pressure.
5. Repeat 10 slow, alternating strokes.
6. Now, twist the ceramic rod so the fine
(smooth) side lines up with the guides.
Using light pressure, make 10 alternating
strokes. Lighter pressure creates sharper
results.
8
MICROFORGE
Our exclusive MicroForge feature cold forges micro-facets along the cutting edge,
extending the life of your blade between sharpenings, increasing cutting control,
and creating more durability.
You only need to apply the MicroForge edge 1-2 times per year. Maintain your
MicroForged edge with standard honing using the CERAMIC HONING ROD or
the REFINE stage on the E5.
1. First sharpen your knife using the E5
sharpener.
2. Remove the Ceramic Rod from the handle.
3. Hold the handle vertically, resting the base
on a cutting board.
4. Place the tip of the blade into the
MicroForge slot and hold the knife parallel
to the cutting board.
5. Slowly PUSH entire length of blade
through slot ONCE. Keep blade resting
against handle of the honing rod as you
push the knife through.
TIP: Use moderate force, (similar pressure required to
cut a sweet potato, approx 4 lbs pressure).
6. Now hone the blade by reinstalling the
ceramic rod into the handle, with the fine,
smooth side lining up with the guides.
TIP: You can also hone using the REFINE stage
7. Make 10 slow, alternating strokes.
MicroForge works especially well for cutting
veggies, fruits, cooked proteins, and crusty
breads.
Hone the MicroForged edge
See how to remove MicroForge in the
FREQUENTLY ASKED QUESTIONS
page on WorkSharpCulinary.com.
9
1. Remove the right sharpening guide to
expose the scissor guide.
2. Open the front cover and keep open.
Single click for the REFINE stage.
3. Place the scissor blade, flat side facing
up, all the way to the hinge, resting on the
scissor sharpening guide as shown.
4. Using light pressure against the belt, pull
blade straight along the belt (keeping it
flat against the guide).
5. Flip the scissors and repeat on the other
blade, flat side facing up, staying on the
right side of sharpener
TIP: For left handed scissors, use left side
of the sharpener.
SCISSORS/SHEARS
Sharpen
ONLY
the beveled side of your scissors.
BEVEL
SCISSOR
GUIDE
TOP VIEW
FL AT
Most serrated and bread knives have a flat side and a beveled side on the blade.
Sharpen only the FLAT SIDE using the CERAMIC HONING ROD.
1. Align the fine (smooth) side of the ceramic
rod with the guides.
2. Hold the handle hoizontally.
3. Lay the knife flat on the rod with the flat
side of the blade resting on the rod.
Pull from heel to tip across the rod for 5
strokes at a slight angle.
SERRATED KNIVES
10
1. Pull open the front cover of the unit. Cover
is secured with magnet.
2. Press down on the tensioner, located
behind the top, large pulley (wheel).
3. Holding tensioner down, slide belt off.
4. Lift up tensioner to find extra belt storage.
5. To install new belt, hold tensioner down
and slide belt around all 3 pulleys
(wheels).
For more info about belts, see SHARPENING
BELT INFORMATION section.
CHANGING/REPLACING BELTS
ON
OFF
Belts
Belt Tensioner
1. Push back on guide from the front of the
sharpener until the guide snaps out of
place.
2. Lift the guide to remove.
TIP 1: Remove guides to clean debris on the leather
liner with a dry cloth or brush.
TIP 2: Remove right or left guide to access scissor
guide. See sharpening scissor section for more detail.
3. To reinstall guide, align screw with hole on
sharpener.
4. Push the guide forward toward the front
of the sharpener until it snaps into place.
Make sure it is flush with the sharpener.
The E5 Upgrade Kit includes
expandable sharpening capabilities
with 15° EAST GUIDES and 20°
WEST GUIDES (sold separately).
REMOVING GUIDES
11
SHARPENING BELT INFORMATION
Our belts have been tested to provide optimum material removal while being
gentle on your knives. Our belts run at controlled speeds, keeping your knives
cool while sharpening.
ABRASIVE BELT WEAR
Belt discoloration is not an indicator of wear. Our engineered belts expose new
abrasive as they break down.
ADDITIONAL BELTS INCLUDED IN THE E5 UPGRADE KIT (SOLD SEPARATELY)
COLOR: White
GRIT: X4 (3000)
DESCRIPTION: Fine
USE: Refine
COLOR: Grey
GRIT: X30 (1000)
DESCRIPTION: Medium
USE: Sharpen, Refine
COLOR: Red
GRIT: P120 Ceramic
DESCRIPTION: Coarse
USE: Shape, Sharpen, Rene
COLOR: White
GRIT: X4 (3000)
DESCRIPTION: Fine
USE: Refine
COLOR: Grey
GRIT: X30 (1000)
DESCRIPTION: Medium
USE: Sharpen, Refine
COLOR: Blue
GRIT: P120 ZA
DESCRIPTION: Extra Coarse
USE: Repair & Restore
BELTS AND ACCESSORIES
Upgrade Kit .......................................................................... CPAC004
(Includes: 15° East guides, 20° West guides, Repair and Restore Recipe, Master Belt Kit)
Replacement Master Belt Kit ...................................................... CPAC005
(5 belt kit includes: 1-Blue P120 ZA, 2-Red P120, 1-Norax X30, 1-Norax X4)
Replacement Belt Kit ................................................................ CPAC006
(3 belt kit includes: 3-Red P120 belts)
DAREX, LLC
PO Box 730
210 E Hersey St.
Ashland OR 97520
PHONE: 1.800.418.1439
FAX: 1.541.552.1377
WEB: www.worksharpculinary.com
KITCHEN KNIFE SHARPENERS:
CPE5
00119 Rev 0
  • Page 1 1
  • Page 2 2
  • Page 3 3
  • Page 4 4
  • Page 5 5
  • Page 6 6
  • Page 7 7
  • Page 8 8
  • Page 9 9
  • Page 10 10
  • Page 11 11
  • Page 12 12

Work Sharp E5 User manual

Category
Knife sharpeners
Type
User manual

Work Sharp E5 is a versatile electric sharpener that provides three sharpening stages: SHAPE, SHARPEN, and REFINE. It features a dual-grit ceramic honing rod for maintaining a sharp blade between sharpenings and a MicroForge feature for cold forging micro-facets along the cutting edge, extending the blade's life and improving its cutting performance. The E5 also has expandable sharpening capabilities with the E5 Upgrade Kit, which includes additional sharpening guides and a master belt kit.

Ask a question and I''ll find the answer in the document

Finding information in a document is now easier with AI