ekwb EK-Quantum User manual

Type
User manual
USER GUIDE
DISTRIBUTION PLATE
EKQuantum
Reflection2 Torrent DDC 4.2 PWM D-RGB – Plexi
The installation of the product is intended to be undertaken by
an adequately trained and experienced person. You are installing
the product at your own risk. If you are not sufficiently trained
or experienced or feel unsure about the installation procedure,
please refrain from installing the product yourself and contact
our tech support for assistance. We disclaim our liability for any
damages to the product and incidental, consequential, or indirect
damages incurred due to improper or inappropriate installation.
Before you start using this product, please follow these basic guidelines:
Read this manual carefully before beginning the installation
process.
The EK-Quantum Torque fittings require only a tiny amount
of force to screw them firmly in place since the rubber O-ring
gaskets ensure the liquid seal.
Corrosion-inhibiting purpose-made coolants are always
recommended for any liquid cooling system. EK recommends
EK-CryoFuel coolants for worry-free usage.
- 3 -
TABLE OF CONTENT
BOX CONTENT 4
DISTRIBUTION PLATE DIMENSIONS 5
TECHNICAL SPECIFICATIONS AND PRODUCT PARTS 6
PREPARING THE FRACTAL TORRENT CHASSIS 7
OPTIONAL: INSTALLING THE BOTTOM RADIATOR IN THE FRACTAL TORRENT CHASSIS 8
PREPARING THE EK-Quantum Reflection2 Torrent DDC 4.2 PWM D-RGB DISTRIBUTION PLATE 9
INSTALLING THE EK-Quantum Reflection2 Torrent DDC 4.2 PWM D-RGB DISTRIBUTION PLATE INTO CHASSIS 11
RECOMMENDED DISTRIBUTION PLATE CONFIGURATIONS 13
FLOW DIAGRAM 14
CONNECTING THE D-RGB LED STRIP 15
CONNECTING THE PUMP 15
TESTING THE LOOP 16
SUPPORT AND SERVICE 17
SOCIAL MEDIA 17
- 4 -
BOX CONTENT
8 mm
6 mm
4 mm
EK-Quantum Reflection2 Torrent
DDC 4.2 PWM D-RGB – Plexi
Metal Radiator Bracket IDENT: 106328
M4 x 8 DIN7991 Screw (2 pcs
M4 x 6 DIN7984 Screw (2 pcs)
M4 x 4 DIN7984 Screw (6 pcs)
M4 x 0.8 Metal Washer (2 pcs)
2.5 mm Allen Key (1 pc)
EK-Loop Multi Allen Key (1 pc)
Mounting Mechanism: Reflection2 Torrent DDC 4.2 PWM – IDENT: 105703
- 5 -
DISTRIBUTION PLATE DIMENSIONS
14 mm
56.8 mm
91.6 mm
111.9 mm
132.2 mm
161.6 mm
181.9 mm
202.2 mm
230.2 mm
258.2 mm
312 mm
333 mm
62 mm
62 mm
72 mm
80.4 mm
90.3 mm
118.3 mm
145.6 mm 40.4 mm
31.4 mm
27.4 mm27.4 mm
40.4 mm
31.4 mm
- 6 -
TECHNICAL SPECIFICATIONS AND PRODUCT PARTS
6
4
5
16
1
12
15
16
17
2
11
9
Technical Specification:
Dimensions with the attached pump (W x D x H): 145.6 x 40.4 x 333 mm
– D-RGB LED count: 18
– D-RGB cable length: 500 mm
– D-RGB connector: standard 3-pin (+5V, Data, Blocked, Ground)
Position EAN Description Quantity
1105689 TOP Plexi (Block part) 1
2105694 Inox Backplate 1
3105690 TOP Plexi (Lid part) 1
43831109837580 EK-DDC 4.2 PWM (12V SATA) 1
55154 OR 52 x 3 NBR50 1
69018 Screw M4 x 25 DIN7984 4
78207 Screw M4 x 14 DIN7991 33
8101556 LED D-RGB strip 500/300 mm 1
9102639 EK - Plug G1/4 9
10 105693 LED Cover (Black) 1
11 104599 Mylar sticker 1
12 8472 Screw M3 x 6 DIN7991 12
13 105697 OR - 216 x 2 1
14 105698 OR - 75 x 2 1
15 105699 OR - 151 x 2 1
16 105700 OR - 19 x 2 2
17 105701 OR - 85 x 2 1
18 105702 OR - 55 x 2 1
19 3831109834282 Plug cover (Acetal) 9
10
14
7
13
8
19
9
3
18
- 7 -
PREPARING THE FRACTAL TORRENT CHASSIS
STEP 1
Remove the front and side panels of your Fractal Torrent case.
STEP 2
Remove the front fans with upper and lower front bracket covers.
Then unscrew the bottom bracket thumb screws and carefully
pull them outside the case. If you are installing a bottom radiator,
remove all fans from the bottom of the case. Otherwise, you just
need to remove the one closest to the front panel.
Before inserting the EK-Quantum Reflection2 Torrent DDC 4.2
PWM D-RGB – Plexi distribution plate, you must remove all the
abovementioned elements.
STEP 1
STEP 2
Remove just
this fan if you
aren’t using
a bottom
radiator.
LOWER FRONT
BRACKET COVER
UPPER FRONT
BRACKET COVER
- 8 -
STEP 2
Once you have successfully pulled the bottom bracket outside the
chassis, mount the radiator and carefully tighten the screws without
completely fixing it in place. This step is crucial if you want to install
hard tubing without difficulties.
STEP 2
OPTIONAL: INSTALLING THE BOTTOM RADIATOR IN THE FRACTAL TORRENT CHASSIS
STEP 1 For this step, you need:
Important: These steps are to be followed if you are
using the EK-Quantum Surface P240 radiator and hard
tubing. 360mm or longer radiators cannot be used in the
bottom of the chassis when EK-Quantum Reflection2
Torrent DDC 4.2 PWM D-RGB distribution plate is
installed. Also note that EK-Loop Vertical GPU holder is
NOT compatible with the bottom radiator in this case.
STEP 1
Position the Quantum Surface fittings and end tank plugs as seen
in the image so that you can use tubing parallel to the longest side
of the radiator.
EK-Loop Multi Allen Key
- 9 -
STEP 3
Place the bottom bracket with the installed radiator inside the
chassis and tighten the thumb screws. After that, move the radiator
as far back as possible against the PCI slot brackets.
STEP 3
PREPARING THE EK-Quantum Reflection
2
Torrent DDC 4.2 PWM D-RGB DISTRIBUTION PLATE
STEP 1
STEP 1
Take the metal radiator bracket and tighten it on the EK-Quantum
Reflection2 Torrent DDC 4.2 PWM D-RGB distribution plate with two
(2) M4x8 DID7991 screws from the mounting mechanism packaging.
For this step, you need:
2.5 mm Allen Key
M4 x 8 DIN7991 SCREW
METAL RADIATOR
BRACKET
- 10 -
STEP 2
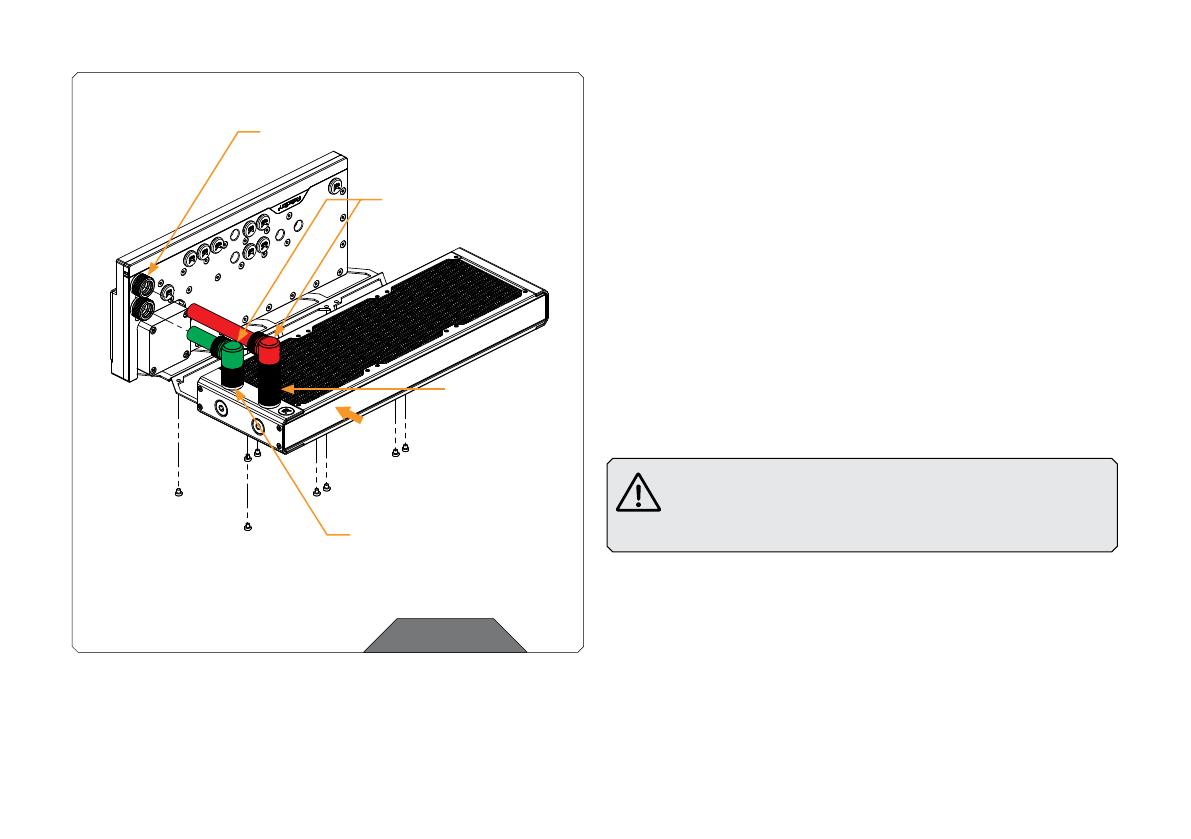
Optional Step 2.1 (Using the Front and Bottom Radiator – GREEN)
Install the following in this sequence: EK-Quantum Torque Extender
Rotary MF 14mm, EK-Quantum Torque Angled – 90°, and EK-
Quantum Torque HTC fitting on the radiator port closer to the
distribution plate. EK-Torque HTC fittings should be installed on the
other radiator port and the bottom two distribution plate holes.
Optional Step 2.2 (Using the Front Radiator Only – RED):
Execute the previous “GREEN” steps with an additional EK-Quantum
Torque Extender Static MF 28mm for the radiator port further from
the distribution plate.
After either of these steps, push the radiator on the bracket with
ports on the bottom, as seen in the image. Make sure you cut the
tubes just right, with the position of the radiator matching the
screw holes on the metal bracket. We suggest the shorter tube be
51 mm and the longer one 107 mm. Once you’re finished with the
placement, tighten the radiator screws.
Important: Optional steps apply when using EK-
Quantum Surface P360 or P240 radiators, or in case of
S360 and S240 radiators when extra 14 mm extenders on
both radiator ports are needed.
STEP 2
TORQUE ROTARY
90° FITTING
14mm EXTENDER
28mm + 14mm
EXTENDER
FITTING
- 11 -
STEP 2
Use six (6) M4x4 DIN7984 screws from the mounting mechanism
packaging to secure the assembly to the front chassis mounting
holes. For extra rigidity, find the distribution plate screw holes
that match the cutout slots of the back side panel and use two (2)
Metal Washers M4 x 0.8 and two (2) M4 x 6 DIN7984 screws to
tighten the distribution plate.
STEP 2
INSTALLING THE EK-Quantum Reflection2 Torrent DDC 4.2 PWM D-RGB DISTRIBUTION PLATE INTO CHASSIS
STEP 1
A) Tilt the whole distribution plate assembly, so it fits inside the
case.
B) When the assembly is inside the case, push it as far to the upper
right corner as possible.
C) Then rotate the bottom assembly until it’s aligned with the front
case mounting holes.
Two M4x6
Two METAL
WASHERS
M4x0.8 For this step, you need:
2.5 mm Allen Key
A B C
STEP 1
Six M4x4
DIN7984
- 12 -
STEP 3
If you plan to use the bottom radiator and the front radiator, make
one straight tube that will go directly from the front to the bottom
radiator and one 90° tube from the distribution plate to the radiator.
We suggest the straight tube be 93.5mm long and match its end
with the 90° tube. Then you can push the tubes into radiator ports
and tighten the fittings.
Now, tilt the case on its side panel and tighten the bottom radiator
screws you can reach.
STEP 3
90° TUBE
STRAIGHT TUBE
TIGHTEN ALL
SCREWS YOU
CAN REACH.
- 13 -
RECOMMENDED DISTRIBUTION PLATE CONFIGURATIONS
DRAIN PORT
CPU INLET
FILL PORT
CPU OUTLET
GPU INLET
GPU OUTLET
GPU INLET
FRONT RADIATOR
INLET or BOTTOM
RADIATOR INLET
(when the front
radiator is not used)
BOTTOM RADIATOR OUTLET or
FRONT RADIATOR OULET
(when using only the front radiator)
All ports must be used as marked in the image to complete your
loop.
The remaining unused ports must be closed with the supplied
plugs using the EK-Loop Multi Allen Key.
If one of the prescribed components will not be installed
(eg. bottom radiator or GPU water block) then one INLET
and one OUTLET port still must be joined in order for
this distribution plate to function!
Note that the bottom and front radiator are entirely optional – the
liquid cooling system without either one can be closed.
Only one INLET and one OUTLET port for the GPU
connection can be used, while all other INLET and
OUTLET GPU ports must be closed with G1/4 plugs
(enclosed in the packaging).
- 14 -
FLOW DIAGRAM
DESIGNATED
DRAINAGE
HOLE
- 15 -
CONNECTING THE D-RGB LED STRIP
Plug the 3-pin connector of the distribution plate’s D-RGB LED
light into the D-RGB HEADER on the motherboard. The LEDs will
work if the pin layout on the header is as follows: +5V, Digital,
Empty, Ground.
D-RGB Header
RGB Header
CONNECTING THE PUMP
The EK DDC 4.2 PWM pump has two connectors.
1. SATA Connector: It must be connected directly to your PSU at all
times since it powers the pump.
2. 4-Pin PWM Fan Connector: It can be connected to your
motherboard’s CPU, fan, or designated water pump header. It
can also be connected to a controller. This cable controls and
reports the rotational speed of the pump. The pump will run at its
maximum speed (100% PWM) if not connected.
SATA
CONNECTOR 4-PIN PWM FAN
CONNECTOR
- 16 -
To ensure the installation of EK components was successful, we
recommend you perform a leak test for 24 hours or use the EK-Loop
Leak Tester to do the same within minutes.
When your loop is complete and filled with coolant, connect the pump
to a PSU outside your system. Do not connect power to any of the other
components. Turn on the PSU and let the pump run continuously. It is
usual for the coolant level to drop during this process as air collects
inside the distribution plate.
Inspect all parts of the loop, and in case the coolant leaks, fix the issue
and repeat the testing process. Ensure that all hardware is dry before
the system is powered to prevent damage.
TESTING THE LOOP
If you need assistance or wish to order spare parts or a new mounting
mechanism, please contact:
https://www.ekwb.com/customer-support/
For spare par t orders, refer to the page with Technical Specifications
and Product Parts, where you can find the EAN number of each
part you might need. Mounting Mechanism EAN can be found under
the Box Content section of this manual.
Include the EAN number and desired quantity in your request.
Thermal pads are readily available in the EK Shop.
EKWaterBlocks
@EKWaterBlocks
ekwaterblocks
ekwaterblocks
EKWBofficial
SUPPORT AND SERVICE
SOCIAL MEDIA
  • Page 1 1
  • Page 2 2
  • Page 3 3
  • Page 4 4
  • Page 5 5
  • Page 6 6
  • Page 7 7
  • Page 8 8
  • Page 9 9
  • Page 10 10
  • Page 11 11
  • Page 12 12
  • Page 13 13
  • Page 14 14
  • Page 15 15
  • Page 16 16
  • Page 17 17

ekwb EK-Quantum User manual

Type
User manual

Ask a question and I''ll find the answer in the document

Finding information in a document is now easier with AI