Garmin 301 User manual

Category
Heart rate monitors
Type
User manual
Forerunner
®
301
personal trainer
owner’s manual
© Copyright 2004–2006 Garmin Ltd. or its subsidiaries.
All rights reserved. Except as expressly provided herein, no part of this manual may be reproduced, copied, transmitted, disseminated,
downloaded or stored in any storage medium, for any purpose without the express prior written consent of Garmin. Garmin hereby grants
permission to download a single copy of this manual onto a hard drive or other electronic storage medium to be viewed and to print one copy
of this manual or of any revision hereto, provided that such electronic or printed copy of this manual must contain the complete text of this
copyright notice and provided further that any unauthorized commercial distribution of this manual or any revision hereto is strictly prohibited.
Information in this document is subject to change without notice. Garmin reserves the right to change or improve its products and to make
changes in the content without obligation to notify any person or organization of such changes or improvements. Visit the Garmin Web site
(www.garmin.com) for current updates and supplemental information concerning the use and operation of this and other Garmin products.
Garmin
®
, Forerunner
®
,
Auto Lap
®
, and Auto Pause
®
are registered trademarks and Virtual Partner
, AutoLearn
, Garmin Training
Center
, and MultiSport
are trademarks of Garmin Ltd. or its subsidiaries and may not be used without the express permission
of Garmin.
February 2006 Part Number 190-00370-00 Rev. F Printed in Taiwan
Garmin International, Inc.
1200 East 151st Street
Olathe, Kansas 66062, U.S.A.
Tel. 913/397.8200 or 800/800.1020
Fax 913/397.8282
Garmin (Europe) Ltd.
Unit 5, The Quadrangle
Abbey Park Industrial Estate
Romsey, SO51 9DL, U.K.
Tel. 44/0870.8501241
Fax 44/0870.8501251
Garmin Corporation
No. 68, Jangshu 2nd Road
Shijr, Taipei County, Taiwan
Tel. 886/2.2642.9199
Fax 886/2.2642.9099
Forerunner
®
301 Owner’s Manual i
INTRODUCTION
Thank you for choosing the Garmin Forerunner
®
301
personal trainer! Once you begin training with the heart
rate monitor, building simple and advanced workouts, and
tracking your workout history, the Forerunner 301 will soon
become your indispensable training partner.
To get the most out of your new Forerunner, please review
the Quick Start Guide and this Owners Manual. Consult the
following sections to find valuable information:
Getting Started—Charge your Forerunner, learn to position
and use the heart rate monitor, and set up the Forerunner for
your first workout.
Workouts—
Learn to create and customize workouts on
your Forerunner, from simple timed training to advanced
interval workouts.
Navigation—Learn to use the navigating features of your
Forerunner, including how to view the Map mode, save
locations, create routes, and find your way home.
Appendix—Review cleaning instructions and information
about Garmin Training Center
, the heart rate monitor, and
heart rate zones. Be sure to read the Safety Information
in this section to learn how to use your Forerunner 301
and the heart rate monitor safely and responsibly.
Index—Contains a comprehensive index by subject.
Always consult your physician before you
begin or modify any exercise program.
INTRODUCTION
ii Forerunner
®
301 Owner’s Manual
INTRODUCTION > TABLE OF CONTENTS
Introduction .................................i
Getting Started ...........................1
Charge the Battery ............................. 1
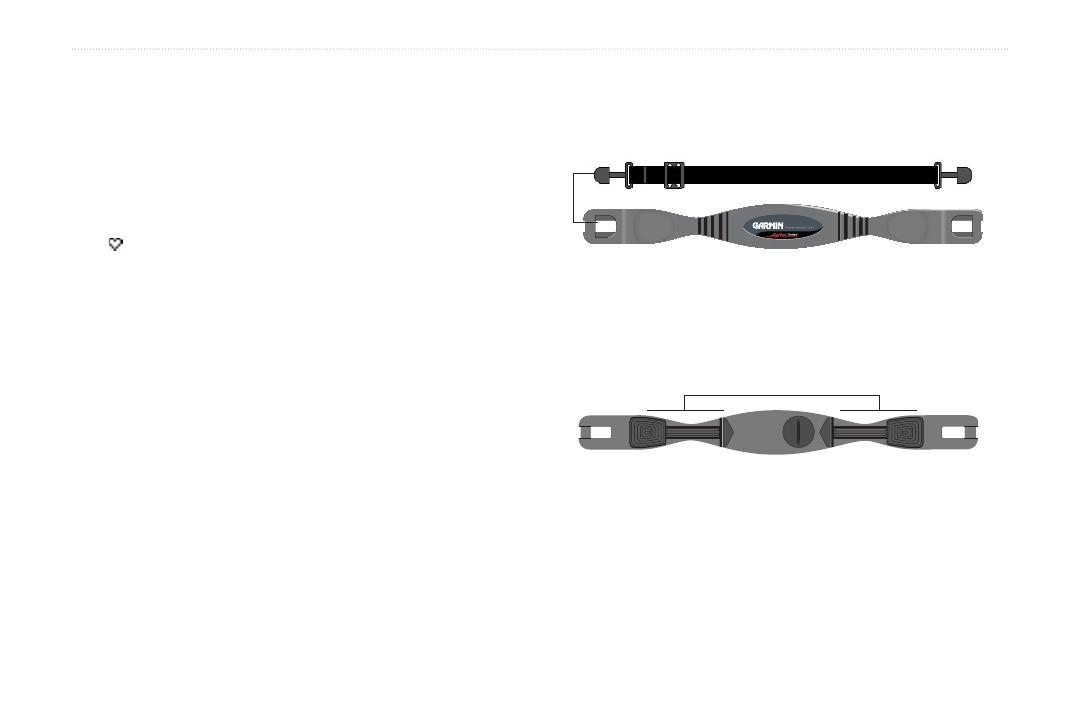
Position the Heart Rate Monitor ........ 2
Position the Forerunner ..................... 3
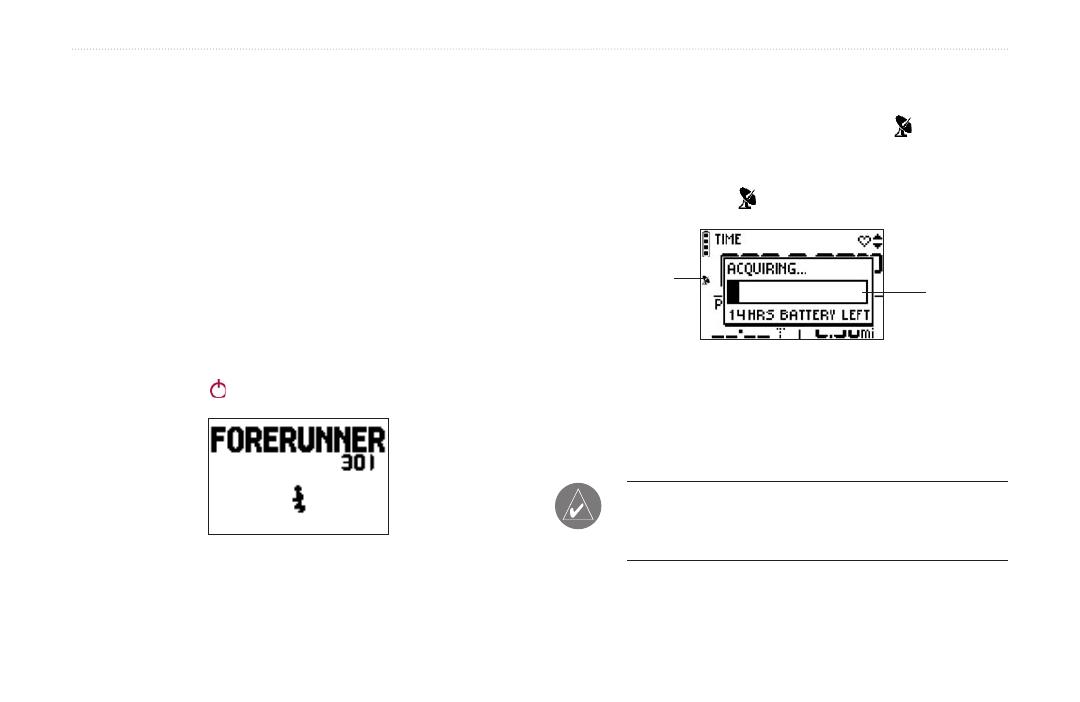
Acquire Satellite Signals ................... 4
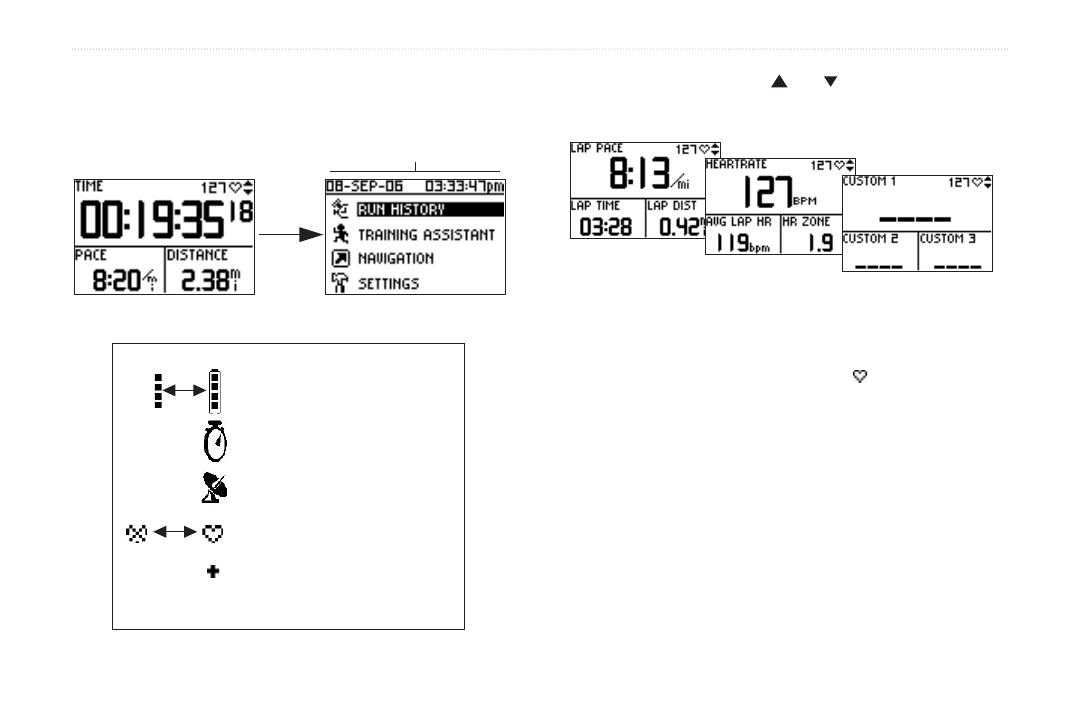
Main Modes ....................................... 5
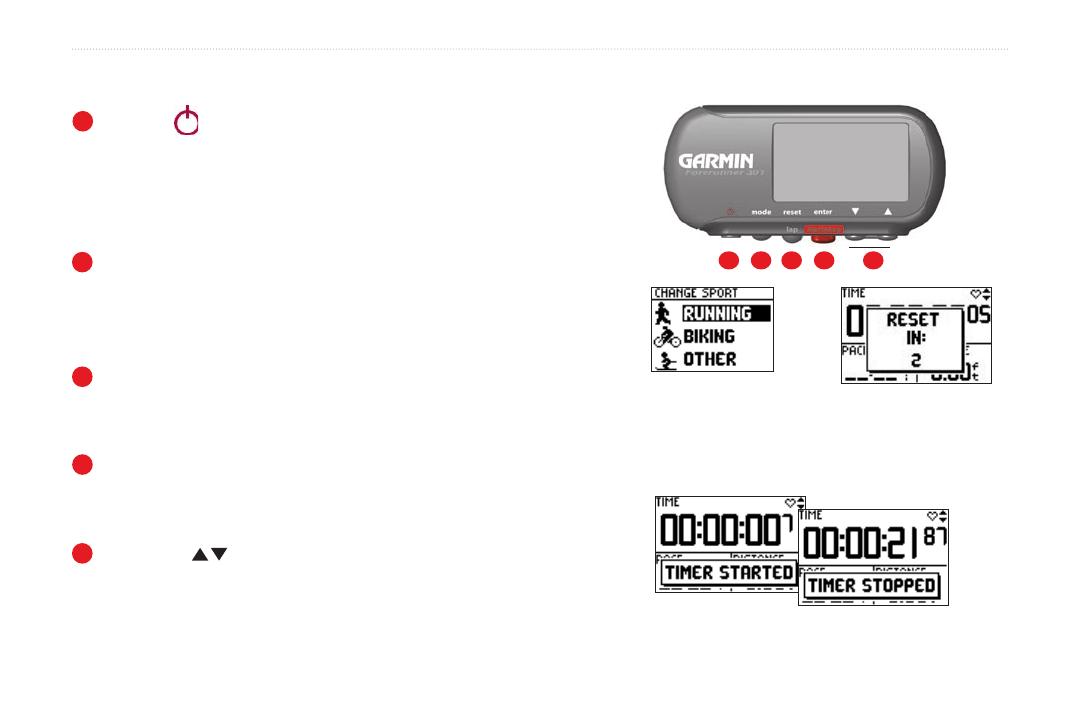
Buttons .............................................. 6
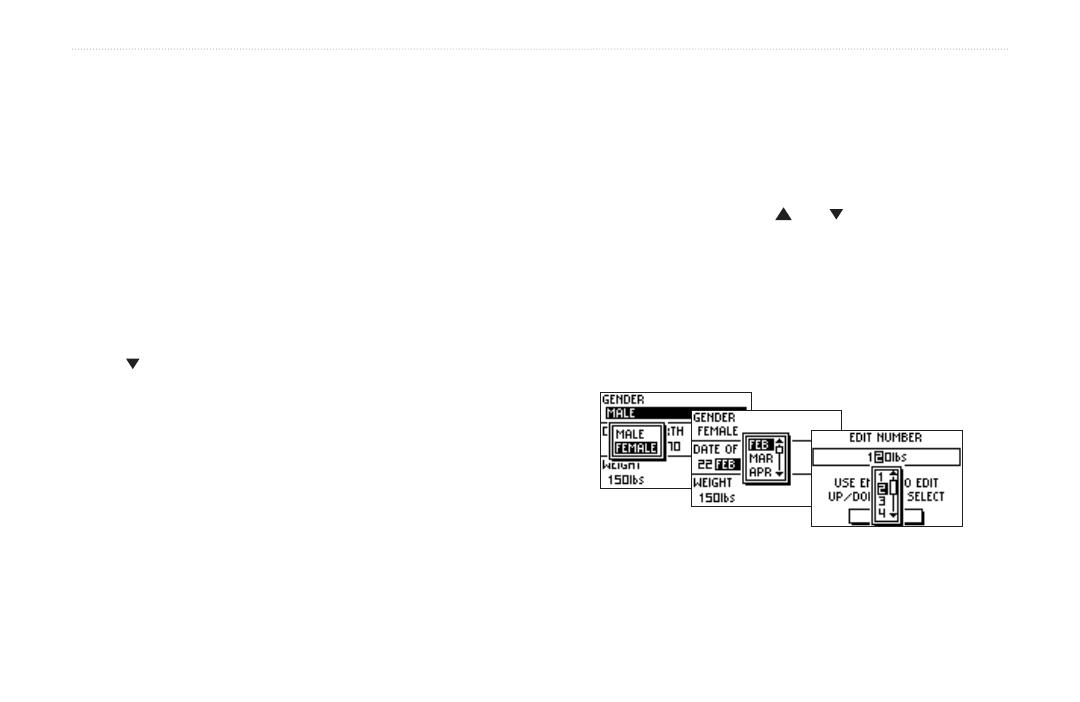
Set Your Time Zone and User Profile 7
Choose Your Sport ............................. 8
Workouts ....................................9
Basic Workouts .................................. 9
Using Time and Distance Alerts .. 9
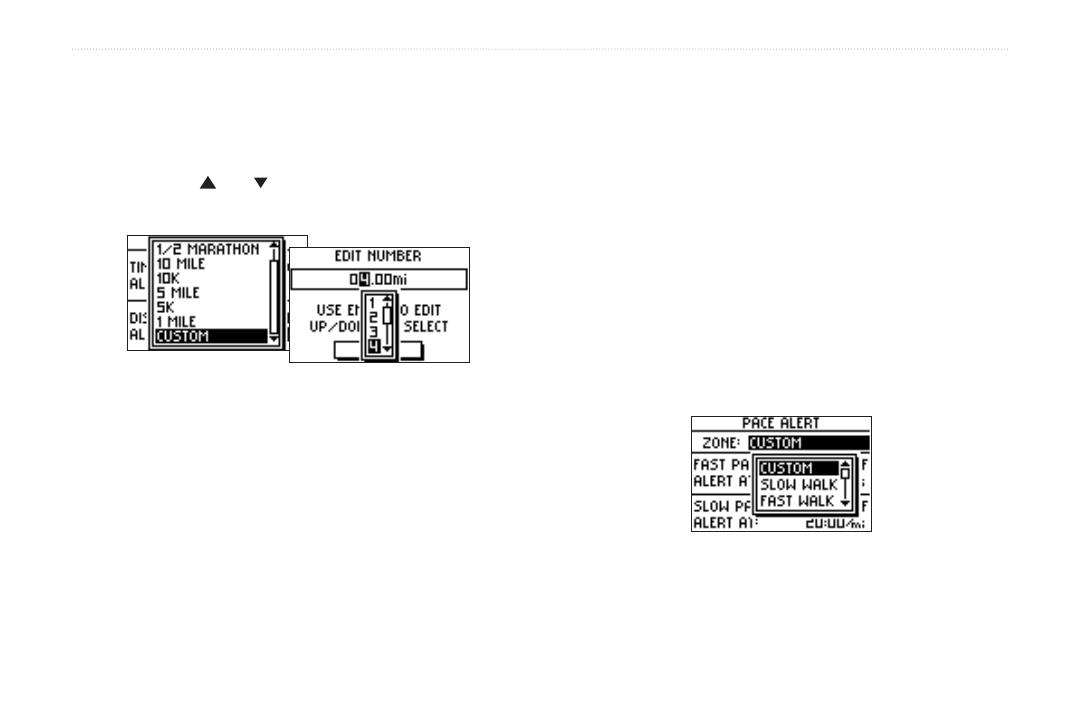
Using Pace/Speed Alerts ............ 10
Using Heart Rate Alerts ............. 11
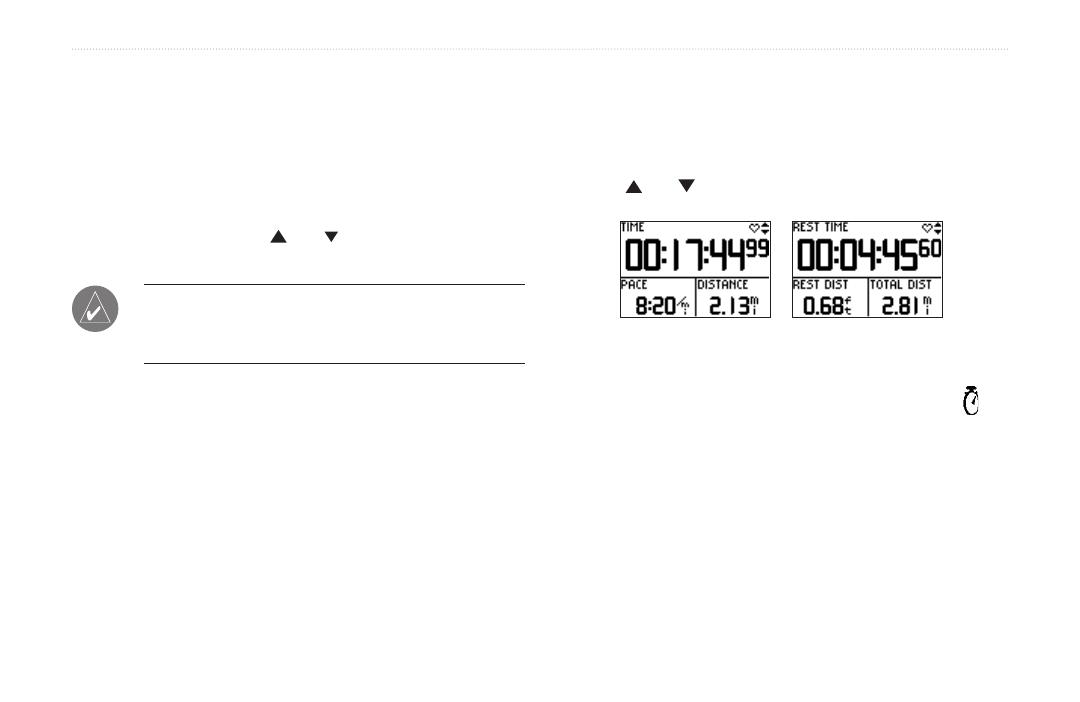
Setting Auto Pause ..................... 12
Setting Auto Lap ........................ 13
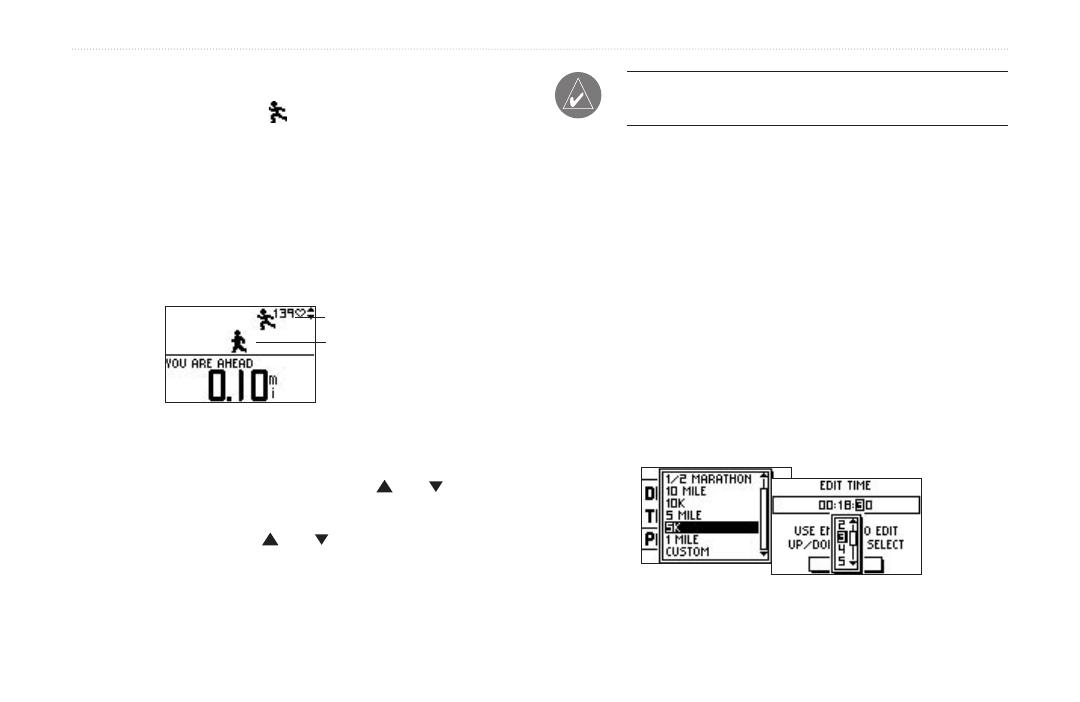
Working Out with Virtual Partner ... 14
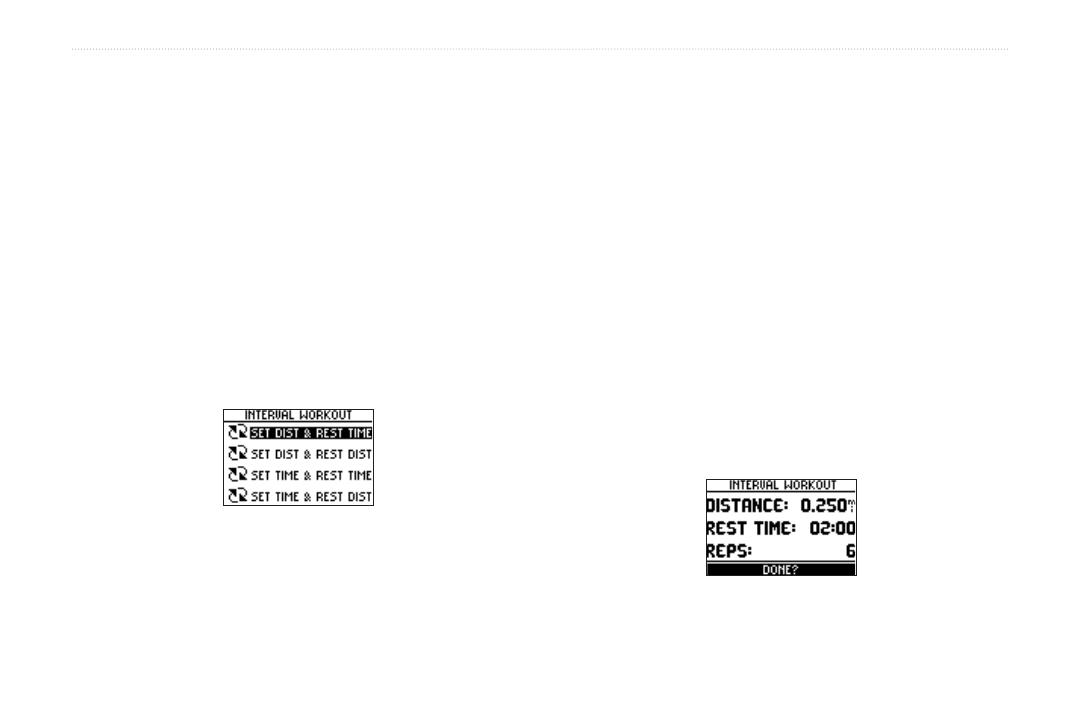
Interval Workouts ............................ 16
Advanced Workouts ........................ 18
Creating Workouts ..................... 18
Starting Workouts ...................... 20
Editing Workouts .......................
22
MultiSport Workouts ....................... 23
Using MultiSport Manually ....... 23
Auto MultiSport Workouts ........ 24
Viewing Workout History ........ 25
Navigating with Forerunner .... 29
Navigating with the Map ................. 29
Marking and Finding Locations ...... 31
Navigating Back to Start ................. 33
Navigating with Routes ................... 34
Viewing GPS Information ............... 36
About GPS ................................. 36
Customizing the Forerunner .. 37
Changing General Settings .............. 37
Changing Sport Settings .................. 39
Setting Up Custom Pages ................ 41
Setting Speed Zones ........................ 42
Setting Heart Rate Zones ................. 43
About AutoLearn™ ................... 43
Using AutoLearn ........................ 43
Setting HR Zones Manually ...... 45
Appendix .................................. 46
Training with Heart Rate Zones ...... 46
Heart Rate Monitor Information ..... 48
Garmin Training Center .................. 50
Caring for the Forerunner ................ 51
Storage ....................................... 51
Water Immersion ....................... 51
Specifications .................................. 52
Product Registration ........................ 54
Safety Information ........................... 55
Limited Warranty ............................ 56
FCC Compliance ............................. 57
Software License Agreement .......... 58
CE Compliance ............................... 58
Index ......................................... 59
Forerunner
®
301 Owner’s Manual 1
GETTING STARTED > CHARGE THE BATTERY
GETTING STARTED
Follow the instructions in this section to set up and begin
using your new Forerunner 301.
Charge the Battery
The Forerunner 301 is powered by a built-in lithium-ion
battery that you can recharge with the A/C Charger included
in the product box. You can also charge the Forerunner with
the USB cable and your personal computer. Charge the
Forerunner 301 for three hours before you begin using it.
Be sure the USB port, weather cap, and surrounding area
are thoroughly dry before charging or connecting to a
personal computer to prevent corrosion.
To charge the Forerunner:
1. Turn the Forerunner over and pull back the weather
cap from the USB port on the back of the unit.
2. Locate the A/C Charger included in the product box.
Plug the mini USB end of the charger into the USB
port on the Forerunner. Then plug the A/C charger
into a standard wall outlet.
NOTE: The unit will not charge outside the tempera-
ture range of 0°C–50°C (32°F–122°F).
Back View (without strap)
Serial number
Access USB port here
(hidden by weather cap)
Speaker
2 Forerunner
®
301 Owner’s Manual
GETTING STARTED > POSITION THE HEART RATE MONITOR
Position the Heart Rate Monitor
Wear the heart rate (HR) monitor directly on your skin, just
below the breastplate. It should be snug enough to stay in
place during your workout. When positioned correctly, the
heart rate monitor automatically transmits your heart rate to
the Forerunner 301. Your heart rate appears next to a heart
icon in Timer mode on the Forerunner (see page 5).
To begin displaying your heart rate on the Forerunner, you
must turn on the Forerunner and bring it within range of the
heart rate monitor. The Forerunner must be within 90–110
cm (35–43 in.) of the heart rate monitor to receive your
heart rate.
Be sure to stand at least six feet away from other heart
rate monitors while the Forerunner is trying to “pair” with
your heart rate monitor and begin receiving heart rate data.
Once the Forerunner pairs with your heart rate monitor,
you can go near other heart rate monitors without fear of
interference. For more information on pairing, interference,
and troubleshooting, see pages 48–49 in the Appendix.
To position the heart rate monitor:
1. Push one tab on the elastic strap through the slot in
the heart rate monitor.
    

Coded
   

Coded
2. Wet both sensors on the back of the heart rate
monitor to create a strong connection between your
pulse and the transmitter.
Sensors
3. Attach the strap to the other side of the heart rate
monitor around your chest.
Forerunner
®
301 Owner’s Manual 3
GETTING STARTED > POSITION THE FORERUNNER
NOTE: If you have trouble with erratic heart rate
readings (bikers especially), position the transmitter
on your back instead of your chest, or try applying
electrode gel.
4. Tighten or loosen the strap as necessary so that it
fits snugly against your body.
Position the Forerunner
For best results, wear the Forerunner 301 on your wrist
as you would wear a watch, with the face oriented toward
the sky. This position allows the GPS antenna to acquire
satellite information quickly and easily.
Do not adjust the Forerunner too tightly around your wrist,
as it may cut off blood circulation. If needed, add the
extension strap to the Forerunners wrist strap.
To add the
extension strap:
1. Slide the end of the existing strap through the
connector on the extension.
2. Place the Forerunner on your wrist or arm.
3. Slide the end of the extension through the connector
on the Forerunner.
4. Adjust to fit comfortably and secure the strap.
4 Forerunner
®
301 Owner’s Manual
GETTING STARTED > ACQUIRE SATELLITE SIGNALS
Acquire Satellite Signals
Before you begin using the Forerunner 301, you must
acquire GPS satellite signals. The first time you turn on the
Forerunner, you may need to wait as long as 15 minutes to
acquire signals; after that, the Forerunner should acquire
signals quickly each time you use it. To acquire satellite
signals, go outdoors away from tall buildings and trees,
which may obstruct signal reception, and position the
Forerunner with its face toward the sky.
To acquire satellite signals:
1. Go outdoors to an open area. Then press and hold
the Power button to turn on your Forerunner 301.
The Welcome Page
2. Wait while the Forerunner searches for satellite
signals. As the unit acquires signals, the bar fills
from left to right and the Satellite icon flashes.
When the Forerunner has acquired enough satellite
signals, the bar fills completely and disappears, and
the Satellite icon stops flashing.
bar
Satellite icon
Once you are outdoors and have acquired satellite
signals, you are ready to begin your workout. Refer to the
“Workouts” section, beginning on page 9, to take advantage
of the Forerunners training features.
NOTE: You can turn off the GPS receiver and use the
Forerunner indoors. See “Changing General Settings”
in the Customizing section.
Forerunner
®
301 Owner’s Manual 5
GETTING STARTED > MAIN MODES
Main Modes
Press the mode button to switch between Timer mode and
Menu mode.
From Timer mode, press the and arrows to access data
pages: the Lap page, Heart Rate page, and Custom page.
Lap Page
Heart Rate Page
Custom Page
The Heart Rate page appears when you are wearing the
heart rate monitor and receiving heart rate data. Your heart
rate appears next to the solid heart icon in Timer mode.
The Heart Rate page displays your heart rate along with
your average heart rate and heart rate zone, which can help
you determine the intensity of your workout. For more
information on heart rate zones, see “Training with Heart
Rate Zones” in the Appendix.
Timer Mode Menu Mode
Current date and time
Forerunner Icons
Battery icon changes
to show it is charging.
Timer
icon appears
when timer starts.
Satellite icon flashes when
acquiring satellite signals.
Heart Rate icon stops
flashing when receiving data.
MultiSport icon appears
during MultiSport workouts
(see page 23).
6 Forerunner
®
301 Owner’s Manual
GETTING STARTED > BUTTONS
Buttons
1
Power
Press and hold to turn unit on/off.
Press to turn backlight on/off.
Press Power while pressing and holding the reset
button to reset the unit if it freezes.
2
mode
Press to switch between Timer and Menu modes.
Press and hold to change sports.
Press to acknowledge messages.
3
reset/lap
Press and hold to reset the timer.
Press to create new lap when timer is started or stopped.
4
enter/start/stop
Press to select options.
Press to start/stop the timer.
5
up/down
Press to highlight options.
Press to scroll through data pages.
Front View
1 2 3 4 5
Press and hold mode to change
to a different sport.
Press and hold reset to
reset the timer.
Press start/stop to control the timer.
Be sure to reset the timer before each new workout,
unless you are doing a MultiSport workout (see page 23).
Forerunner
®
301 Owner’s Manual 7
GETTING STARTED > SET YOUR TIME ZONE AND USER PROFILE
Set Your Time Zone and User Profile
The Forerunner receives accurate time information from
GPS satellites; however, you must enter your time zone
to display the correct local time. The Forerunner 301 also
uses information that you enter about yourself to calculate
calorie consumption. Set your time zone and user profile
before you begin workouts to ensure the Forerunner is
recording accurate workout data.
To set your time zone:
1. Press mode to access Menu mode. Then press
to highlight Settings and press enter.
2. Highlight General and press enter.
3. Highlight Set Time and press enter.
4. Highlight the Time Zone field and press enter.
Select the correct time zone from the menu and
press enter. If your time zone does not appear in the
menu, select Other and then enter the appropriate
UTC offset (Universal Time).
5. Press mode repeatedly to exit.
To set your user profile:
1. Follow steps 1 and 2 of the previous procedure.
Then highlight Set User Profile and press enter.
2. Highlight the Gender field and press enter. Select
your gender from the menu and press enter.
3. Continue to press the and arrows and enter to
change the Date of Birth and Weight fields. When
you are finished, press mode.
4. If you are setting your user profile for the first time, a
Max HR message appears. Select Yes to adjust your
maximum heart rate based on the date of birth you
entered.
Enter your gender, date of birth, and weight.
8 Forerunner
®
301 Owner’s Manual
GETTING STARTED > CHOOSE YOUR SPORT
Choose Your Sport
You can use the Forerunner to train for three different
sports: Running, Biking, and “Other,” which can include
almost any type of sport. When you choose a sport, the
Forerunner automatically changes the way it calculates
calories and displays speed (changes from pace for Running
to speed for Biking and Other). The Forerunner also
organizes workout data by sport; for more information, see
“Viewing Workout History.”
To change your sport:
1. Press and hold mode until the Change Sport
menu appears.
2. Highlight Running, Biking, or Other. Then press
enter.
Changing to a different sport.
When changing sport modes, keep this information in mind:
If you change from one sport mode to another
without resetting the timer, you automatically enter
MultiSport mode. See page 23 for more information.
You can change between pace and speed within a
sport mode. For example, you can change from pace
to speed within Running mode. See page 39 for more
information. Garmin Training Center displays data
about each workout in both pace and speed units.
Forerunner
®
301 Owner’s Manual 9
WORKOUTS > BASIC WORKOUTS
WORKOUTS
The Forerunner 301 offers a wide variety of training
features that can help you train at any level you choose.
Use your Forerunner to set goals and alerts, train with your
Virtual Partner
, program interval workouts from simple to
advanced, set up MultiSport
workouts, and record every
workout for later review.
Basic Workouts
Use alerts to train toward certain time, distance, pace/speed,
or heart rate goals. You can also pause or lap the timer
automatically with Auto Pause
®
and Auto Lap
®
to make
your workout flow smoothly.
NOTE: Alerts, Auto Pause, and Auto Lap settings are
sport-specific: when you change sport modes, you can
set new values for alerts, pauses, and laps.
Using Time and Distance Alerts
Time and distance alerts are useful for long workouts when
you want to train for a certain amount of time or distance.
When you reach your goal, the Forerunner beeps and
displays a message.
To set a time or distance alert:
1. Press mode to access Menu mode. Then
highlight Training Assistant and press enter.
2. Highlight Alerts and press enter. Then
highlight Time/Dist Alert and press enter.
3. Highlight the Time Alert field or Distance Alert field
and press enter. Then select Once or Repeat to set
the alert one time or repeatedly.
Setting a distance alert to
repeat once.
10 Forerunner
®
301 Owner’s Manual
WORKOUTS > BASIC WORKOUTS
4. Highlight the Alert At field and press enter. Select
a preset distance or time from the menu or select
Custom and press enter.
5. If you selected Custom, enter a time or distance
using the and arrows and enter. Then
select OK.
Select a distance from the menu, or select Custom
and enter a distance manually.
6. Press mode repeatedly to exit.
Using Pace/Speed Alerts
Pace/speed alerts notify you if you exceed or drop below
a certain pace/speed setting. (In Running mode, it’s a pace
alert; in Biking and Other mode, it’s a speed alert.)
The pace/speed alert takes advantage of Speed Zones,
which are ranges of pace/speed that you can store in the
Forerunner for each sport. For more information, or to
set your Speed Zones, see “Setting Speed Zones” in the
Customizing section.
To set a pace/speed alert:
1. Press mode to access Menu mode. Then highlight
Training Assistant and press enter.
2. Select Alerts. Then select Pace (Speed) Alert.
3. Highlight the Zone field and press enter. Select a
Speed Zone from the menu, or select Custom to
specify your own alert values.
4. Highlight the Fast Pace Alert field (Fast Speed
Alert) and press enter. Select On and press enter.
Forerunner
®
301 Owner’s Manual 11
WORKOUTS > BASIC WORKOUTS
5. If you selected Custom in step 3, enter a fast pace or
speed using the and arrows and enter. Then
select OK.
Entering a custom pace.
6. Repeat steps 4 and 5 for Slow Pace Alert
(Slow
Speed Alert).
7. Press mode repeatedly to exit.
Using Heart Rate Alerts
Similar to pace/speed alerts, the heart rate alert notifies you
if your heart rate exceeds or drops below a specific number
of beats per minute (bpm).
Heart rate alerts can also notify you if your heart rate
exceeds or drops below a certain heart rate zone—a range
of beats per minute. The five commonly accepted heart rate
zones can help you determine the intensity of your workout.
For more information, or to set your heart rate zones, see
“Setting Heart Rate Zones” in the Customizing section and
“Training with Heart Rate Zones” in the Appendix.
To set a heart rate alert:
1. Press mode to access Menu mode. Then highlight
Training Assistant and press enter.
2. Select Alerts. Then select Heart Rate Alert.
12 Forerunner
®
301 Owner’s Manual
WORKOUTS > BASIC WORKOUTS
3. Press enter to open the Intensity Level menu.
Select a heart rate zone, or select Custom to specify
your own alert values.
4. Highlight Min HR Alert and press enter. Then select
On and press enter.
5. If you selected Custom in step 3, select the Alert At
field. Then use the and arrows and enter to set
a minimum heart rate.
NOTE: When entering custom heart rate values, you
must set your minimum and maximum alerts at least
five bpm apart.
6. Repeat steps 4 and 5 for Max HR Alert
.
7. Press mode repeatedly to exit.
Setting Auto Pause
You can set the Forerunner 301 to pause the timer
automatically during your workout when your pace/speed
drops below a certain value. This setting is especially
helpful if your course includes stop lights or other places
where you need to slow down or stop.
When you turn on Auto Pause, the Forerunner tracks and
displays any paused time as Rest Time on a new data page,
the Rest page. This page becomes part of the data page loop.
To view the Timer page and the Rest page in Timer mode,
press the and arrows.
When Auto Pause is enabled, the Rest page displays
all data collected while the timer is paused.
When the Forerunner pauses the timer, the Timer icon on
the Timer page flashes to indicate that the timer has stopped.
Forerunner
®
301 Owner’s Manual 13
WORKOUTS > BASIC WORKOUTS
To set Auto Pause:
1. Press mode to access Menu mode. Then highlight
Training Assistant and press enter.
2. Highlight Auto Pause/Lap and press enter.
3. Press enter to open the Auto Timer Pause menu.
Then select On and press enter.
4. Select the Pause When field and choose Stopped
or Custom.
5. If you selected Custom, enter a pace/speed to
trigger the automatic pause.
6. Press mode repeatedly to exit.
Setting Auto Lap
You can set the Forerunner 301 to lap automatically after
you travel a certain distance. This setting is helpful for
comparing your performance over different parts of a
workout (each mile or kilometer, for example).
To set Auto Lap:
1. Press mode to access Menu mode. Then highlight
Training Assistant and press enter.
2. Highlight
Auto Pause/Lap and press enter.
3. Highlight the Auto Lap Trigger field and press
enter. Then select On and press enter.
4. Select the Lap Distance field and select a distance
from the menu or select Custom.
5. If you selected Custom, enter a distance to trigger
the automatic lap.
6. Press mode repeatedly to exit.
14 Forerunner
®
301 Owner’s Manual
WORKOUTS > VIRTUAL PARTNER
Working Out with Virtual Partner
Meet your Virtual Partner , a unique tool designed
to help you meet your training goals. Simply enter the
distance, time, or pace/speed at which you want to complete
a workout. Virtual Partner “runs” alongside of you,
graphically displaying your goal pace/speed compared to
your current pace/speed. To complete your workout and
meet your goal, you must stay ahead of the Virtual Partner.
Your Virtual Partner
You
Make sure you stay ahead of
your Virtual Partner.
Once you begin your workout, press the and arrows to
view more Virtual Partner data. Press mode to view Timer
mode, and then press the and arrows to view the data
pages, including the Heart Rate page.
NOTE: Alerts, Auto Pause, and Auto Lap still function
when you train with Virtual Partner.
To set up a workout by distance & time:
1. Press mode to access Menu mode. Then highlight
Training Assistant and press enter.
2. Highlight Virtual Partner and press enter. Then
highlight Set Distance & Time and press enter.
3. Press enter to select the Distance field. Select a
distance from the menu, or select Custom to enter
your own distance value.
4. Highlight the Time field and press enter. Select a
time from the menu, or select Custom to enter your
own time value (hours, minutes, seconds).
Choosing a distance and time.
Forerunner
®
301 Owner’s Manual 15
WORKOUTS > VIRTUAL PARTNER
5. Check the Pace (Speed) field to ensure that the
calculated pace/speed (based on your distance and
time inputs) seems reasonable. If not, make changes
to the Distance and Time fields. Then highlight Done
and press enter.
To set up a workout by time & pace/speed:
1. Press mode to access Menu mode. Then highlight
Training Assistant and press enter.
2. Highlight Virtual Partner and press enter. Then
highlight Set Time & Pace (Speed) and press enter.
3. Highlight the Time field and press enter. Select a
time from the menu that appears, or select Custom
to enter your own time value.
4. Enter a pace/speed in the Pace (Speed) field.
5. Check the Distance field to ensure that the
calculated distance seems reasonable. Then
highlight Done and press enter.
To set up a workout by distance & pace/speed:
1. Press mode to access Menu mode. Then highlight
Training Assistant and press enter.
2. Highlight Virtual Partner and press enter. Then
highlight Set Distance & Pace/Speed and
press enter.
3. Highlight the Distance field and press enter. Select
a distance from the menu that appears, or select
Custom to enter your own distance value.
4. Enter a pace/speed in the Pace/Speed field.
5. Check the Time field to ensure that the calculated
time seems reasonable. Then highlight Done and
press enter.
To end a workout early:
1. Press mode to access Menu mode. Then highlight
Training Assistant and press enter.
2. Highlight End Partner Run and press enter.
16 Forerunner
®
301 Owner’s Manual
WORKOUTS > INTERVAL WORKOUTS
Interval Workouts
You can create simple interval workouts according to the
following criteria:
Train for a certain distance and rest for a certain
amount of time.
Train for a certain distance and rest for a certain
distance.
Train for a certain amount of time and rest for a
certain amount of time.
Train for a certain amount of time and rest for a
certain distance.
Select a workout option from
the Interval Workout menu.
To create and save more advanced workouts involving
varied distances, rest times, and repeats, refer to the next
section, “Advanced Workouts.”
To create an interval workout:
1. Press mode to access Menu mode. Then highlight
Training Assistant and press enter.
2. Highlight Interval Workout and press enter.
3. Select an option from the Interval Workout page
according to how you want to set up intervals.
4. Enter distance or time values into the appropriate
fields.
5. Highlight the Reps field and select the number of
times you want to repeat each interval.
6. Highlight Done and press enter.
1 / 1

Ask a question and I''ll find the answer in the document

Finding information in a document is now easier with AI

Ask the document