Page is loading ...

1
WARNING: IT IS STRONGLY RECOMMENDED THAT YOU PERIODICALLY CHECK ALL BOLTS FOR PROPER TORQUE!!!
GARMIN® Mount Installation Instructions
(K13-500-[color])
Description:
The K-EDGE GARMIN Mount is designed for installation of a GARMIN Edge® or GARMIN Forerunner® computer onto a 31.8mm
diameter bicycle handlebar.
Compatibility:
The K13-500 GARMIN Mount is compatible with all GARMIN Edge® 200, 500, 510, 800, and 810 computers. It is also compatible
with the GARMIN Forerunner® 310XT (with 'quick-release kit' purchased separately from GARMIN) computers utilizing the same
mounting system. NOTE: The GARMIN Forerunner® 910XT requires a spacer to properly clear the K13-500, please contact us for
further information.
Warnings:
These instructions are generalized to accommodate a wide range of setups for a bike. If your setup does not match what is being
described, take extra care in the process of your setup and contact K-EDGE Technical Support if you have any questions.
Improper installation of any K-EDGE product or use outside of its design intentions could lead not only to damaging the bike and
related components but could also cause personal injury to the rider.
!! TETHER ATTACHMENT!! – BOTH THE GARMIN 510 AND 1000 COME SUPPLIED WITH TETHERS; HOWEVER,
THE OTHER MODELS DO NOT. IF YOU DO NOT HAVE A TETHER, ONE CAN BE PURCHASED DIRECTLY FROM GARMIN
(PART # 010-11251-16). THE ATTACHMENT OF A TETHER IS STRONGLY RECOMMENDED FOR ANY GARMIN
COMPUTER! SEE SECTION TITLED ‘TETHER INSTALLATION’ IN THESE INSTRUCTIONS.
Parts Included:
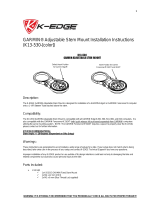
K13-500
1x K-EDGE GARMIN mount
2x M4 x 12 mm bolts
2x M3 x 6 mm (Blue Thread Lock applied)
Default Insert Position
for Garmin Edge
®
Insert Position for Garmin
Forerunner
®
310XT and 910XT

2
WARNING: IT IS STRONGLY RECOMMENDED THAT YOU PERIODICALLY CHECK ALL BOLTS FOR PROPER TORQUE!!!
Tools/Items Required:
Metric Allen Set (3 mm for clamp bolts and 2 mm for the insert bolts)
Torque wrench
**GARMIN Forerunner® Quick Release Kit (required for Forerunner® 310XT and 910XT owners)**
Mount Installation:
1. Separate the upper clamp half (K13-502) from the lower clamp half (K13-501) by removing the 2x M4 x 12 bolts.
2. Install the mount onto the right side (driveside) of the stem on the handlebar.
3. Install the upper clamp half (K13-502) back onto the lower clamp half (K13-501).
4. Install, but do not tighten, the 2x M4 x 12mm bolts back into the clamp assembly.
5. Position the mount to your desired position and 'lightly' tighten the 2x M4 x 12mm bolts to hold that position.
6. Carefully torque both bolts equally to 2 N-m using an alternating pattern back and forth between the bolts.
7. IF you will be using a GARMIN Forerunner® 310XT and 910XT please proceed to "Insert Adjustment", otherwise
installation is complete.

3
WARNING: IT IS STRONGLY RECOMMENDED THAT YOU PERIODICALLY CHECK ALL BOLTS FOR PROPER TORQUE!!!
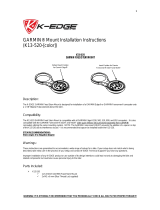
NOTE: The K13-500 is factory assembled for immediate use with GARMIN Edge® computers without any adjustment
necessary, IF you intend to use the K13-500 with a GARMIN Forerunner® 310XT and 910XT computer, please follow the
steps below to adjust the insert (K13-503) to properly accept GARMIN Forerunner® computers.
Insert Adjustment:
1. Remove the 2x M3 x 6mm Flat Head Screws holding the K13-503.
2. Reposition K13-503 (see diagram above).
3. Reinstall, but do not fully tighten, the 2x M3 x 6mm Flat Head Screws.
4. Carefully torque the 2x M3 x 6mm Flat Head Screws to a Max of 1 N-m.
Caution: Do not over-torque the M3 x 6mm Flat Head screws.
Note: A small amount of thread lock has been applied to the M3 x 6mm bolt at the factory, it is recommended that
an additional amount be added if this bolt were to be adjusted multiple times.

4
WARNING: IT IS STRONGLY RECOMMENDED THAT YOU PERIODICALLY CHECK ALL BOLTS FOR PROPER TORQUE!!!
Tether Installation:
CAUTION: THE K13-503 INSERT IS DESIGNED TO FAIL PRIOR TO FAILURE OF THE TABS ON THE BACK OF THE
GARMIN COMPUTER. SUCH FAILURES OCCUR IN THE EVENT OF A CRASH OR ABRUPT IMPACT EITHER WHILE
RIDING OR EXTERNAL CIRCUMSTANCES. THE USE OF A TETHER IS HIGHLY RECOMMENDED TO AVOID THE LOSS
AND/OR DAMAGE OF YOUR COMPUTER IN SUCH AN EVENT. IF YOU DO NOT HAVE A TETHER, ONE CAN BE
PURCHASED DIRECTLY FROM GARMIN (PART # 010-11251-16). THE INSTRUCTION BELOW IS A RECOMMENDATION,
ANCHORING AT THE MOUNT SHOULD ALWAYS BE MADE AT A RIGID POINT.
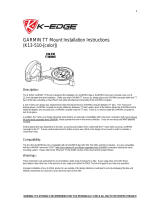
Tether Installation Steps:
1. Attach the GARMIN Tether (Part # 010-11251-16) to your computer.
2. Loop on the other end of the tether (As shown in the diagram above).
3. Slide the loop over the head of the GARMIN mount arm and onto the ‘NECK’ (As shown in the diagram above).
4. Synch the loop around the ‘NECK’ of the GARMIN mount arm.
5. Install your computer onto the mount.
Tether Removal Steps:
1. Remove your computer from the mount.
2. Loosen the loop around the ‘NECK’ of the GARMIN mount arm.
3. Slide the loop over the head of the GARMIN mount.

5
WARNING: IT IS STRONGLY RECOMMENDED THAT YOU PERIODICALLY CHECK ALL BOLTS FOR PROPER TORQUE!!!
Troubleshooting:
• My computer hits the front stem cap when I install/remove it from the mount.
o Check the position of the mount and adjust as needed.
• My computer (Forerunner® 910XT) hits the arm of the K13-500.
o Contact K-Edge for a spacer to properly space your 910XT.
• There is a little play even when my computer is installed onto the mount with a positive click.
o With the computer installed, visually check for movement of the K13-503 from the openings underneath the
mount. If movement is detected slightly increase the torque of the 2x M3 x 6mm Flat Head Screws (1 N-m
Max).
• The mount moves downward when I install my computer.
o Check that the proper amount of torque is applied to the 2x M4 x 12mm bolts on the clamp.
Support/Contact:
If problem(s) still persist after troubleshooting, please contact K-EDGE Support for further assistance at info@K-EDGE.com
immediately. Please be sure to include your full name, phone number, and K-EDGE product purchased.
/