PAGE 3
Linear Drain
Installation Instructions
Contact IPT Sink Company at (678) 445-4638 or visit www.iptsink.com. Copyright ©2016, IPT Sink Company Inc. All rights reserved.
Step 1 - Prepare Shower Pan
Pre-slope shower pan and install waterproofing membrane per manufacturer’s instructions. Any waterproofing membrane material
or procedure can be used (vinyl, CPE Membrane, Roll/Paint On, Metal Pan, Hot Mop, Surface Sheet Membrane, etc.). Perform a
leak test as required.
Step 2 - Rough Opening
The IPT Sink Company Linear Drain channel width is 3-3/16”. Confirm rough opening is approximately 2” wider than drain length to
accommodate backer board and wall tile thickness (A 38” rough opening will close to almost a 36” finish opening based on the
thickness of materials).
Step 3 - Flexible Sealant Application #1
Cut a 2x4 to length for use as a Linear Drain placeholder. This allows for a 1/8” gap around the channel’s perimeter to apply a bead
of flexible sealant. Note: Channel depths are 1.25” for the IPT Sink Company Tile Insert Linear Drain and 0.78” for all other IPT
Sink Company Linear Drains.
Using
overnight
m
b
ortar,
efore
build u
installing
p the
tiles.
shower base. Slope the morta
Step 4 - Mortar Bed Installation
r creating a 1-2% grade towards the drain. Allow the mortar to cure
Step 5 - Tile Installation
c
Using
lean,
a
and s
thinnest
eal
all ti
mortar,
le in the
install
shower
the
floor
area.
tile and entire shower alcove. Install tile into tile insert tray (Tile Insert Drains Only). Grout,
Step 6 - Linear Drain Installation
Remove the 2x4, clean out the void and install the IPT Sink Company Linear Drain channel as you would any tile building up and
upporting as necs essary with mortar. Ensure drain channel is level and just slightly below (1/6” or less) the adjacent tile.
Step 7 - Flexible Sealant Application #2
Line perimeter of linear drain channel with a color-matching flexible, waterproof sealant. This will allow the stainless steel to expand
rnd conta act with damaging the grout or tiles.
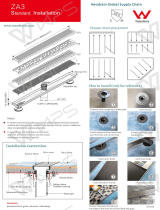
Standard Drain Pipe
Drain Hub with Adapter
with Vinyl Pan Liner
Note: The drain hub
is NOT included in
our product.
Channel
Adapter
Drain Hub