Page is loading ...

ASSEMBLY INSTRUCTIONS
RiverRidge® MEDFORD SPACESAVER
ITEM# 06-104 WHITE
ITEM# 06-105 ESPRESSO
ADULT ASSEMBLY REQUIRED
This product requires assembly by an adult because of small parts. Care should be taken
in unpacking and assembling this item to keep small parts away from children.
WARNING SEE FULL WARNING ON PAGE 2
Young children can be seriously injured or killed if furniture tips over. Don’t use this
item for a TV stand or place heavy objects on top of item. Always use angle-braces or
anchors to secure furniture to the wall.

Send requests for missing or damaged parts by email to: customer.service@ssi-rr.com or
call toll free 1-(844)-223-5201 or order parts on line at www.riverridgehome.com
THIS SHELF UNIT WILL HOLD UP TO 25 POUNDS PER SHELF OR A TOTAL OF 75 POUNDS. DO
NOT LOAD EACH SHELF WITH MORE THAN 25 POUNDS OR 75 POUNDS TOTAL WEIGHT. IF
OVERLOADED WITH MORE THAN 25 POUNDS PER SHELF OR 75 POUNDS TOTAL WEIGHT,
SHELF MAY FALL FROM THE WALL AND CAUSE SERIOUS INJURY OR DEATH.

PARTS LIST
NO QTY DESCRIPTION
1 1PC TOP BOARD
2 1PC UPPER LEFT SIDE PANEL
3 1PC UPPER RIGHT SIDE PANEL
4 1PC ADJUSTABLE SHELF
5 1PC LEFT DOOR
6 1PC RIGHT DOOR
7 1PC BOTTOM SHELF
8 1PC MIDDLE BOARD
9 1PC LOWER LEFT SIDE PANEL
10 1PC LOWER RIGHT SIDE PANEL
11 3PCS CROSS BAR
12 2PCS UPPER BACK BOARD
13 1PC LOWER BACK BOARD
14 1PC PLASTIC CONNECTION STRIP

NO
PARTS QTY DESCRIPTION
A
12PCS CAM BOLT
B
12PCS CAM LOCK
C
8PCS WOOD DOWEL
D
1PC MAGNET
E
10PCS SCREW 3x14mm
F
2PCS METAL BRACKET
G
3PCS SCREW 3x10mm
H
4PCS SHELF HOLDER
I
5PCS SCREW 4x35mm
J
2PCS MAGNET PLATE
K
4PCS DOOR PIN
L
2PCS SCREW 4x25mm
M
2PCS KNOB
N
6PCS PLASTIC NUT
O
6PCS SCREW 5x35mm
P
6PCS PLASTIC CAP
Q
1PC PLASTIC ANCHOR
R
1PC PLASTIC LOCK STRAP
S
8PCS PLASTIC BRACKET
TOOLS NEEDED FOR ASSEMBLY: FLAT & PHILLIPS SCREWDRIVER (NOT INCLUDED)
THE USE OF POWER SCREWDRIVER IS NOT RECOMMENDED FOR ASSEMBLY
TOOL NEEDED FOR SECURING TO WALL: POWER DRILL (NOT INCLUDED)

STEP 1
STEP 1
1. Screw 4 cam bolts (A) into pre-threaded holes on top board (1).
2. Attach magnet (D) to top board (1) by inserting 2 screws (E) through holes on magnet (D) and tighten
to top board (1).
3. Attach metal bracket (F) to top board (1) by inserting 1 screw (G) through hole on metal bracket (F)
and tighten to top board (1).
4. Screw 4 cam bolts (A) into pre-threaded holes on middle board (8).
STEP 2
STEP 2
1. Screw 2 cam bolts (A) into pre-threaded holes on upper left side panel (2).
2. Screw 2 cam bolts (A) into pre-threaded holes on upper right side panel (3).

STEP 3
STEP 3
1. Attach magnet plate (J) to left door (5) by inserting 1 screw (G) through hole on magnet plate (J) and
tighten to left door (5)
2. Attach knob (M) to left door (5) by inserting 1 screw (L) through hole on left door (5) and tighten to
knob (M).
3. Insert 2 door pins (K) into holes on left door (5).
4. Repeat above steps for right door (6).
STEP 4
STEP 4
1. Attach upper left side panel (2) to bottom shelf (7) by inserting cam bolts (A) into cam lock holes on
bottom shelf (7).
2. Insert 2 cam locks (B) into cam lock holes on bottom shelf (7) and rotate clockwise to secure cam
bolts in place.
3. Attach upper right side panel (3) to bottom shelf (7) by inserting cam bolts (A) into cam lock holes on
bottom shelf (7).
4. Insert 2 cam locks (B) into cam lock holes on bottom shelf (7) and rotate clockwise to secure cam
bolts in place.

STEP 5
STEP 5
1. Slide lower back board (13) into grooves on upper left side panel (2), upper right side panel (3) and
bottom shelf (7).
2. Insert 2 wood dowels (C) into dowel holes on upper left side panel (2) and upper right side panel (3).
3. Attach middle board (8) to upper left side panel (2), upper right side panel (3) and lower back board
(13) by aligning groove on middle board (8) with lower back board (13) and inserting wood dowels (C)
into wood dowel holes on middle board (8).
4. Insert 4 screws (I) through holes on middle board (8) and tighten to upper left side panel (2) and upper
right side panel (3).
5. Slide upper back board (12) into grooves on upper left side panel (2), upper right side panel (3) and
bottom shelf (7).
6. Attach plastic connection strip (14) to upper back board (12) and slide another upper back board (12)
into grooves on upper left side panel (2), upper right side panel (3) and plastic connection strip (14).
STEP 6
STEP 6
1. Attach left door (5) and right door (6) to bottom shelf (7) by inserting door pins (K) into door pin holes on
bottom shelf (7).
2. Attach top board (1) to upper left side panel (2), upper right side panel (3), left door (5) and right door (6)
by inserting door pins (K) into door pin holes on top board (1) and inserting cam bolts (A) into cam lock
holes on upper left side panel (2) and upper right side panel (3).
3. Insert 4 cam locks (B) into cam lock holes on upper left side panel (2) and upper right side panel (3) and
rotate clockwise to secure cam bolts in place.

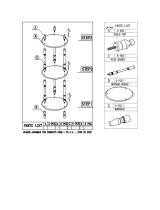
STEP 7
STEP 7
1. Insert 6 wood dowels (C) into wood dowel holes on end of cross bars (11).
2. Attach 3 cross bars (11) to lower left side panel (9) and lower right side panel (10) by inserting wood
dowels (C) into wood dowel holes on lower left side panel (9) and lower right side panel (10).
3. Insert 6 plastic nuts (N) into nut holes on cross bars (11).
4. Insert 6 screws (O) through holes on lower left side panel (9) and lower right side panel (10) and tighten
to cross bars (11).
STEP 8
STEP 8
1. Attach pre-assembled upper unit to pre-assembled lower unit by inserting cam bolts (A) into cam lock
holes on lower left side panel (9) and lower right side panel (10) and inserting 4 cam locks (B) into cam
lock holes and rotating clockwise to secure cam bolts in place.
2. Press 6 plastic caps (P) into holes on lower left side panel (9) and lower right side panel (10).

STEP 9
STEP 9
1. Insert 4 shelf holders (H) into holes on upper left side panel (2) and upper right side panel (3) and make
sure all 4 holders are on same level.
STEP 10
STEP 10
1. Place adjustable shelf (4) onto shelf holders (H).

STEP 11
STEP 11
1. Attach 8 plastic brackets (S) to back of cabinet by inserting 8 screws (E) through holes on plastic
brackets (S) and tighten to cabinet.
STEP 12
STEP 12
1. Place drawing with hole position on wall in desired location and drill 1 hole through the hole position on
the drawing.
2. Insert plastic anchor (Q) into hole on wall and attach metal bracket (F) to plastic anchor (Q) by inserting
1 screw (I) through hole on metal bracket (F) and tighten to plastic anchor (Q).
3. Place cabinet against wall and insert plastic lock strip (R) through metal bracket (F) on cabinet and
metal bracket (F) on wall.
4. Fasten plastic lock strip (R) to secure 2 metal brackets together firmly.

1/11