Page is loading ...

ASSEMBLY INSTRUCTIONS
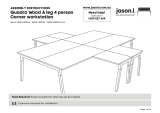
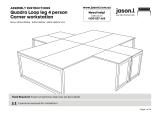
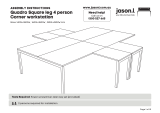
Quadro Wood A leg
Counter table
Radius Corners
Sizes: 3200x1100 mm
Page 1 of 10
Need help!
Call us on
1300 527 665
www.jasonl.com.au
Tools Required: Power screwdriver; Allen key set (provided)
2 persons required for installation

ASSEMBLY INSTRUCTIONS
Quadro Wood A leg
Counter table
Radius Corners
Sizes: 3200x1100 mm
Table top x2
Leg Quadro wood A (Half leg) x3
Leg wood A add on x6
Leg bottom beam x3
Upper beam x2
Lower beam x2
Plastic bracket x8
Feet x6
A
B
C
D
E
F
G
H
Allen key x2P
M8x20MM CSK x12
M8x20MM socket head x8
M6x20MM socket head x6
M6x30MM socket head x8
Pins x3
Corner pads x6
Mushroom head M6x30 x6
I
J
K
L
M
N
O
COMPONENTS
SCREWS
Page 2 of 10
Need help!
Call us on
1300 527 665
www.jasonl.com.au
G
H
I J K L M
N
B
C
D
O
F
E
A

Page 3 of 10
Insert the Leg wood add on (C) into the
Leg Quadro A (Half leg) (B). Using Allen Key
provided, attach mushroom head screw
(O) for all legs.
You will notice two colored
stickers located on each leg.
Both legs must have the colour
sticker facing away from where
the plastic brackets are inserted.
Plastic bracket holes
facing to the other side.
ASSEMBLY INSTRUCTIONS
Quadro Wood A leg
Counter table
Radius Corners
Sizes: 3200x1100 mm
Need help!
Call us on
1300 527 665
www.jasonl.com.au
B
C
STEP 01
B
O

Page 4 of 10
ASSEMBLY INSTRUCTIONS
Quadro Wood A leg
Counter table
Radius Corners
Sizes: 3200x1100 mm
Need help!
Call us on
1300 527 665
www.jasonl.com.au
STEP 02
Now use corner pads (N)
to cover the holes where
just inserted the head
screw sockets.
You will notice two holes in each
Leg wood add on (C). Insert a Pin
into the top hole of each leg, as
shown in the illustration.
Now insert the Leg bottom beam (D)
into the Leg wood add on (C), using
Pins (M) provided. Attach on each leg.
N
B
D
C
M

J
ASSEMBLY INSTRUCTIONS
Quadro Wood A leg
Counter table
Radius Corners
Sizes: 3200x1100 mm
Using Allen Key provided, attach 2 plastic brackets (G) per exterior leg,
and 4 plastic brackets for the shared leg (as per picture above) using
M6x20MM (K) Socket head screw. Screw the feets (H) to the bottom of
each Leg wood add on (C).
Using Allen Key provided, attach M8x20MM Socket head (J)-
screw socket half way into leg for all legs
STEP 02
Page 5 of 10
Need help!
Call us on
1300 527 665
www.jasonl.com.au
TOP VIEW
K
STEP 01
H
G

ASSEMBLY INSTRUCTIONS
Quadro Wood A leg
Counter table
Radius Corners
Sizes: 3200x1100 mm
Page 6 of 10
Need help!
Call us on
1300 527 665
www.jasonl.com.au
E
STEP 03
Adjust extendable beam (E) to desired
length using markers and secure beam
at that length using screws provided
50
1200
1300
1400
1500
1600
1700
1800
1900
2000
50

F
ASSEMBLY INSTRUCTIONS
Quadro Wood A leg
Counter table
Radius Corners
Sizes: 3200x1100 mm
STEP 04
Adjust extendable beams (F) to desired length.
Remove plastic inserts
Loosen 2 bolts on beam using allen key
Extent lower beam to the same distance as upper beam
Insert plastic inserts back into the beam
Page 7 of 10
Need help!
Call us on
1300 527 665
www.jasonl.com.au
2
2
2
4
1
1
1
3
3

ASSEMBLY INSTRUCTIONS
Quadro Wood A leg
Counter table
Radius Corners
Sizes: 3200x1100 mm
STEP 05
TOP VIEW
Frame looks like this. Using Allen Key, attach Upper Beams (E)
with Sockets (I).
STEP 06
Page 8 of 10
Need help!
Call us on
1300 527 665
www.jasonl.com.au
I
E
I
Attach Upper Beams (E) to legs using nut insert.
See point attached

I
I
Frame looks like this. Using Allen Key. Tighen Sockets (I) on the Lower Beams
(F) using Allen Key (O). Insert plastic spacers to improve regidity. Attach two
Sockets (I) to the side of each lower side beams (as shown in the picture).
STEP 07
F
ASSEMBLY INSTRUCTIONS
Quadro Wood A leg
Counter table
Radius Corners
Sizes: 3200x1100 mm
Page 9 of 10
Need help!
Call us on
1300 527 665
www.jasonl.com.au
I

ASSEMBLY INSTRUCTIONS
Quadro Wood A leg
Counter table
Radius Corners
Sizes: 3200x1100 mm
Page 10 of 10
Need help!
Call us on
1300 527 665
www.jasonl.com.au
STEP 08
L
TABLE TOP
BOTTOM VIEW
Place desktops ontop of frame. Nut inserts in top will align with plastic
joiner brackets using M6x30MM (L) sockets attached top to frame.
nut insertnut insert nut insertnut insert
/