Escea TFS1000 Installation guide

Category
Stoves
Type
Installation guide

This manual is also suitable for

Installation Instructions
and User Guide
TFS650 & TFS1000
FREE-STANDING SOLID FUEL BURNER
630592_3
WARRANTY REPAIR AND ANNUAL SERVICING
Please contact Escea if you require warranty work. Warranty repair work must be carried
out by a recognised Escea woodfire installer. It is recommended that recognised Escea
Wood Fire Installers are also used to carry out annual servicing requirements (particularly
during the warranty period). For contact details of recognised Escea Wood Fire Technicians
in your area, or for replacement parts, please contact the retailer from whom the appliance
was purchased from, or visit our website.
All installation work must comply to AS/NZS 2918:2018 Domestic solid fuel burning
appliances- Installation AND these installation instructions. Any work undertaken that
does not comply to AS/NZS 2918:2018 AND these installation instructions will not
qualify for the Escea warranty. Escea will not be accountable for any unsafe installation
that does not comply to AS/NZS 2918:2018.
Manufactured by: Escea Ltd, PO Box 5277 Dunedin NZ, Ph: +64 3 478 8220
For contact details of your local Escea distributor or dealer, please visit www.escea.com,
call 0800 173 000, or email us at [email protected].
From Australia, please visit www.escea.com.au, call AU: 1800 460 832 or WA: 1800 730
140, or email us at [email protected]
CONTENTS
A Safety Information 4
B Product Details 6
C Installation Process 10
D Woodfire Operation 34
E Maintenance & Servicing 41
F Troubleshooting 55
G General Warranty Terms & Conditions 56
H Service History & Data Plate 59
4
AA SAFETY INFORMATION























































ͳThe appliance should be allowed to cool

ͳDo not operate without fully assembling all

ͳ


ͳDo not operate appliance before reading and











55
A





ͳ
ͳ

ͳ
be carefully supervised when they are in the







individuals out of the room and away from hot


ͳ

ͳ


ͳ


ͳ


ͳ
children and dispose of the material in a safe



ͳ

ͳ

ͳThis appliance is designed to burn natural

ͳ



ͳ



ͳ

ͳ


ͳDo not let the appliance become hot enough

ͳ
ͳ



ͳ
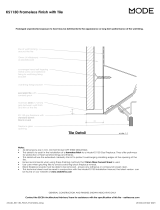
maintained when building a mantel or shelves

on the wall or in the air above the appliance



ͳThe appliance must be installed using only
the building materials as approved by the

ͳ
within 1 meter of the product that is





6
B

B PRODUCT DETAILS
B1 Product Description
The TFS series is a free-standing wood fire.
B2 Product Dimensions
The TFS series consists of the TFS650 and TFS1000 fireplace. Plinths are available for
purchase to go along with the free-standing woodfire.
GRC plinths (Glassfibre-Reinforced Concrete) are available for both TFS650 and
TFS1000 products. The TFS1000 and 1500mm GRC Plinths can be used for both
TFS650 and TFS1000 products. The sheetmetal plinths are available for both TFS650
and TFS1000 products.
Dimensions for each fireplace and plinth options are available in the following pages.
For more detail, view architectural drawings at www.escea.com
TFS650 Fire Dimensions:
606mm
483mm
605mm
200mm
150mm
650mm
291mm
TOP VIEW
689mm
ISOMETRIC VIEW
FRONT VIEW
SIDE VIEW
FLUE PIPE
COMBUSTION
AIR INLET PIPE
506mm
77
B
TFS1000 Fire Dimensions:
Sheetmetal Base 650W Dimensions:
940mm
459mm
988mm
200mm
150mm
506mm
494
240mm
606mm
566mm
83mm
609mm
TOP VIEW
FRONT VIEW SIDE VIEW
FLUE PIPE
COMBUSTION
AIR INLET PIPE
ISOMETRIC VIEW
302mm
292mm
648mm
506mm
106mm
656mm
TOP VIEW
FRONT VIEW
8
8
B
Sheetmetal Base 1000W Dimensions:
Plinth 650W Dimensions:
540
245mm 506mm
650mm
300mm
FRONT VIEW
TOP VIEW
FRONT VIEW
TOP VIEW
994mm
375mm 506mm
99
B
Plinth 1000W Dimensions:
Plinth 1500W Dimensions:
884mm
320mm 506mm
994mm
FRONT VIEW
TOP VIEW
375mm
225mm
1350mm
1500mm
506mm
375mm
FRONT VIEW
TOP VIEW
10 
10
B
B2 Specifications Table
TFS650:
Fuel Type Hardwood
Average Particulate Emission (g/kg) 0.97
Overall Average Eciency (%) 68.63
Maximum Average Heat Output (kW) 6.75
TFS1000:
Fuel Type Hardwood
Average Particulate Emission (g/kg) 1.00
Overall Average Eciency (%) 61.88
Maximum Average Heat Output (kW) 8.77
C
11
C INSTALL ATION PROCESS
C1 Installation - General























ͳ



ͳ
of fuel and burn the appliance with the air
control fully open for an hour as the appliance



moisture is being drawn from the appliance
and it will be necessary to build several hot













Note: the appliance has been tested to AS/NZS
2918 Appendix B. The flue system has been tested
to AS/NZS 2918 Appendix F.
12 
12
C
C2 Safety Clearance Minimum Dimensions
If there is combustible flooring within 500mm of the appliance, a floor protector must be
installed.
If there is combustible flooring directly in front of the appliance, the appliance must be
installed on one of Escea’s plinths/ bases, or another heat resistant structure of minimum
height I (as detailed below). Additionally, a floor protector of any suitable heat resistant
material must be installed to prevent any ash contacting the floor. The floor protector must
extend not less than 300mm from the front of the appliance and not less than 200mm
from each side of the appliance.
Dimension I can be reduced if the product is installed over an insulating, heat resistant
floor complying with the requirements of AS/NZS 2918:2018 section 3.3.3.
TFS650 Clearances:
A
(Back)
(mm)
B
(Side,
behind
fire)
(mm)
C
(Side,
in
front
of fire)
(mm)
D
(Floor
Protector
Front)
(mm)
E
(Floor
Protector
Side)
(mm)
F
(Flue
Centre
to Side)
(mm)
G
(Flue
Centre
to Back)
(mm)
H
(Top to
Ceiling)
(mm)
I
(Oset
height
from
floor)
(mm)
Parallel
Position
200 320 500 300 200 645 415 1420 300
Corner
Position
100 100 N/A 300 200 490 490 1420 300
TFS1000 Clearances:
A
(Back)
(mm)
B
(Side)
(mm)
C
(Side,
in front
of fire)
(mm)
D
(Floor
Protector
Front)
(mm)
E
(Floor
Protector
Side)
(mm)
F
(Flue
Centre
to Side)
(mm)
G
(Flue
Centre
to Back)
(mm)
H
(Top to
Ceiling)
(mm)
I
(Oset
height
from
floor)
(mm)
Parallel
Position
200 370 500 300 200 864 440 1420 375
When installing the TFS and looking to reduce the clearance behind the fireplace, this
must be in accordance with AS/NZS 2918 but doing so may interfere with servicing of the
fan within the fireplace.
1313
C
Parallel Position
Corner Position
G
F
B
A D
E
C
B
B
E
D
F
G
14 
14
C
Height Clearances
Flue Clearances
A minimum clearance of 25mm between the 250mm liner and any combustible material
must be maintained. Note: the Escea ceiling plate must be installed to comply.
H
250mm DIA
GALVANISED LINER
25mm minimum
20mm maximum
250mm GALVANISED LINER
25mm
Ceiling
Bottom of 250mm dia liner
flush with bottom of ceiling 200mm PAINTED FLUE
1515
C
C3 Appliance Installation
 Place the floor protector on the floor. Ensure that the floor protector is properly
centred to the location of the flue exit hole on the ceiling. Place the plinth or base on
the floor protector once the location of floor protector is set.
*Note: Safety clearance requirements for the woodfire must be taken into account
when setting the floor protector location.
 Escea recommends the plinth/base and floor protector be secured to the floor. Into
timber floors secure with 4x M6 bolts or coach screws (minimum), through the pre-
drilled holes on the plinth and floor protector (circled below). For concrete floors, use
M6 concrete screws or expansion anchors.
16 
16
C
 If installing onto one of the Escea Plinths, drill holes for mounting the fire, as per the
schematics below. If installing onto the Escea base, this will not be necessary as the
base already has mounting holes in the sheetmetal.
Note: if installing onto the 1500W Plinth, drill the same holes for the product, but
oset to where the fire is being positioned on the plinth.
DRILL HOLES THROUGH
GRC PLINTH TO SECURE
THE WOODFIRE PRODUCT
TO THE PLINTH
570
TFS650 Hole Locations
20mm dia
43 43
103
363
908
TFS1000 Hole Locations
20mm dia
43 43
98
338
1717
C
 Place the appliance on top of the plinth and secure it to the plinth. Use the supplied 4x
M8x50 Hex bolts and 4x M8 x 32 washers to bolt through the plinth to the appliance.
*Note: Before placing the fire on the plinth, pre-drill 3x 3.3mm dia flue fixing holes on
both the fireplace Ø150mm and Ø200mm spigots.
USE M8 x 32 WASHER AND
M8 x 50 BOLT HEX BOLT FOR
EACH HOLE
2x HOLES ON EACH SIDE
 Connect 3x pieces of the 1219mm long, Ø150mm flue pipe together to create a long
flue pipe. Drill through flue pipes and use a minimum of 3x SS rivets to connect flue
pipes together.
Place Ø150mm flue spiders around each of the Ø150mm flue pipe. Tighten the screws
and nuts to secure the spiders to the flue pipes. Drill through spider and flue pipes and
use a minimum of 3x SS rivets to further secure the spiders to flue.
Connect 3x pieces of the 1219mm long, Ø200mm flue pipe together to create a long
flue pipe. Drill through flue pipes and use the provided rivets to connect flue pipes
together.
Place Ø200mm flue spiders around each of the Ø200mm flue pipe. Tighten the
screws and nuts to secure the spiders to the flue pipes. Drill through spider and flue
pipes and use a minimum of 3x SS rivets to further secure the spiders to flue.
*Note: For more information regarding flue installation and minimum requirements,
please refer to section C4.
18 
18
C
 Place the Escea ceiling plate over the spigots on the fire (folds pointing upwards). The
ceiling plate is supplied with the Escea Freestanding Flue Kit.
 Position the long Ø150mm flue pipe (with the crimped end pointing downwards) into
the inner spigot. Use a minimum of 3x rivets to fasten the Ø150mm flue pipe through
pre-drilled holes on the Ø150mm spigot.
Position the long Ø200mm flue pipe (with the crimped end pointing downwards) into
the outer spigot. Use a minimum of 3x rivets to fasten the 200mm flue pipe through
pre-drilled holes on the outer spigot.
*Note: For more information regarding flue installation, please refer to section C4.
150
PLACE 150mm SPACER HERE
200
MINIMUM 1600mm
PLACE 200mm SPACER HERE
1919
C
 Secure the ceiling plate on to the ceiling. Use the 4x supplied machine pozi screws and
4x 12mm ceramic spacer.
 Cut one of the Ø250mm galvanised liners from a length of 1219mm length to match
the required liner length. Then connect the 2 pieces of the Ø250mm liners together to
create a long liner pipe. Use a minimum of 3x SS rivets to connect flue pipes together.
Position the Ø250mm flue liners above the ceiling plate (with the crimped end
pointing upwards). Align the Ø250mm liner so that the end is flush with the ceiling
and attach the flue liner to ceiling and roof beams using appropriate fasteners. Note:
above the ceiling penetration and below the roof penetration, a 25mm clearance to any
combustible material must be maintained.
For more information regarding flue installation, please refer to section C4.
20 
20
C
Install the back vermiculite panel by tilting the panel and placing the bottom edge of
the back panel above the ember air plenum. Carefully push the top of the back panel
towards the back wall of the firebox.
*Note: Please hold the back panel in place while placing the side panels in place to
prevent it from tipping over.
*Note: Please refer to the diagram below for the correct orientation of the back
vermiculite panel during installation to the firebox. The door has been removed for
clarity.
THIS SURFACE IS VISIBLE
FROM THE FRONT
ISOMETRIC VIEW
BACK SURFACE OF THE
VERMICULITE PANEL
FRONT SURFACE
OF THE
VERMICULITE PANEL
BACK SURFACE
OF THE
VERMICULITE PANEL
THIS CHAMFER IS
NOT VISIBLE
SIDE VIEW
  • Page 1 1
  • Page 2 2
  • Page 3 3
  • Page 4 4
  • Page 5 5
  • Page 6 6
  • Page 7 7
  • Page 8 8
  • Page 9 9
  • Page 10 10
  • Page 11 11
  • Page 12 12
  • Page 13 13
  • Page 14 14
  • Page 15 15
  • Page 16 16
  • Page 17 17
  • Page 18 18
  • Page 19 19
  • Page 20 20
  • Page 21 21
  • Page 22 22
  • Page 23 23
  • Page 24 24
  • Page 25 25
  • Page 26 26
  • Page 27 27
  • Page 28 28
  • Page 29 29
  • Page 30 30
  • Page 31 31
  • Page 32 32
  • Page 33 33
  • Page 34 34
  • Page 35 35
  • Page 36 36
  • Page 37 37
  • Page 38 38
  • Page 39 39
  • Page 40 40
  • Page 41 41
  • Page 42 42
  • Page 43 43
  • Page 44 44
  • Page 45 45
  • Page 46 46
  • Page 47 47
  • Page 48 48
  • Page 49 49
  • Page 50 50
  • Page 51 51
  • Page 52 52
  • Page 53 53
  • Page 54 54
  • Page 55 55
  • Page 56 56
  • Page 57 57
  • Page 58 58
  • Page 59 59
  • Page 60 60
  • Page 61 61

Escea TFS1000 Installation guide

Category
Stoves
Type
Installation guide
This manual is also suitable for

Ask a question and I''ll find the answer in the document

Finding information in a document is now easier with AI