Page is loading ...

1
White Rabbit Automation System
User Guide

White Rabbit Electronics | White Rabbit Automation System User Guide
ii
Contents
Contents
What is the White Rabbit Smart Hub? .................................................................................... 1
About this Guide ................................................................................................................... 1
Initial Setup ........................................................................................................................... 2
Hardwire Internet Connection .................................................................................................... 2
Wi-Fi Internet Connection (TBD) ................................................................................................. 2
Physical Components – Front and Side ....................................................................................... 3
Physical Components – Back ....................................................................................................... 4
Account Setup ............................................................................................................................. 5
Connecting to a Central Station (TBD) ........................................................................................ 9
Status Lights ................................................................................................................................ 9
Status Bar within the White Rabbit Automation System ...................................................... 10
White Rabbit Mobile App .................................................................................................... 10
White Rabbit Automation System Overview ........................................................................ 11
My Home ................................................................................................................................... 11
Devices ...................................................................................................................................... 12
Users .......................................................................................................................................... 12
Actions ....................................................................................................................................... 12
Log ............................................................................................................................................. 12
Admin ........................................................................................................................................ 12
My Home Panel ................................................................................................................... 13
Adding a Dashboard View ......................................................................................................... 15
Display by Room ........................................................................................................................ 16
Video Camera ............................................................................................................................ 16
People Status ............................................................................................................................. 18
Emailing and Text Messaging Users ...................................................................................... 18
Arming the System for an Area ................................................................................................. 19
In Alarm ..................................................................................................................................... 20
“In Alarm” Options ................................................................................................................ 21

White Rabbit Electronics | White Rabbit Automation System User Guide
iii
Disarming the System................................................................................................................ 21
Resetting the System (Unknown Status) ................................................................................... 22
Devices Panel ...................................................................................................................... 23
Adding an Area .......................................................................................................................... 25
Defining Area Details ............................................................................................................. 25
Adding a Room .......................................................................................................................... 27
Changing the Image for a Room ............................................................................................ 27
Adding and Pairing a Device ...................................................................................................... 28
Calibrating Locks .................................................................................................................... 29
Associating Devices ................................................................................................................... 29
Defining Device Details ............................................................................................................. 30
Device Details ........................................................................................................................ 31
Action Links ............................................................................................................................ 31
Advanced Options ................................................................................................................. 32
Adding a Device to a Dashboard ............................................................................................... 35
Configuring Devices ................................................................................................................... 35
Viewing and Filtering Devices ................................................................................................... 35
Users Panel ......................................................................................................................... 37
Actions Panel ...................................................................................................................... 41
Configuring an Action – Overview ............................................................................................. 43
Activators and Triggers .......................................................................................................... 43
Alarm Conditions ................................................................................................................... 46
Additional Device Constraints ............................................................................................... 46
Scheduling Constraints .......................................................................................................... 47
Adding a Prebuilt Scenario ........................................................................................................ 47
Adding a Manual (Personalized) Trigger ................................................................................... 52
Adding Steps to a Trigger .......................................................................................................... 58
Events and Text Messages ..................................................................................................... 61
Adding a Schedule ..................................................................................................................... 61
Log Panel ............................................................................................................................. 63

White Rabbit Electronics | White Rabbit Automation System User Guide
iv
Admin Panel ........................................................................................................................ 65
Figures
Figure 1: White Rabbit Smart Hub Physical Components – Front .................................................. 3
Figure 2: White Rabbit Smart Hub Physical Components – Side .................................................... 3
Figure 3: White Rabbit Smart Hub Physical Components – Back ................................................... 4
Figure 4: White Rabbit Automation System – Home Page ........................................................... 11
Figure 5: My Home Panel .............................................................................................................. 13
Figure 6: Camera Status ................................................................................................................ 16
Figure 7: Video Camera Widget .................................................................................................... 17
Figure 8: Alarm State – My Home ................................................................................................. 20
Figure 9: Devices Panel ................................................................................................................. 23
Figure 10: Save Configuration Dialog Box ..................................................................................... 25
Figure 11: Device Details Example Panes ..................................................................................... 31
Figure 12: User Codes – Add a New User Code ............................................................................ 32
Figure 13: User Codes – Set Time Restriction ............................................................................... 33
Figure 14: Device Filter Banner ..................................................................................................... 36
Figure 15: Users Panel .................................................................................................................. 37
Figure 16: Panel Password ............................................................................................................ 40
Figure 17: Actions Panel................................................................................................................ 42
Figure 18: Prebuilt Scenario – Naming an Action ......................................................................... 47
Figure 19: Selecting Prebuilt Scenario .......................................................................................... 48
Figure 20: Prebuilt Scenario – Selecting Trigger Device ............................................................... 48
Figure 21: Prebuilt Scenario – Configuring Trigger Device ........................................................... 49
Figure 22: Prebuilt Scenario – Selecting a Device ......................................................................... 49
Figure 23: Prebuilt Scenario – Device Options ............................................................................. 50
Figure 24: Prebuilt Scenario – Select Option Path ........................................................................ 50
Figure 25: Prebuilt Scenario – Action Complete ........................................................................... 51
Figure 26: Prebuilt Scenario – Action, Trigger, Step at Actions Panel .......................................... 51
Figure 27: Manual Trigger – Naming an Action ............................................................................ 52
Figure 28: Selecting Manual Trigger ............................................................................................. 53
Figure 29: Manual Trigger – Selecting an Activator ...................................................................... 53
Figure 30: Manual Trigger – Selecting Alarm System Event ......................................................... 54
Figure 31: Manual Trigger – Selecting a Mode ............................................................................. 54
Figure 32: Manual Trigger – Selecting a Device ............................................................................ 55
Figure 33: Manual Trigger – Selecting Alarm State ...................................................................... 55
Figure 34: Manual Trigger – Selecting Device Constraints ........................................................... 56
Figure 35: Manual Trigger – Setting Time Constraints ................................................................. 56

White Rabbit Electronics | White Rabbit Automation System User Guide
v
Figure 36: Manual Trigger – Trigger Complete ............................................................................. 57
Figure 37: Manual Trigger – Action and Trigger at Actions Panel ................................................ 57
Figure 38: Creating a Step – Sending a Text Message .................................................................. 58
Figure 39: Creating a Step – Users Who Receive Text Message Notification ............................... 59
Figure 40: Creating a Step – System Delay Time .......................................................................... 59
Figure 41: Creating a Step – Step Complete ................................................................................. 60
Figure 42: Creating a Step – Action, Trigger, and Step at Actions Panel ...................................... 60
Figure 43: Creating a Predefined Schedule for Actions ................................................................ 61
Figure 44: Log Panel ...................................................................................................................... 63
Figure 45: Admin Panel – Top Portion .......................................................................................... 65
Figure 46: Admin Panel – Bottom Portion .................................................................................... 66

White Rabbit Electronics | White Rabbit Automation System User Guide
vi
Confidentiality Statement
All information contained in this document is provided in confidence and shall not be published
or disclosed wholly or in part to any other party without the expressed prior written permission
of White Rabbit Electronics. It shall be held in safe custody at all times. These obligations shall
not apply to information which is published or becomes known legitimately from sources other
than White Rabbit Electronics.
Acknowledgments
The information contained in this document represents the current view of White Rabbit
Electronics on the issues discussed as of the date of publication. White Rabbit Electronics must
continuously respond to the changing market conditions; therefore, it should not be
interpreted to be a commitment on the part of White Rabbit Electronics. White Rabbit
Electronics cannot guarantee the accuracy of any information presented after the date of
publication.
This document is for informational purposes only. The system descriptions and diagrams
contained within should be used as guidelines only. WHITE RABBIT ELECTRONICS MAKES NO
WARRANTIES, EXPRESS OR IMPLIED, IN THIS DOCUMENT.
Android is a trademark or registered trademark of Google Incorporated in the United States and
other countries.
iPhone is a trademark or registered trademark of Apple Incorporated in the United States and
other countries.
Similarly, White Rabbit Electronics acknowledges trademarks or registered trademarks in the
United States and other countries of other entities mentioned in this document, but not listed
here.
Copyright
©2015 White Rabbit Electronics. All Rights Reserved.
Corporate Office: 425 Windchime Pl., Colorado Springs, CO 80919 USA

Contents
White Rabbit Electronics | White Rabbit Automation System User Guide
1
What is the White Rabbit Smart Hub?
This system delivers the most comprehensive feature set to combine security and the Smart
Home. The White Rabbit Smart Hub:
Offers home security with optional professional monitoring and emergency response
Connects the “Internet of Things” in today’s Smart Home
Works in combination with your smartphone for automating a variety of devices
Adapts to your lifestyle
Eliminates the need for manual arming and disarming
Automatically arms itself when the last family member leaves the home and disarms
itself when the first family member returns
The smart hub is at the center of a smart system. It communicates with White Rabbit Cloud,
your wireless devices, and your smartphones. The cloud is a collection of monitoring and
services that are accessed over the Internet. Your smartphones are what are used by the smart
system to perform automated actions and monitor your family’s home and away status. The
effective range of your smartphones within the smart system is determined by your internet
modem’s or router’s signal strength. Together, the smart hub, the cloud, your devices, your
smartphones, and central monitoring provides you with security and smart living.
About this Guide
This guide is intended to be used by professional installers and home users. However, if you’re
a home user and you have any doubts as to any configuration you’re attempting to make within
the system, it’s recommended that you consult with a professional installer. Incorrect
installation or configuration of security hardware might cause the security of your system to be
reduced or cause it to report false alarms more frequently.
There’s a variety of devices available to you through the White Rabbit Automation System. And,
there’s a variety of prebuilt configurations, as well as custom configurations that you can
create. As it can’t be known what devices you have or how you want to configure them, and to
avoid this guide being unnecessarily cumbersome, this guide provides example configurations,
but doesn’t attempt to document every conceivable device and scenario.
Note: If you’re viewing this document online, you can zoom in to enlarge the details of any
example screens by using the standard method per your PDF reader or operating system.

Contents
White Rabbit Electronics | White Rabbit Automation System User Guide
2
Initial Setup
Your system includes:
The White Rabbit Smart Hub
An Ethernet Cable, 5 Foot, Cat5
A Power Supply, 5VDC, 1.5A
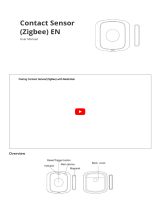
Hardwire Internet Connection
See Figure 2, page 3 for the port and power connection locations.
Go to Account Setup, page 5 in this guide, to set up your smart hub account.
Notes:
The smart hub should automatically power on when plugged in.
Once the smart hub initially connects to the Internet, it’s in an initializing state, and the
light bars turn purple. Once the smart hub achieves a ready state the light bars turn
medium blue. You can then proceed with creating your account.
Should there be a power failure and you have a backup power supply, the smart hub
should restart automatically. If the smart hub doesn’t start automatically, press the
Power On/Off button. See Figure 3, page 4, for the location of the Power On/Off button.
Wi-Fi Internet Connection (TBD)
In development…
1
2
Network
Connection
Power
Connection

Contents
White Rabbit Electronics | White Rabbit Automation System User Guide
3
Physical Components – Front and Side
Figure 1: White Rabbit Smart Hub Physical Components – Front
Figure 2: White Rabbit Smart Hub Physical Components – Side
White Rabbit Smart Hub Physical Components – Front and Side
Component
Number
Component
1
WPS (Wi-Fi Protected Setup) and Arm/Disarm Combination Button
2
Backup Cellular Modem* and Status Light**
3
Status Light Bars. See Status Lights, page 9.
4
Active Streaming Digital Camera Status Light**
5
Wi-Fi Status Light**
1
2
3
3
4
5
7
8
6

Contents
White Rabbit Electronics | White Rabbit Automation System User Guide
4
6
Speaker
7
Ethernet Port
8
Power Connector
*Additional Optional Hardware Required
**Lights Up When Active
Physical Components – Back
Figure 3: White Rabbit Smart Hub Physical Components – Back
White Rabbit Smart Hub Physical Components – Back
Component
Number
Component
1
Wall Mount Brackets
2
Factory Reset Pinhole Button
3
Battery Backup Port (USB Port)
4
Power On/Off Button
1
1
2
3
4

Contents
White Rabbit Electronics | White Rabbit Automation System User Guide
5
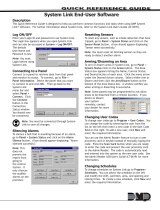
Account Setup
Notes:
The setup wizard might not display initially if you’re connecting to
http://my.whiterabbithub.com from a different network than the smart hub. In this case
the initial screen to display is the Login screen.
From the Login screen you would click, I just connected my hub, but don’t yet have a
login. Next, the smart hub attempts to determine your MAC ID (media access control
identification), and if successful, displays it on the first setup wizard screen for
confirmation. Your MAC ID is located on a sticker on the bottom of the smart hub. You
then continue to the setup wizard.
If your MAC ID isn’t determined automatically, you’re prompted to enter your MAC ID.
You can then continue to the setup wizard.
Home PC
http://my.whiterabbithub.com/
1
Power On
2


Contents
White Rabbit Electronics | White Rabbit Automation System User Guide
8
Notes:
The first person to create a user account becomes the default administrator, which can
be changed later on the Admin Panel within the system.
You’re prompted if you’re using the smart hub for residential or commercial use. The
default selection is Residential and for the purpose of this guide, we’re using the
residential option. The commercial option is similar with the exception of some different
terminology used on the setup screens (for example, there would be a reference to
“building” as opposed to “home”).
It’s important for alarm handling that you correctly type your full home address in the
Address box and select the correct Time Zone.
If you live in an area that supports daylight savings, leave Observes Daylight Savings
selected – if you live in an area that doesn’t, clear the checked box.
8
9

Contents
White Rabbit Electronics | White Rabbit Automation System User Guide
9
Your Email Address is your user nameat login and must be valid to receive system alerts.
Your Password is case sensitive.
An area is the main location. Rooms are spaces or “subsets” of areas. For example, your
home could be an “area” and the entryway to your home could be a “room.”
As you go to the login screen, the light bars flash green, which means the smart hub is
saving your information. Next, the light bars become a steady blue, which means the
hub is in a normal state, connected to the cloud, and the system is capable of being
used and armed.
Connecting to a Central Station (TBD)
In development…
Status Lights
The status lights on the smart hub indicate the condition of the system as a whole. Once you’ve
reviewed and familiarized yourself with the meaning of the different colored lights, please
review the subsection that immediately follows, “Status Bar within the White Rabbit
Automation System.”
Color of Light Bars
Status
Off
If you choose to turn off the status bar lights then the system is
normal – all devices are ready. Or, the Off state can also
indicate that the system hasn’t finished starting up.
Medium Blue
The system is normal – all devices are ready.
Medium Blue “flashing”
slow
System is pairing/unpairing a device. Commands can’t be
accepted from the user interface during this process.
Light Blue
The smart hub is connected to the cloud, disarmed, and not
ready.
Purple
The smart hub is connected to the cloud and is in an initializing
state.
Purple “flashing” medium
The system is in error, not connected to the cloud, and
commands can’t be accepted from the user interface.
Green
The system was “In Alarm,” the alarm state has been canceled,
but the system isn’t fully restored.
Green “flashing” fast
Updates are in the process of being saved in the cloud and the
smart hub. Commands can’t be accepted from the user
interface during this process.
White “flashing” slow
The smart hub is downloading new firmware. Commands can’t
be accepted from the user interface during this process.
Yellow “beeping”
The alarm is arming itself. If arming for Away or Vacation, you
have a specified amount of time to exit.

Contents
White Rabbit Electronics | White Rabbit Automation System User Guide
10
Color of Light Bars
Status
Yellow “flashing” medium
The arming countdown has more than 10 seconds for Away and
Vacation.
Yellow “flashing” fast
The arming countdown has less than 10 seconds for Away and
Vacation.
Yellow “flashing” slow
An area error – typically the system tried to arm itself, but
failed.
Red
The alarm is armed in Away, Stay, or Vacation mode.
Red “flashing” medium
The system is “In Alarm.”
Status Bar within the White Rabbit Automation System
In addition to the status lights displaying on the smart hub, a colored horizontal status bar
displays below the toolbar throughout the White Rabbit Automation System. This status bar
matches the color of the lights on your smart hub. Therefore, you can know the status of the
smart hub even if you’re not in the same room as where it’s located. If the smart hub status
lights are on steadily, the status bar is a solid line – if the lights are flashing, the status bar is a
dashed line.
White Rabbit Mobile App
Ensure that you download the White Rabbit Mobile App for your mobile devices from your
preferred mobile app store. The app is available for Android and iPhone operating systems.
If you’ve never registered your device with your user account in the White Rabbit Automation
System, you’ll be prompted automatically to register immediately after logging into the mobile
app – when prompted, tap Yes.
If you ever change the registration for a device, for example, get a new smartphone, swipe the
Additional Information icon at the Home screen of the mobile app. Next, tap Update Device
Registration at the Additional Information screen.

Contents
White Rabbit Electronics | White Rabbit Automation System User Guide
11
White Rabbit Automation System Overview
The main webpage of the White Rabbit Automation System displays a toolbar. Through this
toolbar you can configure, monitor, and take action on devices, user accounts, and activity logs.
Notes:
The user who’s currently logged in displays just above the Logout button.
When you point to a toolbar button, the name of the related panel appears.
When one user makes an update in the system and saves the configuration, a broadcast
notification is sent to all the other logged in users, prompting them to reload their
account so the update is reflected.
Figure 4: White Rabbit Automation System – Home Page
The following subsections are an introduction to each toolbar button and related activity panel:
My Home
Clicking My Home takes you to the My Home Panel. With the use of dashboards, this view
provides you a current “snapshot” status by area and device. From here you can monitor and
control your areas and devices using your home computer or any mobile device with web
access. A dashboard is where you can arm/disarm your alarm system for when you’re away, in,
or on vacation. Additionally, you can add and remove as many dashboard views as you like.
And, you can send emails and text messages to users who are part of your White Rabbit
Automation System.
My
Home
Devices
Users
Actions
Log
Admin
Logged
in User
Online Guides
Log Out
Status
Views
Add
View

Contents
White Rabbit Electronics | White Rabbit Automation System User Guide
12
Devices
Clicking Devices takes you to the Devices Panel. From here you can add, remove, and
change areas, rooms, and devices, and pair/unpair those devices to the White Rabbit
Automation System. You can choose from a variety of filters to change your view on the Devices
panel. And, depending on the type of device, there are advanced options to change how each
device operates and behaves within the monitoring and alarm system. These devices can also
be added to a dashboard view from this panel.
Users
Clicking Users takes you to the Users Panel. From here you can add, remove, and change
user, phone, email, text messaging details, and privacy details.
Actions
Clicking Actions takes you to the Actions Panel. From here you can select from prebuilt
scenarios or add and personalize your own actions for devices and alarm handling. And, you can
add and personalize schedules that you can apply to those actions. For example, you can
configure an action so when you approach or open the front door to your home at night,
designated lights will turn on automatically.
Log
Clicking Log takes you to the Log Panel. From here you can view recorded actions against
individual areas, rooms, and devices by date and time to include arming/disarming and alarm
actions. You can also choose from a variety of filters to change your view of the log file.
Admin
Clicking Admin takes you to the Admin Panel. From here you can enter and change your
user profile information to include: address, language, time zone, status light and chime
notifications, temperature units, alarm system components tests, and system panel themes.

Contents
White Rabbit Electronics | White Rabbit Automation System User Guide
13
My Home Panel
To familiarize you with the My Home panel, Figure 5 and the table that follows provide a
functional overview.
Figure 5: My Home Panel
My Home Panel
Component
Number
Component
1
My Home panel toolbar button – click to go to the My Home panel.
2
Refresh all statuses – click to load the current status of all devices, users,
and areas from the smart hub. Please note that the system does
automatically update device states as things change. This button simply
forces a refresh of everything.
3
Add dashboard view – click to add a new dashboard view. New View
displays, which is an editable box. See Adding a Dashboard View, page 15.
4
Dashboard Views – click to switch between views.
5
Camera Status – if a camera is streaming, a red ring flashes around the
lens of the video camera icon. If you click on a video camera icon, a
widget displays for the video camera on the Devices panel. See Video
Camera, page 16.
1
2
4
5
6
7
8
12
13
10
11
3
9

Contents
White Rabbit Electronics | White Rabbit Automation System User Guide
14
My Home Panel
Component
Number
Component
6
People at Home/People Not at Home – you can get a status of the
number of people at home or not at home. You can email or text message
those people by clicking on the person’s picture or name. See People
Status, page 18.
7
View – the current dashboard you’re looking at. You can click the name to
edit.
8
Alarm Status – the state of the alarm system and related details. The
statuses are: In Alarm, Disarmed (Ready), Disarmed (Not Ready),
Disarmed (Was In Alarm), and Unknown. See In Alarm, page 20, and
Disarming the System, page 21.
9
Arming Options:
Away – click this button to arm the selected area when you’re about
to leave your home and no one else is there.
Stay – click this button to arm the perimeter of the selected area, but
you still want to be able to move about the interior of your home
without setting off the alarm.
Vac – click this button to arm the selected area for when you’re about
to leave your home for a vacation and no one else is there.
Reset – the button can display if the smart hub is in an Unknown state.
When you click this button, you’re requesting that the smart hub go to
a “clear” state. However, for the smart hub to be able to go to a
“clear” state, all active security devices for that area must be ready to
be armed.
See Arming the System for an Area, page 19.
10
Collapse – click this icon to collapse the view of an area on a dashboard.
11
Remove – click this icon to remove a view.
12
Device Summary – you can sort and select devices by Type, Device, and
Status by clicking the column heading.
13
Device – click a device widget to perform functions with the selected
widget, for example lock or unlock a door. See Devices Panel, page 23.
For devices that you choose to add to a dashboard through the Devices Panel, those devices
will appear on the selected dashboard. On the My Home panel, you see both a Device
Summary and the individual device icons.
On the Device Summary, you can sort devices by Type, Device, and Status by clicking the
column heading. If you select a device from the summary, the related icon for the device
displays, where you can click Minus to remove the device from the My Home panel.
/