Page is loading ...

For assistance with assembly contact:
Southern Enterprises Inc.
Customer Service 1-800-633-5096
www.seidal.com
FA8575- "ELINGTON"FIREPLACE
BROWN MAHOGANY
Assembly Instructions

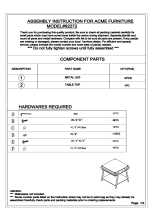
A Quantity
of 18
CAM BOLT
B Quantity
of 24
WOOD DOWEL
C Quantity
of 18
CAM LOCK
D Quantity
of 34
FLAT HEAD LONG SCREW
E Quantity
of 6
SOCKET HEXAGON SCREW
F Quantity
of 6
CAM NUT
G Quantity
of 1
SOCKET HEAD WRENCH
Quantity
of 1
FIREBOX X1PC
SOLD IN A SEPARATE CARTON.
"ELINGTON"FIREPLACE
Parts List
Please review all parts and hardware before disposing of any packaging.
Call Customer Service if missing hardware. Do not return to store/retailer.
Screws shown in actual size. Using a screw that is too long will cause damage.
Before beginning assembly, separate each type of screw. Carefully study the
screw diagrams below (SHOWN ACTUAL SIZE). You may receive extra
hardware with
y
our unit.

(1) Quantity
of 2
FRONT PILLAR(L&R)
(2) Quantity
of 2
SIDE PANEL(L&R)
(3) Quantity
of 1
FRONT PANEL
(4) Quantity
of 2
MIDDEL FRONT PANEL(L&R)
(5) Quantity
of 1
UPPER CROSS BRACE
(6) Quantity
of 2
BACK PANEL(L&R)
(7) Quantity
of 1
LOWER CROSS BRACE
(8) Quantity
of 1
TOP FRAME
(9) Quantity
of 1
BOTTOM FRAME
(10) Quantity
of 1
FIREBOX SUPPORT
(11) Quantity
of 2
FIXED WOOD
Care and Cleaning Instructions:
Before using, wipe with a clean, dry cloth.
Periodically apply furniture wax to renew
the finish . Avoid rubbing or scratching the
surface with rough or abrasive objects.
For replacement parts or questions, please
Call Customer Service at 1-800-633-5096
Do not return product to store, please call
Manufacturer for assistance, questions or
Parts.
Assembly Tool Required
No.2 Phillips Screwdriver (Not Included)
"ELINGTON"FIREPLACE
Parts List
Please review all parts and hardware before disposing of any packaging.
Call Customer Service if missing hardware. Do not return to store/retailer.
Screws shown in actual size. Using a screw that is too long will cause damage.
Before beginning assembly, separate each type of screw. Carefully study the
screw diagrams below (SHOWN ACTUAL SIZE). You may receive extra
hardware with
y
our unit.

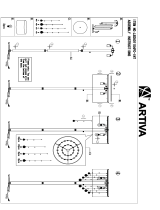
Figure 1
INSERT 4PCS WOOD DOWEL(B)&
6PCS CAM BOLT(A) ONTO
CORRESPONDING HOLE OF
FRONT PILLARS(1),THEN INSERT
6PCS CAM-LOCKS (C) INTO BIG
HOLES ON INSIDE OF SIDE
PANELS(2) WITH SLOT FOR
SCREWDRIVER FACING
OUTWARD. ROTATE CAM-LOCKS
(C) CLOCKWISE TO SECURE
CAM-BOLTS (A). AS FIGURE 1
SHOWN.
Figure 2
INSERT 2PCS WOOD DOWEL(B)&
2PCS CAM BOLT(A) ONTO
CORRESPONDING HOLE OF
FRONT PANEL(3), THEN INSERT
2PCS CAM-LOCKS (C) INTO BIG
HOLES OF RIGHT AND LEFT
MIDDLE FRONT PANELS(4) WITH
SLOT FOR SCREWDRIVER FACING
OUTWARD. ROTATE CAM-LOCKS
(C) CLOCKWISE TO SECURE
CAM-BOLTS (A). AS FIGURE 2
SHOWN.
Figure 3
INSERT 10PCS FLAT HEAD LONG
SCREW(D) ONTO
CORRESPONDING HOLE OF
FRONT PANEL AND MIDDLE
FRONT PANEL (3&4) TO
ASSEMBLE FIGURE 2 FRMAE AND
FIGURE1 FRAME .
"ELINGTON"FIREPLACE
Assembly Instructions

Figure 4
INSERT 4PCS WOOD DOWEL (B)
& 2PCS CAM BOLT(A) ONTO
CORRESPONDING HOLE OF
UPPPDER CROSS BAR & LOWER
CROSS BAR (5&7),THEN INSERT
2PCS CAM-LOCKS (C) INTO BIG
HOLES OF RIGTH AND LEFT BACK
PANELS(6) WITH SLOT FOR
SCREWDRIVER FACING
OUTWARD. ROTATE CAM-LOCKS
(C) CLOCKWISE TO SECURE
CAM-BOLTS (A). AS FIGURE 4
SHOWN.
Figure 5
CONNECT THE ASSEMBLED
FRAMES FINISHED AT FIGURE 3 &
FIGURE 4, USING 14PCS FLAT
HEAD LONG SCREW (D).
Figure 6
INSERT 6PCS WOOD DOWEL(B)
AND 6PCS SOCKET HEXAGON
SCREW(E) TO CORRESPONDING
HOLES OF BOTOOM FRAME(6)
AND PLACE THE ASSEMBLED
UNIT OF FIGURE 5 ONTO BOTTOM
PANEL UPRIGHTLY. THEN INSERT
CAM-NUT (F) INTO
CORRESPONDINIG HOLES,AND
TIGHTEN (E) WITH SOCKET HEAD
WRENCH(G);
SECONDLY, USE 8PCS CAM BLOT
(A) AND 8PCS WOOD DOWEL (B)
AND 8PCS CAM-LOCK(C) TO
ASSEMBLE TOP FRAME(8) AND
PREASSEMBLED FRAME
TOGETHER.AS FIGURE 6 SHOWN.
"ELINGTON"FIREPLACE
Assembly Instructions

Figure 7
PUT FIXBOX SUPPORT (10) ONTO
CORRESPONDING FRAME, AND
FIX IT BY 6PCS FLAT HEAD LONG
SCREW (D).
Figure 8
INSERT FIREBOX FROM THE BACK
OF FIREPLACE. MAKE SURE
FIREBOX IS PRESSED TIGHTLY
AGAINST THE ASSEMBLED UNIT.
ATTACH THE FIXED WOOD (11)
ON THE SIDES OF FIREBOX.
INSERT 4PCS FLAT HEAD LONG
SCREW (D) THROUGH
PREDRILLED HOLES ON FIXED
WOOD (11) AND TIGHTEN INTO
CORRESPONDING HOLES.AS
FIGURE 5 SHOWN.
"ELINGTON"FIREPLACE
Assembly Instructions

Customer Service 1-800-633-5096
Southern Enterprises, Inc.
2915 Merrell Road
Dallas, Texas 75229
Customer Information
Name
Address
City/State/Zip Code
Phone Number
Please indicate where you purchased this item: Store/Website/Catalog
Please indicate color/size/style number:
Style No Parts Letter Parts Description Quantity Needed
FA8575 - Parts Replacement Form
Missing or damaged hardware and/or parts will be replaced free of charge. We do not sell parts. Southern
Enterprises Inc. will provide replacement parts for only those items purchased within the last 9 months. If
this product has not been purchased from our retail affiliates (within 9 months), we are under no obligation
to provide parts or replacement merchandise. Parts will not be available for items arriving fully assembled.
Parts will be sent if available from SEI.
The fireplace mantel will fit both gel fuel and electric firebox inserts. Depending on the insert ordered only
one insert will be included. Not recommended to put electronic equipment on or above a mantel due to the
heat.
/