Page is loading ...

Bicycle Owner's Manual
& Technical Handbook 2009

Apollo Bicycle Limited Lifetime Warranty.
Subject to the terms, conditions and limitations set forth below, Apollo Bicycle Co. Pty. Ltd (ABN 60 001 914 469),
warrants to the original purchaser of each new Apollo bicycle (that has a wheelbase exceeding 640mm
or a wheel size of 16” (40cm) or greater.) that Apollo Bicycle Company will repair or replace the frame or
fork free of charge should it fail at any weld point, provided it was purchased new from, and assembled
by, an authorised Apollo bicycle dealer.
Item 1: Warranty coverage for frames of Hi Tensile steel or Chromoly steel construction, without rear
suspension systems, shall be for 10 years. This covers the frame only or fork other than suspension forks.
Item 2: Warranty coverage for Aluminium frames, without rear suspension systems, shall be for a period
of 5 years. Frame fatigue shall not be covered under the terms of this warranty on these frames.
Warranty coverage for Carbon Fibre frames, without rear suspension systems, shall be for a period of
5 years. Frame fatigue shall not be covered under the terms of this warranty on these frames.
Item 3: Warranty coverage for Downhill main frames, Chromoly or Aluminium rear suspension systems
and system components shall be for a period of one year, covering faulty workmanship or materials
making up the suspension system. These frames, except Downhill main frames, are covered under the
regular warranty for frames of the same material construction should they fail at any regular weld
point. Rear suspension design is not covered under this warranty.
Item 4: Warranty coverage for front suspension systems shall be for a period of one year, covering faulty
workmanship or materials only.
Item 5: Warranty coverage shall last 12 months from the date of purchase for paint finish and all other
parts & accessories. Tyres and tubes are not covered by this warranty.
The above warranty coverage periods are subject to all the limitations described below. This limited
warranty is not transferable and shall only apply to normal and ordinary use of this product. To obtain
service under this warranty, the bicycle should be returned to the Apollo dealer from whom it was
purchased, together with a receipt or appropriate proof of purchase document which identifies the
bicycle by frame number.
Should this bicycle or any part or accessory be determined by Apollo to be defective and covered by
this limited warranty, Apollo will at its option, either replace or repair any defective product, part or
accessory. Repair services or replacement parts will be provided free to you. Dealer labour charges for
installing replacement parts or accessories are not covered by this limited warranty. The cost of
transportation to and from an authorised Apollo dealer for repair or replacement of any defective part
and/or accessory is to be borne by the owner.
This bicycle (Item 1) has not been designed, manufactured or sold for use at any time or place or in any
manner whatsoever as a power driven vehicle or for the purposes or racing, motorcross, stunt riding,
ramp jumping, acrobatics, dirt riding, or any other similar competitive event or activity, or rental, hiring
or other such commercial activity and this limited warranty does not cover these acts.
This limited warranty does not cover any personal injuries, mechanical damage or any other damage
or injury due to misuse, neglect, accident, normal wear and tear, abuse, improper use or improper
maintenance, corrosion to the frame or any part or accessory due to exposure to the weather or
exposure to a chemical environment, or modifications to the original specifications or factory fitted
components, treatment or assembly of this bicycle. Any use of this bicycle which is in-compatible
with those parts and accessories installed as original equipment by the factory is not covered.
Subject to the Trade Practices Act and any equivilent state legistration, this statement constitutes the
exclusive expression of warranties by the manufacturer and the supplying "dealer" and to the extent
permitted by law is in lieu of any, and all other warranties or merchantability or fitness purposes.
Apollo Bicycle Company Pty. Ltd. ABN: 60 001 914 469

Updated 27/05/08 APOM0508 Apollo Bicycle Company Pty. Ltd. ABN: 60 001 914 469
1
Congratulations on your purchase. Your Apollo bicycle has been fully tested
and carefully produced with performance, comfort and safety in mind.
With proper care and maintenance your bicycle will give you years of
riding pleasure.
Use this owner’s manual as a guide for the recommended maintenance
and safe usage of your new bicycle. Take the time to read and understand
this manual; and for parents of young riders please explain the content to
your child. Please note that it is not intended as a full workshop manual.
Every effort has been made to ensure that the content in this manual
is accurate and current as at May 2008.
Please consult a specialist bicycle dealer if:
- a specific subject is not covered in this manual
- the subject matter seems beyond your level of experience or ability
- you have any further questions
General Warning:
It is your responsibility to correctly maintain your bicycle. Failure to maintain
or inspect your bicycle may have severe consequences, such as losing control
when riding and falling, which may ultimately result in injury or death.
The risk of injury or death due to falling is implicit in the many “warnings” and
“cautions” stated in this manual. As such, whenever the risk of falling is stated
we do not repeat the warning of possible death or injury.
Please Note:
This is a partially assembled bicycle requiring final assembly and adjustments
before riding. Final assembly and adjustment should only be carried out by
a qualified bicycle mechanic at your specialist bicycle store.
CONGRATULATIONS

Updated 27/05/08APOM0508 Apollo Bicycle Company Pty. Ltd. ABN: 60 001 914 469
2
DIRECTORY
PART 1
Warranty
Inside Front Cover
PART 2
Parts Classification
Pages 4 – 7
PART 3
Before You Ride
Pages 8 – 21
PART 4
Bicycle Care & Servicing
Pages 22 – 26
PART 6
Purchase Details
Page 68
PART 7
Contact Addresses
Back Cover
PART 5
Comprehensive
Maintenance
Page 27 – 67
Warning /
Important
(take notice of this symbol
throughout this manual)

Updated 27/05/08 APOM0508 Apollo Bicycle Company Pty. Ltd. ABN: 60 001 914 469
3
2. PARTS CLASSIFICATION 4
Mountain bicycles & Cross Bicycles 4
Suspension Bicycles 5
BMX/Loop Frame/U-Frame Bicycles 6
Road Bicycles 7
3. BEFORE YOU RIDE 8
Correct Frame Size 8
Riding Position 10
- saddle height 10
- reach 10
- handlebar height 11
Safety Checklist 12
- brakes 12
- wheels & tyres 12
- saddle 12
- steering 13
- chain 13
- bearings 13
- cranks & pedal 13
- derailleur 13
- frame & fork 13
- suspension 13
- accessories & safety 14
Helmets 14
Riding Safely 15
- general rules 15
- wet weather riding 16
- night riding 16
- pedalling technique 16
- hill technique 17
- cornering technique 17
- rules for children 17
Gears . How to Operate 18
- derailleur gears 18
- operating principles 19
- hand grip shifters 20
- below the bar shifters 20
- dual control shifters 21
4. BICYCLE CARE & SERVICING 22
- basic maintenance 22
- storage 22
- security 23
- Schedule 1. Lubrication 24
- Schedule 2. Service Checklist 25
Torque Requirements & Tools Required 26
INDEX
5. COMPREHENSIVE MAINTENANCE 27
Wheels and Tyres 27
- wheel inspection 27
- tyre inspection 28
- recommended tyre pressures 28
- front wheel removal & replacement 29
- rear wheel removal & replacement 30
- correct Quick Release axle setting 31
- hub bearing adjustment
& lubrication 32
- how to fix a flat tyre 33
- tyre valve 34
Steering System 35
- handlebar stem 35
- handlebar / forks 36
Bicycle suspension 37
- headset 38
- quill type assemblies 38
- 'Ahead Set' type assemblies 38
- rotor installation & adjustment 40
Saddle & Seat Post 41
Brakes 43
- sidepull callipers 44
- linear pull 45
- U-brake 47
- disc brake 48
Drivetrain 49
- pedals 49
- clipless pedals 50
- crank set 52
- one piece crank set 53
- cotterless cranks (three piece) 54
- chain 56
- freewheel 57
- coaster hub 58
Derailleur Systems 59
- rear derailleur 60
- front derailleur 62
Reflectors 63
Accessories 64
Troubleshooting 66
6. PURCHASE DETAILS 68
7. CONTACT ADDRESS Back cover

Updated 27/05/08APOM0508 Apollo Bicycle Company Pty. Ltd. ABN: 60 001 914 469
4
Finding the bicycle to best suit your needs is made easy by the vast array of bicycle
models and sizes available. Refer to the following diagrams to familiarize yourself with
the names of the various parts on your bicycle.
Mountain Bikes & Crossbikes.
Mountain bikes are one of the most versatile bicycles. Wider wheel rims and tyres ensure
maximum comfort and traction over a wider variety of surfaces and the frame and forks
are strong, making them particularly suitable for rough terrain. Manoeuvring is made
easier by the wider handlebars and convenient shift lever position. The Crossbike or
hybrid blends features of the mountain and racing bicycles. Its frame is lighter than
a mountain bike but heavier than a racing bicycle, providing stability and comfort with
increased speed.
PART 2 - PARTS IDENTIFACATION
Top Tube
Seat
Seat Post
Seat Post Binder Bolt
Seat Stay
Rear Reflector
Rear Brake
Wheel Reflector
Freewheel
Gear Control Cable
Rear Derailleur
Handlebar Stem
Head Set
Head Tube
Seat Tube
Down Tube
Front Derailleur
Rear Gear
Control Cable
Pedal
Crank Arm
Chainwheel
Chainstay
Chain
Tyre Valve
Rim
Tyre
Shift Lever
Brake Lever
Handlebar
Brake Control Cables
Front Reflector
Front Brake
Wheel Reflector
Front Fork
Front Hub
Spokes

Updated 27/05/08 APOM0508 Apollo Bicycle Company Pty. Ltd. ABN: 60 001 914 469
5
Suspension Bikes.
Suspension bicycles aim to maximize comfort and traction over rough terrain. The basis
of the mountain bike frame is blended with suspension – either suspension front forks only
or in combination with a rear suspension mechanism built into the frame. A special shock
absorbing seat pillar may also be present for improved rider comfort. Despite the variety
of suspension bikes available the basic components are similar in all models, such as
wide rims and tyres for increased traction and comfort.
Seat
Seat Post
Seat Tube
Seat Post Binder Bolt
Rear Reflector
Brake Control Cable
Gear Conrol Cable
Rear Suspension Damper
Rear Brake
Wheel Reflector
Gear Control Cable
Freewheel
Rear Derailleur
Pedal
Crank Arm
Bottom Bracket Axle
Chainwheel
Chainstay
Drive Chain
Tyre Valve
Rim
Tyre
Shift Lever
Brake Lever
Control Cables
Reflector
Upper Fork (Suspension)
Protective Boot
Fork Brace
Front Brake
Lower Fork (Suspension)
Front Hub Axle
Spokes
Handlebar
Handlebar Stem
Head Seat
Top Tube
Front Derailleur
Down Tube
Suspension Mounting
Head Tube
Rear Frame Sub Assembly

Updated 27/05/08APOM0508 Apollo Bicycle Company Pty. Ltd. ABN: 60 001 914 469
6
BMX Bicycles.
BMX style bicycles are ideal for young riders. Their durable, simple design makes them
perfect for general purpose use with minimal maintenance required. Alternative frame
styles, such as U-shape frames and loop frames, may also be used for other varieties
of children’s bicycles.
Top Tube
Seat
Seat Post
Seat Post Binder Bolt
Seat Stay
Rear Reflector
Wheel Reflector
Rear Sprocket
Training Wheel
Crash Pad
Handlebar Stem
Head Set
Head Tube
Chainwheel
Chainstay
Chain
Tyre Valve
Rim
Tyre
Handlebar Grip
Brake Lever
Handlebar
Brake Control Cable
Reflector
Front Brake
Brake Pad
Front Fork
Wheel Reflector
Front Hub
Spokes
Chain Guard
Crank Arm
Pedal
Crash Pad
Seat Tube
Down Tube

Updated 27/05/08 APOM0508 Apollo Bicycle Company Pty. Ltd. ABN: 60 001 914 469
7
Road Bicycles.
Road or racing bikes aim to cater for fast travel over long distances on smooth surfaces.
Frames are light weight and rims have a narrower profile, for maximum efficiency and
speed.
Top Tube
Seat
Seat Post
Seat Post Binder Bolt
Seat Stay
Rear Reflector
Rear Brake
Wheel Reflector
Spoke Protector Disc.
Rear Derailleur
Freewheel
Rear Dropout
Handlebar Stem
Head Set
Head Tube
Seat Tube
Down Tube
Front Derailleur
Bottom Bracket Axle
Toe Strap
Toe Clip
Pedal
Crank Arm
Chainwheel
Chainstay
Chain
T y re Valve
Rim
Tyre
Brake Control Cable
Front Reflector
Brake/Shift Lever
Handlebar
Front Brake
Brake Pad
Wheel Reflector
Front Fork
Front Hub
Spokes

Updated 27/05/08APOM0508 Apollo Bicycle Company Pty. Ltd. ABN: 60 001 914 469
FRAME SIZE
Choosing the appropriate frame and wheel size
is imperative when purchasing a new bicycle.
For safe riding the size of your bicycle should
properly match your build. In the case of children,
a bike should never be bought with aim of
“growing into it”. Riding the appropriate sized
bicycle enables the child to develop confidence,
as they have the necessary co-ordination to control
the bicycle. To accommodate the vast array of
height and size variables in children, even within
the same age groups, juvenile bicycles come in
different wheel sizes and frame styles to best suit
the rider’s size.
Ladies and gents’ bicycles are also available in
a variety of frame sizes. Sizing is based on the
distance between the centre of the bottom bracket
and the top of the frame seat tube.
Female riders should take into account the slope
of the top tube to determine frame size suitability.
WARNING:
For safe riding your bicycle should
match your size correctly, otherwise
you may loose control and fall. Ideally
there should be a minimum clearance
of 25mm between the crotch of the
intended rider and the top frame tube
of the bike, while the rider straddles the
bicycle with both feet flat on the ground.
Clearance over the top of the frame ensures that
the rider can safely stand astride the bike when
forced out of the saddle, such as stopping at
traffic lights. Clearance heights vary according
to rider preference and between the different
bicycle models.
8
PART 3 - BEFORE YOU RIDE

Updated 27/05/08 APOM0508 Apollo Bicycle Company Pty. Ltd. ABN: 60 001 914 469
9
Please refer to the chart below to assist you in making the correct choice.
If you have any queries refer to your dealer.
Bicycling Sizing Guide
Approx.
Ages
Wheel
Size (kid’s
models)
Suggested
Frame Size for
Road Bikes
Suggested Frame Size
for Mountain or Hybrid
Bikes
4-6 30cm(12”) - -
46cm min. 5-10 40cm(16”) - -
55cm min. 6-14 50cm(20”) - -
61cm min. 12-16 61cm(24”) - -
61-69cm 12 plus - - 37cm(14.5”)
66-76cm 12 plus - - 43cm(17”)
71-79cm 12 plus - 50cm(19.5”) 45cm(18”)
12 plus - 55cm(21.5”) 50cm(19.5”)
79-86cm 12 plus - 57cm(22.5”) 52cm(20.5”)
81-89cm 12 plus - 60cm(23.5”) 53cm(21”) - 56cm(22”)
12 plus - 63cm(25”) 58cm(23”) - 60cm(23.5”)

Updated 27/05/08APOM0508 Apollo Bicycle Company Pty. Ltd. ABN: 60 001 914 469
10
RIDING POSITION
1. Saddle Height
To ensure pedalling efficiency, safety and rider
comfort it is crucial that the seat is set at the correct
height. The rider’s leg length is used to determine
the appropriate saddle position. When the seat is
positioned correctly the rider’s leg should not strain
from over-extension and the hips should remain
level when pedalling. To establish seat height sit
on the bicycle with one pedal at its lowest point,
and place the ball of the foot on that pedal.
If the knee is slightly bent in this position then the
seat is at its correct height. The leg should be
practically straight when the heel of that foot is
placed on the pedal.
Caution:
Ensure the seat pillar post does not
extend beyond the minimum insertion
mark. (Refer to Page 42 on how to
adjust the seat height). Take special
note if your bicycle is fitted with a
suspension type seat post.
2. Reach
When riding it is important not to overextend one’s
reach. To determine the ideal positioning place
your elbow against the seat and stretch out your
arm toward the handlebars. The distance between
the handlebar and the outstretched fingertips of the
arm should be 20mm – 50mm. This distance can
be adjusted by altering the location of the seat in
relation to the seat pillar. (Refer to Part 5 on how
to adjust the seat clamp)
Arms not over exteneded
Handlebar stem height
about the same as seat height
Pedal at bottom position

Updated 27/05/08 APOM0508 Apollo Bicycle Company Pty. Ltd. ABN: 60 001 914 469
11
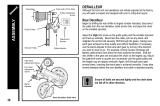
3. Handlebar Height
It is recommended you try various handlebar heights to find the most suitable position
for you. Usually it is most comfortable when the handlebar height is the same as the
height of the seat. The handlebar stems of some bikes can be altered to customize
fit even further.
Caution:
Ensure the handlebar’s stem does not extend beyond the minimum
insertion mark. (Refer to Part 5 on how to adjust Handlebars).
WARNING:
The steering action may be compromised if the stem binder bolt, the
handlebar binder bolt or the bar end extension clamping bolts are not
sufficiently tightened. This could result in the rider losing control and falling.
To check, try to twist the handlebar/stem assembly whilst the front wheel
of the bike is positioned between your legs. If the stem twists in relation
to the front wheel, the handlebars turn relative to the stem, or the bar end
extension rotates in relation to the handlebar, the bolts need
to be tightened.
Handlebar Binder Bolt
Stem Wedge Bolt
Maximum Height/
Minimum Insertion Mark
Exceeds 2 1/2" (64mm)

Updated 27/05/08APOM0508 Apollo Bicycle Company Pty. Ltd. ABN: 60 001 914 469
12
SAFETY CHECKLIST
Safety checks are an important part of any ride. In conjunction with the
recommended maintenance in Parts 4 and 5 of this manual it is also
suggested that a thorough inspection should be undertaken fortnightly,
tightening all nuts and bolts, replacing worn and damaged parts and ensuring
all components are in their correct positions. For further details please refer
to Parts 5 and 6.
WARNING:
Body parts and other objects should be kept clear from the moving
components of the bicycle when in use, such as the spinning wheels and the
moving chain. When riding always wear appropriate footwear – i.e. shoes
that will grip the pedals and no sandals. Refrain from jumping with your
bike. Jumping puts enormous stress on many components of your bicycle,
especially your front fork.
Prior to every ride please complete the following safety checks.
1. Brakes
- Check front and rear brakes are working correctly
- Check brake control cables for wear and ensure they are oiled
and properly adjusted
- Check brake control levers are lubricated and securely fastened
to the handlebar.
- Check brake shoe pads for wear and their positioning in relation to the rims
2. Wheels and Tyres
- Check tyre pressure is as recommended according to the specification
displayed on the tyre sidewall
- Check tyres for tread and ensure they do not have any bulges
or excessive wear.
- Check all wheel spokes are firm and are intact
- Check rims run true and are without any obvious buckles or kinks
- Check that axle nuts are tight. For bicycles equipped with quick release
axles, ensure locking levers are tensioned appropriately and in the
closed position.
3. Saddle
- Check the clamp underneath the saddle is firmly secured
to the saddle post
- Check frame clamping mechanism is tightly fastened
- Ensure that the minimum insertion mark cannot be seen on the saddle pillar

Updated 27/05/08 APOM0508 Apollo Bicycle Company Pty. Ltd. ABN: 60 001 914 469
13
4. Steering
- Check that the handlebar and stem enable correct steering
and are properly adjusted and tightened
- Check that the setting of the handlebars is correct in relation to the forks
and the direction of travel
- Check the head set locking mechanism is appropriately fixed and fastened
- If handlebar extensions are fitted check they are positioned
and secured correctly
- Ensure the minimum insertion mark cannot be seen on the handlebar stem
- Ensure the ends of the handlebars and bar ends are covered or capped.
5. Chain
- Check the chain is lubricated, clean and runs freely
- In wet or dusty conditions service the chain more frequently
6. Bearings
- Check headset, wheel bearings, pedal bearings and bottom
bracket bearings
- Check all bearings are oiled, run smoothly and show no signs of excess
movement, grinding or rattling
7. Cranks and Pedals
- Check cranks are securely fastened to the axle and are straight
- Check pedals are properly and firmly attached to the crank
8. Derailleurs
- Check the front and rear mechanisms are operating appropriately
- Check control levers are securely anchored
- Check derailleurs, control cables and shift levers are sufficiently lubricated
- If the gear components come with a separate, specific manual, refer to this
for further information
9. Frame and fork
- Check that the frame and fork are straight and intact.
- Replace if either is bent or broken.
10. Suspension (if applicable)
- Check that components operate smoothly with no binding. Keep clean
of grit, and lubricate top of outer leg seal.
- Check that all components of the fork & rear suspension
are properly tightened
- Check the rear suspension components for excessive wear or side play
- If the suspension components come with a separate, specific manual, refer
to this for more in depth information

Updated 27/05/08APOM0508 Apollo Bicycle Company Pty. Ltd. ABN: 60 001 914 469
14
11. Safety & Accessories
- Check that all reflectors are attached correctly
and visible
- For riding at night, fit fully functioning dynamo
or battery powered lights
- Check that the bell is fully operational
- Check all additional components on the bike
are appropriately secured and functioning
- Ensure the bicycle rider and any passenger
in a child seat are wearing helmets
HELMETS
When riding your bicycle it is recommended that
you always wear an appropriately fitting, Australian
Standards Approved bicycle helmet. This also
applies to any passengers you may carry in a child
safety seat.
A bicycle helmet must:
- carry the Australia & New Zealand Standards
approved mark AS/NZS 2063 label
- fit properly
The helmet should be:
- well ventilated
- comfortable
- lightweight
The wearing of helmets is mandatory
in most Australian states. Non-
compliance may result in an
enforceable penalty.

Updated 27/05/08 APOM0508 Apollo Bicycle Company Pty. Ltd. ABN: 60 001 914 469
15
RIDING SAFELY
General Rules
- The same road rules used for vehicles apply to
cyclists. Obey the road rules at all times, such
as giving way to pedestrians, and stopping
at red traffic signals
- Notify the Road Traffic Authority in your state if further
information is required.
- Ride on the left side of the road and never against
the traffic.
- Take extra care when attempting to overtake other
vehicles and at intersections.
- Indicate intended actions, such as turning or
stopping, by using appropriate hand signals.
- Ride predictably and in a straight line.
- Always ride defensively. You may be difficult to see
to other road users.
- Closely observe the riding terrain. Avoid obstacles
such as pot holes, gravel, wet road markings, oil,
curbs, speed humps and drain grates.
- Be alert. Watch for such things as motorists opening
doors or backing out of concealed driveways.
- Sound your bell for a warning when required.
- Train and tram tracks should be crossed at a
90 degree and preferably walk your bicycle over.
- Know how your bicycle operates. Practice braking,
gear shifts and if fitted, using toe clips and straps.
- Always apply the rear brake first, then the front when
braking. The front brake is more potent and if it is not
used properly you may loose control and fall.
- Allow reasonable space between yourself and other
vehicles and objects when riding and stopping.
Take note of weather conditions and its possible
impact on safe braking distances. e.g.. Wet riding
surfaces increase braking distances.
- Use leg clips or elastic bands if you are wearing
loose trousers to stop them catching in the chain.
- Ensure your vision or control of the bicycle is not
obstructed by any items you may be transporting.
- Do not use items that may impede your hearing.
e.g. Headphones

Updated 27/05/08APOM0508 Apollo Bicycle Company Pty. Ltd. ABN: 60 001 914 469
16
Wet Weather
- Ride more cautiously in wet weather.
Avoid sudden braking, slow overall riding pace
and approach corners more carefully.
- Brake sooner, stopping distance increases
in wet conditions.
- Remember pot holes and slippery surfaces
such as line markings and tram tracks all
become more hazardous in the wet.
Try to avoid where possible.
- Cornering traction will also be reduced in wet
weather.
Night Riding
- Wear reflective and light coloured clothing.
- Reflectors should be fitted correctly to the
bicycle and clearly visible. (Refer to Part 5
of this manual.)
Riding in the dark should never be
undertaken without fully operational
front and rear bicycle lights. The use
of bicycle lights is mandatory for night
riding in most Australian States.
- Attach a fully operational lighting set.
Lights should have a white front lamp
and a red rear lamp.
- Use a flashing rear light to improve visibility.
- Charge batteries if battery powered lights
are to be used. Check wiring connections
for dynamo powered lights.
- Avoid riding at night if possible. If not, slow
down and opt for familiar roads with street
lighting when able.
Pedalling Technique
- Place the ball of your foot on the centre
of the pedal.
- Ensure your knees are parallel to the bicycle
frame when pedalling.
- Keep your elbows slightly bent. This will help
to absorb shock.
- Learn how to use the gears correctly (Refer
to Pages 18-21 in this part of the manual).

Updated 27/05/08 APOM0508 Apollo Bicycle Company Pty. Ltd. ABN: 60 001 914 469
17
Hill Technique
- Prior to a climb, gear down and continue gearing down as necessary in order to sustain
pedalling speed.
- By standing up on your pedals you will be able to generate greater power from each turn
of the pedal. This is useful if you are straining and are using the lowest gear.
- Use the high gears on a descent to prevent rapid pedalling.
- Take extra care when descending. Do not exceed a comfortable speed
and maintain control.
WARNING:
Downhill mountain biking can be a dangerous activity. To reduce the likelihood
of injury appropriate safety equipment should be worn and ensure that your
bike is working perfectly. Follow all of the above instructions.
Cornering Technique
- Before entering a corner brake slightly and begin to lean your body into the corner.
- The inside pedal should be held at the 12 o’clock position and the inside knee angled
slightly in the direction you are turning. The other leg should be kept straight.
- Avoid pedalling through fast or tight corners.
Rules for Children
Any child bicycle rider needs to be taught correct riding skills and behaviour, particularly
addressing safety, before they take to the streets. Hopefully by doing so accidents can
be avoided.
1. Always wear a correct fitting helmet
2. Follow all road rules, especially stop signs and red lights
3. Always proceed with caution before entering a street. Only enter if there
is no traffic approaching.
4. Avoid riding on driveways or the road
5. Do not ride on busy streets
6. Be conscious of other road vehicles in the vicinity
7. Avoid night riding
8. Take extra care when riding downhill. Slow down using the brakes and maintain
control of the steering
As suggested by the Consumer Affairs Department riding bicycles with small
wheel diameter at excessive speeds can lead to instability and is therefore not
recommended.
Caution:
When riding downhill never take your hands off the handlebars,
or feet off the pedals.

Updated 27/05/08APOM0508 Apollo Bicycle Company Pty. Ltd. ABN: 60 001 914 469
18
GEARS: HOW TO OPERATE
Derailleur Gears
Derailleur gears are the most common type
of gear systems used on bicycles. They are the
changing mechanism used to move the drive chain
up and down a series of cogs or sprockets
(the cluster or cassette stack) at the rear of the
bicycle and across the chainwheel at the front
of the bike (if fitted). Multispeed bicycles today
can range form 5-6 gears to as many as 30.
Rear derailleurs are fitted to all multispeed bicycles
while front derailleurs are only present on those
bicycles with the higher number of gears.
Gears enable the cyclist to select the most
appropriate pedalling resistance best suited
for the riding conditions. The more gears fitted
to the bicycle the greater choice available
to the rider.
TYPES OF GEAR SHIFTERS
- Hand Grip Shifters
- Below Bar Shifters
- Dual Control Shifters
/