Page is loading ...

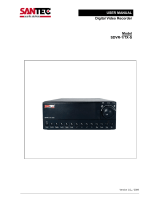
DIGITAL VIDEO RECORDER
VR – 601
INSTRUCTION MANUAL
PLAY
STOP
REC
FWDREV
PAUSE
OPERATEDISK
DIGITAL VIDEO RECORDER VR-601
LST0130 - 001A
Thank you for purchasing this JVC product.
Before operating this unit, please read the
instructions carefully to ensure the best
possible performance.
For Customer Use:
Enter below the serial No. which is
located on the rear of cabinet. Retain
this information for future reference.
Model No: VR-601
Serial No:

2
IMPORTANT SAFEGUARDS
1. Read all of these instructions.
2. Save these instructions for later use.
3. All warnings on the product and in the operating instructions should be adhered to.
4. Unplug this appliance system from the wall outlet before cleaning. Do not use liquid cleaners or aerosol cleaners. Use a
damp cloth for cleaning.
5. Do not use attachments not recommended by the appliance manufacturer as they may cause hazards.
6. Do not use this appliance near water “ for example, near a bathtub, washbowl, kitchen sink, or laundry tub, in a wet
basement, or near a swimming pool, etc.
7. Do not place this appliance on an unstable cart, stand, or table. The appliance
may fall, causing serious injury to a child or adult, and serious damage to the
appliance.
Use only with a cart or stand recommended by the manufacturer, or sold with the
appliance.
Wall or shelf mounting should follow the manufacturer instructions, and should
use a mounting kit approved by the manufacturer.
An appliance and cart combination should be moved with care. Quick stops,
excessive force, and uneven surfaces may cause the appliance and cart
combination to overturn.
8. Slots and openings in the cabinet and the back or bottom are provided for
ventilation, and to insure reliable operation of the appliance and to protect it from
overheating, these openings must not be blocked or covered. The openings should never be blocked by placing the
appliance on a bed, sofa, rug, or other similar surface. This appliance should not be placed in a built-in installation such as
a bookcase unless proper ventilation is provided.
9. This appliance should be operated only from the type of power source indicated on the marking label. If you are not sure of
the type of power supplied to your home, consult your dealer or local power company. For appliance designed to operate
from battery power, refer to the operating instructions.
10. This appliance system is equipped with a 3-wire grounding type plug (a plug having a third (grounding) pin). This plug will
only fit into a grounding-type power outlet. This is a safety feature. If you are unable to insert the plug into the outlet,
contact your electrician to replace obsolete outlet. Do not defeat the safety purpose of the grounding plug.
11. For added protection for this product during a lightning storm, or when it is left unattended and unused for long periods of
time, unplug it from the wall outlet and disconnect the antenna or cable system. This will prevent damage to the product
due to lightning and power-line surges.
12. Do not allow anything to rest on the power cord. Do not locate this appliance where the cord will be abused by persons
walking on it.
13. Follow all warnings and instructions marked on the appliance.
14. Do not overload wall outlets and extension cords as this can result in fire or electric shock.
15. Never push objects of any kind into this appliance through cabinet slots as they may touch dangerous voltage points or
short out parts that could result in a fire or electric shock. Never spill liquid of any kind on the appliance.
16. Do not attempt to service this appliance yourself as opening or removing covers may touch dangerous voltage or other
hazards. Refer all servicing to qualified service personnel.
17. Unplug this appliance from the wall outlet and refer servicing to qualified service personnel under the following conditions:
a. When the power cord or plug is damaged or frayed.
b. If liquid has been spilled into the appliance.
c. If the appliance has been exposed to rain or water.
d. If the appliance does not operate normally by following the operating instructions. Adjust only those controls that are
covered by the operating instructions as improper adjustment of other controls may result in damage and will often
require extensive work by a qualified technician to restore the appliance to normal operation.
e. If the appliance has been dropped or the cabinet has been damaged.
f . When the appliance exhibits a distinct change in performance this indicates a need for service.
18. When replacement parts are required, be sure the service technician has used replacement parts specified by the
manufacturer that have the same characteristics as the original part. Unauthorized substitutions may result in fire, electric
shock, or other hazards.
19. Upon completion of any service or repairs to this appliance, ask the service technician to perform routine safety checks to
determine that the appliance is in safe operating condition.

3
SAFETY PRECAUTIONS (FOR USA AND CANADA)
The lightening flash with arrowhead symbol, within
an equilateral triangle, is intended to alert the user
to the presence of uninsulated “dangerous voltage”
within the product’s enclosure that may be of
sufficient magnitude to constitute a risk of electric
shock to persons.
The exclamation point within an equilateral triangle
is intended to alert the user to the presence of
important operating and maintenance (servicing)
instructions in the literature accompanying the
appliance.
WARNING:
TO REDUCE THE RISK OF FIRE OR
ELECTRIC SHOCK, DO NOT EXPOSE THIS
APPLIANCE TO RAIN OR MOISTURE.
This unit should be used with 120V AC only.
CAUTION:
To prevent electric shocks and fire hazards, DO
NOT use any other power.
NOTE:
The rating plate (serial number plate) is on the rear of the unit.
INFORMATION
This equipment has been tested and found to comply with the limits
for a Class A digital device, pursuant to Part 15 of the FCC Rules.
These limits are designed to provide reasonable protection against
harmful interference when the equipment is operated in a
commercial environment. This equipment generates, uses, and can
radiate radio frequency energy and, if not installed and used in
accordance with the instruction manual, may cause harmful
interference to radio communications.
Operation of this equipment in a residential area is likely to cause
harmful interference in which case the user will be required to
correct the interference at his own expense.
CAUTION
CHANGES OR MODIFICATIONS NOT APPROVED
BY JVC COULD VOID USER’S AUTHORITY TO
OPERATE THE EQUIPMENT.
This Class A digital apparatus meets all
requirements of the Canadian Interference-Causing
Equipment Regulations.
CAUTION
Risk of explosion if replaced by an incorrect
type. Dispose of used batteries according to
the instructions.
.
Le symbole de l’ éclair a l’ interieur d’ un triangle equilateral
est destine a alerter l’ utilisateur sur la presence d’ une tension
dangereuse non isolee dans le boitier duprodult. Cette
tension est sufflsante pour provoquer l’ electrocution de
personnes
Le point d’ exclamation a l’linterieur d’ un triangle equilateral
est destine a alerter l’ utilisateur sur la presence d’ openations
d’ entretien importantes au sujet desquelles des
renseignements se trouvent dand le manuel d’ instructions.
Ces symbols ne sont utilizes qu’aux Etats-Unis.
AVERTISSEMENT:
POUR EVITER LES RISQUES D’INCENDIE
OU D’ELECTROCUTION, NE PAS EXPOSER
L’APPAREIL A L’HUMIDITE OU A LA PLUIE.
Ce magnetoscope ne doit etre utilize que sur du
courant alternatif en 120V.
ATTENTION:
Afin d’eviter tout resque d’incendie ou
d’electrocution, ne pas utiliser d’aufres sources
d’alimentation electrique.
REMARQUE:
La plaque d’identification (numero de serie) se trouve dur le
pammeau arriere de l’appareil.
WARNING:
The battery used in the VR-601U must be replaced by a
JVC authorized service dealer only.
WARNING:
The installation of this equipment should be made by a
qualified service person and should conform to all local
codes.
Cet appareil numerique de la Classe A respecte
toutes les exigencies du Reglement sur le materiel
brouilleur du Canada.

4
SAFETY PRECAUTIONS (FOR EUROPE AND AUSTRALIA)
Warning Notice
FOR YOUR SAFETY (Australia)
1. Insert this plug only into effectively earthed
three-pin power outlet.
2. If any doubt exists regarding the earthing,
consult a qualified electrician.
3. Extension cord, if used, must be
three-core correctly wired.
POWER SYSTEM
Connection to the mains supply
This unit operates on voltage of 220 V to 240
V
AC, 50 Hz/60Hz.
IMPORTANT (In the United Kingdom)
Mains Supply (AC 230 V)
WARNING – THIS APPARATUS
MUST BE EARTHED
The wires in this mains lead are coloured in
accordance with the following code;
GREEN-and-YELLOW : EARTH
BLUE : NEUTRAL
BROWN : LIVE
A
s the colours of the wires in the mains lead of
this apparatus may not correspond with the
coloured markings identifying the terminals in
your plug, proceed as follows.
The wire which is coloured GREEN-AND
-YELLOW must be connected to the terminal
in the plug which is marked with the letter E or
by the safety earth symbol or coloured GREEN
or GREEN-AND-YELLOW. The wire which is
coloured BLUE must be connected to the
terminal which is marked with the letter N or
which is coloured BLOCK. The wire which is
coloured BROWN must be connected to the
terminal which is marked with the letter L or
coloured RED.
WARNING:
TO REDUCE THE RISK OF FIRE OR
ELECTRIC SHOCK, DO NOT EXPOSE THIS
APPLIANCE TO RAIN OR MOISTURE.
CAUTION
To prevent electric shock, do not open the
cabinet. No user serviceable partsinslde. Refer
servicing to qualified service personnel.
Note:
The rating plate and the safety caution are on
the rear of the unit.
The OPERATE button does not completely
shutoff mains power from the unit, but switches
operating current on and off.
WARNING
It should be noted that it may be unlawful to
rerecord pre-recorded tapes, records, or discs
without the consent of the owner of copyright
in the sound or video recording, broadcast, or
cable programme and in any literary, dramatic,
musical or artistic work embodied therein.
CAUTION
RED colour indications on the operation panel
are provided but they are not safety related.
RED colour indications:
(1) For Recording Button.

5
SAFETY PRECAUTIONS
Place of storage and use
Please avoid storing or using this DVR in the
following places:
Extremely hot or cold places beyond the
allowable temperature for operation (5°C –
40°C).
Humid or dry places beyond the allowable
humidity range for operation (30% –80% RH).
Dusty or sandy places.
Places exposed to oil, smoke or steam, such
as the kitchen vicinity.
Intensely vibrating or unstable places.
Places prone to condensation.
Places that generate strong magnetic fields,
e.g., transformer or motor.
Places near devices that generate electric
waves, e.g., transceiver or mobile phone.
Places that generate radiation, X-rays or
corrosive gases.
Handling the unit
Please do not place heavy objects on the DVR,
like a monitor or TV.
Please keep the mobile rack into the
compartment. As injury may result from fingers
getting clamped.
Please do not block the ventilation openings.
Avoid violent shocks to the unit. Do not drop the
unit.
Please remove the AC adapter to save energ
y
when the unit is not in use.
Maintaining the unit (Please turn off the
power before performing maintenance
work.)
Please wipe the unit with a soft cloth. Do not wipe
it with thinner or benzene lest the surface melts o
r
becomes dull. For stubborn stains, wipe first with a
water-diluted neutral detergent and then wipe dry.
A
bout the provided power cables (fo
r
VR-601 U)
Two power cables are provided with the
VR-601 U. Use the one that corresponds to
your power – supply.
When usage voltage is 120V or less; use the
A – type (flat – pin type).power cable.
When usage voltage is 127V or over; use the
C – type (round – pin type).power cable.
Please use the provided AC adapter to
connect the DVR to a power source.
Please use the supplied power cord.
Using a different type or damaged cord
may cause fire or electric shock.
Hard-disk
The hard-disk is a consumable item.
Replacement is recommended after 10000
hours of use ( if used in a 25∘C environment ).
For information on maintenance planning and
costs, consult your nearest JVC dealer.
To save energy, be sure to turn off the
system when not in use.

6
AC adapter section
IMPORTANT SAFETY INSTRUCTIONS
1) Read all of these instructions.
2) Keep these instructions.
3) Heed all warnings.
4) Follow all instructions.
5) Do not use this apparatus near water.
6) Clean only with dry cloth.
7) Do not block any ventilation openings. Install in accordance with the manufacturer’s instructions.
8) Do not install near any heat sources such as radiators, heat registers, stoves, or other apparatus
(including amplifiers) that produce heat.
9) Do not defeat the safety purpose of the polarized or grounding-type plug. A polarized plug has two
blades with one wider than the other. A grounding type plug has two blades and a third grounding prong.
The wide blade or the third prong are provided for your safety. If the provided plug does not fit into your
outlet, consult an electrician for replacement of the obsolete outlet.
10) Protect the power cord from being walked on or pinched particularly at plugs, convenience receptacles,
and the point where they exit from the apparatus.
11) Only use attachments/accessories specified by the manufacturer.
12) Use only with the cart, stand, tripod, bracket, or the table specified by the
manufacturer, or sold with the apparatus.
When a cart is used, use caution when moving the cart/apparatus
combination to avoid injury from tip-over.
13) Unplug this apparatus during lightning storms or when unused for long periods of time.
14) Refer all servicing to qualified service personnel. Servicing is required when the apparatus has been
damaged in any way, such as power-supply cord or plug is damaged, liquid has been spilled or objects
have fallen into the apparatus, the apparatus has been exposed to rain or moisture, does not operate
normally, or has been dropped.
WARNING - To reduce the risk of fire or electric shock, do not expose this apparatus to rain or moisture.
Apparatus shall not be exposed to dripping or splashing and no objects filled with liquids, such as vases,
shall be placed on the apparatus.
CAUTION – These servicing instructions are for use by qualified service personnel only. To reduce the
risk of electric shock, do not perform any servicing other than that contained in the operating
instructions unless you are qualified to do so.

7
Table Of Contents
1. PRODUCT FEATURES ..................................................................................................... 9
1.1 Product Introduction.................................................................................................................... 9
1.2 Product Features.......................................................................................................................... 9
2. DESCRIPTION OF THE FRONT/REAR VIEW................................................................ 10
2.1 Front View .................................................................................................................................. 10
2.2 Rear View ................................................................................................................................... 13
2.3 ALARM In/Out ........................................................................................................................... 14
3. INSTALLATION ............................................................................................................... 15
3.1 Basic Connection ....................................................................................................................... 15
3.2 Hard-Disk Drive Installation ..................................................................................................... 19
3.3 System Information .................................................................................................................... 20
3.4 Updating System Software ......................................................................................................... 21
4. BASIC OPERATIONS ..................................................................................................... 22
4.1 Configuring Recording Settings................................................................................................. 22
4.2 Recording Operations ................................................................................................................ 25
4.3 Playback Operations.................................................................................................................. 30
4.4 Search Operations...................................................................................................................... 32
4.5 Backup Operations..................................................................................................................... 36
4.6 Key Lock Operation ................................................................................................................... 39
5. MENU SETUP ................................................................................................................. 40
5.1 REC SETTING ........................................................................................................................... 41
5.2 ALARM SETTING ...................................................................................................................... 42
5.3 CLOCK / TIMER........................................................................................................................ 45
5.4 COMMUNICATION .................................................................................................................. 46
5.5 DISK SETTING.......................................................................................................................... 49
5.6 SYSTEM ..................................................................................................................................... 50

8
6. RS-232 & RS-485 PROTOCOL....................................................................................... 53
6.1 Setup........................................................................................................................................... 53
6.2 Communication Protocol:.......................................................................................................... 53
7. MOBILE RACK INSTALLATION..................................................................................... 56
8. SYSTEM DEFAULT......................................................................................................... 59
9. O.S.D MESSAGE ............................................................................................................ 61
10. NETWORK VIEWER AND IMAGE VIEWER................................................................. 62
10.1 The Network Viewer ................................................................................................................. 62
10.2 The Image Viewer..................................................................................................................... 70
11. INDEX TABLE ............................................................................................................... 71
12. NETWORK CONFIGURATION ..................................................................................... 72
12.1 Cable Connections ................................................................................................................... 72
12.2 Configure Your DVR Network Settings .................................................................................... 73
12.3 TCP/IP Communication Software............................................................................................ 75
12.4 TCP/IP installation .................................................................................................................. 77
12.5 TCP/IP Configuration setting .................................................................................................. 77
12.6 Connection Testing................................................................................................................... 78
13. SPECIFICATIONS ......................................................................................................... 80
14. COMPATIBLE MULTIPLEXERS ................................................................................... 81

9
1. PRODUCT FEATURES
1.1 Product Introduction
This DVR is a storage media of digital video image, which uses hard-disk drives instead of VCR tapes
to store video. It enables you to enjoy the extreme flexibility of digital image archiving instead of clumsy
tape management, and is compatible with most multiplexers in the market. Equipped with a range of
comprehensive features, such as playback picture-by-picture, quick access video recording by time
and event, the upgradeable software of the system, the expandable capacities of hard drive, and much
more, the DVR will make your applications far more flexible and effective than ever before. For all, the
DVR is going to prove the timely substitute for Time-lapse VCR.
1.2 Product Features
* Stores video in hard-disk drives instead of VCR tapes.
* Maximum 2 hard-disk drive capability. (One removable)
* Hard-disk drive hot-swapping capability.
* Pre-alarm image recording.
* Capable of working with various known multiplexers.
* Time-lapse and real-time recording.
* Refresh rate up to 60 IPS (50 IPS for PAL).
* Image quality selectable at 4 different levels for recording.
* Event/Timer/Alarm recording mode.
* Quick search by time, alarm, event, and recording list.
* Fast and slow playback of recorded video at various speeds.
* Single-picture playback.
* On-screen setup menu, title and system timer.
* Password protection.
* Disk-full warning and operation status LEDs.
* RS-232, RS-485 communication port.
* Remote control via RS-232, RS-485 and Ethernet ports
* Power interruption recovery.
* Operation-status record log.
* Distributing live and recorded images through TCP/IP network environment.
* Audio function included
* Built-in SD card slot for copying image to SD card
* Support DHCP protocol.

10
2. DESCRIPTION OF THE FRONT/REAR VIEW
2.1 Front View
Operate Display
Enter Monitor
Setup
PLAY
STOP
REC
FWDREV
PAUSE
A-recSearch
T-rec
OPERATEDISK
1 3 4 5 6
7 8 9 10 11 14 13 12 15 16 17 18 19 20 21 22
223 24
Hard-disk drive compartment.
The compartment allows you to install a hard-disk drive mostly for backup purposes. Make sure the
drive is well secured with the mounting screws in the mobile rack before you put the rack into the
compartment. And remember to turn on the power of the compartment by locking it.
Hard-disk compartment lock:
The key lock secures a hard-disk in place. Unlock the compartment before you remove the
hard-disk from the slot without turning off the device.
PAUSE button:
In a playback display, press this to freeze the display. During the freeze, press to display one
frame/field of a picture at a time in the forward direction. (Illuminate green in PAUSE mode.)
PLAY button:
Press to play back a recorded video from the hard-disk. (Illuminate green in PLAY mode.)
STOP button:
Press to stop playing back a recorded video or recording video into a hard-disk. (Illuminate green
in STOP mode.)
REC button:
Press to start recording video into a hard-disk while in the live display mode.(Illuminate red in
REC mode.)
OPERATE button:
Press this button for at least 3 seconds to power off. Press again to activate the device.
DISPLAY button:
Press to show the system operation status on the screen.

11
Setup button:
Press this to enter the setup menu. Press again to exit the setup mode.
Search button:
Press to enter the search mode to access recorded video.
Left / Right buttons:
Press the two buttons to highlight desired items in the menu setup mode. For Key Lock operation,
press these two buttons simultaneously once; to disable Key Lock, press these two buttons
simultaneously again.
Up / Down buttons:
Press these two buttons to select the desired contents for programming in the setup menu mode.
Enter Button:
Press to enter a selected item and save the setting in the menu setup mode.
Monitor button:
Press to switch between a multiplexer-decoded video and the encoded video to be displayed
when connected with a multiplexer. When the button light is on it indicates the unit is displaying
the decoded video.( The images are not multiplexing . ) In this mode, the unit doesn’t display the
OSD message of the unit on the screen. However, this doesn’t affect the unit’s OSD message
which is recorded into hard-disk drives. When the button light is off it indicates the unit is
displaying encoded video. (The images switch swiftly).
T-rec Indicator:
This indicator of the timer recording mode lights up to signal the scheduled record setting is on.
A-rec Indicator:
This indicator of the alarm recording mode lights up to indicate the alarm record setting is on.
DISK Indicator:
The indicator shows the operation status of the unit’s hard-disk drives. The green light indicates
the hard-disk drive is storing or retrieving data. The red light signals the hard-disk drive is filling up.
The orange light indicates the hard-disk is retrieving data at disk-full status.
Shuttle Ring:
The shuttle can be moved forward and backward for playback in either direction. Turn this left to
play a recorded video in the reverse direction at faster or slower speeds than the recorded speed.
Turn this right to play a recorded video in the forward direction at faster or slower speeds than the
recorded speed.
Jog Dial:
This dial can act in both a forward and a backward direction, as well as step by step. Turn this left
to play a recorded video in the reverse direction. Turn this right to play a recorded video in the
forward direction.
OPERATE Indicator:
Indicates the power status of the unit. The green light indicates the hard-disk drive is
activating.
The orange light signals the hard-disk drive is power stand by.

12
Mobile Rack Power LED:
Indicates the power status of the Mobile Rack. The green light indicates the Mobile Rack is
activating.
Mobile Rack HDD LED:
Indicates the HDD status of the Mobile Rack. The orange light indicates the HDD is storing or
retrieving data.

13
2.2 Rear View
SD Card
RS-232
ALARM
DC12V
RS-485
AUDIO
IN
IN
OUT
OUT
VIDEO
TO
MONITOR
TO
MUX'S VCR IN
FROM MUX
MAIN MONITOR
ETHERNET
10/100
I/O
25 26 27 28 29 30 31
32 33
34 35 37 38 36
VIDEO IN Connector: This BNC connector is used to connect the video output from a camera or a
MUX to the DVR.
FROM MUX MAIN MONITOR Connector: This BNC connector is used to connect the live video output
from a MUX to the DVR.
AUDIO IN Connector: This connector is used to connect the audio output from a camera, a MUX or
other devices to the DVR.
ETHERNET 10/100 Connector: This is one standard RJ-45 connector for 10/100 Mbps Ethernet
networks.
RS-485 Port: The RS-485 communication ports function as connectors when two or more units are
serially connected to expand the storage capacity.
SD CARD Slot: This is used for system software updating and archiving/accessing critical images.
RS-232 Port: The RS-232 communication port functions as a connector to an external control device.
Please refer to RS-232 & RS-485 Protocol for more details.
VIDEO OUT Connector: The connector provides the unit’s composite video signals to a MUX.
MONITOR Connector: The connector provides the unit’s composite video or a MUX’s live signal if
connected to a display device.
AUDIO OUT: This provides the unit’s audio signal to a speaker.
ALARM I/O: This is a 9-PIN D-SUB connector including SWITCH OUT, GROUND, ALARM OUT, DISK
FULL, RECORD IN, ALARM RESET, and ALARM IN for connecting with external devices. Please
refer to the next section for details.
Plug Inlet: The inlet connects to an external power supply. Connect to the provided AC adapter.
Wire Catch: The wire catch secures the power cord and keeps it in place (so that it does not droop or
hang loosely).
Ground Screw’s: The ground screw is for chassis terminal.

14
2.3 ALARM In/Out
ALARM IN
ALARM OUT
RECORD IN GROUND
DISK FULL
ALARM RESET
NO CONNECTION NO CONNECTION
SWITCH OUT
12345
6789
*THIS FIGURE IS LOOKED FROM THE REAR
1. GND: Ground Contact.
2. ALARM OUT (OUTPUT): This is an alarm output trigger. Connect this to external devices such
as buzzers or lights. (
5V
0V(Active)
)
3. DISK FULL (OUTPUT): This is a disk full output trigger. Connect this to external devices such
as buzzers or lights. (
5V
0V(Active)
)
4. ALARM RESET (INPUT): This pin connects to an alarm-clear device for clearing an alarm.
(
5V
0V(Active)
)
5. RECORD IN (INPUT): This pin connects to a record trigger device for starting a record.
(
5V
0V(Active)
)
6. SWITCH OUT (OUTPUT): This pin, sending out timing signals (falling / negative) to a
multiplexer, connects to a multiplexer’s trigger terminal so the multiplexer can switch to use the
same recording speed as the DVR.
7. NO CONNECTION
8. NO CONNECTION
9. ALARM IN (INPUT): This is an alarm input which can be programmed in the menu system to
Normally Open or Normally Closed. (
5V
0V(Active)
)

15
3. INSTALLATION
Please follow the instructions and the diagram below to set up the system.
3.1 Basic Connection
CONNECTIONG TO THE AC ADAPTER
Connect the provided AC adapter to the main unit.
SD Card
RS-232
ALARM
DC12V
AUDIO
IN
IN
OUT
OUT
VIDEO
TO
MONITOR
TO
MUX'S VCR IN
FROM MUX
MAIN MONITOR
I/O
RS-485
ETHERNET
10/100
DC IN terminal
DC cord
Provided AC adapter
(model:STD-1205)
Provided AC
mains cable
AC
Clamp
Screw
1. Connect the DC cord of the AC adapter to the DC IN terminal of the main unit.
2. To prevent accidental disconnection of the DC cord, fasten the DC cord with a wire catch.
1) Remove 1 screw followed by the wire catch.
2) Insert the DC cord into the wire catch and fasten the wire catch unto the main unit.
3. Connect the provided power cord to the AC IN terminal of the AC adapter.
4. Connect the power cord to the power socket.
• Power is channeled into the unit and the OPERATE indicator lights up green.
(OPERATE ON mode)
• Press OPERATE button
for at least 3 seconds to power off and the OPERATE indicator lights
up orange.. (OPERATE OFF mode)
The orange light signals the hard-disk drive is power stand by.
Memo
• Even in the OPERATE OFF mode, a small amount of electricity will still flow into the unit.
• When the unit is in the OPERATE OFF mode, no operation can be performed except that of the
OPERATE button.
Note:
• Please supply power to the unit via the provided AC adapter. Do not use other power sources.
• During recording or playback, please do not unplug the DC or power cord.
* About the location of the buttons, please refer to Page 10 2.1 Front View.

16
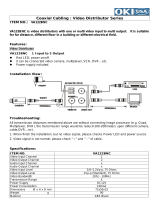
CONNECTING WITH A SINGLE CAMERA
Please set the MULTIPLEXER option to OFF on the REC SETTING page in the setup menu
when it is connected with a single camera. (Please refer to section 5.1 MULTIPLEXER option)
SD Card
RS-232
ALARM
DC12V
AUDIO
IN
IN
OUT
OUT
VIDEO
TO
MONITOR
TO
MUX'S VCR IN
FROM MUX
MAIN MONITOR
I/O
Camera
Monitor
RS-485
ETHERNET
10/100
CONNECTING WITH A MULTIPLEXER
To match the multiplexer’s recording speed, please set the MULTIPLEXER option to ON on the
REC SETTING page in the setup menu when it is connected with a multiplexer. (Please refer to
section 5.1 MULTIPLEXER option)
Caution: When being set up so that an multiplexer may record only the Alarm-in camera
during alarm record, or when there is only one camera input, if it is going to see
the playback picture of VR-601 with the monitor out of multiplexer, the picture
may not update. Before beginning record for the multiplexer in the case of usage,
the playback picture can update normally by setting REC RATE to 60F/S.

17
CONNECTING WITH A QUAD
Please set the MULTIPLEXER option to OFF on the REC SETTING page in the setup menu
when it is connected with a quad. (Please refer to section 5.1 MULTIPLEXER option)
12345
6789
SD Card
RS-232
ALARM
DC12V
AUDIO
IN
IN
OUT
OUT
VIDEO
TO
MONITOR
TO
MUX'S VCR IN
FROM MUX
MAIN MONITOR
I/O
Audio
IN
OUT
S-video
Trig In
Multiplexer
Monitor Speaker
GROUND
SWITCH OUT
PC
RS-485
ETHERNET
10/100
SD Card
RS-232
ALARM
DC12V
AUDIO
IN
IN
OUT
OUT
VIDEO
TO
MONITOR
TO
MUX'S VCR IN
FROM MUX
MAIN MONITOR
I/O
Audio
IN
OUT
S-video
Quad
Monitor Speaker
PC
RS-485
ETHERNET
10/100

18
ATTACHING AN EXTERNAL DEVICE TO DVR
Connect an alarm out, alarm input, and a peripheral device as shown in the diagram below.
SD Card
RS-232
ALARM
DC12V
AUDIO
IN
IN
OUT
OUT
VIDEO
TO
MONITOR
TO
MUX'S VCR IN
FROM MUX
MAIN MONITOR
I/O
12345
6789
Alarm Reset
(Normally Open)
(Normally Open)
Alarm in
Ground
RS-485
ETHERNET
10/100
Lamp
CLOCK SET
Please set the clock before operating the DVR. (For operation details, please refer to section 5.3
CLOCK/TIMER)

19
3.2 Hard-Disk Drive Installation
The DVR is equipped with two compartments of hard-disk drive. The unit usually comes with one
hard-disk drive installed in the compartment HD1, which is default-configured as a master. If you need
a second hard-disk drive to be installed in the compartment HD2 (Mobile), please contact your
distributors or installers for specific instructions on how to install it. Please don’t serve yourself before
consulting your installers. If there is only one hard-disk drive in the mobile compartment, please set the
HD2 USAGE option to REC (Please refer to section 5.5) before proceed recording function. The
jumper-settings arrangement of installed hard-disk drives for the system (Table 3.2 A.) is shown in the
tables below.
Table 3.2 A. The jumper settings of hard-disk drives in the system
Location Jumper
IDE 1 Compartment HD 1 Master (Default)
IDE 2 Compartment HD 2 Master
Table 3.2 B. Compatible hard-disk drives
Manufacturer Model Capacity Rotation
ST380020A/P 80GB 5400 RPM
Seagate
ST340810A/P 40GB 5400 RPM
4A160J0-1A 160GB 5400 RPM
4R080L0-1 80GB 5400 RPM
Maxtor
6Y120L0-1 120GB 7200 RPM
NOTE: Hard-disk drives not shown on this list have not been tested by the engineering team
and are not recommended for use with this product. For the latest updated list on the
recommended hard-disk drives, please contact your dealers or distributors.

20
3.3 System Information
You can display system settings information as shown on Table 3.3 A below at any time by pressing
the Display button
. In the playback mode, the recorded video information is displayed. In the live or
recording mode, the Manual Recording information is displayed. However, when the DVR is displaying
a decoded image from a multiplexer, you must first switch the unit to encoded image displaying (The
pictures is switching swiftly and the light of Monitor button
is off) by pressing the Monitor button
. Each sequential press of the Display button displays a different message detailed in the
following example. By default, the unit displays time, date, and an indicating bar of capacity status on a
monitor as shown next.
Default display
(Capacity Used) (Capacity Remaining)
09-05-2003 16:13:02
(System Time)
(Date)
The TOP
of the HDD
Current
Position
The END
of the HDD
Press the Display button
once; the DVR will display the following sample message plus the default
display. Press the Display button
again; the unit will not display any OSD message. Press the
button one more time to back to the default display.
Table 3.3 A. Description of Table 3.3 A
(1+2: 59G): Total capacity of installed hard-disk, 59 GB
(12.4 HR): Total 12.4 hour recording time available
(
): Timer record activated
(
): Alarm record activated
(QUALITY: BEST): Record quality setting, BEST
(NTSC): NTSC system
(RATE: 6 HR): Setting of Record time mode, 6 hours
(20 F/S): Record speed setting, 20 fields/sec
(MUX: OFF):
Only connected to a single camera.
( ): Audio function activated
(
): Indicate which HDD is activated
(9K): The image file size
(HD): Hard-disk Compartment
(P): Y Hard-disk installed; . No hard-disk installed
(SIZE 20G): The capacity of the installed hard-disk
(POS): Percentage of system; R: Recording; P: Playback
(IP : 192 . 168 . 1 . 90): Setting of
the Ethernet
communication,192.168.1.90
(
): External signal
( X): Cannot operate at now
* About the location of the buttons, please refer to Page 10 2.1 Front View.
1+ 2: 59G 12.4 HR
QUALITY: BEST NTSC
RATE: 6 HR 20 F/S
MUX : OFF 9K
HD P SIZE POS
1 Y 20 G 39.5% P
2 Y 39 G 0.0% R
IP : 192 . 168 . 1 . 90
/