Page is loading ...


© 2007 Adobe Systems Incorporated. All rights reserved.
Using Adobe® Visual Communicator 3 for Windows®
If this guide is distributed with software that includes an end user agreement, this guide, as well as the software described in it, is
furnished under license and may be used or copied only in accordance with the terms of such license. Except as permitted by any
such license, no part of this guide may be reproduced, stored in a retrieval system, or transmitted, in any form or by any means,
electronic, mechanical, recording, or otherwise, without the prior written permission of Adobe Systems Incorporated. Please note
that the content in this guide is protected under copyright law even if it is not distributed with software that includes an end user
license agreement.
The content of this guide is furnished for informational use only, is subject to change without notice, and should not be
construed as a commitment by Adobe Systems Incorporated. Adobe Systems Incorporated assumes no responsibility or liability
for any errors or inaccuracies that may appear in the informational content contained in this guide.
Please remember that existing artwork or images that you may want to include in your project may be protected under copyright
law. The unauthorized incorporation of such material into your new work could be a violation of the rights of the copyright
owner. Please be sure to obtain any permission required from the copyright owner.
Any references to company names in sample templates are for demonstration purposes only and are not intended to refer to any
actual organization.
Adobe, the Adobe logo, Flash, Flex, and Visual Communicator are either registered trademarks or trademarks of Adobe Systems
Incorporated in the United States and/or other countries.
Microsoft, Windows, and Windows Server are either registered trademarks or trademarks of Microsoft Corporation in the United
States and/or other countries. Apple is a trademark of Apple Inc., registered in the United States and other countries. Intel and
Pentium are trademarks or registered trademarks of Intel Corporation or its subsidiaries in the U.S. and or other countries. All
other trademarks are the property of their respective owners.
MPEG Layer-3 audio coding technology licensed from Fraunhofer IIS and Thomson.
Certain sound effects are copyright © 2002 Cosmi Corporation.
Certain images are copyright © 2002 Painet, Inc.
Adobe Systems Incorporated, 345 Park Avenue, San Jose, California 95110, USA. Notice to U.S. Government End Users. The
Software and Documentation are “Commercial Items,” as that term is defined at 48 C.F.R. §2.101, consisting of “Commercial
Computer Software” and “Commercial Computer Software Documentation,” as such terms are used in 48 C.F.R. §12.212 or 48
C.F.R. §227.7202, as applicable. Consistent with 48 C.F.R. §12.212 or 48 C.F.R. §§227.7202-1 through 227.7202-4, as
applicable, the Commercial Computer Software and Commercial Computer Software Documentation are being licensed to U.S.
Government end users (a) only as Commercial Items and (b) with only those rights as are granted to all other end users pursuant
to the terms and conditions herein. Unpublished-rights reserved under the copyright laws of the United States. Adobe Systems
Incorporated, 345 Park Avenue, San Jose, CA 95110-2704, USA. For U.S. Government End Users, Adobe agrees to comply with
all applicable equal opportunity laws including, if appropriate, the provisions of Executive Order 11246, as amended, Section
402 of the Vietnam Era Veterans Readjustment Assistance Act of 1974 (38 USC 4212), and Section 503 of the Rehabilitation
Act of 1973, as amended, and the regulations at 41 CFR Parts 60-1 through 60-60, 60-250, and 60-741. The affirmative action
clause and regulations contained in the preceding sentence shall be incorporated by reference.

3
Contents
Chapter 1: Installing Visual Communicator . . . . . . . . . . . . . . . . . . . 9
Installation . . . . . . . . . . . . . . . . . . . . . . . . . . . . . . . . . . . . . . . . . . . . . . . . . . . . . 9
System requirements . . . . . . . . . . . . . . . . . . . . . . . . . . . . . . . . . . . . . . . . .9
Install Visual Communicator . . . . . . . . . . . . . . . . . . . . . . . . . . . . . . . . . . . 9
Chapter 2: Feature and control overview. . . . . . . . . . . . . . . . . . . . .11
Visual Communicator windows, Action window, and Media libraries . .11
The Output Monitor window and buttons . . . . . . . . . . . . . . . . . . . . . . . .11
The Teleprompter and Action window . . . . . . . . . . . . . . . . . . . . . . . . . 12
The Media libraries . . . . . . . . . . . . . . . . . . . . . . . . . . . . . . . . . . . . . . . . . . 13
The Coach area. . . . . . . . . . . . . . . . . . . . . . . . . . . . . . . . . . . . . . . . . . . . . . . . 14
The tabbed control panels . . . . . . . . . . . . . . . . . . . . . . . . . . . . . . . . . . . . . . 14
The Project tab . . . . . . . . . . . . . . . . . . . . . . . . . . . . . . . . . . . . . . . . . . . . . . 15
The Director tab . . . . . . . . . . . . . . . . . . . . . . . . . . . . . . . . . . . . . . . . . . . . . 16
The Actions tab . . . . . . . . . . . . . . . . . . . . . . . . . . . . . . . . . . . . . . . . . . . . . 17
The V-Screen tab. . . . . . . . . . . . . . . . . . . . . . . . . . . . . . . . . . . . . . . . . . . . 19
The Setup tab for audio and video . . . . . . . . . . . . . . . . . . . . . . . . . . . . 20
The Audio setup button . . . . . . . . . . . . . . . . . . . . . . . . . . . . . . . . . . . . . 20
The Video setup button . . . . . . . . . . . . . . . . . . . . . . . . . . . . . . . . . . . . . . 21
The Menu bar . . . . . . . . . . . . . . . . . . . . . . . . . . . . . . . . . . . . . . . . . . . . . . . . 22
The File menu . . . . . . . . . . . . . . . . . . . . . . . . . . . . . . . . . . . . . . . . . . . . . . 23
The Edit menu. . . . . . . . . . . . . . . . . . . . . . . . . . . . . . . . . . . . . . . . . . . . . . 23
The Director menu . . . . . . . . . . . . . . . . . . . . . . . . . . . . . . . . . . . . . . . . . . 24
The Teleprompter menu . . . . . . . . . . . . . . . . . . . . . . . . . . . . . . . . . . . . . 24
The Hosting menu . . . . . . . . . . . . . . . . . . . . . . . . . . . . . . . . . . . . . . . . . . 25
The Settings menu . . . . . . . . . . . . . . . . . . . . . . . . . . . . . . . . . . . . . . . . . 25
The Tools menu . . . . . . . . . . . . . . . . . . . . . . . . . . . . . . . . . . . . . . . . . . . . 26
Dialog boxes . . . . . . . . . . . . . . . . . . . . . . . . . . . . . . . . . . . . . . . . . . . . . . . . . 26
The Application Settings dialog box . . . . . . . . . . . . . . . . . . . . . . . . . . 26
The Performance Settings dialog box. . . . . . . . . . . . . . . . . . . . . . . . . 28
Chapter 3: Making your first show . . . . . . . . . . . . . . . . . . . . . . . . . 31

4Contents
Save the show file . . . . . . . . . . . . . . . . . . . . . . . . . . . . . . . . . . . . . . . . . . . 34
Rehearse and record a show . . . . . . . . . . . . . . . . . . . . . . . . . . . . . . . . . 34
Publish a show. . . . . . . . . . . . . . . . . . . . . . . . . . . . . . . . . . . . . . . . . . . . . . 35
Chapter 4: Setting up a studio . . . . . . . . . . . . . . . . . . . . . . . . . . . . 37
Chapter 5: Creating a show . . . . . . . . . . . . . . . . . . . . . . . . . . . . . . .45
Creating a show using the wizard. . . . . . . . . . . . . . . . . . . . . . . . . . . . . . . . 45
Use the wizard to create a show based on a style . . . . . . . . . . . . . . . 45
Use the wizard to create a blank show . . . . . . . . . . . . . . . . . . . . . . . . . 46
Creating a One-Click Video template . . . . . . . . . . . . . . . . . . . . . . . . . . . . 46
Chapter 6: Managing projects and media files . . . . . . . . . . . . . . .49
Best practices for organizing projects and media files . . . . . . . . . . . . . 49
Locate and store projects and files . . . . . . . . . . . . . . . . . . . . . . . . . . . . 49
Edit project files on a single computer . . . . . . . . . . . . . . . . . . . . . . . . . 50
Change the default path for project files . . . . . . . . . . . . . . . . . . . . . . . 50
Save a project to a different path . . . . . . . . . . . . . . . . . . . . . . . . . . . . . 50
Save, package, open, and delete projects . . . . . . . . . . . . . . . . . . . . . . . . 51
Save a project . . . . . . . . . . . . . . . . . . . . . . . . . . . . . . . . . . . . . . . . . . . . . . 51
Package a project with Pack and Go . . . . . . . . . . . . . . . . . . . . . . . . . . 51
Delete a project and cleaning up your hard disk . . . . . . . . . . . . . . . . 52
Planning shows and writing scripts . . . . . . . . . . . . . . .53
Planning your show. . . . . . . . . . . . . . . . . . . . . . . . . . . . . . . . . . . . . . . . . . . . 53
Planning checklist . . . . . . . . . . . . . . . . . . . . . . . . . . . . . . . . . . . . . . . . . . . 53
Making a show outline . . . . . . . . . . . . . . . . . . . . . . . . . . . . . . . . . . . . . . . 54

Contents 5
Writing a script . . . . . . . . . . . . . . . . . . . . . . . . . . . . . . . . . . . . . . . . . . . . . 55
Chapter 8: Using the Teleprompter . . . . . . . . . . . . . . . . . . . . . . . .57
Chapter 9: Adding closed captions to a video . . . . . . . . . . . . . . . . 61
Chapter 10: Media inputs, video effects, and external events . . .67

6Contents
Trim video and audio clips. . . . . . . . . . . . . . . . . . . . . . . . . . . . . . . . . . . . 78
Review a trimmed clip . . . . . . . . . . . . . . . . . . . . . . . . . . . . . . . . . . . . . . . 80
Save a trimmed clip . . . . . . . . . . . . . . . . . . . . . . . . . . . . . . . . . . . . . . . . . 81
Adjust the color of a video clip . . . . . . . . . . . . . . . . . . . . . . . . . . . . . . . . 81
Adjust the volume of an audio or video clip . . . . . . . . . . . . . . . . . . . . . 81
Save a DV clip from tape. . . . . . . . . . . . . . . . . . . . . . . . . . . . . . . . . . . . . 82
Add an audio clip. . . . . . . . . . . . . . . . . . . . . . . . . . . . . . . . . . . . . . . . . . . . 83
About title graphics. . . . . . . . . . . . . . . . . . . . . . . . . . . . . . . . . . . . . . . . . . 84
Edit the text in a title . . . . . . . . . . . . . . . . . . . . . . . . . . . . . . . . . . . . . . . . . 85
Customize effects in a title graphic . . . . . . . . . . . . . . . . . . . . . . . . . . . . 86
Save a custom title . . . . . . . . . . . . . . . . . . . . . . . . . . . . . . . . . . . . . . . . . . 86
Adding PowerPoint files . . . . . . . . . . . . . . . . . . . . . . . . . . . . . . . . . . . . . 86
Video effects: transitions and more . . . . . . . . . . . . . . . . . . . . . . . . . . . . . . 87
About types of effects . . . . . . . . . . . . . . . . . . . . . . . . . . . . . . . . . . . . . . . 87
About effect icons . . . . . . . . . . . . . . . . . . . . . . . . . . . . . . . . . . . . . . . . . . . 90
Selecting effects . . . . . . . . . . . . . . . . . . . . . . . . . . . . . . . . . . . . . . . . . . . . 91
Customize an effect . . . . . . . . . . . . . . . . . . . . . . . . . . . . . . . . . . . . . . . . . 91
Updating an effect with a newer version . . . . . . . . . . . . . . . . . . . . . . . 95
Triggering events outside the video. . . . . . . . . . . . . . . . . . . . . . . . . . . . . . 95
About events . . . . . . . . . . . . . . . . . . . . . . . . . . . . . . . . . . . . . . . . . . . . . . . 96
Add a web link . . . . . . . . . . . . . . . . . . . . . . . . . . . . . . . . . . . . . . . . . . . . . . 96
Trigger a web page or image . . . . . . . . . . . . . . . . . . . . . . . . . . . . . . . . . 96
Display a caption. . . . . . . . . . . . . . . . . . . . . . . . . . . . . . . . . . . . . . . . . . . . 97
Set up a Chapter Marker or hyperlink. . . . . . . . . . . . . . . . . . . . . . . . . . 97
Set advanced web scripting options. . . . . . . . . . . . . . . . . . . . . . . . . . . 98
Digitally replacing the background . . . . . . . . . . . . . . .99
Chapter 12: Rehearsing and recording a show . . . . . . . . . . . . . . 105

7
Recording a show. . . . . . . . . . . . . . . . . . . . . . . . . . . . . . . . . . . . . . . . . . . . .108
About flex recording . . . . . . . . . . . . . . . . . . . . . . . . . . . . . . . . . . . . . . . .108
Use freestyle flex recording . . . . . . . . . . . . . . . . . . . . . . . . . . . . . . . . . .109
Use existing action trays to flex record . . . . . . . . . . . . . . . . . . . . . . . . 110
Manually controlling the script and effects. . . . . . . . . . . . . . . . . . . . . . 111
Altering timing in a recorded show. . . . . . . . . . . . . . . . . . . . . . . . . . . . 112
Edit dynamically . . . . . . . . . . . . . . . . . . . . . . . . . . . . . . . . . . . . . . . . . . . . 112
Calculating disk space for a recorded show. . . . . . . . . . . . . . . . . . . . 113
Clear recorded content for a show. . . . . . . . . . . . . . . . . . . . . . . . . . . . 113
Review a show . . . . . . . . . . . . . . . . . . . . . . . . . . . . . . . . . . . . . . . . . . . . . . . 114
Use the Review feature. . . . . . . . . . . . . . . . . . . . . . . . . . . . . . . . . . . . . . 114
Using real-time scrubbing to review a show . . . . . . . . . . . . . . . . . . . 114
Save an image of the current frame. . . . . . . . . . . . . . . . . . . . . . . . . . . 115
Chapter 13: Presenting live shows . . . . . . . . . . . . . . . . . . . . . . . . 117
Set up for a live presentation . . . . . . . . . . . . . . . . . . . . . . . . . . . . . . . . . . . 117
Set up a projector or second monitor . . . . . . . . . . . . . . . . . . . . . . . . . 117
Set your microphone to be live . . . . . . . . . . . . . . . . . . . . . . . . . . . . . . . 118
Set up an audio or video loop . . . . . . . . . . . . . . . . . . . . . . . . . . . . . . . . 119
Set up live video from a DV camera. . . . . . . . . . . . . . . . . . . . . . . . . . . 119
Giving a live presentation . . . . . . . . . . . . . . . . . . . . . . . . . . . . . . . . . . . . . . 119
Manually triggering events. . . . . . . . . . . . . . . . . . . . . . . . . . . . . . . . . . . 119
Use the Mini-Switcher to switch from one camera to another. . . .120
Dynamic editing . . . . . . . . . . . . . . . . . . . . . . . . . . . . . . . . . . . . . . . . . . . . 121
Chapter 14: Publishing a video . . . . . . . . . . . . . . . . . . . . . . . . . . . 123
Select the publishing method . . . . . . . . . . . . . . . . . . . . . . . . . . . . . . . . . .123
Publish a video . . . . . . . . . . . . . . . . . . . . . . . . . . . . . . . . . . . . . . . . . . . . .123
Publishing to an FTP server on the Internet. . . . . . . . . . . . . . . . . . . .124
Publish to a vlog . . . . . . . . . . . . . . . . . . . . . . . . . . . . . . . . . . . . . . . . . . . .124
Publishing to web pages . . . . . . . . . . . . . . . . . . . . . . . . . . . . . . . . . . . .124
Publish to DV tape . . . . . . . . . . . . . . . . . . . . . . . . . . . . . . . . . . . . . . . . . .126
Setting file and account information . . . . . . . . . . . . . . . . . . . . . . . . . . . . 127
Selecting the file type . . . . . . . . . . . . . . . . . . . . . . . . . . . . . . . . . . . . . . . 127
Setting the output path and file name . . . . . . . . . . . . . . . . . . . . . . . . .128
Send an e-mail regarding a new web-hosted video. . . . . . . . . . . . .128
Manage account information for web-hosted videos and vlogs . .129
Getting through the firewall . . . . . . . . . . . . . . . . . . . . . . . . . . . . . . . . . . 131
Set the destination path for output files . . . . . . . . . . . . . . . . . . . . . . . 131
Setting video publishing options. . . . . . . . . . . . . . . . . . . . . . . . . . . . . . . . 131
Set the video size and quality . . . . . . . . . . . . . . . . . . . . . . . . . . . . . . . . 131
FLV video encoding settings. . . . . . . . . . . . . . . . . . . . . . . . . . . . . . . . .133
Real video encoding settings . . . . . . . . . . . . . . . . . . . . . . . . . . . . . . . .135
AVI video encoding settings . . . . . . . . . . . . . . . . . . . . . . . . . . . . . . . . .136

8Contents
Summary. . . . . . . . . . . . . . . . . . . . . . . . . . . . . . . . . . . . . . . . . . . . . . . . . . 138
Live streaming . . . . . . . . . . . . . . . . . . . . . . . . . . . . . . 139
Chapter 16: Shortcuts . . . . . . . . . . . . . . . . . . . . . . . . . . . . . . . . . . 149
Chapter 17: Glossary. . . . . . . . . . . . . . . . . . . . . . . . . . . . . . . . . . . . 153

9
1
CHAPTER 1
Installing Visual
Communicator
Check that your computer meets the system requirements, then install and start Adobe®
Visual Communicator® 3.
Installation
If you haven’t installed your new software, begin by reading some information on installation
and other preliminaries. Before you begin working with your software, take a few moments to
read an overview of Adobe Help and of the many resources available to users.
“System requirements” on page 9
“Install Visual Communicator” on page 9
System requirements
To review complete system requirements and recommendations for your Adobe software, see
the ReadMe file on the installation disc.
Install Visual Communicator
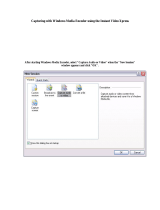
1. Insert the Visual Communicator installation disc into your computer’s DVD drive.
If the installation program does not start automatically, use Microsoft® Windows®
Explorer to view the contents of the disc and double-click the setup.exe file.
2. Follow the on-screen instructions.

10 Installing Visual Communicator
3. When the installation is finished, click Finish.
NOTE
The devices attached to your computer, such as a mouse or web cam, are controlled by
software called drivers. Most device manufacturers release new drivers periodically that
can increase performance or fix compatibility issues. If your devices work with Visual
Communicator, you do not need to update their drivers. New drivers can sometimes
cause performance or behavior issues. However, if you are having problems, try
updating your drivers.

2
CHAPTER 2
Feature and control overview
The Visual Communicator 3 main window is designed to be easy to use and simple to
understand. You can resize the window to suit your preference.
Visual Communicator windows, Action
window, and Media libraries
“The Output Monitor window and buttons” on page 11
“The Teleprompter and Action window” on page 12
“The Media libraries” on page 13
The Output Monitor window and buttons
What it does
Output Monitor The Output Monitor, in the top-left corner of the interface, displays the
video from the show. If you’re in a live video segment that is not yet
recorded or have the Setup tab open with Video selected, the Output
Monitor displays the live feed from the camera. When you double-click
an effect or media in a library or action tray, the monitor shows a
preview of that item. When you rehearse, record, or review, it displays
the show.
Depending on your computer’s processing power and settings, the
video displayed in the Output Monitor may preview at a lower quality
than that of the finished show.
Rehearse Plays the show without recording so you can check and adjust action
timing.
Record Runs the show and records both the video from the cameras and audio
from the microphone.
Review Plays back the show.

12 Feature and control overview
See also
Chapter 12, “Rehearsing and recording a show,” on page 105.
Chapter 14, “Publishing a video,” on page 123.
Action window
The Teleprompter and Action window are scrollable areas where you build the show. Enter
the script in the Teleprompter and drag effects and media into the Action window to create
the sequence of events.
See also
Chapter 8, “Using the Teleprompter,” on page 57
Opens the Video Publisher wizard.
Stop Stops the show in Rehearse, Record, or Review modes. Also stops any
previewing source or effect and returns to the show.
Teleprompter The area in the top-center portion of the interface for the script or
outline. When you are rehearsing or recording, read the text as it scrolls
through the pink action bar along the top. The controls for the
Teleprompter are on the Director tab.
Action window The area in the top-right portion of the interface where you arrange
action trays that contain media, such as prerecorded video, audio,
camera input, and effects. While rehearsing or recording, the trays scroll
up the Action window along with the text in the Teleprompter.
Tickmark ruler This is a multipurpose element at the left edge of the Action window:
•
•
• Scrubbing

Visual Communicator windows, Action window, and Media libraries 13
The Media libraries
The Media libraries area at the bottom of the interface provides access to the effects and
content that you add to the show. To assemble the shows, you drag icons from these libraries
into the Action window. Most tabs let you access library folders that store content that is
installed with Visual Communicator. You can also store your content in the same folders for
easy access. The Browse tab lets you browse to any folder on your system, and you can add
content that you use on a regular basis to a Favorites library.
Video Effects The Visual Communicator video effects.
Styles An assortment of title graphics.
Topics More title graphics, which are used for shows created with the Topics
option in the New Show wizard.
Videos Video clips, and the three icons for video cameras.
Graphics Still images for use as backgrounds for V-Screen effects or as
supporting images in the shows. This library is also home to the Pop
Ups and Text Effects folders, which contain special title graphics.
Audio Audio clips that Visual Communicator includes, including TV-quality
music tracks and sound effects.
Browse Folders to locate and load files from outside of Visual Communicator.
Projects Projects created with Visual Communicator and saved to the folder that
is currently set as the home directory for the Projects library.
Output Videos published from Visual Communicator to the folder that’s set as
the home for the Output library, the reference files for trimmed video
clips and customized title graphics, and video clips captured using
Visual Communicator to this folder.
Address bar pop-up
menu
Displays the path of the currently selected folder. Click the arrow to
view and navigate to other folders. This pop-up menu also contains a
link to the user-specified My Favorites folder.
Back button Takes you to the last folder to which you navigated in the current library.
Forward button Returns you to the folder that you navigated from.
Up button Moves up one level from the current folder.

The Coach area
The Coach area provides descriptions of the user interface elements you are currently using
and hints about how to achieve the best results with Visual Communicator. Click Next to
view the next tip or description about the part of the application you are currently using. To
display detailed about the current part of the application, click Help .
You can show and hide the Coach area from the Help menu.
The Visual Communicator Coach area
The tabbed control panels
“The Project tab”
“The Director tab”
“The Actions tab”
“The V-Screen tab”
“The Setup tab for audio and video”
“The Audio setup button”
“The Video setup button”
—as
thumbnails (the default), a simple list, or a detailed list.
IP
Control Description

The tabbed control panels 15
The Project tab
The Project tab provides options for creating and saving project files. From here, you can start
the New Show wizard, start capturing video from a video device, and print the Teleprompter
script. You can also set whether to use web or television-quality media in the shows and zoom
to view the Video Safe area only. The following table describes the controls on the Project tab.
Set Thumbnail
button
Creates a new thumbnail for the show file based on the current contents
of the Output Monitor.
Project Name box Contains the name of the current show file, with the .msh extension.
New button Creates a new show. Visual Communicator gives the project a default
file name, which you can change by revising what appears in the Project
Name box.
Open button Opens a browser, which defaults to the folder that is set as the home for
the My Projects library.
Wizard button Opens the New Show wizard, which helps you create a new show
based on a style or topic.
Capture button Opens a control panel through which you can copy a video clip from a
tape in the connected camera to your hard drive. You can then include
the resulting clip in a project like any digital video clip.
Save button Saves the project.
Save As button Opens a dialog box where you can enter a new file name and
destination for the current project. This also sets the default directory
for new projects.
Print Script button Opens the Print Setup dialog box and sends the contents of the
Teleprompter to the printer.
Clear Recordings
button
Deletes all audio and video recorded within the current show. This is
useful to regain valuable hard drive space for shows you have already
published and never intend to republish in the future.
TV Content and
Web Content
buttons
Determines the format of the content you see in the media libraries.
Selecting TV Content makes the media in the show compatible with
high-resolution television-quality format. Selecting Web Content
optimizes media for viewing on computers or the web.
Zoom To Video
Safe Area check
box
Causes the Output Monitor to display only the area that will be visible on
a television screen.

16 Feature and control overview
See also
Chapter 6, “Managing projects and media files,” on page 49
Chapter 3, “Making your first show,” on page 31
“Save a DV clip from tape” on page 82
The Director tab
Use the Director options to run the Teleprompter and navigate the Action window while
rehearsing and recording. The following table describes the controls on the Director tab.
See also
“Using the Teleprompter” on page 57
“Selecting Pass-Thru To Speakers” on page 145
Enable Mini-
Switcher check box
Switches the Mini-Switcher on and off. The Mini-Switcher allows you to
dynamically insert camera input from any one of up to three cameras
while you are recording or rehearsing a show.
Camera Insert
buttons
Switch the camera input to any of up to three active cameras. The
action uses the default effect assigned in the Application Settings
dialog box. Alternatively, by clicking on the mini camera preview icon,
you can insert a cut instead of the default effect. If you hold down the
Ctrl key when you click the icon, a dissolve is used.
Pause/Resume
button
Pauses and resumes scrolling of the Teleprompter and Action window
while rehearsing and recording. The keyboard shortcuts for these
actions is Ctrl+Spacebar.
This has no effect on recording—if you are recording when you pause
the Teleprompter, recording continues.
Advance button Causes the paused Teleprompter to scroll down one line of text.
Next Effect button Advances to the next tray in the Action window. If the Teleprompter is
paused when you manually go to the next effect, the effect plays out as
programmed but the Teleprompter remains paused.
Scroll Speed slider Adjusts how fast the Teleprompter scrolls. The box to the right of the
slider shows the numeric setting.
Timer Display Displays the current position in the show.
Live Streaming
status indicator
Indicates the live streaming status.

The Actions tab is where you adjust timing, volume, and other settings specific to the
currently selected video effect or content file. Click an effect, image, or audio or video file in
an action tray to display its properties and controls. The controls that you see change
depending on the type of media or effect selected.
The following table describes the controls on the Actions tab.
Common controls
Video effects
Title graphics
Audio & video clips

“Media inputs, video effects, and external events” on page 67
“Trim video and audio clips” on page 78
Still Images
Video clips

“The Video setup button” on page 21
“Trim video and audio clips” on page 78
The V-Screen tab
If you add virtual sets or greenscreen effects to a show, use the V-Screen tab to select the
background, set and adjust the key, and make color corrections.
The following table describes the controls on the V-Screen tab.
See also
“Selecting the V-Screen background or virtual set” on page 100
“Create a key with the V-Screen wizard” on page 103
V-Screen
background
thumbnail
Shows the image or a frame of the video that is assigned as the virtual
background. The file name appears to the right of the thumbnail. To
replace the current background, drag the desired file onto this icon. You
can also change the V-Screen background in the middle of the show by
using the Change Background effect.
Active check box Switches the V-Screen effect on and off.
Input pop-up menu Sets which camera you are setting the V-Screen options for. Each
camera has its own V-Screen settings.
Wizard button Starts the V-Screen setup wizard.
Auto-Set Key
button
Automatically calibrates the V-Screen settings.
Adjust Key button Opens the dialog box for manually refining V-Screen settings.
Don’t Show V-
Screen During
Rehearse/Record
check box
Disables the V-Screen effect during rehearsal and recording to improve
performance on slower computers. This does not affect the published
video.
Freeze V-Screen
Background check
box
Displays an animated background as a still image to conserve system
resources.
Adjust Colors
button
Opens the Color Correction dialog box where you can change the
brightness and colors of the V-Screen background.
V-Screen Tips
button
Opens Help for Using The V-Screen.

20 Feature and control overview
The Setup tab for audio and video
Use the Setup tab to configure audio and video input devices like microphones and cameras
and to test their connection. Click Audio or Video to view these controls.
The Audio setup button
Input pop-up menu Sets which audio device is selected for setup purposes.
Audio Input Device
pop-up menu
Displays the name of the audio device that’s assigned to the currently
selected input (Audio 1, Audio 2, and so on). If the audio device is
connected but not listed here, either it or its driver is not installed
properly.
Input Source pop-
up menu
Select from multiple input sources available for the current device, such
as Microphone or Line-In. Some devices will not have any Input Source
options.
Audio Output
Method pop-up
menu
Allows you to choose either wave out or kernel streaming for the audio
portion of your recorded shows.
Hardware Level
slider and meter
Controls the volume level of the currently selected audio input card and
affects the volume at which audio is recorded. Adjust this level so that
the meter stays mostly in the yellow range.
Digital Boost slider,
meter, and clipping
lights
Sets the hardware level amplification by degrees. Adjust this level only if
the volume is too low even with the Hardware Level option set to
maximum, or if the prerecorded audio volume needs to be increased or
reduced.
The meter shows sound levels. The clipping lights at the top indicate
that sound levels might be too loud, which can result in some sounds
being truncated.
Pass-Thru To
Speakers
Controls whether the microphone’s output plays through to the
computer speakers while rehearsing or recording. If you are
experiencing feedback, disabling this option can eliminate it.
Mute Silences the current audio input for rehearsal and recording and in the
published video.
Output Volume
Master Volume Adjusts the output volume of the computer’s main speakers.
/