Planet GS-4210-16UP4C Quick start guide

Category
Networking
Type
Quick start guide

This manual is also suitable for

L2/L4 Managed Gigabit Ethernet Switch
GS-4210 802.3bt PoE++ Series
Quick Installation Guide
Table of Contents
1. Package Contents ................................................................................. 3
2. Requirements ....................................................................................... 5
3. Terminal Setup ..................................................................................... 6
3.1 Logging on to the Console .............................................................. 7
3.2 ConguringIPAddressviatheConsole ............................................ 8
3.3 StoringCurrentSwitchConguration ............................................... 9
4. Starting Web Management .................................................................. 10
4.1 LoggingintotheManagedSwitch ................................................. 11
4.2 SavingCongurationviatheWeb .................................................. 13
5. RecoveringBacktoDefaultConguration ............................................. 14
6. Customer Support .............................................................................. 16
3
1. Package Contents
Thankyoufor purchasingPLANET L2/L4Managed GigabitEthernet Switch.The
descriptionsofthisseriesareshownbelow:
GS-4210-8HP2T2S
4-port10/100/1000T802.3btPoE+4-port
10/100/1000T802.3atPoE+2-port10/100/1000T+
2-port100/1000XSFPManagedSwitch
GS-4210-8HP2S
2-port10/100/1000T802.3btPoE+6-port
10/100/1000T802.3atPoE+2-port100/1000XSFP
ManagedSwitch
GS-4210-8UP2S 8-Port10/100/1000T802.3btPoE+2-Port100/1000X
SFPManagedEthernetSwitch
GS-4210-16UP4C 16-port10/100/1000T802.3btPoE+4-portGigabitTP/
SFPComboManagedSwitch
GS-4210-24UP4C 24-port10/100/1000T802.3btPoE+4-portGigabitTP/
SFPComboManagedSwitch
GS-4210-24HP2C
4-port10/100/1000T802.3btPoE+20-port
10/100/1000T802.3atPoE+2-portGigabitTP/SFP
ComboManagedSwitch
4
“Managed Switch” mentioned in this Quick Installation Guide refers to the
abovemodels.
Open the box of the Managed Switch and carefully unpack it. The box should
containthefollowingitems:
ModelName
PackagedItem
GS-4210-
8HP2T2S
GS-4210-
8HP2S
GS-4210-
8UP2S
GS-4210-
16UP4C
GS-4210-
24UP4C
GS-4210-
24HP2C
TheManagedSwitch 
QRCodeSheet 
CloudViewerPro
QuickGuide 
RS-232toRJ45
Console Cable 
RubberFeet 
TwoRack-mounting
Bracketswith
AttachmentScrews

PowerCord 
SFPDustCaps 222442
If any item is found missing or damaged, please contact your local reseller for
replacement.
5
2. Requirements
zWorkstations running Windows XP/2003/2008/2012/Vista/7/8/10/11, MAC
OS X or later, Linux, UNIX, or other platforms are compatible with TCP/IP
protocols.
zWorkstationsareinstalledwithEthernet NIC(NetworkInterfaceCard).
zSerial Port Connection(Terminal)
The above Workstations come with COM Port (DB9) or USB-to-RS-232
converter.
The above Workstations have been installed with terminal emulator,
suchasHyperTerminalincludedinWindowsXP/2003,puttyorteraterm.
Serial cable -- One end is attached to the RS-232 serial port, while the
otherendstotheRJ45typeconsoleportoftheManagedSwitch.
zEthernet Port Connection
zNetwork cables -- Use standard network (UTP) cables with RJ45 connec-
tors.
zTheabovePCisinstalled withWeb browser.
It is recommended to use Chrome 98.0.xxx or above to access
theManagedSwitch.
If the Web interface of the Managed Switch is not accessible,
please turn off the anti-virus software or firewall and then try it
again.
6
3. Terminal Setup
TheManaged Switchisequipped witha consoleinterfacefor localswitch setup
and maintenance. To congure the system, connect a serial cable to a COM
port on a PC or notebook computer and to the RJ45 type of the console port
oftheManagedSwitch.
Managed Switch
PC / Workstation
with
Terminal Emulation Software
Serial Port
RS232 to RJ45 Cable
Console Port
RJ45
Figure 3-1: Managed Switch Console Connectivity
A terminal program is required to make the software connection to the
ManagedSwitch.
1. Run terminal program on the OS.
2.When thefollowing screenappears, makesure that theCOM portshould be
conguredas:
Baud:115200
Databits:8
Parity:None
Stopbits:1
Flowcontrol:None
7
3.1 Logging on to the Console
Once the terminal is connected to the device, power on the Managed Switch
and the terminal will display “running testing procedures”. Then, the following
message asks to log in user name and password. The factory default user
name and password are shown as follows, and the login screen in Figure 3-2
appears.
Username:admin
Password:admin
Figure 3-2: Managed Switch Console Login Screen
The user can now enter commands to manage the Managed Switch. For a
detaileddescriptionofthecommands,pleaserefertothefollowingchapters.
1.For security reason, please change and memorize the new
passwordafterthisfirstsetup.
2.Only accept command in lowercase letter under console inter-
face.
8
3.2 ConguringIPAddressviatheConsole
TheManagedSwitchisshippedwithdefaultIPaddressasfollows:
IPAddress:192.168.0.100
SubnetMask:255.255.255.0
To check the current IP address or modify a new IP address for the Switch,
pleaseusetheproceduresasfollows:
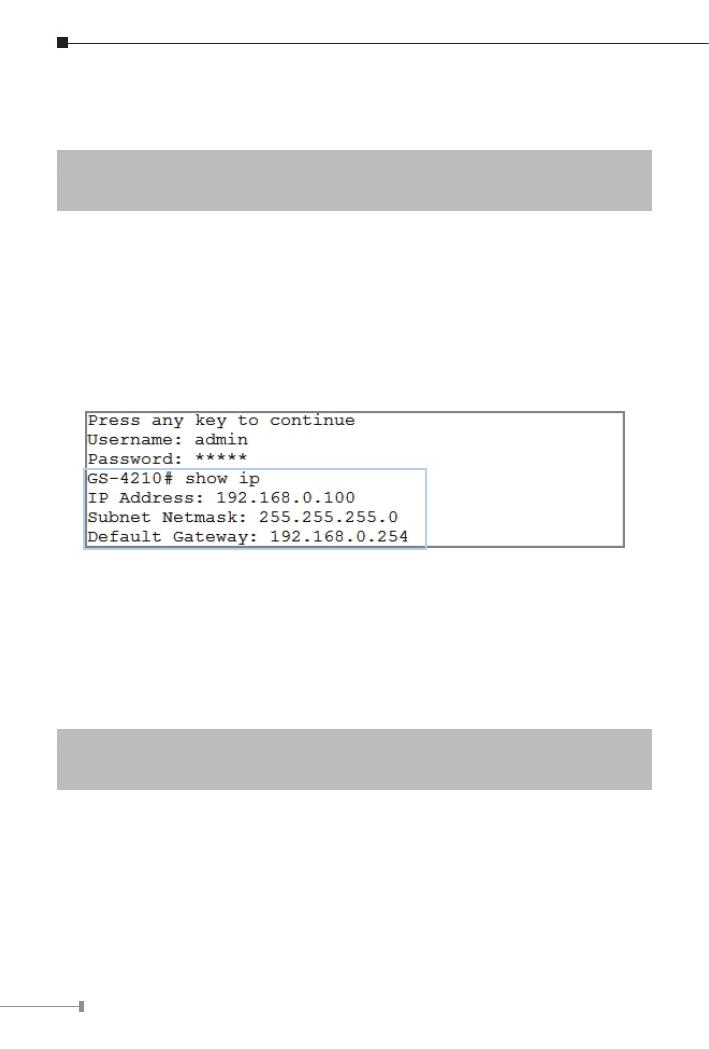
Showing the current IP address
1.Atthe “GS-4210 Series#”prompt,enter “show ip”.
2.The screen displays the current IP Address, Subnet Mask and Gateway as
showninFigure3-3.
Figure 3-3: IP Information Screen
Conguring IP address
3.Atthe“GS-4210 Series#”prompt,enter“congure”.
4.At the “GS-4210 Series(cong)#” prompt, enter the following command
andpress<Enter>asshowninFigure3-4.
GS-4210Series(cong)#ip address 192.168.1.100 mask 255.255.255.0
GS-4210Series(cong)#ip default-gateway 192.168.1.254
ThepreviouscommandwouldapplythefollowingsettingsfortheSwitch.
IP Address: 192.168.1.100
Subnet Mask: 255.255.255.0
Gateway: 192.168.1.254
9
Figure 3-4: IP Address Screen
5.RepeatStep1tocheckiftheIPaddresshas changed.
If the IP is successfully congured, the Managed Switch will apply the new IP
addresssetting immediately. You can accessthe Webinterface of theGS-4210
ManagedSwitchSeriesthroughthenewIPaddress.
3.3 StoringCurrentSwitchConguration
In the Managed switch, the running conguration le is stored in the RAM. In
the current version, the running conguration sequence of running-cong can
be saved from the RAM to FLASH by writing the command or copying the
running-cong startup-cong command, so that the running conguration
sequence becomes the startup conguration le, which is the conguration
saved.
1.At the “GS-4210 Series#” prompt, enter “copy running-cong startup-
cong”asshowninFigure3-5.
Figure 3-5: Storing Current Conguration Command Screen
If you are not familiar with console command or the related
para-meter, enter “?” anytime in console to get the help
description.
10
4. Starting Web Management
The following shows how to start up the Web Management of the Managed
Switch. Note the Managed Switch is congured through an Ethernet
connection. Please make sure the manager PC must be set to the same IP
subnet address.
Forexample,thedefaultIPaddress oftheManagedSwitchis 192.168.0.100,
then the manager PC should be set to 192.168.0.x (where x is a
number between 1 and 254, except 100), and the default subnet mask is
255.255.255.0.
PC / Workstation
with Web Browser
192.168.0.x
Managed Switch
RJ45/UTP Cable
IP Address:
192.168.0.100
Figure 4-1: IP Management Diagram
11
4.1 Logging in to the Managed Switch
1.Use Chrome 98.0.xxx or above Web browser and enter IP address
https://192.168.0.100toaccesstheWebinterface.
2.When the following dialog box appears, please enter the default user name
andpassword“admin”.TheloginscreeninFigure4-2appears.
DefaultUsername:admin
DefaultPassword:admin
Figure 4-2: Login Screen
3.Afterenteringthepassword,themainscreenappearsasFigure4-3shows.
Figure 4-3: Web Main Screen of Managed Switch
12
The Switch Menu on the top of the Web page lets you access all the
commands and statistics the Managed Switch provides. The Switch
Menu always contains one or more buttons, such as “System”,
“Switching”,“QoS”, “Security”, “Ring” “PoE”and“Maintenance”.
Figure 4-4: Switch Menu
Now, you can use the Web management interface to continue the Switch
management.
Pleaserefertotheuser’smanualformore.
13
4.2 SavingCongurationviatheWeb
To save all applied changes and set the current conguration as a startup
conguration, the startup-conguration le will be loaded automatically across
a system reboot.
1. Click “Save > Save Congurations to FLASH” to log in to the “Congu-
rationManager”page.
2. Press the “Apply” button to save running conguration to start up congu-
ration.
14
5.RecoveringBacktoDefaultConguration
IP address has been changed or admin password has been forgotten –
To reset the IP address to the default IP address “192.168.0.100” or reset
the login password to the default value, press the hardware-based reset
buttononthefrontpanelfor about 10 seconds.Afterthedeviceisrebooted,
you can log in the management Web interface within the same subnet of
192.168.0.xx.
9
10
1
2
3
4
5
6
7
8
PWR
115200, N, 8, 1
Console
GS-4210-8HP2S
2-Port 10/100/1000T 802.3bt PoE + 6-Port 10/100/1000T 802.3at PoE + 2-Port 100/1000X SFP Managed Switch
1 2 3 4 5 6
Reset
Mode
(Press for 3 secs.)
LNK/ACT
PoE-in-Use
LED Mode
LNK/ACT
1000 10/100
PoE-in-Use
bt af/at
Reset Button
Figure 5-1: GS-4210-8HP2S Reset Button
2
1
4
3
6
5
8
7
PWR 109
Reset
2
1
4
3
6
5
8
7
SYS ACTLNK
PoE-in-Use
GS-4210-8UP2S
8-Port 10/100/1000T 802.3bt PoE
+2-Port 100/1000X SFP
Managed Ethernet Switch
Reset Button
Figure 5-2: GS-4210-8UP2S Reset Button
PWR
SYS
115200, N, 8, 1
Console
Reset
2 6 10 14
4 8 12 16
1 5 9 13
3 7 11 15
PoE
GS-4210-16UP4C
802.3bt PoE++
16-Port Gigabit Managed Switch
ACTLNK1000
ACTLNK10/100
PoE-in-Usebt
PoE-in-Useat/af 1 3
2 4
Reset Button
Figure 5-3: GS-4210-16UP4C Reset Button
15
10
9
12
11
PWR
SYS
115200, N, 8, 1
Console
Reset
2 6
4 8
1 5
3 7
10 14
12 16
9 13
11 15
18 22
20 24
17 21
19 23
ACTLNK1000
ACTLNK10/100
PoE-in-Usebt
PoE-in-Useat/af
PoE
GS-4210-24UP4C
802.3bt PoE++
1 53 7
2 64 8
Reset Button
Figure 5-4: GS-4210-24UP4C Reset Button
1 9 17 25
5 13 21
2 10 18 26
6 14 22
311 19
7 15 23
4 12 20
8 16 24
Reset PWR
Mode
(Press for 3 secs.) 115200, N, 8, 1
Console
1
2
3
4
5
6
25
26
GS-4210-24HP2C
LNK/ACT
PoE-in-Use
LNK/ACT
1000 10/100
PoE-in-Use
bt af/at
4-Port 10/100/1000T 802.3bt PoE + 20-Port 10/100/1000T 802.3at PoE +
2-Port Gigabit TP/SFP Combo Managed Switch
LED Mode
Reset Button
Figure 5-5: GS-4210-24HP2C Reset Button
16
6. Customer Support
Thank you for purchasing PLANET products. You can browse our online FAQ
resource and User’s Manual on PLANET Web site rst to check if it could solve
your issue. If you need more support information, please contact PLANET
support team.
PLANETonlineFAQs:
https://www.planet.com.tw/en/support/faq
Supportteammailaddress:
GS-4210802.3btPoESeriesUser’sManual:
https://www.planet.com.tw/en/support/download.
php?&method=keyword&keyword=GS-4210&view=3#list
(PleaseselectyourswitchmodelnamefromProduct Modeldrop-downmenu)
Copyright©PLANETTechnologyCorp.2023.
Contentsaresubjecttorevisionwithoutpriornotice.
PLANETisaregisteredtrademarkofPLANETTechnologyCorp.
Allothertrademarksbelongtotheirrespectiveowners.
  • Page 1 1
  • Page 2 2
  • Page 3 3
  • Page 4 4
  • Page 5 5
  • Page 6 6
  • Page 7 7
  • Page 8 8
  • Page 9 9
  • Page 10 10
  • Page 11 11
  • Page 12 12
  • Page 13 13
  • Page 14 14
  • Page 15 15
  • Page 16 16

Planet GS-4210-16UP4C Quick start guide

Category
Networking
Type
Quick start guide
This manual is also suitable for

Ask a question and I''ll find the answer in the document

Finding information in a document is now easier with AI