Page is loading ...

ASSEMBLY INSTRUCTION
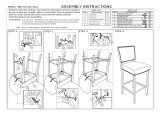
ITEM : Oak-DC
NOTE : AFTER A FEW DAYS OF ASSEMBLY. IT WILL HAVE ACCLIMATIZED TO THE ENVIRONMENT. PLEASE TIGHTEN ALL HARDWARE.CHECK TIGHTNESS OF ALL
SCREWS EVERY 6 - 8 WEEKS.
Fix chair back (3),chair seat (4) and armrest of chair (1)&(2) by using bolt(A),
nut (B) and allen key (C).
STEP 1
STEP 3
NO.
NO.
PARTLIST QTY
QTY
HARDWARE
RIGHT RAMREST
11PC
31PC
A
B
C
D
E
8PCS
8PCS
1PC
8PCS
4PCS
1
BOLT
M6 X 55
FELT PAD
NUT
ASSEMBLY COMPLETED
4
x8
E
C
AB
2
3
D
CHAIR BACK
4
CHAIR SEAT
1PC
ALLEN KEY
WOOD PLUG
LEFT RAMREST
21PC
STEP 2
Insert wood plug (D) into the armrest of chair, then add felt pad (E)
on bottom.
/