Page is loading ...

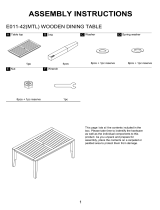
ASSEMBLY INSTRUCTION
E031LS-L/E031C-A/E031C-RA RATTAN LEFT ARM LOVESEAT
1pc
Washer
Back Frame
1pc
Allen Key
Left Armrest
(in the other carton)
1pc
Nut
Bolt (M6*65)
11pcs
This page lists all the contents included in the
box. Please take the time to identify the
hardware as well as the individual components
to this product. As you unpack and prepare for
assembly, place the contents on a carpeted or
padded area to protect them from damage
1
B
C
D
E
F
G
H
Seat Frame
A
Wrench
22pcs
1pc
11pcs
1pc

Assemble Seat Frame (A) to the Back Frame (B) with Bolt (D) and Washer (E) by using Allen Key (F).
Then in the other Side of Rim, Put Nut (G) into Bolt (D) and Washer (E) to Fasten by Wrench (H).
2
1
2
Assemble Left Armrest (C) to Seat Frame (A) and Back Frame(B) with Bolt (D) and Washer (E) by
using Allen Key (F).Then in the other Side of Rim, Put Nut (G) into Bolt (D) and Washer (E) to Fasten
by Wrench (H).
A
B
C
E
F
H
G
E
F
D
E
E
G
H
B
A
D

3
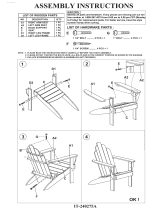
Assembly is Completely.
Cleaning & Care
Treat surface with care. Surface is resistant to scratches but is not scratch resistant. Clean surfaces with a
dry or damp soft cloth. Do not use abrasive cleaners. Hardware may loosen over time. Periodically check
that
all connections are tight
.
3
C
A
B

ASSEMBLY INSTRUCTION
E031CR RATTAN CORNER CHAIR
1
p
c
Small Back Frame
1pc
Allen Key
Big Back Frame
1pc
Nut
Bolt (M6*65)
8pcs
Wrench
Washer
16pcs
This page lists all the contents included in the
box. Please take the time to identify the
hardware as well as the individual components
to this product. As you unpack and prepare for
assembly, place the contents on a carpeted or
padded area to protect them from damage
1
B
C
D
E
F
G
H
Seat Frame
A
1pc
8pcs
1pc

Assemble Seat Frame (A) to the Small Back Frame (B) with Bolt (D) and Washer (E) by using Allen
Key(F). Then in the other Side of Rim,Put Nut (G) and Washer (E) into Bolt (D) to Fasten by Wrench
(H).
1
2
2
Assemble Seat Frame (A) to the Big Back Frame (C) with Bolt (D) and Washer (E) by using Allen
Key(F). Then in the other Side of Rim,Put Nut (G) and Washer (E) into Bolt (D) to Fasten by Wrench
(H).
F
D
E
H
G
E
A
C
B
A
B
F
D
E
H
G
E

Assembly is Completed.
3
Cleaning & Care
Treat surface with care. Surface is resistant to scratches but is not scratch resistant. Clean surfaces with a
dry or damp soft cloth. Do not use abrasive cleaners. Hardware may loosen over time. Periodically check
that
all connections are tight
3
B
A
C

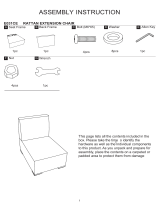
ASSEMBLY INSTRUCTION
E031CE RATTAN EXTENSION CHAIR
1pc
Back Frame
1pc
Bolt (M6*65)
4pcs
Washer
8pcs
Allen Key
1pc
1
B
C
D
E
Seat Frame
A
This page lists all the contents included in the
box. Please take the time
t
o identify the
hardware as well as the individual components
to this product. As you unpack and prepare for
assembly, place the contents on a carpeted or
padded area to protect them from damage
Nut
F
G
Wrench
4pcs
1pc

Assembly is Completed.
2
1
2
Cleaning & Care
Treat surface with care. Surface is resistant to scratches but is not scratch resistant. Clean surfaces with a
dry or damp soft cloth. Do not use abrasive cleaners. Hardware may loosen over time. Periodically check
that
all connections are tight
.
Assemble Seat Frame (A) to the Back Frame (B) with Bolt (C) and Washer (D) by using Allen Key (E).
Then in the other Side of Rim, Put Nut (F) into Bolt (C) and Washer (D) to Fasten by Wrench (G).
E
C
D
G
F
D
B
A
A
B

ASSEMBLY INSTRUCTION
E031LS-R/E031C-A/E031C-RA RATTAN RIGHT ARM LOVESEAT
1pc
Washer
Back Frame
1pc
Allen Key
Right Armrest
(in the other carton)
1pc
Nut
Bolt (M6*65)
11pcs
This page lists all the contents included in the
box. Please take the time to identify the
hardware as well as the individual components
to this product. As you unpack and prepare for
assembly, place the contents on a carpeted or
padded area to protect them from damage
1
B
C
D
E
F
G
H
Seat Frame
A
Wrench
22pcs
1pc
11pcs
1pc

Assemble Seat Frame (A) to the Back Frame (B) with Bolt (D) and Washer (E) by using Allen Key (F).
Then in the other Side of Rim, Put Nut (G) into Bolt (D) and Washer (E) to Fasten by Wrench (H).
2
1
2
Assemble Right Armrest (C) to Seat Frame (A) and Back Frame(B) with Bolt (D) and Washer (E) by
using Allen Key (F).Then in the other Side of Rim, Put Nut (G) into Bolt (D) and Washer (E) to Fasten
by Wrench (H).
A
B
C
E
F
H
G
E
F
D
E
E
G
H
B
A
D

3
Assembly is Completely.
Cleaning & Care
Treat surface with care. Surface is resistant to scratches but is not scratch resistant. Clean surfaces with a
dry or damp soft cloth. Do not use abrasive cleaners. Hardware may loosen over time. Periodically check
that
all connections are tight
.
3
C
A
B
/