Page is loading ...


Table of Contents
Warranty & Customer Support ..........................2
Product Specifications .......................................1
Package Contents ...............................................2
Camera Overview ................................................3
Getting Started ...................................................6
Video Settings ...................................................11
Device Layout .........................................................................3
Buttons ....................................................................................4
Status Icons ............................................................................5
Installation ...............................................................................6
Charging the Battery ...............................................................8
Inserting the Memory Card ......................................................9
Removing the Memory Card ...................................................9
Formatting the Memory Card ................................................10
Powering the Device Manually ..............................................10
Basic Operation .....................................................................11
Resolution ..............................................................................11
Dual Camera .........................................................................12
Record Audio ........................................................................13
Looping Recording ................................................................12
Interval Record ......................................................................12
HDR .......................................................................................12
Exposure ...............................................................................13
Motion Detection ...................................................................13

System Settings ................................................14
Photo Settings ..................................................16
Date Stamp ..........................................................................13
G-Sensor ..............................................................................13
Parking Guard ......................................................................14
Car Number ..........................................................................14
Format ...................................................................................15
Date/Time ..............................................................................15
Auto Power Off ......................................................................14
Beep Sound ..........................................................................15
Language ..............................................................................15
Frequency .............................................................................14
Screen Saver ........................................................................14
Default Setting .......................................................................15
Version ..................................................................................15
Resolution .............................................................................16
Caputer Mode .......................................................................16
Continuous Shooting .............................................................16
Sharpness .............................................................................16
Quality ...................................................................................16
White Balance .......................................................................16
ISO ........................................................................................17
Color ......................................................................................17
Exposure ...............................................................................17
Anti-Shaking ..........................................................................17

Playback ............................................................18
Product Care .................................................... 20
Questions & Answers ...................................... 21
Date Stamp ...........................................................................18
Camera Playback Mode ........................................................19
Computer Playback ...............................................................20

CPU JL5601
Display 3.2 inch IPS LCD
Audio I/O Internal high-sensitivity mic and speaker
External Memory Class 10 or higher Micro SD card (up to 32GB)
G-Sensor Low / Medium / High / Off
Shutter Electronic
Frequency 50HZ / 60HZ
Exposure
+3 +2 +1 +0.0 -1 -2 -3
Battery 180mAh 3.7V rechargeable lithium-ion battery
Video Format .MOV
USB Connection USB 2.0
Loop Recording 1 min / 3 min / 5 min/ Off
Screen Saver 30second / 1 min / 2 min / Off
Auto Power Off 1 min / 3 min / 5 min / Off
Audio Recording 1 min / 3 min / 5 min / Off
Video Resolution 1080FHD , 720P , VGA
Languages
English, Chinese, French, Spanish, Portuguese,
German, Italian, Russian, Japanese
Product Specifications

Package Contents
Warranty & Customer Support
The following items should be found in the package:
1*Carigogo D3 Dashboard Camera
1*Car charger
1*3M adhesive mount
1*Suction cup mount
1*USB cable
1*User manual
1*Thank you card
For questions, support, or warranty claims, please contact
us at the address below.
Customer Service Team : [email protected]

Camera Overview
Device Layout
1. Micro SD Card Slot
2. UP
3. MENU
5. OK
4. DOWN
6. MODE
7. Emergency Lock
8. POWER
9. Mini-USB Port
10. Bracket mounted hole
11. Rear Camera Hole
1
2
3
4
5
6
7
8
9 10 11

Buttons
Button Function
Hold to turn the device on or off manually
Cycle through menus or exit current menu
Toggle between Video / Photo / Playback modes
Playback Mode: Stop playback
Lock current recording
Menus: Confirm a selection
Video Mode: Start recording video
Photo Mode: Take photo
Playback Mode: Play/pause recording
Menus: Move selection up
Playback Mode: Decrease or reverse playback
speed / Cycle left through recordings
Menus: Move selection down
Video Mode: Enable/disable audio recording
Playback Mode: Increase playback speed /
Cycle right through recordings

Status Icons
Icon Meaning
Video Resolution
Blinking – Recording
High Dynamic Range enabled
Connected to power source
Battery level (not connected to power source)
Audio recording disabled
Audio recording enabled
Video Recording Mode
Playback Mode
Photo Mode
Loop Recording
Memory card detected
G-Sensor
White Balance
Motion Detection

Getting Started
Installation
1.Attach the camera to the window mount
Make sure that you mount the camera in a safe, appropriate location where
it will not obstruct the driver’s view. Clean your windshield before applying
the mount.
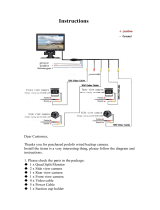
2.Mounting the rear camera
Mount the rear camera as shown below, using rear camera extension cable,
connect rear camera to the main unit.

3.Insert a memory card
You will need to insert a memory card before you can begin recording.
Do not insert or remove a memory card while the device is powered on.
The Carigogo D3 supports Micro SD cards up to 32GB in size.
4.Connect the car charger to the car's 12V~24V DC outlet
Run the cable down from your camera to the 12V~24V cigarette lighter
port of your vehicle, as shown in the diagram.
5.Format the memory card
To ensure your camera records to your Micro SD card properly and without
error, you must format the card within the camera.

Charging the Battery
Connect your camera to your vehicle via the included car charging cable to
power your camera and charge the battery while driving.
Connect the charger to the car cigarette lighter or 12V~24V DC power outlet,
then insert the mini-USB end of the charger into the mini-USB port on the
camera.
You should always connect the camera to a power source while recording.
The internal battery is primarily used to save files in the event of an
emergency and is only intended to handle a maximum of 15 minutes of
disconnected operation.
If the battery is completely depleted, the device will not turn on
immediately when the charger is connected. Allow a depleted battery to
charge for at least 5 minutes before attempting to turn on the device.
If the device receives an unstable power supply while charging,
the screen may not function properly. If this happens, unplug the charger
from the device.
While charging, the device may heat up. This is normal and should
not affect the device’s performance or lifespan.
If the device is not charging properly, take the device and the charger
to an authorized Carigogo Service Center or contact Customer Care.
Connecting the charger improperly may cause serious damage to
the device. Any damage caused by misuse is not covered by the
warranty.
Use only Carigogo-approved chargers. Using unapproved chargers
or cables can damage the device or cause the battery to explode.

Inserting the Memory Card
Removing the Memory Card
The D3 accepts Micro SD memory cards (class 10 or higher) with a
maximum capacity of 32GB. Depending on the memory card manufacturer
and type, some cards may not be compatible with your device.
Using an incompatible card may damage the device or the memory
card, or corrupt the data stored on it.
Inserting a memory card:
1.Press and hold the Power button to turn the camera off.
2.Insert the card in the orientation shown.
3.Push the card into the slot.
4.Listen for click sound that signals the card is securely inserted.
Before removing a memory card from your camera, you must first prepare
it for safe removal by powering down the device.
Removing a memory card from your camera:
1.Press and hold the Power button to turn the camera off.
2.Gently push the memory card in until you hear a click, and allow the
spring release to push the card out.

Formatting the Memory Card
Powering the Device Manually
Do not remove the memory card while the device is transferring or
accessing information. Doing so can result in data loss or corruption,
or damage to the memory card or device. Carigogo is not responsible
for losses that result from the use of damaged memory cards,
including the loss of data.
Using your camera to format a memory card:
1.Upon turning on the camera, press the OK button to stop recording.
2.Press the Menu button twice to enter the Setup Menu.
3.Use the up and down buttons to navigate to the "Format" option.
4.Press OK to confirm your selection.
5.You will be notified that all data will be deleted. Press the down button
to scroll down to “OK”.
6.Press OK to confirm.
Before formatting your memory card, always remember to make
backup copies of all important data stored on the device. The
manufacturer’s warranty does not cover loss of data resulting
from user actions.
It’s recommended that you format your memory card after
transferring files to your computer, or at least once a month.
For best results, format the memory card using the Format
function on your camera.
You may find yourself wanting to access the device manually,
independent from a power source. To do so, press and hold the Power
button for a few seconds to manually turn on the device. A welcome
message will be displayed onscreen, as shown in the image below.
To turn off the device, again press and hold the Power button for a few
seconds. The above image will again be displayed briefly upon shutdown.

Basic Operation
Video Settings
-Resolution
Automatic recording
The D3 will automatically power on and start recording once it begins
receiving a charge, such as when you start your car. There will be a
red dot blinking on the top left of the screen to indicate that it’s
currently recording.
Locking videos
While in Video Recording Mode, you can press the lock button to
manually lock the current video clip. This will ensure that Loop
Recording will not overwrite the clip when the memory card is full.
Locked videos can be found on the memory card under “\DCIMA\LOCA”.
Automatic shutdown
Once power is disconnected, the dash cam will shut down after 5 seconds.
These settings affect your video recordings. In Video Recording Mode,
press OK to stop recording, then press Menu once to open the Video
Menu.
Default setting: 1080FHD 1920*1080
Set the video recording resolution.
Approximate recording time
Memory Card Size 1080p Resolution 720p Resolution
16GB
32GB
2.5 hours
5 hours
4 hours
8 hours

-Loop Recording
Default setting: 3 Minutes
Video will be continually recorded in 1, 3 or 5 minutes segments.
When the storage limit is reached on the memory card, new recordings
will automatically overwrite oldest recordings. Locked video files on the
memory card will remain protected, and will not be overwritten by
Loop Recording.
Note: Turning Loop Recording off would require you to manually clear
recordings from your memory card whenever storage is full, thus we
highly recommend keeping Loop Recording enabled.
-Dual CameraRear Camera Needed
Default setting: off
Allows you to turn off/ or turn on the rear camera.
-Interval Record
Default setting: Off
There are four selection: Off100ms200ms500ms.
Interval Record means the camera capture a photo in 100ms200ms or
500ms.So if you choose the 500ms Interval record, the video will be
recorded at the shortest time (Similar to fast play).
-HDR (High Dynamic Range)
Default setting: Off
The camera automatically adjusts exposure settings to provide balanced
lighting and clear vide.

-Exposure
Default setting: +0.0
Manually adjust the camera’s exposure value to brighten or darken
recordings. Positive values brighten recordings, while negative
value darken them.
-Motion Detection
Default setting: Off
When the machine is in the standby state, the camera will automatically
monitor whether there is any moving object in front. When the moving
object is detected, the machine will automatically record it.
-Recording
Default setting: On
Allows you to enable or disable audio recording with your videos.
-Date Stamp
Default setting: On
Stamp the date and time to the bottom of your videos.
-G-Sensor
Default setting: Medium
If a change in gravitational forces is detected, such as in the event of a
vehicular accident, the G-Sensor will signal to the camera, and an
automatic file.
lock will be placed on the current video, preserving your most crucial
footage. Locked videos can be found on the memory card under
“\DCIMA\LOCA”.
Note: Locked video files will not be erased by Loop Recording,
they will remain on the memory card until they are manually deleted,
or when the card is formatted.

System Settings
-Parking Guard
Default setting: Off
When this function is enabled, the camera will automatically enter parking
mode whenever it is shut down. When parking mode is enabled and a
collision is detected, the dash cam will turn on and begin recording a 20
second video clip, which it will then lock to prevent overwriting.
-Car Number
Default setting: Off
Set the car number A/A/B/C/D/E/F/*/then captured images (works similarly
to the Date Stamp function in the Video Menu).
Press twice to open the Setup Menu (in Video Recording Mode,
you must first stop recording, done by pressing OK).
-Auto Power Off
Default setting: Off
When enabled, this feature allows the device to shut down after a period of
time in which the camera isn’t recording.
-Screen Saver
Default setting: Off
Specifies the duration for which the display will stay on after the device is
powered on. Having this setting disabled (default) will keep the display on
constantly, though you may manually toggle it with the button.
-Frequency
Default setting: 50Hz
Power supply specification used in your country or geographical region.

-Date/Time
Set the time and date on your device.
To enter the date/time:
Up/ Down – Change current value
OK – Move to next value
Menu– Confirm setting
Note: If the battery is fully discharged or removed from the device,
the time and date may be reset.
-Beep Sound
Default setting: On
Enable or disable the device’s sound effects.
-Language
Default setting: English
Set your preferred menu language.
-Format
Performing this operation will format the memory card, clearing it of all files.
Note: Locked videos will also be cleared, so ensure you have backed up
your important footage before formatting the card.
-Default Setting
Performing this operation will reset all settings to their default values.
-Version
Displays the current device firmware information.

Photo Settings
-Resolution
Default setting: 12M
Set the pixel resolution for captured images. Higher resolution images are
more detailed, but take up more space on the memory card.
-Capture Mode
Default setting: Single Shot
There are 3 modes, single shot/ 2s Delay/ 5s Delay/10s Delay
Single shot:capture the picture now
2s Delay:capture the picture two seconds later
5s Delay:capture the picture five seconds later
10s Delay:capture the picture ten seconds later
-Continuous Shooting
Default setting: Off
When enabled, capturing a photo will produce three photos in rapid
succession, rather than just one.
-Quality
Default setting: Fine
Set the quality level of captured images. Lower quality images will take up
less space on the memory card, but are more visually compressed than
higher quality images.
Default setting: Strong
Automatically enhance images for a clearer, more distinct picture.
-Sharpness
These settings affect your still photo captures. In Photo Mode,
Press MENU once to open the Still Menu.
/