Page is loading ...

FormNo.3389-753RevA
CenterlineTrencher
RT600TractionUnit
ModelNo.25431—SerialNo.313000001andUp
ModelNo.25431—SerialNo.314000001andUp
ModelNo.25431—SerialNo.315000001andUp
ModelNo.25431E—SerialNo.315000001andUp
ModelNo.25431E—SerialNo.313000001andUp
Registeratwww.Toro.com.
OriginalInstructions(EN)
*3389-753*A

WARNING
CALIFORNIA
Proposition65Warning
Thisproductcontainsachemicalorchemicals
knowntotheStateofCaliforniatocausecancer,
birthdefects,orreproductiveharm.
Introduction
Thisattachmentisdesignedtodigtrenchesinsoiltobury
cablingandpipingforvariousapplications.Itisnotintended
tocutrock,wood,oranyothermaterialotherthansoil.
Readthisinformationcarefullytolearnhowtooperateand
maintainyourproductproperlyandtoavoidinjuryand
productdamage.Youareresponsibleforoperatingthe
productproperlyandsafely.
YoumaycontactTorodirectlyatwww .Toro.comforproduct
andaccessoryinformation,helpndingadealer,ortoregister
yourproduct.
Wheneveryouneedservice,genuineToroparts,oradditional
information,contactanAuthorizedToroServiceDealer
orToroCustomerServiceandhavethemodelandserial
numbersofyourproductready.Figure1illustratesthe
locationofthemodelandserialnumbersontheproduct.
Writethenumbersinthespaceprovided.
1
G023157
Figure1
1.Locationofthemodelandserialnumberplate
ModelNo.
SerialNo.
Thismanualidentiespotentialhazardsandhassafety
messagesidentiedbythesafetyalertsymbol(Figure2),
whichsignalsahazardthatmaycauseseriousinjuryordeath
ifyoudonotfollowtherecommendedprecautions.
Figure2
1.Safetyalertsymbol
Thismanualuses2wordstohighlightinformation.
Importantcallsattentiontospecialmechanicalinformation
andNoteemphasizesgeneralinformationworthyofspecial
attention.
©2014—TheToro®Company
8111LyndaleAvenueSouth
Bloomington,MN55420
2
Contactusatwww.Toro.com.
PrintedintheUSA
AllRightsReserved

Contents
Safety...........................................................................3
SafetyandInstructionalDecals.................................4
Setup............................................................................6
1InstallingtheTrencherAttachment..........................7
2PreparingtheHydraulicMotor................................8
3InstallingtheHydraulicHoses...............................10
4InstallingtheSprocket..........................................12
5InstallingtheBoom..............................................12
6AligningtheBoom...............................................14
7InstallingtheDiggingChain..................................15
Operation....................................................................16
SelectingtheProperComponentsforthe
Trencher............................................................16
UsingtheTrencher.................................................18
OperatingTips......................................................20
Maintenance.................................................................21
GreasingtheTrencher(LeftSide).............................21
GreasingtheTrencher(RightSide)............................21
ServicingthePlanetaryDrive...................................22
ServicingtheTrencherDiggingChain.......................23
ReplacingtheDiggingChain....................................27
Storage........................................................................29
Troubleshooting...........................................................30
Safety
Improperlyusingormaintainingthetrenchercanresult
ininjury.Toreducethepotentialforinjury,comply
withthesesafetyinstructionsandthoseinthetraction
unit
Operator’ s Man ual
.Alwayspayattentiontothe
safetyalertsymbol,whichmeansCaution,Warning,or
Danger—personalsafetyinstruction.Failuretocomply
withtheinstructionmayresultinpersonalinjuryor
death.
DANGER
Theremaybeburiedpower,gas,and/ortelephone
linesintheworkarea.Anelectricshockoran
explosionmayoccurifyoudigintoautilityline.
Havethepropertyorworkareamarkedforburied
linesanddonotdiginmarkedareas.Contactyour
localmarkingserviceorutilitycompanytohavethe
propertymarked(forexample,intheUnitedStates,
call811forthenationwidemarkingservice).
DANGER
Themovingteethandaugerwillcutorseveryour
hands,feet,orotherbodyparts.
•Keephands,feet,andanyotherpartofyour
bodyorclothingawayfrommovingteeth,auger,
orotherparts.
•Beforeadjusting,cleaning,repairing,or
inspectingthetrencher,lowerthetrencherto
theground,stoptheengine,waitforallmoving
partstostop,andremovethekey.
WARNING
Whentheengineisoff,anattachmentintheraised
positioncangraduallylower.Someonebelow
theattachmentmaybepinnedorinjuredbythe
attachmentasitlowers.
Alwayslowertheattachmenteachtimeyoushut
offthetractionunit.
WARNING
Whengoingupordownhill,themachinecould
overturniftheheavyendistowardthedownhill
side.Someonemaybepinnedorseriouslyinjured
bythemachineifitoverturns.
Operatethemachineupanddownslopeswith
theheavyendofthemachineuphill.Anattached
trencherwillmakethebackendofthemachine
heavy.
3

WARNING
Lightningcancausesevereinjuryordeath.
Iflightningisseenorthunderisheardinthearea,
donotoperatethemachine;seekshelter.
CAUTION
Hydraulicuidescapingunderpressurecan
penetrateskinandcauseinjury.Fluidinjectedinto
theskinmustbesurgicallyremovedwithinafew
hoursbyadoctorfamiliarwiththisformofinjury;
otherwise,gangrenemayresult.
•Keepyourbodyandhandsawayfrompin-hole
leaksornozzlesthatejecthigh-pressure
hydraulicuid.
•Usecardboardorpapertondhydraulicleaks;
neveruseyourhands.
CAUTION
Hydraulicttings,hydrauliclines/valves,and
hydraulicuidmaybehotandcanburnyouifyou
touchthem.
•Weargloveswhenmaintaininghydraulic
components.
•Allowthetractionunitandtrenchertocool
beforetouchinghydrauliccomponents.
•Donottouchhydraulicuidspills.
SafetyandInstructionalDecals
Safetydecalsandinstructionsareeasilyvisibletotheoperatorandarelocatednearanyareaofpotential
danger.Replaceanydecalthatisdamagedorlost.
Figure3
1.Decal125-66703.Decal125-6671
2.Decal125-66934.Decal125-6694
4

125–6670
1.Cutting/dismembermenthazard,trencher—keep
bystandersawayfromthetrencher;keepawayfrommoving
parts;keepallguardsandsafetiesinplace.
125-6671
1.Explosionhazard;electricshockhazard—calllocalutilities
beforedigging.
125-6693
1.Trencheroil3.Lubricatetheaugerevery
10to50operatinghours.
2.Gear-boxoil4.ReadtheOperator’s
Manualformaintenance
information.
125–6694
1.Tie-downpoint
5

Setup
LooseParts
Usethechartbelowtoverifythatallpartshavebeenshipped.
ProcedureDescription
Qty.
Use
Trencherattachment1
Bolt(3/4x2-3/4inch)
4
Bolt(3/4x2-1/2inch)
2
Flatwasher11
1
Locknut8
Installthetrencher.
Straightadaptertting(5/8inch)
1
Straightadaptertting(3/4inch)
1
Restrictortting
1
90°elbow(male/male)
1
Teetting
1
2
90°elbow(female/male)
1
Preparethehydraulicmotor.
Hose(34-1/2inch)
1
Hose(35-1/2inch)
1
Hose(40inch)
1
Bypasshose(16inch)
1
Hose(23inch)
2
Straightadaptertting(3/8inch)
2
3
Cabletie
1
Installthehydraulichoses.
Sprocketsegment
2
Bolt8
4
Locknut8
Installthesprocket.
Boom1
Bolt(3/4x6-1/2inch)
2
Washer(3/4inch)
2
Nut(3/4inch)
2
Bolt(1x2inch)
2
5
Washer(1inch)
2
Installtheboom.
6
Shim
3Aligntheboom.
7
Diggingchain1Installthediggingchain.
6

1
InstallingtheTrencher
Attachment
Partsneededforthisprocedure:
1Trencherattachment
4
Bolt(3/4x2-3/4inch)
2
Bolt(3/4x2-1/2inch)
11Flatwasher
8Locknut
Procedure
1.RaisetheattachmentofftheoorasshowninFigure4.
Important:Ensurethattheliftingequipmenthas
aliftingcapacityofatleast405kg(893lb).
Figure4
2.Locatethe2rowsofholesinthemountingplatethat
youwillusetosecuretheattachmenttothetraction
unit(Figure5).
2
3
Figure5
1.Row2mountingholes3.Row4mountingholes
2.Mountingplate
3.Insertalocknutintothenutretainerlocatedinside
thetrencherattheholeinrow2(Figure5)asshown
inFigure6.
Figure6
1.Locknut3.Washer
2.Nutretainer
4.Bolt(3/4x2-1/2inch)
4.Slipawasherontoabolt(3/4x2-1/2inch),and
partiallythreadtheboltintothenutthatyouinstalled
instep3;refertoFigure6.
7

5.Slipawasherontoeachof2bolts(3/4x2-1/4inch),
andinsertthemfrominsidethetrencher(Figure7)
throughtheremaining2holesinrow2.
Figure7
1.Bolt—3/4x2-1/4inch(2)
4.Washer
2.Washer5.Locknut
3.Hole
6.Slipawasherandpartiallythreadalocknutontothe
endofeachofthe2bolts.
7.Positionthetrenchersothatitisattherearofthe
tractionunit.
8.Aligntherowofboltsonthetrenchersothattheyare
abovetheupperslotsinthemountingplateonthe
tractionunit(Figure8).
3
Figure8
1.Upperslots3.Lowerslots
2.Mountingplate
9.Lowerthetrencherattachmentuntilitisalignedwith
themountingplateandtheboltstintheupperslots.
Note:Ensurethatthewashersontheboltsprojecting
throughthetrencherattachmentarealignedtothe
forwardsideofthemountingplateasyoulowerthe
trencherattachmentonthemachine;refertoFigure9.
Figure9
1.Trencher3.Boltsandlocknuts
2.Boltheadandwasher
4.Upperslot(3)
10.Handtightenalltheboltsandnuts.
11.Frominsidethetrencherattachment,installabolt(3/4
x2-1/2inch),2washers,andalocknutintheoutermost
leftholeinrow4(Figure8)asshowninFigure10.
Figure10
1.Locknut
4.Bolt(3/4x2-3/4inch)
2.Washer
5.Bolt(3/4x2-3/4inch)
3.Bolt(3/4x2-1/2inch)
12.Frominsidethetrencherattachment,install2bolts
(3/4x2–3/4inch),4washers,and2locknutsinthe
remainingholesinrow4asshowninFigure10.
13.Torquetheboltsandthelocknutsto583to624N-m
(400to460ft-lb).
8

2
PreparingtheHydraulicMotor
Partsneededforthisprocedure:
1
Straightadaptertting(5/8inch)
1
Straightadaptertting(3/4inch)
1
Restrictortting
1
90°elbow(male/male)
1
Teetting
1
90°elbow(female/male)
Procedure
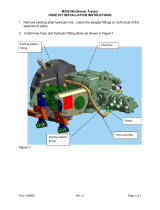
1.Removeanddiscardtheplasticplugsfromtheportsof
thehydraulicmotorasshowninFigure11andFigure
12.
Figure11
1.Plasticplug
4.Port(upperoutboard)
2.Steelplug5.Steelplug—removeand
saveit
3.PortC(upperinboard)
6.PortB
Figure12
1.Port(loweroutboard)4.Steelplug(removedfrom
PortB)—insertitintothe
loweroutboardport
2.Port(lowerinboard)5.Steelplug—removeand
discardit
3.Plasticplug—removeand
discardit
2.Removethesteelplug(withtheO-ring)fromPortB
(Figure11),andinstalltheplugintotheloweroutboard
portasshowninFigure12.
3.RemoveanddiscardthesteelplugfromPortC.
4.Removeanddiscardthesteelplug(andtheO-ring)
fromthelowerinboardport(Figure12).
5.Installthestraightadaptertting(5/8inch)intoPortC
(Figure13).
9

10
Figure13
1.PortC6.Teetting
2.Straightadaptertting(5/8
inch)
7.Restrictortting
3.Straightadaptertting(3/4
inch)
8.90°elbow(female/male)
4.Port(upperoutboard)9.Port(loweroutboard)
5.PortB
10.90°elbow(male/male)
6.Installthestraightadaptertting(3/4inch)intothe
upperoutboardport(Figure13).
7.LooselythreadtheteettingintoPortBofthe
hydraulicmotor(Figure13).
Note:AligntheteettingasshowninFigure13.
8.Installtherestrictorttingintotherearportofthetee
tting(Figure13).
Note:Ensurethattheelbowisalignedtowardtherear
andupward.
9.Installthe90°elbow(female/male)totherestrictor
tting(Figure13).
10.Installthe90°elbow(male/male)ontothelower
outboardport(Figure13).
Note:Ensurethattheelbowisalignedtowardtherear
andupward.
11.Tightenallttingssecurely.
3
InstallingtheHydraulicHoses
Partsneededforthisprocedure:
1
Hose(34-1/2inch)
1
Hose(35-1/2inch)
1
Hose(40inch)
1
Bypasshose(16inch)
2
Hose(23inch)
2
Straightadaptertting(3/8inch)
1
Cabletie
Procedure
1.Installthebypasshosebetweentheelbows(Figure14).
Note:Thebypasshoseshouldforma“U”shape.
Figure14
1.Hose(34-1/2inch)4.Hose(35-1/2inch)
2.Hose(40inch)5.Bypasshose(16inch)
3.Teetting6.90°elbows
2.Removethe2caps(1-7/16inch)andthe1cap(5/8
inch)ontheleftsideofthehydraulicattachmentpanel
(Figure15).
10

3
Figure15
Hydraulicattachmentpanel
1.Cap(1-7/16inch)3.Cap(3/8inch)
2.Cap(5/8inch)
3.Removethe2caps(3/8inch)fromtherightsideofthe
hydraulicattachmentpanel(Figure15).
4.Installthe34-1/2inch,40-inch,and35-1/2inchhoses
betweenthettings(Figure14)onthehydraulicmotor
andthettingsonthehydraulicattachmentpanelas
showninFigure16.
Note:Ensurethattheangledttingsonthe
34-1/2-inchhoseandthe40-inchhoseareconnected
totheirrespectivettingsonthehydraulicattachment
panel.
7
Figure16
1.Cabletie5.Angledttings
2.Hose(35-1/2inch)6.Manifold
3.Hose(34-1/2inch)
7.Fittings
4.Hose(40inch)
5.Securethe3hydraulichoseswithacabletieasshown
inFigure16.
6.RemovetheplugsfromPortAandPortBofthe
manifold.
7.Installthestraightadapterttings(3/8inch)intothe
manifold(Figure16).
8.Connectthe2hoses(23inch)tothemanifoldandto
thehydraulicattachmentpanelttingsasshownin
Figure17.
7
Figure17
1.Retracttting5.Manifold
2.Extendtting6.Extendtting
3.Extendhose
7.Retracttting
4.Retracthose
9.Startthemachine;refertothetractionunitOperator’s
Manual.
10.Operatethetrencher-chaindirectioncontrolandthe
attachmentcontrol(locatedontherightsideofthe
operatorseat)inbothdirectionsseveraltimestobleed
theairfromthehydraulicmotorandthehydrauliclift
cylinder(Figure18).
Note:Thetrencher-chaindirectioncontrolrotatesthe
hubforwardandrearward,andtheattachmentcontrol
raisesandlowerstheboom-mounttting.Have
anotherpersonobservethehubandtheboom-mount
ttingastheymove.Moveeachofthecontrolsinboth
directionsuntilthehubandtheboom-mounttting
movesmoothlyinbothdirections.
11

G023281
Figure18
1.Trencher-chaindirection
control
2.Attachmentcontrol
4
InstallingtheSprocket
Partsneededforthisprocedure:
2
Sprocketsegment
8Bolt
8Locknut
Procedure
1.Install1ofthe2sprocketsegmentsontothehubofthe
planetarydrivewith4boltsand4locknuts(Figure19).
1
2
3
G023225
Figure19
1.Bolt(4)3.Locknut(4)
2.Sprocketsegment
2.Startthemachineandrotatetheplanetarygearby
movingthetrencherfunctioncontroluntiltheother
halfofthehubisaccessible.
3.Repeatstep1toinstalltheothersprocketsegment.
4.Torquetheboltsandlocknutsto160to190N-m(120
to140ft-lb).
5
InstallingtheBoom
Partsneededforthisprocedure:
1Boom
2
Bolt(3/4x6-1/2inch)
2
Washer(3/4inch)
2
Nut(3/4inch)
2
Bolt(1x2inch)
2
Washer(1inch)
Procedure
1.Startthemachine;refertothetractionunitOperator’s
Manual.
2.Movetheboom-mountttingonthetrenchertothe
horizontalposition(Figure20).
12

Figure20
1.Boom-mountingttingonthetrencher
3.Attachtheliftingequipmenttotherestraintbar,and
lifttheboom(Figure21).
Important:Ensurethattheliftingequipmenthas
averticalliftcapacityofatleast313kg(690lb).
Note:Ensurethattheboomislevelwhenyouliftit.
Figure21
1.Boom-mountttingonthe
trencher
2.Mountingttingonthe
boom
4.Cleanthemountingsurfacesoftheboom-mounttting
onthetrencherandthemountingttingontheboom.
5.Aligntheholesinthemountingttingontheboom
withtheholesintheboom-mountttingonthe
trencher(Figure22).
Figure22
1.Mount-ttinghole(vertical)5.Mountttinghole
(horizontal)
2.Bolt—(3/4x6-1/2inch(2)6.Washer—1inch(2)
3.Washer—3/4inch(2)7.Bolt—1x2inch(2)
4.Nut—3/4inch(2)
6.Assemblethe2horizontalbolts(1x2inch)and2
washerstothehorizontalholesinthemountttings,
andtightenthembyhand(Figure22).
7.Assemblethe2verticalbolts(3/4x6-1/2inch),2
nuts,and2washerstotheverticalholesinthemount
ttings,andtightenthembyhand(Figure22).
8.Torquethebolts(1x2inch)263to320N-m(194to
237ft-lb).
9.Torquethebolts(3/4x6-1/2inch)189to231N-m
(140to170ft-lb).
13

6
AligningtheBoom
Partsneededforthisprocedure:
3
Shim
Procedure
1.Checkthealignmentoftheboomandrecordyour
measurementsintheAlignmentWorksheetbelow:
•Left-offsetboom:Iftheboomisalignedtothe
leftofthesprocketcenterline,placeastraight
edgeacrosstherightfaceofthedrivesprocket
andmeasurethegap(DimensionA)betweenthe
straightedgeandtheendroller(Figure23and
Figure24).
•Right-offsetboom:Iftheboomisalignedtothe
rightofthesprocketcenterline,placeastraight
edgeacrosstheleftfaceofthedrivesprocket
andmeasurethegap(dimensionA)betweenthe
straightedgeandtheendroller(Figure23and
Figure24).
•Nooffset:theboomisaligned.
Note:IfthemeasuredDimension-Agapis0to4.8
mm(0to0.1875inch),skiptostep10.
AlignmentWorksheet
YourMeasurement
(dimensionA)
Maximum-offsetGap4.8mm(0.1875inch)
Shim-correctionDimension
Figure23
Leftoffsetshown
1.DimensionAgap
3.Straightedge(211cm(83
inch)forthe48-inchrock
boom;244cm(96inch)
forthe60-inchrockboom)
2.Endroller
4.Sprocket
Figure24
1.Endroller(leftoffset)3.Endroller(rightoffset)
2.Sprocketcenterline
2.Usingthealignmentworksheet,determinethe
numberofshimsthatyouneedbysubtracting
yourmeasurement(dimensionA)fromthe
maximum-offsetgap4.8mm(0.1875inch).
Note:Theresultistheshim-correctiondimension.
14

3.Usetheshimtabletodeterminethenumberofshims
neededtoaligntheboomwithinthe4.8mm(0.1875
inch)maximum-offsetgap.
ShimTable
NumberofShims
forCorrection
22cm(48inch)
RockBoom
Shim-correction
Dimension
152cm(60inch)
RockBoom
Shim-correction
Dimension
1
7.1mm(0.28inch)9.4mm(0.37inch)
2
14.5mm(0.57
inch)
19.6mm(0.77
inch)
3
21.8mm(0.86
inch)
29.5mm(1.16
inch)
4.Installtheliftingequipmenttotheboomandsupport
it.
5.Removethe2bolts(3/4x6-1/2inch),washers,and
nuts(Figure25).
Figure25
1.Bolt(3/4x6-1/2inch)6.Locknut(3/4inch)
2.Mountingtting(rock
boom)
7.Washer(1inch)
3.Boom-tting(trencher)8.Bolt(1x2inch)
4.Shim(s)9.Left-offsetshimposition
5.Washer(3/4inch)10.Right-offsetshimposition
6.Removethe2bolt(1x2inch)andwashers.
7.Installtheshimsasfollows:
A.Determinetheshim(s)positionatthettingof
therockboom.
•Foraleft-offsetboom,aligntheshim(s)to
themountttingoftherockboomatthe
left-offsetshimposition(Figure25).
•Foraright-offsetboom,aligntheshim(s)to
themountttingoftherockboomatthe
right-offsetshimposition(Figure25).
B.Applyacoupleofdropsoffast-bonding
cyanoacrylatebasedadhesivetotheshim(s);refer
toFigure26.
Figure26
1.Shimlocations5.Locknut(3/4inch)
2.Bolt(3/4x6-1/2inch)6.Shim(s)
3.Mountingtting(rock
boom)
7.Washer(1inch)
4.Washer(3/4inch)8.Bolt(1x2inch)
C.Aligntheholeintheshim(s)withthehorizontal
25mm(1inch)holeinthemountttingofthe
rockboom,andtacktheshimtotheforwardface
tting(Figure26).
8.Aligntheholesinthemountingttingontheboom
withtheholesintheboom-mountttingonthe
trencher(Figure25).
9.Assemblethe2bolts(3/4x6-1/2inch),2washers,and
2nutstotheholesintheboomandtrenchermount
ttings,andtightenthembyhand(Figure25).
10.Applythread-lockingcompoundtothe2horizontal
bolts(1x2inch).
Note:Ifyouskippedtostep9becausethemeasured
Dimension-Agapis0to4.8mm(0to0.1875inch),
youwillhavetoremovethe2horizontalboltsinorder
toapplythethread-lockingcompound.
11.Assemblethe2bolts(1x2inch)and2washerstothe
holesintheboomandtrenchermountttings,and
tightenthembyhand(Figure25).
12.Torquethe2bolts(3/4x6-1/2inch)378to462N-m
(279to341ft-lb).
Torquethe2bolts(1x2inch)525to641N-m(387
to473ft-lb).
15

7
InstallingtheDiggingChain
Partsneededforthisprocedure:
1Diggingchain
Procedure
RefertoInstallingtheDiggingChain(page28).
Operation
SelectingtheProper
ComponentsfortheTrencher
Usingthecorrecttrenchercomponentshelpstoincrease
thetrenchingspeedandextendingthelifeofthetrencher.
ContactanAuthorizedToroServiceDealerformore
informationonpartsforyourtrencher.
SelectingtheProperChain
Itisimportanttohavethecorrectchainforthejob.The
soilconditionswilldeterminethetypeofchainthathasthe
strengthandtensionthatyouneed.Achainthatistoolight
wearsfastorbreaks;achainthatistooheavyincreasesthe
loadonthemachineandreducesthetrencherdiggingspeed;
however,aheavychainhasalongerwearlifethanalighter
chain.
Youcancongurethetrencherwithananti-backexdigging
chainthatisdesignedforharddiggingconditionsorawelded
H-platechainforextremeconditions.Thesideplatesofthe
anti-backexdiggingchainareclosetogether.Asthechain
leavesthesprocket,eachlinkcomestogetherandformsa
soliddiggingchannel.Thisactionkeepseachtoothatthe
correctdiggingangle.TheweldedH-platechainisfordigging
inthemostextremeconditions.
Important:Maintainthecorrectchaintension.Ifthe
chainistootightortooloose,thediggingefciency
decreasesandthepartswearmorequickly.Referto
CheckingtheChainTension(page23).
Note:Trencherchainsareratedbytheirtensilestrength;for
example,a34019kg(75,000lb)chaintakesaminimumof34
019kg(75,000lb)ofpulltobreakthechain.
Selectthechaintype;chooseeitheraanti-backexchainora
weldedH-platechain(Figure27andFigure28).
Figure27
1.Anti-backexchain
16

Figure28
1.H-platechain
SelectingtheProperDiggingTeeth
Themostimportantcomponentofthetrencherarethe
diggingteeth;thetypeofteeththatyouselectandthe
arrangementofteeththatyouusegreatlyaffectsthedigging
efciencyandtoothwear.
•Choosetheteethtype:
–cuppedteeth
–rock/frostbit
–sharkteeth
–cuppedteethandrock/frostbitcombination
–cuppedandsharkteethcombination
•Choosethetootharrangementwidth:
–152mm(6inch)
–203mm(8inch)
TypesofDiggingTeeth
Thetypesofdiggingteethareasfollows:
•Cuppedteeth(Figure29)arethebestforcutting
throughlighttomediumsoil.Thecuppeddesignofthe
toothcutsthroughthesoilandthenmovesitupandout
ofthetrench.
1
G02191 1
Figure29
1.Cuppedteeth
•Rockandfrostteeth(Figure30)orsharkteeth(Figure
31)arebestforcuttinggroundthatisveryhard,rocky,or
frozen;itisalsousedforcuttingthroughasphalt.
G021912
1
Figure30
1.Sharktooth
1
G021972
Figure31
1.Rockandfrosttooth
ArrangementsoftheDiggingTeeth
Thearrangementofdiggingteethinvolvesbothwhereand
howeachtoothisattachedtothediggingchain.Usethe
followingguidelineswhenyouselectthearrangementsof
teeth:
•Installteeththatarethesamewidthandarespaced
equallyaroundthechain.
•Usefewerteethonthechainwhenyouareoperatingthe
trencherinwetclayorgumbo.
•Usemoreteethonthechainwhenyouareoperatingthe
trencherinsandyloamorrockyground.
Note:Youcanusedifferenttypesandcombinationsofteeth
toincreaseproductivityinvariousdiggingconditions.The
rockandfrostteethorthesharkteethpenetratethesoilwell,
andthecuppedteethhelptoremovethesoil.Tryseveral
combinationstodeterminetheonebestsuitedforyoursite.
17

CombinationsofBoom,Chain,andTeethforVariousSoilTypesandConditions
SoilTypeChainType
DiggingTeethType
HeavyDuty
Anti-backex
H-Plate
CupCutterRock/Frost
MiningBit
Shark
Mixed
Sand
X
SandyLoam
X
LooseShale
XX
TopsoilX
Caliche(Hard)
XXXXX
Clay(Gumbo)
XX
Coral
XXXX
Rock(Loose)
XXXX
AsphaltXXXX
HardClay
XXXXX
FrozenSoil
XXXXX
Note:Youneedarockwheeltocutsolidrockorconcrete.
UsingtheTrencher
CheckingtheTooth-mountingBolts
ServiceInterval:Beforeeachuseordaily
Checkthemountingboltsofallthechainteeth(Figure32),
andtightentheboltsasneeded.
g021914
1
Figure32
1.Mountingbolts
PositioningtheSeatforTrenching
Fastentheseatbeltandrotatetheseattothetrenching
position.
Note:Youmustbeseatedintheoperatorseatbeforemoving
themachine;otherwise,theenginewillstopin1second.
UsingtheTrencherControls
•Movetherearattachmentspeedcontrolleverforwardto
actuatethediggingchainintheforwarddirection.
•Movetheleverfurtherforwardtoincreasethechain
speed.
•Movetheleverfurtherrearwardtodecreasethechain
speed.
MovethecontroltotheNeutralposition(A)tostopthe
chain;movethecontrolleverrearward(B)toreversethe
chaindirection.
•Tolowerthetrencherboomtothedesireddepth,push
theattachmentcontrolleverawayfromyou;toraisethe
trencherboom,pullthecontrollevertowardyou.When
youreleasethecontrollever,itwillreturntotheNeutral
positionautomatically.
18

PositioningtheBoomforTrenching
Forthebesttrenchingperformanceandthesmoothest
machineoperation,theboommustbeinthefulldown
trenchingposition(Figure33).Havingtheboominthis
positionpullsthemachinedownforbettertraction.The
grounddrivesimplypullsthetrencherteethintothefaceof
thetrench.
g021973
Figure33
Whenyouraisetheboomfromthefulldownposition,the
trenchingloadpullsthemachinerearward.Thispulling
reducesthetractionandmaycausethemachinetobounce
andpullwhenthechaincontactsrootsorrocks.Therearward
pullofthetrenchingoperationalsoworksagainsttheground
drive,causingtheenginetoworkharder.
StartingaTrench
Important:Knowthelocationofallunderground
utilitiesbeforeoperatingthemachineontheworksite.
1.Ensurethatallpersonsareawayfromthemachine
beforeyoustarttheengineandwhileyouaretrenching.
2.Starttheengine;refertothetractionunitOperator’s
Manual.
3.Runtheengineat1/4throttleuntiltheenginereaches
theoperatingtemperature.
4.Movethecrumber(ifequipped)totheTransport
position(Figure34).
Figure34
1.Crumberbar(optional)
5.Whentheenginehasreachedtheoperating
temperature,movethemachinetotheworkareaand
positionthemachinetocutthetrench.
Note:Ensurethattheendofthetrencherboomis
severalfeetbeyondthestartingpointofthetrench.
6.Alignthemachinetothecenterlineofthenewtrench.
7.AdjusttheenginespeedtotheFullthrottleposition,
andlowertheboomtojustabovetheground.
8.Startthediggingchainbymovingtherearattachment
controllevertowardthefrontofthemachine.
Note:Youmustbeseatedintheoperatorseatbefore
movingthemachine;otherwise,theenginewillstop
in1second.
Note:Thecrumber(ifequipped)willautomatically
movefromtheTransportpositionintotheOperating
positionwhenthetrencherattachmentreachesthe
maximumdigdepth.
9.Movetheutility-tractionleverforwarduntilthe
machinestartstomoveforward.
10.Lowertheboomintotheground.
11.Whenthediggingchainisloweredtothedesireddepth,
movetheutility-tractionleverforwarduntiltheengine
speeddecreasesabout10%(200to300rpm).
Note:Rememberthatspeedonthetachometer.
19

12.Decreasethediggingchainspeedandlookatthe
tachometer.
Note:Iftheenginespeedincreases,pushthe
utility-tractionleverforwarduntiltheenginespeedis
thesamethatinstep11.Repeatthissteptoobtain
thebesttrenchingspeed.
Note:Somehardsoilconditionswillallowyoutodig
atrenchfasterbyreducingthechainspeed.
WARNING
Operatingatrencherattachmentwithouta
restraintbaroracrumbercouldseverelyinjure
orkillyouifthechainbreaks.
Donotoperateatrencherattachmentwithout
arestraintbar.
Note:Thetrencheroperatesbestwhentheengineis
atfullthrottle.Adjustthegroundspeedtokeepfrom
luggingtheengine.
Important:Allsteeringshouldbegradual.Donot
makesharpturnswiththeboomintheground.
Markingsharpturnswhilediggingwiththe
trencherwilldamagethetrencher.
Note:Checkthechaintensionwhenyouarestarting
anewtrenchineachlocation;refertoCheckingthe
ChainTension(page23).
CuttingaCurvedTrench
Important:Donotmakesharpturnswiththeboomin
theground.Markingsharpturnswhilediggingwiththe
trencherwilldamagethetrencher.
Youcanmakeagradualcurvebyusingtherear-wheelsteering
controlonlyasneededtoslightlyarticulatethemachine.Do
notmakesteeringcorrections,asthiswillswingtheboom
intothesideofthetrenchandundercutit.
StraighteningaCrookedTrench
Asthetrencherisdigging,itmayvaryslightlyfromastraight
line;thiscanoccurifyouarediggingtooquicklyforthesoil
conditions.Tostraightenthetrench,raisetheboom,reverse
thegroundtravelandmovethetrencherforwarduntilthe
diggingchainclearsthetrench.Correctthealignmentofthe
trenchertothetrenchandlowertheboom.
FinishingtheTrench
1.Whenyoucompletethetrench,stopthemachine.
2.Slowlyraisetheboomuntilitisoutofthetrenchabout
15cm(6inches).
3.Movetheattachmentgroundspeedcontrollevertothe
Neutral(disengaged)positiontostopthediggingchain.
4.PulltheattachmentliftleverbacktotheRaiseposition
untiltheboomisintheTransportposition.
5.MovethethrottletotheIdleposition,stoptheengine,
andremovethekey.
OperatingTips
•Cleantheareaoftrash,branches,androcksbefore
trenchingtopreventdamagingtheequipment.
•Alwaysselecttheshortestboom,thelightestchain,and
thelightestteethtohandlethejob.Inharddigging
conditions,selectahightensile-strengthchain,arock
boom,andananti-backexchainwithrockandfrost
teeth.
•Alwaysbegintrenchingwiththeslowestgroundspeed
possible.Increasethetrenchingspeedifconditions
permit.Ifthechainspeedslowsdown,reducetheground
speedtokeepthechainmovingatitsfastestrate.Donot
spinthewheelswhiletrenching.
•Alwaysusefullthrottle(maximumenginespeed)when
trenching.
•Alwaystrenchwhilethemachineismovingintheforward
direction.
•Trenchwiththechainata45-to60-degreeanglefor
bestresults.
•Youcandigatrenchfasterbycontrollingthedepthand
adjustingtheboomperiodically.
•Ifthetrencherbindsinthesoil,reversethechain
direction.Oncethechainisloose,changechaindirections
andcontinuetrenching.
•Ifyouneedthenishedtrenchtobecleanerthanwhatis
possiblewiththetrencher,youcanpurchaseacrumber
fromanAuthorizedToroServiceDealer.Thecrumber,
whichmountsontotherestraintbar,scrapesthetrench
cleanasyoudig.
•Ifthediggingspeedofthetrencheristooslowortoo
fast,adjustit.
•Usethecorrectchainforthegroundconditions;referto
SelectingtheProperChain(page16).
•Toobtainmaximumdiggingefciencyfromthetrencher,
alwayskeepgoodsharpteethatthenecessaryspaces.As
teethbecomeworn,replacethemimmediately.
•Somegroundconditionsmayrequireafasterchainspeed.
Movethechainspeedcontrolfurtherforwardfromthe
Neutralposition.Youcanreducethelifeofthedigging
chainbyusingitathigherchainspeedsforanextended
time.
20
/