Legrand 205KAN9GA-MM Operating instructions

Type
Operating instructions

This manual is also suitable for

125 EUGENE O’NEILL DRIVE
NEW LONDON, CT 06320
TEL: 877-599-5393
FAX: 888-282-0043
INSTALLATION INSTRUCTIONS
,
LC ANAEROBIC STYLE CONNECTOR, SINGLE &
MULTI-MODE ON BUFFERED FIBER
INSTRUCTION SHEET # REV. ECN # SHEET DWN. BY: DATE CHK. BY: DATE APP. BY: DATE
71601488
01 03215
1 of 4
VSL 03/31/06 A.M. 04/03/06 RZ 04/03/06
Buffered fiber
Buffer
support
boot
1/2 to 5/8 inch
(
13 to 16 mm
)
TABLE OF CONTENTS
1.0 GENERAL
2.0 SAFETY PRECAUTIONS
3.0 REQUIRED CONSUMABLES
4.0 ASSEMBLY INSTRUCTIONS
4.1 FIBER PREPARATION
4.2 PREPARE ADHESIVE & PRIMER
4.3 PREPARE THE CONNECTOR
4.4 APPLY PRIMER TO BUFFER
4.5 APPLY ADHESIVE TO CONNECTOR
4.6 INSERT FIBER INTO CONNECTOR, CURE & ATTACH BUFFER SUPPORT BOOT
4.7 SCORE THE FIBER
4.8 REMOVE THE FIBER STUB
4.9 POLISH FIBER END – BOTH SINGLE & MULTI-MODE
4.10 REPAIR POLISHING
4.11 INSPECTION
5.0 TECHNICAL SUPPORT & ORDERING INFORMATION
1.0 GENERAL
This document describes the procedure to install Ortronics’ Anaerobic Style LC Connectors, part numbers OR-205KAN9GA-SM/MM,
OR-205KAN9GB-SM/MM, & OR-205KAN9GC-SM/MM onto 900 micron buffered fiber, utilizing Ortronics’ Field Termination Kit OR-85400010.
2.0 SAFETY PRECAUTIONS
2.1 Safety glasses must be worn at all times while performing this procedure.
2.2 Avoid skin contact with the adhesive and primer.
2.3 Dispose fiber remnants in a proper manner.
3.0 REQUIRED CONSUMABLES
Kit Type Kit Number Kit Includes
Polishing Kit, Single mode OR-85400011 Polishing paper and other materials required to polish 100 SM connectors
Polishing Kit, Multi-Mode OR-85400012 Polishing paper and other materials required to polish 100 MM connectors
Adhesive OR-70600021 1 bottle of anaerobic adhesive
Primer OR-70600022 1 bottle of primer
Note: Kits do not include connectors, adhesive & primer, isopropyl alcohol, non-ozone-depleting canned air.
4.0 ASSEMBLY INSTRUCTIONS
4.1 Fiber Preparation
4.1.1 Remove the cable sheath and outer jacket. Typical working length for buffered
fiber is 24 to 36 inches (61 to 91 cm). Be careful not to cut or damage the fiber
during this step.
4.1.2 Install buffer support boot by sliding the small end of the boot onto the buffered fiber.
4.1.3 Measure and mark the buffered fiber 1/2 to 5/8 inch (13 to 16mm) from the end.
4.1.4 Using the stripper tool provided in your kit, remove a 1/2 to 5/8 inch (13 to 16mm) length of buffer from the fiber. You must
strip down to the bare fiber (i.e., all residue and coating must be removed).
4.1.5 Clean the bare fiber by saturating a wipe with isopropyl alcohol and wiping the fiber starting from approximately 2 inches
below the edge of the buffer toward the end of the fiber. One stroke is all that is required. Multiple strokes may damage
the glass.
NOTE: If residue remains on the glass after this procedure, repeat cleaning one time only. If the second cleaning attempt does not remove the
residue repeat steps 4.1.3 thru 4.1.5.
4.2 Prepare the Adhesive and Primer (avoid contact with skin)
4.2.1 Recommended usage temperatures for the adhesive is as follows:
125 EUGENE O’NEILL DRIVE
NEW LONDON, CT 06320
TEL: 877-599-5393
FAX: 888-282-0043
INSTALLATION INSTRUCTIONS
,
LC ANAEROBIC STYLE CONNECTOR, SINGLE &
MULTI-MODE ON BUFFERED FIBER
INSTRUCTION SHEET # REV. ECN # SHEET DWN. BY: DATE CHK. BY: DATE APP. BY: DATE
71601488
01 03215
2 of 4
VSL 03/31/06 A.M. 04/03/06 RZ 04/03/06
Adhesiv
e
bottle
Syringe
tip
Connector
holder wit
h
extension
BTW
connector
Connector
latch
Remove
connector
white dust
cap
Buffer
slot
Back of
ferrule
Tip of
ferrule
Back of
connector
Small
tube
Condition Temperature
Storage
-5°C to 30°C (23°F to 86°F)
Installation
0°C to 38°C (32°F to 100°F)
Operating
-40°C to 75°C (-40°F to 167°F)
4.2.2 Shake the bottles of adhesive and primer vigorously.
4.2.3 Remove the cap from the bottle and replace with the syringe tip provided with your kit. Gently pressing while
simultaneously twisting the syringe tip will secure it in place snugly onto the nozzle.
NOTE: If the bottle has never been opened, use a straight pin to puncture a hole in the tip of the nozzle.
4.2.4 To prepare the primer, repeat steps 4.2.2 and 4.2.3.
4.3 Prepare the Connector
4.3.1 Locate the connector and connector holder with extension. The connector holder
may be used to help protect the fiber protruding from the connector.
4.4 Apply Primer to the Buffer
4.4.1 While holding the prepared buffer fiber in one hand horizontally, place one drop of primer onto the buffer as shown below.
4.4.2 Place the prepared buffer on a wipe. Some of the primer will be absorbed by the wipe
4.5 Apply Adhesive to the Connector
4.5.1 Place a wipe on the work table, then place one drop of primer onto the
wipe.
4.5.2 Wipe the connector ferrule tip through the drop of primer that was
placed on the wipe one time only. This will apply just enough primer to
the ferrule tip to accelerate the curing of adhesive.
4.5.3 Locate the small plastic tube at the back of the connector.
4.5.4 Carefully insert the syringe tip attached to the adhesive bottle into the
small tube until the tip contacts the back of ferrule.
4.5.5 While holding the syringe straight and axial to the small tube and
simultaneously applying light pressure inward onto the back of the
ferrule, inject adhesive into the ferrule by applying light pressure to the adhesive bottle until the adhesive flows
through the ferrule and forms a small bead of adhesive on the tip of the ferrule.
4.5.6 While maintaining the light pressure on the adhesive bottle back the syringe away from the back of the ferrule just
slightly, then inject another small amount of adhesive at the back of the ferrule. While still maintaining the light pressure
on the adhesive bottle carefully back the syringe out of the small tube. Once you begin backing out the syringe the
pressure on the bottle can be released. If the pressure is released from the bottle of adhesive too soon vacuum will suck
the adhesive back into the bottle.
125 EUGENE O’NEILL DRIVE
NEW LONDON, CT 06320
TEL: 877-599-5393
FAX: 888-282-0043
INSTALLATION INSTRUCTIONS
,
LC ANAEROBIC STYLE CONNECTOR, SINGLE &
MULTI-MODE ON BUFFERED FIBER
INSTRUCTION SHEET # REV. ECN # SHEET DWN. BY: DATE CHK. BY: DATE APP. BY: DATE
71601488
01 03215
3 of 4
VSL 03/31/06 A.M. 04/03/06 RZ 04/03/06
Cleaving
tool
Exposed
fiber
Use
stroke to
score fiber
ONE
Connecto
r
ferrule
Type G
paper (green) wit
h
dull side up
NOTE: Proceed to the next step immediately
4.6 Insert the Bare Fiber Into the Connector and Attach the Buffer Support Boot
4.6.1 Immediately insert the bare fiber into the small tube inside the connector and carefully locate the hole in the ferrule, then
push the bare fiber through the ferrule. Slightly rotating the fiber while applying light force may ease this process.
4.6.2 Place the connector in a safe location and allow to cure for a minimum of one minute.
4.6.3 Remove the connector from the holder and push the buffer support boot onto the connector. Use the edge of a wipe to
remove any uncured adhesive from around the fiber.
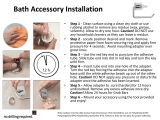
4.7 Score the Fiber
4.7.1 Delicately place the cleaving tool provided in your kit down onto the top of the adhesive bead and up against the exposed
fiber. The objective is to cleave the fiber as close to the top of the adhesive bead as possible (do not attempt to cut the
adhesive bead). Position the cleave tool at approximately 45° for optimum results.
4.7.2 Using one stroke of the cleaving tool, gently score the exposed fiber by sliding the cleave tool across the bare fiber. The
cleave is designed to score the fiber, not actually cut it.
4.7.3 Remove the cleaved fiber by gently pulling it straight away or axially from the connector. If the fiber does not easily pull
off, score again 180° from the initial score.
4.7.4 Dispose of fiber remnants responsibly.
4.8 Remove the Fiber Stub
4.8.1 Hold the connector in one hand vertical with the fiber stub or ferrule tip facing upward.
Hold one sheet of Type G Polishing Paper (green) in the finger tips of the other hand,
with the dull side facing downward.
4.8.2 Position the polishing paper perpendicular to the connector axis and
with just the weight of the polishing paper (dull side) resting on the
fiber stub, polish the fiber stub in a circular pattern of approximately 1
inch. Continue polishing until the burr from the cleave is removed.
Completion is determined by feel and/or sound. When you begin to
polish, you can actually feel and/or hear the sharp cleaved end of the
glass against the polishing paper. As the burr is removed, the scratching sound is
reduced, and the circular pattern feels smoother. This may require approximately 6-10
revolutions.
4.9 Polish the Fiber End
4.9.1 Clean both sides of a full sheet of Type G Polishing Paper with canned air.
4.9.2 Saturate a wipe with isopropyl alcohol.
4.9.3 Obtain the 5 inch diameter Universal Polishing Pad (OR-60300166) and the LC Polishing Tool/Puck. Clean the
unmarked/shiny side of the pad and the polishing tool with the saturated wipe from step 4.9.2. Dry both with canned air.
4.9.4 Insert the LC connector ferrule tip into the polishing tool/puck.
4.9.5
Stack four (4), 3-mil mylar spacers (clear) on top of the rubber pad, then place one sheet of Type G Polishing Paper
(green), dull side up onto the mylar spacers (the 4 mylar spacers provide additional cushion for polishing).
4.9.6 Gently place the polishing tool and connector onto the polishing paper. Start with light pressure and use figure 8 strokes
that are approximately 2 inches high and 1 inch wide. The figure 8 stroke must be well rounded to ensure complete
removal of adhesive from the end of the ferrule. If you feel any drag between the fiber and the paper revert back to step
4.8. Using moderate pressure, polish the connector for 30 figure 8 strokes. Move to an unused section of the polishing
paper for each connector polished. Approximately 6 connectors can be polished on a single sheet of Type G Paper.
4.9.7 Using the microscope provided with your kit, inspect the ferrule tip for excess adhesive. Excess adhesive must not
surround the fiber, nor should there be any adhesive on the beveled edge of the ferrule. If excess adhesive is observed,
continue to use the Type G Paper until the excess adhesive is removed.
NOTE: This concludes the multi-mode polishing procedure, for single mode polishing continue on to step 4.9.8.
4.9.8 Remove the Type G paper and replace with a sheet of Type M Paper (white) over the 4 mylar spacers that are positioned
on the rubber pad.
4.9.9 Dampen the Type M Paper with distilled water (do not soak/flood). Remove the connector from the polishing tool and use
the tool (lightly) to distribute the water evenly over the paper. Replace the connector back in the polishing tool.
4.9.10 Using (10) 2 inch X 1 inch figure eight strokes as described in section 4.9.6, buff polish using moderate pressure.
4.9.11 Clean the fiber end with a wipe dampened with water, then clean a second time with a wipe dampened with alcohol.
125 EUGENE O’NEILL DRIVE
NEW LONDON, CT 06320
TEL: 877-599-5393
FAX: 888-282-0043
INSTALLATION INSTRUCTIONS
,
LC ANAEROBIC STYLE CONNECTOR, SINGLE &
MULTI-MODE ON BUFFERED FIBER
INSTRUCTION SHEET # REV. ECN # SHEET DWN. BY: DATE CHK. BY: DATE APP. BY: DATE
71601488
01 03215
4 of 4
VSL 03/31/06 A.M. 04/03/06 RZ 04/03/06
4.10 Repair Polishing (only if needed)
4.10.1 Place a sheet of Type F Paper over the 4 spacers that are positioned on the rubber pad.
4.10.2 Using firm pressure, polish the connectors for 5 figure 8 strokes or until the flaw has been removed. To avoid over
polishing, do not exceed 10 strokes. This concludes the repair process for multi-mode connectors. For single mode
polishing repair repeat steps 4.9.8 thru 4.9.11.
4.10.3 Once the polishing is complete, cover the connector end with the white dust cap.
4.11 Inspection
4.11.1 Insert the connector tip into the bottom of the microscope, then turn on the microscope to illuminate the connector tip. Use
the side wheel to focus the image. An acceptable fiber end is free from cracks. Voids and scratches in the core area are
not acceptable. If the fiber is unacceptable and cannot be repaired per section 4.10, re-terminate with a new connector.
5.0 Technical Support and Ordering Information
5.1 For product information and/or technical support, visit www.ortronics.com
, or, contact sales at 877-599-5393 (Toll Free U.S.
Only) or 860-405-2970 (Int.).
POLISHING OVERVIEW (ANAEROBIC STYLE CONNECTOR, SM & MM)
STEP POLISHING MATERIALS
NO. OF FIGURE 8
STROKES
NOTES
1
(SM & MM)
Type G (green) As required Air polish to remove fiber stub
2
(SM & MM)
Type G (green) placed over 4 spacers, which are placed
over the 5 inch diameter rubber pad.
30, then as required Dry polish to remove adhesive
3
(SM ONLY)
Type M paper (white) placed over 4 spacers, which are
placed over the 5 inch diameter rubber pad.
10
Wet polish. Wet paper with distilled
water
REPAIR
POLISHING
(SM & MM)
Type F Paper (yellow) placed over 4 spacers, which are
placed over the 5 inch diameter rubber pad.
5, then as required to
remove flaw, but not to
exceed 10.
Dry polish. For SM Fiber, after flaw is
removed repeat steps 4.9.8 thru 4.9.11.
  • Page 1 1
  • Page 2 2
  • Page 3 3
  • Page 4 4

Legrand 205KAN9GA-MM Operating instructions

Type
Operating instructions
This manual is also suitable for

Ask a question and I''ll find the answer in the document

Finding information in a document is now easier with AI