Page is loading ...

Instructions
SC & FC/PC3 Pull-Proof
Fiber Optic Connectors
Termination Procedures for
Single-mode and Multimode
Field-Mountable Connectors
using Epoxy
Issue 1, May 1993

2
Contents:
A) Warnings, Recommendations and Overview................................................................................................ 3
B) Jacketed Cable Preparation.......................................................................................................................... 5
C) Mounting........................................................................................................................................................ 8
D) Scoring .......................................................................................................................................................... 12
E) Standard Polishing Process for Single-mode and Multimode Connectors (>30dB)..................................... 13
F) Polishing Process for Single-mode Connector Return Loss >40dB............................................................. 16
G) Final Cleaning ............................................................................................................................................... 20
H) Mounting Unjacketed/900 ϑm Buffered Fiber ............................................................................................... 20
I) Connector Assembly and Installation............................................................................................................ 22
J) 3M SC and FC/PC3 Epoxy Field Termination Kits........................................................................................ 24
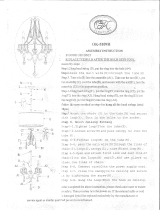
FC/PC3 Connector
SC Connector
SC Connector
Crimp Ring Boot
1.97 in.
(50.0 mm)
.925 in.
(23.5 mm)
Ø .0984 in.
(2.499 mm)
.283 in.
(7.19 mm)
.266 in.
(6.75 mm)
.289 in.
(7.34 mm)
.205 in.
(5.2 mm)
.972 in.
(24.7
mm)
.068 in.
(1.73 mm)
Key-Shell
.352 in.
(8.94 mm)
.289 in.
(7.34 mm)
.218 in.
(5.54 mm)
.235 in.
(5.97 mm)
BootCrimp Ring
FC/PC3
Connector
2.27 in.
(57.7 mm)
1.66 in.
(15.0 mm)
.925 in.
(23.5 mm)
.154 in.
(3.9 mm)
Ø .234 in.
(5.94 mm)
Ø .386 in.
(9.8 mm)
Ø .094 in.
(2.499
mm)

3
SECTION A
Warnings, Recommendations and Overview
1. Most fibers can be mechanically stripped without the aid of chemicals or heat. If the fiber is not mechanically
strippable, contact 3M's Training Department or the cable manufacturer for their recommendations.
2. The recommended cleaning solvent for connectors and tools is isopropyl alcohol (reagent grade, 99% or
better). It may be purchased from laboratory supply companies. Isopropyl alcohol may also be used to clean
the lapping acetate and stripping tool when necessary. Do not use acetone for cleaning.
3. For safety reasons, no chemicals have been shipped with the 3M brand Field Termination Kit. We have,
however, included bottles for the alcohol and water.
Note: Carefully follow safety,health and disposal information on container label or Material Safety Data
Sheet for isopropyl alcohol being used.
4. Please contact the 3M Telecom Systems Training Department if you have any questions concerning
chemicals or procedures.
Warning: Do not view fiber ends if they are laser illuminated. Eye damage may result. Illuminate fiber
ends with white light only.
5. The connectors described in this manual have pre-radiused PC "domed" ferrule ends to ensure low
attenuation and the best reflection performance. All polishing should be done on the soft polishing pad
only, as described in this manual.
6. The 3M brand connectors with PC finishes are completely intermateable with flat finished connectors. PC to
flat terminations actually provide improved performance over flat to flat terminations. PC to PC terminations
as produced while using this manual, however, offer the best performance.
7. Safety glasses should be worn when working with optical fibers.
8. Appropriate containers of clean, dry, compressed air may be obtained from photographic supply stores. Do
not use types that leave a residue.

4
(A) - Strain Relief Boot
(B) - Crimp Ring
(C) - Connector
(D) - Housing
SECTION A
Warnings, Recommendations and Overview
This manual is for terminating the following field mountable connectors:
Identification
SC Single-mode Product Number Housing (Color) Ferrule Collar Strain Relief Boot
125 ϑm 8305 Blue Black White
126 ϑm 8306 Blue Yellow White
127 ϑm 8307 Blue Silver White
SC Multimode
125 ϑm 6306 Beige Black Beige
FC Single-mode
125 ϑm 8202 Gray Black White
126 ϑm 8203 Gray Yellow White
127 ϑm 8204 Gray Silver White
FC Multimode
125 ϑm 6202 Beige Black Beige
Field Termination Kits
Field Termination Kit for SC & FC/PC3 Connectors (110V) 8350
Field Termination Kit for SC & FC/PC3 Connectors (220V) 8351
(See section J for kit listing)
(A)
(B)
(C)
(D)
SC Connector FC/PC3
Connector
(A)
(B)
(C)

5
Fig. B1
SECTION B
Jacketed Cable Preparation
This section is for mounting the 3M brand SC and FC/PC3 field-
mountable connectors on 2.4 mm cable and 3.0 mm cable.
The process for mounting on 900 ϑm buffered fiber can be found in
Section H.
1. TURN THE OVEN ON
When the oven is heated to the proper temperature the heater
light will go off.
2. ASSEMBLE THE CURING STAND ACCORDING TO FIGURE B11
3. PREPARE CONTAINERS AS LABELED
a. Fill one bottle with isopropyl alcohol (reagent grade).
b. Fill one bottle with water.
Note: Carefully follow safety, health and disposal information on
container label or Material Safety Data sheet for isopropyl
alcohol being used.
4. PREPARE THE CRIMP TOOL
Included in the field termination kit is a crimp tool set. The package
includes a base tool and three die sets to be used as follows:
Die Marking Cavity Marking Application
BIC/ST .151 ST* Bayonet, FC-1 & Biconic
.213 TECS 200/230 connector
.178 Not used
SC / FC3 .120 2.4 mm Jacketed Cable
.137 3.0 mm Jacketed Cable
.190 Kevlar crimp
PPST (Push-Pull ST) .120 2.4 mm Jacketed Cable
.137 3.0 mm Jacketed Cable
.226 Kevlar crimp
Select the jaw labeled "SC/FC3." Secure the jaws loosely with the
thumb screws. Close the jaws to the fully closed position allowing
the jaws to align, then tighten the screws (Fig. B1).

6
SECTION B
Jacketed Cable Preparation
5. SLIP THE STRAIN RELIEF BOOT AND THE CORRECT CRIMP
RING ONTO THE CABLE
DO NOT FORGET TO DO THIS STEP. The boot will not fit over a
mounted connector assembly so it is essential that it be slipped
onto the cable at this time. Slip the smaller diameter of the boot
onto the cable first.
Red crimp rings for 2.4 mm cable and black crimp rings for 3.0
mm cable are provided with each connector. Slide the appropriate
crimp ring onto the cable, small opening first (Fig. B2).
6. CUT AND REMOVE 1 3/16" (30 mm) OF THE CABLE'S OUTER
JACKET
Adjust the yellow handled stripper to cut the jacket and not the
Kevlar
1
.
Using the ruler supplied in the field kit, measure and mark the
cable 1 3/16" (30 mm) from the end of the jacket. Close the yellow
handled stripper on the cable until the outer jacket is cut (Fig. B3).
Remove the jacket with your fingers.
Fig. B2
Fig. B3
Fig. B4
Fig. B5
Fig. B6
7. CUT AND FLARE THE STRENGTH MEMBERS
Gather the Kevlar and pull it off to one side giving it a slight twist.
Using the serrated scissors cut the Kevlar leaving about 5/16" (8
mm) sticking out of the outer jacket (Fig. B4). Slip the smaller
hole of the blue stripping collar over the buffer and flare out all of
the Kevlar evenly (Fig. B5). Reverse the collar and slide the
larger hole over the buffer and outer jacket. Push down gently
until the stripping collar folds the Kevlar back and seats.
8. HOLD THE CABLE SECURELY
Before stripping the buffer it is important to hold the cable in a
configuration which will prevent the buffered fiber from being
pulled out of the outer jacket.
Grasp the end of the outer jacket between your thumb and
forefinger. Wind the cable between your fingers (Fig.B6).
Squeezing with all fingers will clamp the buffered fiber in the outer
jacket (Fig. B6).

7
SECTION B
Jacketed Cable Preparation
9. BUFFER REMOVAL
With the modified No-Nik tool's arrow pointing in the direction of
the stripping, remove the fiber's buffer in small bites, about 3/16"
(5 mm).
Be sure to remove the stripped material from the tool after each
incremental cut. When stripping the last increment, the end of the
stripping collar should gently rest against the fiber guide inside of
the clearance hole of the No-Nik (Fig. B7). This will ensure the
correct
9/16" (14 mm) buffer length remaining.
10. CLEAN THE FIBER WITH ALCOHOL
With the collar still in place, moisten a lint free cloth with isopropyl
alcohol from the bottle and wipe the fiber clean (Fig. B8). Make
sure there is absolutely no buffer residue or dirt on the fiber by
holding it to a light and inspecting for a smooth shiny surface. If
necessary, wipe the fiber a second time to be sure that it is clean.
11. REMOVE THE STRIPPING COLLAR
Remove the stripping collar and position the cut Kevlar so that it is
evenly distributed around the buffer. At this time, verify the strip
length dimensions. It is very important that the exposed buffer
measures 9/16" (14 mm) from the end of the cut jacket as
shown in Fig. B9. (Figure not to scale). Confirm all dimensions
using the ruler provided (Fig. B10).
12. PROTECT PREPARED FIBERS
Clip the cable in the curing stand where the fiber end will not
touch anything (Fig. B11). When mounting more than one
connector, prepare all fiber ends before mixing the epoxy.
Fig. B7
Fig. B8
Fig. B10
Fig. B11
Fig. B9
Outer Jacket
5/16" (8 mm)
Kevlar
9/16"
(14 mm)
1 3/16"
(30 mm)

8
SECTION C
Mounting
1. INSPECT THE CONNECTOR
Before mounting, hold the connector up to a light to ensure that
the capillary hole of the ceramic ferrule is clear. If the hole is
obstructed, blow it clear with air or use a piece of stainless steel
wire supplied with the kit. To clear simply insert a wire through the
back end of the connector so that the wire forces any debris
through the front end of the ceramic ferrule (Fig. C1).
2. MULTIMODE CONNECTOR MOUNTING
The 125 ϑm size connector will fit standard 125 ϑm multimode
fibers. Since dry fitting is therefore not necessary, advance to C3
in this section.
For 140 ϑm size fibers contact your local 3M sales representative.
SINGLE-MODE CONNECTOR FITTING
In order to achieve the lowest attenuation, it is important to dry fit
single-mode connectors onto individual fibers.
Single-mode connectors are available in three closely toleranced
ferrules sizes for mounting on single-mode fiber. Refer to page 4
for connector identification.
Select a 125 ϑm size connector. Line up the connector straight
with the fiber and thread it onto the fiber while slightly rotating the
connector between thumb and forefinger (Fig. C2). Do not try to
force the connector onto the fiber. If the ferrule is too tight, the
fiber will begin to buckle. If this is the case, carefully remove the
125 ϑm size and select a 126 ϑm size connector. Check to see
that the ferrule hole is clear and dry fit. If the 126 ϑm size is too
tight then a 127 ϑm connector should be used. If the connector
cannot be threaded onto the fiber, re-inspect the fiber and the
connector. Re-clean if necessary.
Note: At times when fitting connectors, a fiber particle may
become lodged in the ferrule. In order to clear the ferrule
it may be necessary to insert a stainless steel wire through
the front of the ferrule and push the fiber out through the
rear. Be sure to blow the connector clean after using the
wire.
Slide the correct size connector all the way onto the fiber until the
buffer bottoms against the ferrule. At this point, there should be
no more than 1/16" (2 mm) space between the end of the cable
and the back end of the connector (Fig. C3). After the fit is
confirmed, carefully remove the connector from the fiber and
place the fiber in the curing stand.
Fig. C1
Fig. C2
Fig. C3
3. INSTALL THE LOAD ADAPTER ONTO THE CONNECTOR
After the connector has been fitted, insert it into the load adapter
(Fig. C4) and place the connector in the stand with its matching
fiber.
Fig. C4

9
Fig. C5
Fig. C6
Fig. C7
SECTION C
Mounting
4. PREPARE THE SYRINGE AND EPOXY
Remove the plunger and protective cap from the syringe and
place both parts on a clean convenient surface along with the
dispensing tip. The epoxy supplied has been specifically
designed for use with fiber optic connectors and is packaged in
premeasured 2 gram bi-packs.
- Working time is 45 minutes.
- Cure time is 20 minutes, in 3M epoxy oven.
- Cure time is 18 hours at room temperature of 70ϖF (22ϖC).
- Shelf life is 9 months at 25ϖC. (Packages are dated).
(Refrigeration will prolong shelf life). If epoxy is stored at a
higher temperature, shelf life will be shortened.
- Each bi-pack will mount up to 30 connectors per mounter.
Bi-packs can be shared between 2 or 3 syringes, if desired.
Remove the separating bar by pulling the bi-pack ends. Mix the
two components together for one full minute by massaging the
package and rubbing it back and forth over the smooth edge of a
table (Fig. C5). Make sure that the epoxy is thoroughly mixed and
is a uniform blue color.
Note: Carefully follow safety, health and disposal information on
epoxy label or Material Safety Data Sheet.
Fig. C7a
5. LOAD THE SYRINGE WITH EPOXY
When thoroughly mixed, cut a small corner off of the package and
squeeze the contents into the syringe while holding the syringe
diagonally (Fig. C6).
Insert the plunger only about 3/8" (10 mm) and hold the syringe
pointing straight upward. After the epoxy settles on the plunger,
push in gently to expel any air through the tip of the syringe.
6. ATTACH THE EPOXY DISPENSING TIP
The mint green dispensing tips included in the field termination kit
are required for use with the 3M SC, FC3 and ST Push-Pull
connectors.
Push and twist-lock the dispensing tip onto the syringe body.
Depress the plunger and eject the epoxy until there are no air
pockets remaining.
7. INJECT EPOXY INTO THE CERAMIC FERRULE
Each time you inject a new connector, wipe the needle tip clean to
be sure that it is completely free of epoxy.
Insert the syringe tip into the back end of the connector until it
seats. Maintain pressure and slowly inject epoxy until a bead
appears on the end of the ceramic tip (Fig. C7 and Fig. C7a).
Continue to inject epoxy until the bead covers about one third of
the ferrule end face. Release the pressure on the plunger and
withdraw the needle straight back. DO NOT ALLOW EPOXY TO
FILL THE INSIDE OF THE CONNECTOR.
Note: Unlike other mounting procedures, do not place epoxy on
the fiber or in the back end of the connector.
Mint green color dispensing tip
stops and seals at this point, leaving
small reservoir of adhesive.
Epoxy
Bead
Buffer to contact ferrule.
Adhesive encapsulates
buffer in collar.

10
Fig. C8
Fig. C9
Fig. C10
Fig. C11
SECTION C
Mounting
8. THREAD THE CONNECTOR ONTO THE FIBER
Slide the crimp ring up the cable within 1/2" (13 mm) of the end of
the jacket. Hold the cable in one hand directly behind the crimp
ring and hold the connector in the other hand. Rest your hands
on the table or against each other and carefully thread the
connector straight onto the fiber. Slowly rotate the connector
between thumb and forefinger in order to ease the funneling of the
fiber into the guide hole of the ferrule (Fig. C8). Carefully observe
that the fiber is moving through the ferrule while threading the
connector. This ensures that the fiber hasn't broken during the
mounting process.
While rotating the connector, maintain a continuous light inward
pressure in order to assist entry alignment. Slowly slide the
connector onto the fiber until the buffer seats at the base of the
ferrule. The Kevlar must flare around the backbone of the
connector (Fig. C9).
Once the buffer is seated, do not pull on the fiber. Keeping the
fiber forward will ensure that the epoxy does not deposit anywhere
inside the body of the connector. Hold the connector in place and
carefully slide the crimp ring up over the Kevlar until the ring is
seated with the back end of the connector (Fig. C10).
9. CRIMP THE RING ONTO THE CONNECTOR BACKBONE.
Make sure that the crimp ring is fully seated over the back of the
connector. Hold the connector in place with your forefinger and
middle finger. Be sure that the crimp cavity marked .190
completely covers the upper portion of the ring and crimp the ring
to the connector, securing the Kevlar (Fig. C11).
Next, crimp the smaller diameter of the crimp ring to retain the
cable's jacket. Use cavity .137 for 3.0 mm and .120 for 2.4 mm.
Be careful not to pinch the cable between the jaws.
10. EXAMINE THE EPOXY BEAD
The correct epoxy bead height at the fiber should be between 2 to
4 fiber diameters (0.10" to 0.020") above the ceramic tip. If this is
not the case, additional epoxy must be applied around the fiber
base to build the bead to the proper height. A short piece of
buffered fiber with about 1/4" (6 mm) of exposed fiber makes a
good applicator.
To apply: Carefully deposit epoxy on the end of the ferrule
through the opening in the load adapter using a short piece of
buffered fiber .
Important: The outside diameter of the ceramic ferrule must be
free of epoxy. Excess epoxy will adhere the load
adapter to the ferrule during the curing process.

11
Fig. C12
Fig. C13
SECTION C
Mounting
11. SECURE THE STRAIN RELIEF BOOT
Use the syringe to apply two dabs of epoxy onto the larger half of
the crimp ring (Fig. C12). While holding the load adapter, slide the
boot up over the crimp ring and rotate it to evenly distribute the
epoxy.
The boot should cover only the crimp ring, not the plastic body of
the connector.
Note: Be sure to wipe away any excess epoxy using a dry lint-free
cloth.
For SC Connectors
Be sure to align the key on the boot with the flat, smooth side of
the connector (Fig. C13). Attach an alignment clip over the boot
and connector body to hold the boot in alignment while the epoxy
cures . The back of the alignment clip should cover the key on the
boot
(Fig. C14). (If the clips spread with use, pinch them closed while
warm.)
Fig. C14
Fig. C15
12. EPOXY CURING
When the oven is heated to the proper temperature, the heater
light will go off. Place the connector and load adapter into one of
the oven's ports (Fig. C15). After 20 minutes, remove the
connector from the oven and place it in the curing stand to cool.
Note: Do not score the fiber before the epoxy is cool and hard.
Note: Heat curing this epoxy in the 3M oven is required in order
to meet the Bellcore temperature requirement of +85
ϖ
C as
outlined in TR-NWT-000326 Issue 3. If compliance to this
specification is not necessary, the 3M epoxy can also be
cured overnight at room temperature.

12
SECTION D
Scoring
1. CAREFULLY REMOVE THE LOAD ADAPTER
2. SCORE THE FIBER
Hold the connector in a vertical position with the fiber pointing
upward. Score the fiber by drawing the scoring blade lightly
against the fiber, just above the epoxy bead (Fig. D1). The fiber
should merely be touched and not severed.
3. DETACH THE SCORED FIBER
Using your fingers, carefully remove the fiber by pulling straight up
from the ferrule. If the fiber is too short, use the scoring tool to
gently press against the fiber from the scored side until it breaks
along the score mark.
Note: Be sure to dispose of all fiber ends per company practice.
If the fiber should break off accidentally without the benefit
of proper scoring, polishing should still be attempted.
4. CHECK THE FIBER END
Check the quality of the score using the jeweler's loupe. The fiber
should not protrude from the epoxy bead more than one fiber
diameter (Fig. D2). If the fiber is longer than one diameter,
proceed as follows: Hold the connector in one hand and a sheet
of brown
5 ϑm acetate in the other. Using small circular strokes, shorten
the fiber to an acceptable length (Fig. D3).
Fig. D1
Fig. D2
Fig. D3

13
SECTION E
Standard Polishing Process for Single-mode and
Multimode Connectors (>30dB)
Note: See Section F to achieve >40 dB Return Loss.
1. PREPARE THE 5 ϑm POLISHING SURFACE
Clean the surface of the soft polishing pad with a lint-free cloth
dampened with isopropyl alcohol. Blow clean both sides of a
sheet of brown 5 ϑm lapping acetate. Place the acetate shiny
side down onto the soft pad.
Note: Carefully follow safety, health and disposal information on
container label or Material Safety Data Sheet for isopropyl
alcohol being used.
2. PREPARE THE POLISHING JIG AND CONNECTOR
Wipe the polishing surface of the jig with a lint-free cloth
moistened with isopropyl alcohol. Blow the entire jig clean with
compressed air. Clean the connector with compressed air only,
since wiping it may break the fiber.
Note: The polishing jig used in these procedures is designed
with three "wear indicators" on its polishing surface (Fig.
E1). Each indicator is 0.002" deep. As polishing is done,
the surface of the jig will be worn away. Uniform pressure
across the jig's surface during polishing will result in the
areas surrounding the "indicators" to wear evenly. Non-
uniform pressure will result in one or two indicators
disappearing, thereby requiring the jig to be replaced.
Fig. E1
Wear Indicator
(3 Places)

14
SECTION E
Standard Polishing Process for Single-mode and
Multimode Connectors
3. PERFORM THE 5 ϑm FINISH
While holding the polishing jig in your hand, insert the connector
so that the ferrule end does not protrude past the bottom of the
polishing jig. This is to ensure that the extended fiber from the
ferrule will not be broken off below the epoxy level upon initial
contact with the lapping film.
Note: The ferrule must be inserted straight into the jig hole. If
the ferrule tip is wiggled upon entering the composite jig,
the composite jig may be damaged.
Note: If the connector does not fit easily into the jig, examine the
sides of the ceramic ferrule for epoxy. Any excess epoxy
can be removed with a razor blade.
While holding both the connector and the polishing jig in one
hand, slowly place the jig on the lapping film and begin to polish in
a figure 8 motion without applying pressure on the connector (Fig.
E2). Light scratch marks should begin to appear on the acetate
surface.
Continue to polish until the fiber is flush with the epoxy bead
(approximately 6 figure 8's) (Fig. E3). Once the fiber is supported
by the epoxy bead, begin applying light pressure on the connector
while polishing in a figure 8 motion. Continue to polish on the 5
ϑm acetate until a thin layer of light blue color epoxy remains on
the ceramic tip (Fig. E4). Stop when the outer edges of the epoxy
layer start to break up and feather. This can be seen using the 7X
jewelers loupe.
Note: Until familiar with the process from this point, inspect the
remaining epoxy after each single figure 8 until a thin
feathered edge remains. DO NOT REMOVE ALL EPOXY
WITH THE 5
ϑ
m ACETATE.
Note: The 5
ϑ
m lapping acetate can be cleaned with isopropyl
alcohol and blown dry for reuse. The sheet can be used to
polish 2 to 4 connectors.
Fig. E2
Fig. E3
Fig. E4

15
SECTION E
Standard Polishing Process for Single-mode and
Multimode Connectors
4. PREPARE TO PERFORM THE 1 ϑm FINISH
Using an isopropyl alcohol dampened lint-free cloth, clean the
ferrule, the polishing jig, and the 5 ϑm lapping acetate. Blow all
pieces dry with compressed air.
Clean a sheet of the green 1 ϑm lapping acetate and place it shiny
side down directly on top of the 5 ϑm acetate which remains on
the polishing pad. Place three to four drops of water on the 1 ϑm
acetate (Fig. E5).
5. PERFORMING THE 1 ϑm FINISH
Insert the ferrule into the jig and lower it gently on to the
moistened green 1 ϑm acetate.
Lightly polish until all the epoxy is removed (15 to 20 figure 8's).
Inspect with the jewelers loupe (Fig. E6).
Do not overuse the 1 ϑm lapping acetate. Always attempt to
polish on fresh areas of the acetate. After the entire surface of the
acetate has been used it can be cleaned with isopropyl alcohol
and reused to polish several more connectors and then discarded.
If deep scratches appear on the fiber, discard the 1 ϑm acetate at
that time.
6. FINAL INSPECTION
After polishing, remove the connector from the polishing jig, clean
the ferrule and insert it into the fiber view scope (Fig. E7). The
fiber should be free of epoxy and scratches and be flush with the
domed end of the ceramic ferrule (Fig. E8). If scratches or epoxy
are present (Fig. E9) clean the 1 ϑm acetate surface and repeat
step 5 with frequent inspections.
Fig. E5
Fig. E6
Fig. E7
Fig. E8
Fig. E9

16
SECTION F
Polishing Process for Single-mode Connector Return
Loss >40dB
This process will need to be used for single-mode finishes with a
reflection requirement of 40dB or better. This specification is outlined in
Bellcore TR-NWT-00326 Issue 3.
1. PREPARE THE POLISHING SURFACE
Clean the surface of the soft polishing pad with a lint-free cloth
moistened with isopropyl alcohol. Blow clean both sides of a
sheet of brown 5 ϑm lapping acetate. Place the acetate shiny
side down onto the soft pad.
Note: Carefully follow safety, health and disposal information on
container label or Material Safety Data Sheet for isopropyl
alcohol being used.
Fig. F1
Fig. F2
2. PREPARE THE POLISHING JIG
Wipe the polishing surface of the composite jig with a lint-free
cloth moistened with isopropyl alcohol. Blow the entire jig clean
with compressed air.
Note: The polishing jig used in these procedures is designed
with three "wear indicators" on its polishing surface (Fig.
F1). Each indicator is 0.002" deep. As polishing is done,
the surface of the jig will be worn away. Uniform pressure
across the jig's surface during polishing will result in the
areas surrounding the "indicators" to wear.
Note: The composite polishing jig must be used when following
the >40dB process. The stainless steel jig, which is
available separately, can be used with the standard
polishing process only.
3. CHECK THE FERRULE HOLE IN THE POLISHING TOOL
In order to achieve greater than -40dB reflection on single-mode
connectors, it is extremely important that the polishing tool
accurately holds the ceramic ferrule radius on center during the
polishing procedure. This is accomplished by the squareness and
tight dimensional clearance of the polishing jig.
Periodically, check the ferrule hole in the jig using the NO/GO
gauge pin provided in the Field Termination Kit. The NO/GO pin
should not even start into the hole if the polishing jig is within
tolerance. To check the ferrule hole, gently insert the gauge pin
through the hole on the top of the polishing tool (Fig. F2). DO
NOT TRY TO FORCE THE PIN THROUGH THE OPENING. If
the pin does not pass through the hole, continue to use the tool to
polish single-mode connectors. If the pin does pass through the
opening of the tool, the tool has worn and should be used for
multimode finishes only.
Wear Indicator
(3 Places)

17
SECTION F
Polishing Process for Single-mode Connector Return
Loss >40dB
4. PERFORM THE 5 ϑm FINISH
While holding the polishing jig in your hand, insert the connector
so that the ferrule end does not protrude past the bottom of the
polishing jig. This is to ensure that the extended fiber from the
ferrule will not be broken off below the epoxy level upon initial
contact to the lapping film.
Note: The ferrule must be inserted straight into the jig hole. If
the ferrule tip is wiggled upon entering, the composite jig
may be damaged.
Note: If the connector does not fit easily into the jig, examine the
sides of the ceramic ferrule for epoxy. Any excess epoxy
can be removed with a razor blade.
While holding both the connector and the polishing jig in one
hand, slowly place the jig on the lapping film and begin to polish in
a figure 8 motion without applying pressure on the connector (Fig.
F3). Light scratch marks should begin to appear on the acetate
surface.
Continue to polish until the fiber is flush with the epoxy bead
(approximately 6 figure 8's) (Fig. F4). Once the fiber is supported
by the epoxy bead, begin applying light pressure on the connector
while polishing in a figure 8 motion. Continue to polish on the 5
ϑm acetate until a thin layer of light blue color epoxy remains on
the ceramic tip (Fig. F5). Stop when the outer edges of the epoxy
layer start to break up and feather. This can be seen using the 7X
jewelers loupe.
Note: Until familiar with the process from this point, inspect the
remaining epoxy after each single figure 8 until a thin
feathered edge remains. DO NOT REMOVE ALL OF THE
EPOXY WITH THE 5
ϑ
m ACETATE.
Note: The 5
ϑ
m lapping acetate can be cleaned with isopropyl
alcohol and blown dry for reuse. The sheet can be used to
polish 2 to 4 connectors.
Fig. F3
Fig. F4
Fig. F5
5. PREPARE TO PERFORM THE 1.5 ϑm FINISH
Using an isopropyl alcohol dampened lint-free cloth, clean the
ferrule and the polishing jig. Blow both parts dry with compressed
air.
Clean a sheet of the 1.5 ϑm diamond lapping acetate and place it
shiny side down directly onto the clean polishing pad.

18
SECTION F
Polishing Process for Single-mode Connector Return
Loss >40dB
6. PERFORM THE 1.5 ϑm FINISH
Insert the ferrule into the jig and lower it gently onto the 1.5 ϑm
acetate.
Using medium pressure (equivalent to 1 lb of force), perform four
figure 8 strokes. Rotate the ferrule in the jig 180ϖ (Fig. F6) and
perform another four figure 8's. Continue to follow this sequence
rotating 180ϖ every 4 strokes until 6 sets of 4 figure 8's (24 total)
have been performed.
Note: Without rotating the ferrule the radius center may drift.
Rotating effectively eliminates this.
Clean the ferrule with a lint-free cloth moistened with isopropyl
alcohol and inspect the fiber using the 100X view scope. The
fiber should be completely smooth and all the epoxy removed as
in Fig. F7. If epoxy remains or scratches or rough edges are
present on the fiber as in Fig. F8, perform a few more figure 8
strokes on each 180ϖ orientation.
Note: If all of the epoxy was removed from the fiber during the
first step of polishing, the fiber surface may be heavily
scratched and pitted. If this is the case, perform another
set of figure 8's on each 180
ϖ
orientation and inspect again.
Note: The 1.5
ϑ
m diamond film can be cleaned with isopropyl
alcohol and blown dry for reuse. The sheet can be used to
polish up to 15 connectors.
Fig. F6
Fig. F7
Fig. F8

19
SECTION F
Polishing Process for Single-mode Connector Return
Loss >40dB
7. PREPARE TO PERFORM THE FINAL POLISH
Using an isopropyl alcohol dampened lint-free cloth, clean the
ferrule and the polishing jig.
Clean a sheet of the final polishing film and place it shiny side
down onto the clean polishing pad. Section the film into four (4)
quarters. Mark the section 1, 2, 3 and 4. Place a few drops of
water on section 1 of the film (Fig. F9).
8. PERFORM THE FINAL POLISH
Insert the ferrule into the jig and lower it gently onto the moistened
polishing film.
Using the same medium pressure as in step 6, perform small
circles in a spirograph pattern as shown in (Fig. F10). Perform 25
circular strokes. Wipe the ferrule dry with a lint-free cloth and
inspect the ferrule end using the 100X microscope. The fiber
should be completely smooth and free of any scratches (Fig. F11).
If scratches are present in the fiber, perform an additional 3 to 5
strokes on an unused area of the film and inspect again. If
necessary a final lapping of 3 to 5 strokes can be performed.
Note: The final polishing film can be used to polish up to 4
ferrule ends. Be sure to use a fresh area of the polishing
film each time a new connector is to be polished.
Fig. F9
Fig. F10
Fig. F11

20
SECTION G
Final Cleaning
1. BLOW THE DUST CAP WITH COMPRESSED AIR
2. WIPE THE CERAMIC FERRULE WITH AN ISOPROPYL
ALCOHOL DAMPENED LINT-FREE CLOTH (Fig. G1)
Be sure to wipe the entire length of the ferrule and the ferrule tip.
Note: Carefully follow safety, health and disposal information on
container label or Material Safety Data Sheet for isopropyl
alcohol being used.
3. BLOW THE FERRULE WITH THE COMPRESSED AIR
4. IMMEDIATELY COVER THE FERRULE WITH THE DUST CAP
Fig. G1
SECTION H
Mounting Unjacketed/900
m Buffered Fiber
Note: General instructions for preparation for mounting may be
found in Section B steps 1 - 4.
1. SLIP THE STRAIN RELIEF BOOT ONTO THE BUFFERED
FIBER, SMALL END FIRST (Fig. H1)
Fig. H1
Fig. H2
Fig. H3
Fig. H4
2. PLACE THE CRIMP RING ONTO THE STRAIN RELIEF TUBE
Measure and mark the clear strain relief tube 3/16" (5 mm) from
its end. Slide the smaller diameter of the black 3.0 mm crimp ring
onto the tube until the end of the ring aligns with the mark on the
tube (Fig. H2).
3. PLACE THE CLEAR TUBE WITH THE CRIMP RING ONTO THE
BUFFERED FIBER (Fig. H3)
The larger diameter of the crimp ring MUST be towards the end of
the fiber.
4. REMOVE 3/4" (19 mm) OF BUFFER USING THE NO-NIK TOOL
(Fig. H4)
(Refer to Section B, step 9).
5. CLEAN THE FIBER WITH ISOPROPYL ALCOHOL
(See Section B, step 10).
Note: Carefully follow safety, health and disposal information on
container label or Material Safety Data Sheet for isopropyl
alcohol being used.
6. CONTINUE WITH STEPS C1 - C7
/