Page 3
STEP 3 - TUB JAMBS:
Ÿ The Tub Jamb (3) opposite the shower head wall is installed first
Ÿ Set Tub Jamb in gap between the Stay Clean Sill (2) and wall
Ÿ Plumb the jamb
Ÿ Mark only the bottom Tub Jamb hole using the factory hole as a
template
Ÿ Drill the hole with a 3/16” drill bit (carbide bit for masonry)
Ÿ Insert one Wall Anchors
Ÿ Insert a 1 - #8x1-1/2” FHPHSMS (8) into
bottom hole
Ÿ
Ÿ
Ÿ
(9) into the tile. See Illustration #1
Bumper Guide (5) and
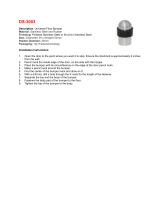
Orient Bumper Guide with panel crevice to outside. Illustration #4
Tighten screw until snug.
Secure top of jamb to wall on both sides with painter’s tape
--------
Ÿ Position and plumb the second Tub Jamb onto the opposite wall,
Ÿ Plumb with a level and mark all three holes.
Ÿ Drill the holes with a 3/16” drill bit. Insert three Wall Anchor (9)
and secure Tub Jamb with three #8 X 1-1/2” FHPHSMS (8) and 2
- Bumper Guides (5). Panel crevice of these bumper guides
should be oriented inside of unit. Illustration #4.
.
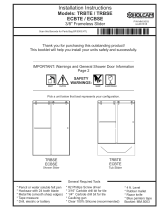
STEP 4 - TUB HEADER:
Ÿ Measure wall to wall at the top of the Tub Jambs
Ÿ Deduct 1/16” and cut Tub Header (1) to length
Ÿ Drill a 1/8" hole at each end on the inside. Screw size is a
#6x3/8” PHPHSMS (7), see illustration #5.
-----
Ÿ Make sure that the Tub Jamb opposite the showerhead (only one screw) is
snug, and secured with painters tape
Ÿ Place inside panel (Knob Panel) inside the shower or tub stall. Lean against
the back wall. Use pad to protect the glass/tile from damage. See Illustration #3
Ÿ Hang outside panel (Towel Bar Panel) in place in the and slide to
showerhead wall (fully secured Tub Jamb)
Ÿ Install the inside panel and slide to wall opposite shower head
Ÿ Ensure rollers on both panels are fully seated into the header tracks
Ÿ Install the Center Guide (6) and securing it with one #6x3//8” MS (7).
STEP 5- PANEL INSTALLATION:
STEP 6 - PANEL ALIGNMENT and FINAL PANEL INSTALLATION:
Ÿ Standing outside the shower, slowly move the sliding panels one at a time into the
proper Bumper Guides (5) and Tub Jambs (3)
Ÿ Adjust the header side to side (you will have to remove and reapply painter’s tape)
until both panels pocket perfectly into both Tub Jambs
Ÿ When the panels pocket perfectly, mark the remaining two holes of the Tub Jamb
onto the wall opposite the showerhead
Ÿ Slide both panels back to the showerhead Tub Jamb
Ÿ Remove the Center Guide
Ÿ Remove both sliding panels and set them in a safe place on a padded surface.
Ÿ Move the Tub Jamb out of the way just far enough to reveal the marked holes and
drill the holes with a 3/16” drill bit
Ÿ Insert two Wall Anchors (9)
Ÿ Realign the Tub Jamb and secure with two #8 X 1-1/2” FHPHSMS (8). Ensure you
install the top Bumper Guide (5) when you install the top screw
Ÿ Reinstall both of the sliding glass panels as you did earlier in the last step, then
reinstall the Center Guide
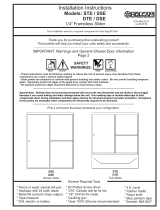
ILLUSTRATION #6
Anti Jump Runner
w/ Red Tape
1/8”
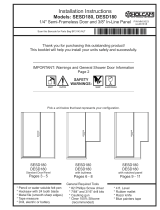
ILLUSTRATION #5
Step #1
Mark Centerline
up walls and
along threshold
Install this side
Tub Jamb first
Showerhead
Wall
set inside
panel
Inside
shower
Ÿ Find Parts Bag BP.3000.NTL - Anti-Jump Runners (19) and follow installation
instructions (see Illustration #6). NOTE: Use of runners is encouraged, but
optional and must be ordered separately on some units
-----
Ÿ Set header in place over the Tub Jambs but do not secure at this time.
ILLUSTRATION #3
ILLUSTRATION #4
1
Bumper Guide orientation for
showerhead right
Reverse above orientation for
showerhead left
1/8”
3
1
Installation Instructions
3/8" Frameless Slider
Models: ESE / ETE or ELTE / ELSE