
May 2018
Arlo Technologies, Inc.
2200 Faraday Ave. Suite 150
Carlsbad, CA 92008 USA
202-11380-14
Arlo
HD Security Camera System
User Manual

2
Support
For product updates and web support, visit http://www.arlo.com/en-us/support/.
Trademarks
© Arlo Technologies, Inc. Arlo, Arlo logo, and Every Angle Covered are trademarks of Arlo Technologies, Inc. App Store is a service
mark of Apple Inc., registered in the U.S. and other countries. Google Play and the Google Play logo are trademarks of Google
Inc. Amazon, Alexa and all related logos are trademarks of Amazon.com, Inc. or its aliates. Other trademarks are for reference
purposes only.
Compliance
For the current EU Declaration of Conformity, visit
http://support.netgear.com/app/answers/detail/a_id/11621/.
For regulatory compliance information, visit
http://www.netgear.com/about/regulatory/.
See the regulatory compliance document before connecting the power supply.

3
Contents
1. Set Up Your System 6
How Arlo Works .......................................................................................................................................................................................6
Get the Arlo App .................................................................................................................................................................................... 6
Connect Your Base Station to the Internet ....................................................................................... 7
Arlo Base Station LEDs ..............................................................................................................................................................8
Get an Account ........................................................................................................................................................................................8
Insert Batteries Into Your Cameras ...................................................................................................................9
Sync Your Cameras With the Base Station ....................................................................................... 10
Arlo Camera LED ................................................................................................................................................................................ 11
Firmware Updates .........................................................................................................................................................................12
Add a Camera From Another Arlo Account .......................................................................................12
Place or Mount Your Cameras .................................................................................................................................. 13
Choose a Good Spot for Your Camera .......................................................................................................13
Position Your Camera to Optimize Its Field of View 14
Position Mode .........................................................................................................................................................................................16
2. View Your Content 17
View the Devices Page ...........................................................................................................................................................17
View Camera Feeds ......................................................................................................................................................................18
Pan and Zoom Video ....................................................................................................................................................................18
Record Clips From Live Video .....................................................................................................................................19
Take a Snapshot From Live Video .......................................................................................................................19
Control the Camera Feed Image ..........................................................................................................................20
Cloud Recording ................................................................................................................................................................................. 22
View Recordings and Snapshots .......................................................................................................................... 22
Share and Manage Library Recordings ....................................................................................................24
Optimize Video Quality ............................................................................................................................................................26

4
3. Personalize Your System 28
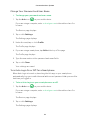
Name Your Cameras .................................................................................................................................................................... 28
Profile Settings ..................................................................................................................................................................................... 28
Grant Access to Friends ......................................................................................................................................................30
4. Modes, Rules, and Smart Alerts 33
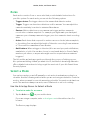
Modes ....................................................................................................................................................................................................................33
Rules ........................................................................................................................................................................................................................ 34
Select a Mode ......................................................................................................................................................................................... 34
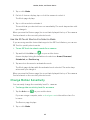
Change Motion Sensitivity ...............................................................................................................................................35
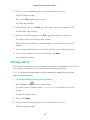
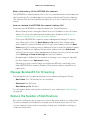
Manage Alerts ........................................................................................................................................................................................ 36
Set Up Geofencing .........................................................................................................................................................................37
Geofencing With Multiple Mobile Devices ...........................................................................................39
Geofencing Accuracy ...............................................................................................................................................................40
Geofencing First In, Last Out ...................................................................................................................................... 40
Schedule Your Camera Rules ......................................................................................................................................41
Add a Mode ..................................................................................................................................................................................................42
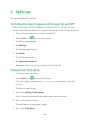
5. Settings 44
Turn the Arlo App Fingerprint ID Login On and O 44
Change the Time Zone ............................................................................................................................................................ 44
Video Settings ........................................................................................................................................................................................ 45
Base Station Settings .............................................................................................................................................................. 46
View Device Information ..................................................................................................................................................... 49
Turn an Arlo Camera On and O ...........................................................................................................................49
Remove a Camera From Your Account ...................................................................................................... 50
6. Manage Your Subscription Plan 51
Subscription Plans .........................................................................................................................................................................51
Upgrade to a Paid Subscription Plan ............................................................................................................51

5
7. Arlo Connect 52
Use Arlo With IFTTT ......................................................................................................................................................................52
Use Arlo Cameras With SmartThings ............................................................................................................52
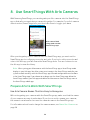
8. Use SmartThings With Arlo Cameras 53
Prepare Arlo to Work With SmartThings ................................................................................................ 53
Integrate Your Arlo Cameras With the SmartThings App 54
Adjust the Motion Sensitivity Level ................................................................................................................55
Adjust Push Notifications .................................................................................................................................................. 56
9. FAQs and Troubleshooting 57
Battery FAQs ............................................................................................................................................................................................ 57
Manage Bandwidth for Streaming ...................................................................................................................58
Reduce the Number of Notifications ...........................................................................................................58
Can’t See Video Streams in a Browser ......................................................................................................59
Not Receiving Push Notifications .......................................................................................................................60
Verify That the Arlo Base Station Is Online ...................................................................................... 62
Base Station Is Oine ............................................................................................................................................................. 63
Signal Strength .................................................................................................................................................................................... 64
Reset the Arlo Base Station to Factory Settings 65
10. Battery Warnings and Safety 67
Counterfeit and Inferior-Quality Battery Warning 67
Rechargeable Battery Warning ............................................................................................................................. 67
Safe Battery Handling and Usage ..................................................................................................................... 68

6
1. Set Up Your System
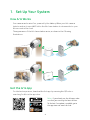
How Arlo Works
Your camera works wire-free, powered by the battery. When your Arlo camera
detects motion, it uses a WiFi link to the Arlo base station to stream video to your
Arlo account in the cloud.
The appearance of the Arlo base station varies, as shown in the following
illustrations.
Get the Arlo App
For the best experience, download the Arlo app by scanning this QR code or
searching for Arlo in the app store.
Note: If you already use the Arlo app, make
sure that you are using the latest version.
To find out if an update is available, go to
the app store and search for Arlo.

7
Set Up Your System
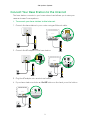
Connect Your Base Station to the Internet
The base station connects to your home network and allows you to view your
camera streams from anywhere.
¾ To connect your base station to the Internet:
1. Connect the base station to your router using an Ethernet cable.
2. Connect the AC adapter to the base station.
3. Plug the AC adapter into an electrical outlet.
4. If your base station includes an On-O button on the back, press the button.
SYNC
Ethernet
DC
Reset
SYNC
Reset
Ethernet
DC
SYNC
Ethernet
DC

8
Set Up Your System
The Power LED and Internet LED light green in about two minutes.
Your base station is set up.
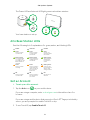
Arlo Base Station LEDs
See the following list of explanations for green, amber, and blinking LEDs:
Get an Account
¾ To set up an Arlo account:
1. Tap the Arlo icon on your mobile device.
If you are using a computer, enter arlo.netgear.com in the address bar of a
browser.
If you are using a mobile device that supports a Touch ID
®
fingerprint identity
sensor, you are prompted to enable Touch ID or skip.
2. To use Touch ID, tap Enable Touch ID.
SYNC
Ethernet
Reset
DC
Green
The base station
is powered on.
Blinking green
A firmware update
is in progress. DO
NOT TURN OFF THE
BASE STATION OR
CAMERAS.
O
The base station
is powered o.
Green
The base station
is connected to
the Internet.
Blinking green
The base station is
sending data over
the Internet.
Amber
The base station is
connected to the
router but did not
get an Internet
connection.
O
The base station is
not connected to
your router.
Green
Cameras are
connected to the
base station.
Blinking green
The base station
is attempting
to sync with a
camera.
Blinking amber
A camera is too
far from the base
station. Signal
strength is weak.
O
No cameras are
detected.
Amber
The base station
is booting.
Power Internet Camera

9
Set Up Your System
If you tap Skip, you can turn on the Arlo app fingerprint ID login later. See Turn
the Arlo App Fingerprint ID Login On and O on page 44.
3. Tap or click New to Arlo?.
4. Select Arlo (Wire-Free).
The app discovers your device.
5. Select your base station’s serial number from the menu.
6. Complete the required fields for account setup.
7. Tap or click Continue.
8. Select a subscription plan.
Note: For more information, see Subscription Plans on page 51.
Insert Batteries Into Your Cameras
We recommend that you use the batteries supplied by NETGEAR, or high-quality
batteries from other established, well-known manufacturers such as Panasonic
®
,
Energizer
®
, or Duracell
®
, with your Arlo cameras.
¾ To insert batteries into your cameras:
1. Slide and hold the latch on the bottom of the camera.
2. Slide the battery door back and lift it to open the battery compartment.
3. Insert two batteries near the back of the camera. Pay careful attention to the
orientation of the batteries when you insert them.

10
Set Up Your System
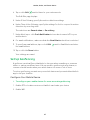
4. Insert two batteries near the compartment hinge. Pay careful attention to the
orientation of the batteries when you insert them.
5. Close the battery door.
For more information, see Safe Battery Handling and Usage on page 68.
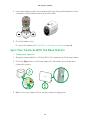
Sync Your Cameras With the Base Station
¾ To sync your cameras:
1. Bring the camera within 1 to 3 feet (30 to 100 centimeters) of the base station.
2. Press the Sync button on the base station for about two seconds and then
release the button.
3. Wait for the sync status LED on the base station to light green.
SYNC
Ethernet
Reset
DC
SYNC
Ethernet
Reset

11
Set Up Your System
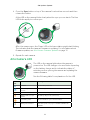
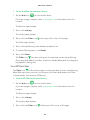
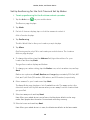
4. Press the Sync button on top of the camera for about two seconds and then
release the button.
A blue LED on the camera blinks slowly when the sync process starts. The blue
LED blinks rapidly to confirm sync.
After the camera syncs, the Power LED on the base station might start blinking.
This indicates that the camera’s firmware is updating. For information about
firmware updates, see Arlo Camera Firmware Updates on page 12.
5. Repeat for each camera.
Arlo Camera LED
The LED on the camera lights when the camera is
powered on. The LED changes color and blinks depending
on the battery charge and to indicate the status of
activities such as syncing the camera and updating the
camera firmware.
See the following table for explanations for the LED.
Camera
LED
Color and Action Meaning
Solid blue The camera is powered on.
Fast blinking blue for 10
seconds
The camera synced to the base station.
Solid amber The camera is booting.
Blinking amber once per
minute
The battery charge is low (15% or less).
Fast blinking amber The camera failed to sync to the base station.
Blinking blue and amber A firmware update is in progress. DO NOT TURN OFF THE
CAMERA.

12
Set Up Your System
Firmware Updates
A firmware update might start after you sync a camera to the base station. If a
firmware update is in progress, the LED on the camera blinks alternating blue and
amber. After this, the LED is o for one to two minutes while the camera installs
the firmware. This update happens automatically.
Important: Do not open the battery door while an Arlo camera is updating and
installing firmware.
After the camera firmware update completes, the camera syncs to the base
station again and the LED blinks blue rapidly.
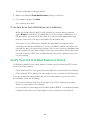
Add a Camera From Another Arlo Account
¾ To add a camera from another Arlo account:
1. Tap the Arlo icon on your mobile device.
If you are using a computer, enter arlo.netgear.com in the address bar of a
browser.
The Devices page displays.
2. Log in to the old Arlo account.
3. Tap or click Settings > My Devices.
A list of devices including the base station and cameras displays.
4. Tap or click the camera.
The settings for the camera display.
5. Scroll down and tap or click Remove Device.
The camera is removed from your account.
6. Log out of the Arlo app.
7. Sync the camera to the base station.

13
Set Up Your System
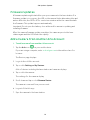
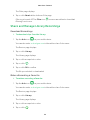
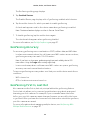
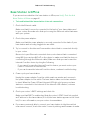
Place or Mount Your Cameras
You can place your camera on a shelf or other
flat surface, or you can mount it on the wall.
Note: Use the Arlo app in Position mode to help aim
the camera. See Position Mode on page 16.
¾ To mount your camera on the wall:
1. Fasten the mounting screw into the
wall, and hang the magnetic mount from the
screw.
2. If you’re mounting the camera on drywall, be
sure to use the plastic drywall anchors that
are provided.
Note: You can also use double-sided tape instead
of screws.
Choose a Good Spot for Your Camera
Place your Arlo camera in a location with a clear, unblocked field of view and with a
good WiFi signal to the base station.
It’s important to keep distance in mind when placing your Arlo cameras:
• Maximum. Place your camera a maximum of 300 feet (90 meters) from the base
station. The maximum line-of-sight range of 300 feet is reduced by each wall,
ceiling, or other major obstruction between the camera and base station. The
following materials reduce signal strength the most:
• Unusually thick walls and ceilings
• Brick
• Concrete
• Stone
• Ceramic
• Glass, especially mirrors
• Metal
• Large quantities of water, such as the water in a fish tank or water heater

14
Set Up Your System
Note: Check the Camera LED on the base station. If it’s blinking amber, the base station
detects a low data rate, a sign that a camera is too far from the base station.
• Minimum. Place your Arlo cameras at 10 feet (300 centimeters) away from the
base station, and allow at least 6½ feet (2 meters) between cameras. Follow
these guidelines to prevent WiFi signals between the devices from interfering
with each other.
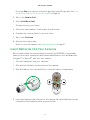
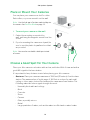
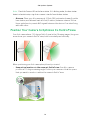
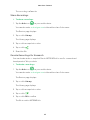
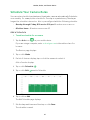
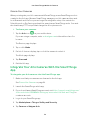
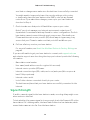
Position Your Camera to Optimize Its Field of View
Your Arlo camera has a 110-degree field of view. In the following images, the green
areas show your camera’s field of view, both horizontally and vertically.
When positioning your Arlo camera, keep these tips in mind:
• Keep active locations in the camera’s field of view. Your Arlo camera
provides a 110-degree viewing angle. Position your camera so that the space
that you want to monitor is within the camera’s field of view.

15
Set Up Your System
• Aim with the cloud. Use Arlo’s Position mode to send video to the cloud as
quickly as possible. This allows you to aim the camera while watching the video
feed on your Arlo smartphone app to make near-real-time adjustments to the
camera’s position. Go to your camera’s Settings page to turn on Position mode.
After the camera is in place, you can turn o Position mode, or wait for it to
automatically turn o after five minutes. For more information, see Position
Mode on page 16.
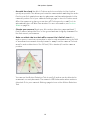
• Elevate your camera. Mount your Arlo motion detection camera at least 7
feet (2 meters) above the floor or the ground and aim it slightly downward for
the best sensor performance.
• Make sure that side-to-side trac crosses Arlo’s field of view. Arlo’s
motion sensor is much more sensitive to side-to-side movement across its field
of view than to movement directly toward or away from the camera. The best
area for motion detection is 5 to 20 feet (1.5 to 6 meters) from the camera
position.
You can use the Motion Detection Test to verify if motion can be detected in
a camera’s current placement. The camera’s LED blinks amber when motion is
detected. Go to your camera’s Settings page to turn on the Motion Detection
Test.

16
Set Up Your System
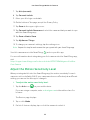
Position Mode
Position mode is available only when the camera is not streaming, recording motion,
or in a motion detection mode.
¾ To place your camera in Position mode:
1. Tap the Arlo icon on your mobile device.
If you are using a computer, enter arlo.netgear.com in the address bar of a
browser.
If you are using a mobile device that supports a Touch ID fingerprint identity
sensor, you are prompted to enable Touch ID or skip.
2. Tap the gear icon for the camera feed on your mobile device.
The Settings page displays.
3. Tap or click Position Mode.
Note: If Position Mode is grayed out and you cannot tap it, the camera might be in
Armed mode or another motion detection mode. To stop motion detection, tap Mode,
and then select Disarmed for the camera.
The camera starts streaming video.
In Position mode, the camera streams video as fast as possible, without
buering, so that you can aim the camera while watching on a smartphone and
make near-real-time adjustments. This means that you might see lower-quality
video while the camera is in Position mode.
4. Adjust the camera position as needed.
5. If you selected the Disarmed mode for the camera and now you want the
camera to detect motion again, tap Mode and select the desired mode.

17
2. View Your Content
Videos recorded by your camera are stored in a library. You can view your recordings,
mark them as favorites, and search using the filter.
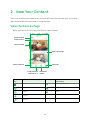
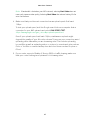
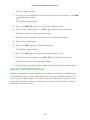
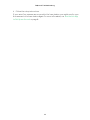
View the Devices Page
When you launch the Arlo app, the Devices page displays.
Live Feed
Icon
Tap or click Live to display Camera Icon Display is based on the mode and
camera setup
Pause. Motion detection is on.
Record video manually. WiFi signal.
Snapshot. Battery.
Brightness.
Full screen.
Camera name
Camera feed
Camera icons
Select devices
New recordings
Snapshot and
video library
Detection
modes
Settings

View Your Content
18
View Camera Feeds
You can view your camera feeds at any time.
¾ To view camera feeds:
1. Tap the Arlo icon on your mobile device.
If you are using a computer, enter arlo.netgear.com in the address bar of a
browser.
The Devices page displays. The icons above each camera feed depend on the
rules in the currently selected mode and how the camera is connected. For
information about these icons, see View the Devices Page on page 17.
2. To view a live feed, tap or click Live on the camera feed image.
A row of live feed icons displays below the live stream image for the camera.
3. To stop viewing the live feed, tap or click the Pause icon.
Pan and Zoom Video
You can pan and zoom to focus in on the high-def details of any live or recorded
video. Just pinch and drag any image as you do with photos on your smartphone.
¾ To pan and zoom video:
1. Tap the Arlo icon on your mobile device.
If you are using a computer, enter arlo.netgear.com in the address bar of a
browser.
The Devices page displays.
2. Tap or click Library.
The calendar displays on the top of the page.
3. Tap or click any live video or prerecorded video from your Arlo library.
4. To pan and zoom using a mobile device, do the following:
• To zoom in and out of the video, use the pinch gesture.
• To move around the zoomed-in frame, touch and drag.
5. To pan and zoom using a computer, do the following:
• To zoom in and out, click the Zoom icon.
• To move around in the frame, use your mouse button.

View Your Content
19
Record Clips From Live Video
¾ To record clips from live video:
1. Tap the Arlo icon on your mobile device.
If you are using a computer, enter arlo.netgear.com in the address bar of a
browser.
The Devices page displays.
2. Tap or click Live in the camera feed image.
The camera feed icons display at the bottom of the camera feed image.
3. Tap or click Record Video .
This icon turns red to indicate that you are recording the live feed.
4. To stop recording, tap or click Record Video .
The recording is saved in your library.
Take a Snapshot From Live Video
¾ To take a snapshot from live video:
1. Tap the Arlo icon on your mobile device.
If you are using a computer, enter arlo.netgear.com in the address bar of a
browser.
The Devices page displays.
2. Tap or click Live in the camera feed image.
The camera feed icons display at the bottom of the camera feed image.
3. Tap or click Snapshot .
The snapshot is saved in your library.

View Your Content
20
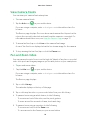
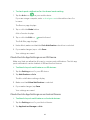
Control the Camera Feed Image
If you use more than one camera, you can change the order in which the camera feeds
are displayed on the Devices page. You can also zoom, invert, or rotate the camera
feed image.
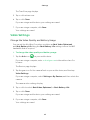
Change the Camera Order
¾ To change the camera order on the Devices page:
1. Tap the Arlo icon on your mobile device.
If you are using a computer, enter arlo.netgear.com in the address bar of a
browser.
The Devices page displays.
2. Tap or click Settings.
The Settings page displays.
3. Under SYSTEM, tap or click Device Order.
A list of devices displays in the order that they display on the Devices page.
4. If you are using a smartphone or tablet, tap Edit at the top of the page.
A list of devices displays.
5. Tap and hold or right-click a camera and drag it to the correct position on the
list.
6. Tap or click Done.
Your settings are saved.
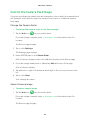
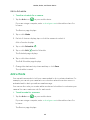
Zoom a Camera Image
¾ To zoom a camera image:
1. Tap the Arlo icon on your mobile device.
If you are using a computer, enter arlo.netgear.com in the address bar of a
browser.
The Devices page displays.
Page is loading ...
Page is loading ...
Page is loading ...
Page is loading ...
Page is loading ...
Page is loading ...
Page is loading ...
Page is loading ...
Page is loading ...
Page is loading ...
Page is loading ...
Page is loading ...
Page is loading ...
Page is loading ...
Page is loading ...
Page is loading ...
Page is loading ...
Page is loading ...
Page is loading ...
Page is loading ...
Page is loading ...
Page is loading ...
Page is loading ...
Page is loading ...
Page is loading ...
Page is loading ...
Page is loading ...
Page is loading ...
Page is loading ...
Page is loading ...
Page is loading ...
Page is loading ...
Page is loading ...
Page is loading ...
Page is loading ...
Page is loading ...
Page is loading ...
Page is loading ...
Page is loading ...
Page is loading ...
Page is loading ...
Page is loading ...
Page is loading ...
Page is loading ...
Page is loading ...
Page is loading ...
Page is loading ...
Page is loading ...
-
 1
1
-
 2
2
-
 3
3
-
 4
4
-
 5
5
-
 6
6
-
 7
7
-
 8
8
-
 9
9
-
 10
10
-
 11
11
-
 12
12
-
 13
13
-
 14
14
-
 15
15
-
 16
16
-
 17
17
-
 18
18
-
 19
19
-
 20
20
-
 21
21
-
 22
22
-
 23
23
-
 24
24
-
 25
25
-
 26
26
-
 27
27
-
 28
28
-
 29
29
-
 30
30
-
 31
31
-
 32
32
-
 33
33
-
 34
34
-
 35
35
-
 36
36
-
 37
37
-
 38
38
-
 39
39
-
 40
40
-
 41
41
-
 42
42
-
 43
43
-
 44
44
-
 45
45
-
 46
46
-
 47
47
-
 48
48
-
 49
49
-
 50
50
-
 51
51
-
 52
52
-
 53
53
-
 54
54
-
 55
55
-
 56
56
-
 57
57
-
 58
58
-
 59
59
-
 60
60
-
 61
61
-
 62
62
-
 63
63
-
 64
64
-
 65
65
-
 66
66
-
 67
67
-
 68
68


Arlo (VMC3030) User manual
- Type
- User manual
- This manual is also suitable for
Ask a question and I''ll find the answer in the document
Finding information in a document is now easier with AI
Related papers
-
Arlo VMS3130-100NAS User manual
-
-
-
Netgear VMB4000-100NAS User manual
-
-
Arlo VMS4230P-100NAS User manual
-
-
-
-
Arlo VML4030-200NAS User manual
Other documents
-
-
-
Amazon Renewed VMC3030-100NAR Installation guide
-
Samsung button User manual
-
-
-
-
Samsung GP-AEOMSSUS User manual
-
-