Page is loading ...

PowerView® Venetian Blind 18VDC
The PowerView® M25S single shaft motor is suited to be used with Ultimate Venetian blind hardware from
HunterDouglas.
1. Delivery condition
As standard, no remote control or hub is connected to the motor. No limits are set. Motor is default set to
Venetian
blind motor type. If the motor condition is unknown, perform the following steps.
1.1. Check motor type
The motor can be programmed as a
• 16mm Venetian blind
• 25mm Venetian blind (default)
By reading out the LED sequence after power up, the motor type can be seen.
Venetian blind
IMPORTANT
The motor type (default set to
25mm Venetian blind
), has to be changed to
Venetian blind 16 or 25mm
type. Use the
PowerView® Programmer
software tool to change.
MANUAL
Page 1 of 22 version: 1.1

1.2. End limits reset (factory default)
This procedure will erase all limits stored in the volatile motor memory. It will not clear the Network ID and Group
assignments. Completing an End limits reset will prevent a PowerView® remote or App from operating a window covering
until it is reprogrammed.
1.1.1 Power up the motor by connecting the power cable to
the battery wand or power supply.
1.1.2 Immediately Check the motor button LED sequence
after start up.
1.1.3 The LED sequence should read:
16mm Venetian blind
25mm Venetian blind
Note
This procedure can be skipped for a fresh out of the box motor.
The motor will jog 2x when receiving any PowerView® command (e.g. Pressing the manual control button on the motor),
to conrm no limits are set.
MANUAL
Page 2 of 22 version: 1.1

1.2.1 Remove power from the motor by disconnecting the
power cable from the battery wand or power supply
and wait for 20 seconds.
1.2.2 Press and hold the manual control button on the
motor.
1.2.3 Reconnect power to the motor while press and hold
the manual control button .
The motor LED turns red/green
1.2.4 Press and hold the manual control button until the
motor jogs 1x.
MANUAL
Page 3 of 22 version: 1.1

1.3. Network reset
This procedure will erase all network data stored in the motor, including Network ID and Group assignments. It will not
clear the end limits. Completing a Network reset will prevent a PowerView® remote or App from operating the window
covering until it is reprogrammed.
2. Pairing a remote
A PowerView® remote can control up to 6 individual groups of blinds (buttons 1 to 6 at the top of the remote). The
instructions below assign a blind to group 1.
1.2.5 Release the manual control button .
The end limits have been cleared.
1.3.1 Press and hold the manual control button on the
motor for 12 seconds.
The blind will jog 1x at 6 seconds and a second time at
12 seconds
1.3.2 Release the manual control button after the
second jog. The Network ID and Group assignments
have been cleared.
The Network ID and Group assignments have
been cleared.
MANUAL
Page 4 of 22 version: 1.1

2.1 Locate the manual control button on your blind.
2.2
Press and hold the stop button for 6 seconds.
Keep pressing until the remote lights start blinking
2.3
Press the group1 button.
IMPORTANT
Watch out to perform steps 2.4 and 2.5 within 3 seconds!
2.4 Press and hold the manual control button .
MANUAL
Page 5 of 22 version: 1.1

3. Checking motor direction
3.1. Put motor in program mode
2.5
Press the open button.
The blind will jog 1x
2.6 Release the manual control button .
2.7
Press and hold the stop button for 6 seconds.
Keep pressing until the remote lights stop blinking
The remote will exit programming mode
automatically after 20 seconds.
IMPORTANT
Reversing motor direction is only possible with a fresh out of the box motor (no limits set) or when the end limits are
reset
.
Before any limits are programmed, the motor direction has to be checked and reversed if needed.
If the top or bottom limit is already set, and the motor direction has to be reversed, perform a
reset
before continuing.
IMPORTANT
Watch out to perform steps 3.1.1 and 3.1.2 within 3 seconds!
MANUAL
Page 6 of 22 version: 1.1

3.2. Check and conrm
3.1.1 Press and hold the manual control button .
3.1.2
Press the open button.
Make sure group1 on the remote is selected.
The blind will jog 1x
3.1.3 Release the manual control button .
The motor LED turns red to acknowledge the motor is
in program mode
3.2.1
Press the arrow down button to check motor
direction.
MANUAL
Page 7 of 22 version: 1.1

4. Setting end limits
It doesn’t matter if you start with setting the open or the close limit rst. In this description we start with the open (top)
limit.
3.2.2.A
If the blind moves upwards, Press the
stop button.
Motor direction NOT OK!
3.2.2.B
If the blind moves downwards, Press the
stop button and continue with step 4.1.4
Motor direction OK!
3.2.3 Press and hold the manual control button for 1
second to reverse motor direction.
The blind will jog 1x to acknowledge the direction is
reversed
3.2.4 Continue with step 4.1.4
MANUAL
Page 8 of 22 version: 1.1

4.1. Open limit (top)
4.1.1 Press and hold the manual control button .
4.1.2
Press the open button.
Make sure group1 on the remote is selected.
The blind will jog 1x
4.1.3 Release the manual control button .
The motor LED turns red to acknowledge the motor is
in program mode
4.1.4
Use the open , stop and close buttons to
move the blind about 20cm below the headrail.
MANUAL
Page 9 of 22 version: 1.1

4.1.5
Use the open button to let the blind hit the headrail.
The motor will stop moving.
The motor needs to hit the headrail!
4.1.6
Move the blind to the desired top position with the
open , close and stop buttons.
Always approach the desired top limit moving
upwards.
4.1.7
Press and hold the stop button for 6 seconds.
DO NOT select a group on the remote!
Keep pressing until the remote lights start blinking
IMPORTANT
Watch out to perform steps 4.1.6 and 4.1.7 within 3 seconds!
4.1.8 Press and hold the manual control button .
MANUAL
Page 10 of 22 version: 1.1

4.1.9
Press the open button.
The blind will jog 1x to acknowledge the limit is set
4.1.10 Release the manual control button .
The motor LED turns off
4.1.11
Press and hold the stop button for 6 seconds.
Keep pressing until the remote lights stop blinking
The remote will exit programming mode
automatically after 20 seconds.
4.1.12 The top limit is set!
MANUAL
Page 11 of 22 version: 1.1

4.2. Close limit (bottom)
Note
To re-position the top limit of the blind, repeat step
4.1 Open limit (top)
.
4.2.1 Press and hold the manual control button .
4.2.2
Press the close button.
Make sure group1 on the remote is selected.
The blind will jog 1x
4.2.3 Release the manual control button .
The motor LED turns red to acknowledge the motor is
in program mode
MANUAL
Page 12 of 22 version: 1.1

4.2.4
Use the open , stop and close buttons to
move the blind to the desired bottom position.
4.2.5
Press and hold the stop button for 6 seconds.
DO NOT select a group on the remote!
Keep pressing until the remote lights start blinking
IMPORTANT
Watch out to perform steps 4.2.6 and 4.2.7 within 3 seconds!
4.2.6 Press and hold the manual control button .
MANUAL
Page 13 of 22 version: 1.1

4.2.7
Press the close button.
The blind will jog 1x to acknowledge the limit is set
4.2.8 Release the manual control button .
The motor LED turns off
4.2.9
Press and hold the stop button for 6 seconds.
Keep pressing until the remote lights stop blinking
The remote will exit programming mode
automatically after 20 seconds.
MANUAL
Page 14 of 22 version: 1.1

5. Slat open position
The slat open position is automatically set, by selecting blind type in the
PowerView® Programmer software tool:
• 16mm Venetian blind
• 25mm Venetian blind (default)
4.2.10 The bottom limit is set!
Note
To re-position the bottom limit of the blind, repeat step
4.2. Close limit (bottom)
.
IMPORTANT
Only
if the slat limit position is not satisfactory, follow below procedure to overwrite and reposition the slat open position.
5.1 Locate the manual control button on your blind.
MANUAL
Page 15 of 22 version: 1.1


5.5
Press and hold the arrow up button until the
motor LED turns red.
The motor LED turns red to acknowledge the motor is
in program mode
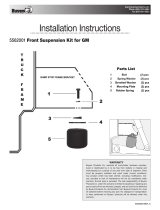
5.6 Determine the maximum rotation position using the
arrow up , arrow down and stop buttons.
Vanes start to tilt open... ...to 90° and continue... ...until 180° reversed
MANUAL
Page 17 of 22 version: 1.1

5.7
Press and hold the stop button for 6 seconds.
DO NOT select a group on the remote!
Keep pressing until the remote lights start blinking
IMPORTANT
Watch out to perform steps 5.8 and 5.9 within 3 seconds!
5.8 Press and hold the manual control button on your
blind.
5.9
Press the arrow up button.
The blind will jog 1x to acknowledge the slat open
position is set
5.10 Release the manual control button .
The motor LED turns off
MANUAL
Page 18 of 22 version: 1.1

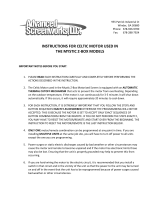
6. Motor control button LED
The motor control button LED gives an indication of the motor status. The LED can ash RED or GREEN. Below you nd an
overview of all possible combinations.
5.11
Press and hold the stop button for 6 seconds.
Keep pressing until the remote lights stop blinking
The remote will exit programming mode
automatically after 20 seconds.
5.12 The slat open position is set!
Sequence Explanation
After power up
Restart / Start up
Blind type: Venetian 16mm slat
Blind type: Venetian 25mm slat
After Reset
End limits reset (factory default),
see chapter 1.2
MANUAL
Page 19 of 22 version: 1.1

Network reset on manual control button
release,
see chapter 1.3. Blind type: Venetian 16mm
slat
Network reset on manual control button
release,
see chapter 1.3. Blind type: Venetian 25mm
slat
Battery operation
Low battery indication (< 11.0V).
The blind will run in slow mode and can only
be send upwards.
Ultra low battery indication (< 8.5V).
The blind will not run anymore. Change the
batteries.
Others
The maximum motor current has been
reached.
E.g. The blind is stuck at an obstacle.
(Continuous)
Steady red LED.
The motor is in program mode (during limit
setting).
Jog sequences Explanation
MANUAL
Page 20 of 22 version: 1.1
/