Panasonic HCX1000E Operating instructions
- Category
- Camcorders
- Type
- Operating instructions

Basic Operating Instructions
4K Video Camera
Model No. HC-X1000
SQT0478
until
2014/9/30
Please read these instructions carefully before using this
product, and save this manual for future use.
More detailed operating instructions are available in “Operating Instructions (PDF format)”. To
read it, download it from the website.
https://eww.pavc.panasonic.co.jp/hdw/oi/X1000/index.html
≥ Click the desired language.
* You will need Adobe Reader to browse or print the Operating Instructions (PDF format).
You can download and install a version of Adobe Reader that you can use with your OS from
the following website. (As of September 2014)
http://www.adobe.com/products/acrobat/readstep2.html
HC-X1000E-SQT0478_mst.book 1 ページ 2014年9月8日 月曜日 午後7時14分
Detaljnije upute za uporabu nalaze se u "Uputama za uporabu (u PDF-formatu)". Da biste ih
pročitali, preuzmite ih s web-mjesta.
https://eww.pavc.panasonic.co.jp/hdw/oi/X1000/index.html
● Kliknite na željeni jezik.
* Morate imati Adobe Reader da biste pretraživali i ispisali Upute za uporabu (u PDF-formatu).
Preuzmite i instalirajte inačicu programa Adobe Reader kojom je moguće koristiti se s vašim
operativnim sustavom sa sljedećeg web-mjesta. (Od rujna 2014.)
http://www.adobe.com/products/acrobat/readstep2.html
Osnovne upute za uporabu
4K videokamera
Model br. HC-X1000
Prije uporabe proizvoda pažljivo pročitajte ove upute i
spremite priručnik za buduću uporabu.

2
VQT4R21
Dear Customer,
We would like to take this opportunity to thank
you for purchasing this Panasonic High
Definition Video Camera. Please read these
Operating Instructions carefully and keep them
handy for future reference. Please note that the
actual controls and components, menu items,
etc. of your High Definition Video Camera may
look somewhat different from those shown in
the illustrations in these Operating Instructions.
“EB” area code model only
∫ Caution for AC mains lead
For your safety, please read the following text
carefully.
This appliance is supplied with a moulded three
pin mains plug for your safety and convenience.
A 5-ampere fuse is fitted in this plug.
Should the fuse need to be replaced please
ensure that the replacement fuse has a rating of
5-ampere and that it is approved by ASTA or
BSI to BS1362.
Check for the ASTA mark Ï or the BSI mark Ì
on the body of the fuse.
If the plug contains a removable fuse cover you
must ensure that it is refitted when the fuse is
replaced.
If you lose the fuse cover the plug must not be
used until a replacement cover is obtained.
A replacement fuse cover can be purchased
from your local dealer.
Before use
Remove the connector cover.
How to replace the fuse
The location of the fuse differ according to the
type of AC mains plug (figures A and B).
Confirm the AC mains plug fitted and follow the
instructions below.
Illustrations may differ from actual AC mains
plug.
1. Open the fuse cover with a screwdriver.
2. Replace the fuse and close or attach the
fuse cover.
Information for Your Safety
HC-X920&X920M&X910EB&EP_VQT4R21_eng.book 2 ページ 2012年12月25日 火曜日 午後6時21分
2
SQT0478
Sigurnosne napomene
Za 3-pinski utikač za napajanje s
izmjeničnom strujom
▄
Mjere opreza za kabel za
napajanje izmjeničnom strujom
Radi osobne sigurnosti pažljivo pročitajte
sljedeći tekst.
Uređaj se isporučuje s izoliranim 3-pinskim
utikačem radi vaše sigurnosti i udobnosti. U
utikač je ugrađen osigurač od 5 ampera.
Ako treba zamijeniti osigurač, upotrijebite
zamjenski osigurač od 5 ampera usklađen sa
standardom BS1362 i s oznakom odobrenja
ASTA ili BSI.
Potražite oznaku ASTA ili BSI na
kućištu osigurača.
Ako utikač ima poklopac osigurača koji se
može skinuti, nakon zamjene osigurača
poklopac obavezno vratite na mjesto.
Ako izgubite poklopac osigurača, utikač
nije dozvoljeno upotrebljavati sve dok se
ne postavi zamjenski poklopac. Zamjenski
poklopac osigurača možete kupiti kod lokalnog
dobavljača.
UPOZORENJE:
Da biste smanjili rizik od požara, strujnog udara ili oštećenja proizvoda,
● Uređaj nemojte izlagati kiši, vlazi, kapanju ili prskanju.
● Na uređaj nemojte stavljati posude s tekućinom, kao što su vaze.
● Koristite se samo preporučenim priborom.
● Nemojte uklanjati poklopce.
● Nemojte sami popravljati uređaj. Servisiranje povjerite kvaliciranom servisnom osoblju.
OPREZ!
Da biste smanjili rizik od požara, strujnog udara ili oštećenja proizvoda,
● Uređaj nemojte postaviti u ormar, ugrađeni ormarić ili u drugi skučeni prostor. Uređaj mora
biti na dobro prozračenom mjestu.
● Ventilacijske otvore uređaja nemojte zaklanjati novinama, stolnjacima, zavjesama i sličnim
predmetima.
● Na uređaj nemojte stavljati izvore otvorenog plamena, kao što su upaljene svijeće.
Utikačem se koristi za isključivanje uređaja. Uređaj postavite tako da se utikač odmah može
izvući iz utičnice.
Prije uporabe
Skinite poklopac priključka.
Zamjena osigurača
Smještaj osigurača razlikuje se ovisno o vrsti
utikača za napajanje izmjeničnom strujom (slike A i
B). Provjerite je li utikač za napajanje izmjeničnom
strujom pričvršćen i slijedite upute u nastavku.
Prikazi se mogu razlikovati od stvarnog utikača
za napajanje izmjeničnom strujom.
1. S pomoću odvijača otvorite poklopac
osigurača.
2. Zamijenite osigurač i zatvorite ili pričvrstite
poklopac osigurača.
Slika A
Slika A
Slika B
Slika B
Poklopac
osigurača
Osigurač
(5 ampera)
Osigurač
(5 ampera)

3
SQT0478
∫ Concerning the battery
For Europe only
∫ EMC Electric and magnetic compatibility
This symbol (CE) is located on the rating plate.
∫ Product identification marking
∫ Disposal of Old Equipment and
Batteries
Only for European Union and
countries with recycling
systems
These symbols on the
products, packaging, and/
or accompanying
documents mean that
used electrical and
electronic products and
batteries must not be
mixed with general
household waste.
For proper treatment, recovery and
recycling of old products and used
batteries, please take them to applicable
collection points in accordance with your
national legislation.
By disposing of them correctly, you will
help to save valuable resources and
prevent any potential negative effects on
human health and the environment.
For more information about collection and
recycling, please contact your local
municipality.
Penalties may be applicable for incorrect
disposal of this waste, in accordance with
national legislation.
Note for the battery
symbol (bottom symbol):
This symbol might be used
in combination with a
chemical symbol. In this
case it complies with the
requirement set by the
Directive for the chemical involved.
Warning
Risk of fire, explosion and burns. Do not disassemble, heat above 60 oC or incinerate.
CAUTION
≥ Danger of explosion if battery is incorrectly replaced. Replace only with the type
recommended by the manufacturer.
≥ When disposing of the batteries, please contact your local authorities or dealer and ask for the
correct method of disposal.
Product Location
4K Video Camera Bottom
Battery charger Bottom
AC adaptor Bottom
HC-X1000E-SQT0478_mst.book 3 ページ 2014年9月8日 月曜日 午後7時14分
3
SQT0478
▄
Odlaganje dotrajale opreme i
baterija
samo za Europsku uniju
i zemlje sa sustavima
recikliranja
Ovim se oznakama na
proizvodu, ambalaži i/ili
pratećim dokumentima
označava da se korišteni
električni i elektronički
uređaji te baterije ne smiju
odlagati s otpadom iz
domaćinstava.
Radi pravilne obrade,
sanacije i recikliranja dotrajalih proizvoda
i baterija, odnesite ih u odgovarajuća
prikupljališta, u skladu s lokalnim
zakonodavstvom.
Pravilnim odlaganjem čuvate vrijedne
resurse i sprečavate moguće negativne
učinke na ljudsko zdravlje i okoliš.
Više informacija o prikupljanju i
recikliranju potražite u lokalnom
poglavarstvu.
▄
Baterija
Upozorenje
Rizik od požara, eksplozija i opeklina. Bateriju nemojte rastavljati, zagrijavati je na temperaturi
višoj od 60 °C ili paliti.
OPREZ
● U slučaju nepravilne zamjene baterije postoji opasnost od eksplozije. Baterije zamijenite
isključivo onom vrstom koju preporučuje proizvođač.
● Ako želite odložiti baterije, obratite se nadležnim lokalnim tijelima ili dobavljačima i raspitajte
se o pravilnom načinu odlaganja.
Samo za Europu
▄
Električna i magnetska kompatibilnost (EMK)
Ovaj se simbol (CE) nalazi na natpisnoj pločici.
▄
Oznake za identikaciju proizvoda
Proizvod Lokacija
4K videokamera Dno
Punjač baterije Dno
Prilagodnik za izmjeničnu struju Dno
Za nepropisno odlaganje ovog otpada
mogli biste biti kažnjeni sukladno
državnom zakonodavstvu.
Napomene o simbolima
na bateriji (donji simbol):
Ovaj se simbol može
upotrebljavati u kombinaciji
s kemijskim simbolom. U
tom je slučaju usklađen sa
zahtjevom postavljenim u
Direktivi za korištene kemikalije.

4
SQT0478
Samo za Europu
Izjava o sukladnosti
Tvrtka "Panasonic Corporation" ovime
izjavljuje da je ovaj proizvod u skladu
s nužnim zahtjevima i ostalim važećim
odredbama Direktive 1999/5/EZ.
Kupci mogu preuzeti kopiju originalne izjave
o sukladnosti za naše R&TTE proizvode s
našeg poslužitelja za izjave o sukladnosti:
http://www.doc.panasonic.de
Kontakt ovlaštenog predstavnika: Panasonic
Marketing Europe GmbH, Panasonicov
centar za ispitivanje, Winsbergring 15,
22525 Hamburg, Njemačka
Ovaj je proizvod namijenjen komercijalnoj
uporabi. (Kategorija 3)
Ovaj je proizvod namjerno povezan s
pristupnom točkom od 2,4 GHz WLAN.
Samo za Singapur
U skladu s IDA
standardima
DB01017
Samo za Indiju
Ove su specikacije izuzete od zahtjeva za
licenciranje Ministarstva telekomunikacija i
informacijskih tehnologija, G.S.R. 45 (E).,
datirano 28. siječnja 2005.
Samo za Nigeriju
Veza i upotreba ove
komunikacijske opreme
dopuštena je od strane
Nigerijske komisije za
telekomunikaciju
▄
Mjere opreza prilikom uporabe
Uređaj i SD-kartica zagrijavaju se tijekom
uporabe. Nije riječ o kvaru.
Uređaj držite što je dalje moguće od
elektromagnetske opreme (poput mikrovalnih
pećnica, TV-prijamnika, igraćih konzola itd.).
● Ako uređaj upotrebljavate na TV-prijamniku
ili blizu TV-prijamnika, elektromagnetsko bi
zračenje moglo štetno utjecati na sliku i/ili zvuk.
● Uređaj nemojte upotrebljavati u blizini
mobitela jer bi se mogle pojaviti smetnje
nepovoljna utjecaja na slike i/ili zvuk.
● Jaka magnetska polja zvučnika ili velikih
motora mogu oštetiti snimljene podatke ili
izobličiti slike.
● Elektromagnetska zračenja koja stvaraju
mikroprocesori mogu štetno djelovati na
uređaj te može doći do izobličenja slike i/
ili zvuka.
● Ako na uređaj nepovoljno utječe
elektromagnetska oprema te on prestane
ispravno funkcionirati, isključite uređaj i
izvadite bateriju ili iskopčajte prilagodnik
za izmjeničnu struju. Nakon toga, ponovno
umetnite bateriju ili ponovno spojite prilagodnik
za izmjeničnu struju te uključite uređaj.
Nemojte upotrebljavati uređaj blizu
radioodašiljača ili vodova pod visokim
naponom.
● Snimanje u blizini radioodašiljača ili vodova
pod visokim naponom moglo bi štetno
djelovati na snimljene fotograje i/ili zvuk.
Povezivanje s računalom
● Upotrebljavajte isključivo isporučeni USB-
kabel.
Uporaba naglavnih slušalica
● Pretjerani zvučni tlak iz slušalica može
uzrokovati gubitak sluha.
● Dugotrajno slušanje glasne glazbe može
oštetiti sluh.
Uporaba slušalica
● Držite vijak držača mikrofona i poklopac
ULAZNOG priključka izvan dohvata djece da
biste spriječili da ih slučajno progutaju.
● Upotrebljavajte isporučene žice i kabele.
Ako upotrebljavate neobavezni pribor,
upotrebljavajte samo žice i kabele
isporučene uz njega.
● Nemojte produljivati žice i kabele.
4
SQT0478
For Europe only
For Singapore only
For India only
For Nigerian only
∫ Cautions for use
Keep this unit as far away as possible from
electromagnetic equipment (such as
microwave ovens, TVs, video games etc.).
≥ If you use this unit on top of or near a TV, the
pictures and/or sound on this unit may be
disrupted by electromagnetic wave radiation.
≥ Do not use this unit near cell phones because
doing so may result in noise adversely
affecting the pictures and/or sound.
≥ Recorded data may be damaged, or pictures
may be distorted, by strong magnetic fields
created by speakers or large motors.
≥ Electromagnetic wave radiation generated by
microprocessors may adversely affect this
unit, disturbing the pictures and/or sound.
≥ If this unit is adversely affected by
electromagnetic equipment and stops
functioning properly, turn this unit off and
remove the battery or disconnect AC adaptor.
Then reinsert the battery or reconnect AC
adaptor and turn this unit on.
Do not use this unit near radio transmitters
or high-voltage lines.
≥ If you record near radio transmitters or
high-voltage lines, the recorded pictures and/
or sound may be adversely affected.
About connecting to a PC
≥ Do not use any other USB cables except the
supplied one.
About using a headphone
≥
Excessive sound pressure from earphones
and headphones can cause hearing loss.
≥ Listening at full volume for long periods may
damage the user’s ears.
About using external microphones
≥ Keep the microphone holder screw and
INPUT terminal cap out of reach of children to
prevent swallowing.
≥ Make sure to use the supplied cords and
cables. If you use optional accessories, use
the cords and the cables supplied with them.
≥ Do not extend the cords and the cables.
Declaration of Conformity (DoC)
Hereby, “Panasonic Corporation” declares
that this product is in compliance with the
essential requirements and other relevant
provisions of Directive 1999/5/EC.
Customers can download a copy of the
original DoC to our R&TTE products from
our DoC server:
http://www.doc.panasonic.de
Contact to Authorized Representative:
Panasonic Marketing Europe GmbH,
Panasonic Testing Centre, Winsbergring
15, 22525 Hamburg, Germany
This product is intended for general
consumer. (Category 3)
This product on purpose to connect to
access point of 2.4 GHz WLAN.
The specifications are exempted for any
licensing requirement by Ministry of
Communications and Information Technology,
G.S.R. 45 (E)., dated 28th January, 2005.
Connection and use of this
communications equipment is
permitted by the Nigerian
Communications Commission
Complies with
IDA Standards
DB01017
The unit and the SD card become warm
during use. This is not a malfunction.
HC-X1000E-SQT0478_mst.book 4 ページ 2014年9月8日 月曜日 午後7時14分

5
SQT0478
● Uređaj nemojte prskati insekticidima ili
hlapljivim kemikalijama.
● Prije čišćenja odspojite bateriju ili izvadite
kabel za izmjeničnu struju iz utičnice za
izmjeničnu struju i nakon toga obrišite uređaj
mekom suhom krpom.
● Ako je uređaj jako prljav, uronite krpu u vodu
i dobro je ocijedite te nakon toga obrišite
uređaj vlažnom krpom. Nakon toga uređaj
osušite suhom krpom.
● Upotreba benzina, razrjeđivača, alkohola ili
tekućine za pranje posuđa može dovesti do
promjena na kućištu uređaja i skidanja boje
s površine. Nemojte upotrebljavati navedena
otapala.
● Ako upotrebljavate kemijsku krpu za prašinu,
slijedite upute koje su priložene uz nju.
● Ako uređaj spremate u ormar, preporučuje
se da uz njega stavite sredstvo za sušenje
(silikatni gel).
● U kameri se upotrebljava punjiva litij-ionska
baterija. Osjetljiva je na vlagu i temperaturu
te se taj učinak povećava povećanjem ili
padom temperature.
● Ako se baterija brzo prazni, čak i nakon
punjenja, znači da je istrošena. Kupite novu
bateriju.
● Kada lampica pristupa kartici svijetli,
nemojte:
– Vaditi SD-karticu
– Isključivati uređaj
– Umetati i vaditi USB-kabel
– Izlagati uređaj vibracijama ili udaru
▄
Metoda snimanja videozapisa
Ovaj uređaj može snimati videozapise s
pomoću različitih metoda snimanja, uključujući
MOV (LPCM), MP4 (LPCM), MP4 i AVCHD*1.
(
27)
*1 Podržan je format Progresivni AVCHD
(1080/50p, 1080/60p).
MOV (LPCM)*
2
, MP4 (LPCM)*
2, 3
:
Ova je metoda snimanja prikladna za
uređivanje slika. Zvuk se snima kao linearni
PCM.
MP4*
2, 3
:
Ova je metoda snimanja prikladna za
reprodukciju i uređivanje na računalu. Zvuk se
snima u formatu AAC.
*2 Ove metode nisu kompatibilne s
videozapisima snimljenim u formatu
AVCHD.
*3 Ove metode mogu snimati videozapise u
formatima koji podržavaju 4K. Videozapisi
u 4K nude četiri puta veću razlučivost od
videozapisa visoke razlučivosti.
AVCHD:
Ova je metoda snimanja prikladna za
reprodukciju na TV-prijamniku visoke
razlučivosti ili pohranjivanje na disk. Zvuk se
snima u Dolby® Digital.
▄
Frekvencija sustava
Standardna postavka ovog uređaja NTSC/
PAL može se promijeniti na [SYSTEM FREQ]
(Frekvencija sustava). (
26)
● Za upotrebu ovog uređaja u regijama u
kojima je sustav TV-emitiranja NTSC,
postavite ga na [59.94Hz(NTSC)]. Za
upotrebu ovog uređaja u regijama u kojima
je sustav TV-emitiranja PAL, postavite ga
na [50Hz(PAL)]. (Reprodukcija nije moguća
na TV-prijamnicima ili drugim uređajima sa
standardom koji se razlikuje od postavki
frekvencije sustava za ovaj uređaj.)
● Ako snimite scenu formata AVCHD na
SD-karticu, ona se ne može upotrebljavati
s drugačijom frekvencijom sustava.
Upotrebljavajte drugu SD-karticu kada
promijenite frekvenciju sustava.
▄
Naknada štete za snimljeni
sadržaj
Tvrtka Panasonic ne preuzima odgovornost
za štete nastale izravno ili neizravno, zbog
bilo koje vrste problema, koje mogu rezultirati
gubitkom snimljenog ili uređivanog sadržaja i
ne jamči za sadržaj ako snimanje ili uređivanje
ne radi pravilno. Jednako se tako prethodno
navedeno primjenjuje u slučaju bilo kakve vrste
popravka izvršenog na uređaju.

6
SQT0478
▄
Kondenzacija
(zamagljivanje objektiva,
tražila ili LCD-monitora)
Do kondenzacije dolazi kod promjena
temperature ili vlage, primjerice kada se
uređaj iznosi van ili kada se prenosi iz hladne
u toplu sobu. Budite pažljivi jer se leće, tražilo
ili LCD-monitor mogu uprljati, oštetiti ili mogu
dobiti neugodan miris. Kondenzacija se može
spriječiti ako se uređaj prije prenošenja na
mjesto s drukčijom temperaturom prilagodi
sobnoj temperaturi odredišta u roku od
približno jednog sata. (Ako je razlika u
temperaturi velika, postavite uređaj u plastičnu
vreću ili slično, istisnite zrak iz vreće i zatvorite
je.) Ako je došlo do kondenzacije, izvadite
bateriju i/ili prilagodnik za izmjeničnu struju te
ostavite uređaj na približno sat vremena. Kada
se fotoaparat prilagodi okolnoj temperaturi,
zamagljenost će prirodno nestati.
▄
Sigurnost
Budite oprezni zbog mogućnosti krađe ili
gubitka uređaja i pripazite da ga ne ostavite
bez nadzora. Imajte na umu da tvrtka
Panasonic nije odgovorna za kompromitiranje,
manipulaciju i gubitak podataka uzrokovanih
ovim događajima.
▄
Oprez u vezi s laserskim
zrakama
Objektiv se može oštetiti ako ga pogode
laserske zrake. Pri snimanju u okolini u kojoj
se upotrebljavaju laserske zrake, obavezno
pripazite da laserske zrake ne pogode objektiv.
▄
Instalacija softvera HDWriter XE 2.0
Za preuzimanje/instalaciju softvera posjetite web-mjesto u nastavku.
http://panasonic.jp/support/global/cs/soft/download/f_xe20.html
▄
Kartice koje možete
upotrebljavati s ovim uređajem
SDHC-memorijska kartica i SDXC-
memorijska kartica
● Memorijske kartice od 4 GB ili više koje
nemaju logotip SDHC ili memorijske kartice
od 48 GB ili više koje nemaju logotip SDXC
ne odgovaraju tehničkim podacima SD-
memorijske kartice.
● Dodatne informacije o SD-karticama
potražite na 19. str.
▄
Za potrebe ovih uputa za
uporabu
● Baterija se označava kao "Baterija".
● SDHC-memorijska kartica i SDXC-
memorijska kartica označavaju se kao "SD-
kartica".
● Pametni telefon i tablet označavaju su kao
"pametni telefon".
● Funkcija koja se može upotrebljavati za
način snimanja:
Funkcija koja se može upotrebljavati za
način reprodukcije:
● Scene snimljene s pomoću [REC MODE]
(Način snimanja) postavljene na [MOV
(LPCM)], [MP4 (LPCM)] ili [MP4]: “MOV/
MP4-scene”.
● Scene snimljene s pomoću [REC MODE]
postavljene na [AVCHD]: "AVCHD-scene”.
● Ispravna vrijednost za 60p/60i/30p/24p jest
59.94p/59.94i/29.97p/23.98p (osim C4K).
● Stranice na koje se upućuje označene su
strelicom, primjerice:
00

7
SQT0478
Sadržaj
Sigurnosne napomene .................................. 2
Pribor ..............................................................8
Priprema
Nazivi i funkcije osnovnih dijelova ..............9
Napajanje...................................................... 16
Punjenje baterije ....................................16
Umetanje/vađenje baterije .....................17
Vrijeme punjenja i snimanja ................... 17
Spajanje u strujnu utičnicu za
izmjeničnu struju ....................................18
Priprema SD-kartica ....................................19
Kartice koje možete upotrebljavati
s ovim uređajem ..................................... 19
Umetanje/vađenje SD-kartice ................20
Uključivanje/isključivanje uređaja ............. 21
Odabir načina rada ......................................21
Uporaba LCD-monitora / tražila .................. 22
Uporaba LCD-monitora .......................... 22
Uporaba zaslona osjetljivog na dodir ..... 23
Podešavanje tražila ................................ 23
Postavljanje datuma i vremena ..................24
Upotreba zaslona s izbornicima ................ 25
Formatiranje kartica ..............................25
Odabir frekvencije sustava .................... 26
Odabir jezika .......................................... 26
Snimanje
Odabir medija za snimanje .........................26
Snimanje videozapisa .................................27
Snimanje fotograja ...................................27
Upotreba zuma ............................................ 28
Inteligentni automatski način rada /
ručnog načina rada .....................................28
Ručno snimanje ........................................... 29
Fokus .................................................... 29
Balans bijele boje ................................... 29
Podešavanje blende/jakosti ...................30
Ručno podešavanje brzine zatvarača .... 30
Korisnički gumb ..........................................31
Postavljanje korisničkog gumba ............. 31
Upotreba korisničkog gumba .................31
Funkcije korisničkog gumba ................... 32
Reprodukcija
Reprodukcija videozapisa/fotograja ........ 33
Gledanje videozapisa/fotograja na
TV-prijamniku ......................................... 34
Wi-Fi
Funkcija Wi-Fi®............................................35
Instalacija aplikacije "Image App" ........... 35
Upotreba daljinskog upravljanja
s izravnim povezivanjem ....................... 36
Nemogućnost uspostavljanja Wi-Fi veze ....37
Ostalo
Rješavanje problema................................... 38
Tehnički podaci ............................................ 39
Autorska prava ...........................................41
Ograničeno jamstvo
(SAMO ZA AUSTRALIJU) ............................ 43
Za korisnike u Ujedinjenom
Kraljevstvu i Irskoj
▄
Podaci o prodajnim
mjestima i tehničkoj podršci
Centar za korisničku podršku
● Za korisnike u Ujedinjenom Kraljevstvu:
0844 844 3899
● Za korisnike u Irskoj: 01 289 8333
● Ponedjeljak – petak 9:00 - 17:00 (osim
državnih praznika).
● Informacije o dodatnoj podršci za svoj
proizvod potražite na našem web-mjestu:
www.panasonic.co.uk
Direktna prodaja za Panasonic UK
● Naručite dodatni pribor i potrošne
predmete za vaš proizvod, jednostavno i
s povjerenjem, pozivanjem našeg Centra
za korisničku podršku od ponedjeljka
do petka od 9:00 do 17:00 sati (osim
državnih praznika).
● Možete i ispuniti našu narudžbenicu za
dodatni pribor na internetu na stranici
www.pas-europe.com.
● Primamo većinu kreditnih i debitnih kartica.
● Sve upite, transakcije i uvjete distribucije
pruža direktno Panasonic UK.
● Ne može biti jednostavnije!
● Putem našeg web-mjesta možete izravno
kupovati i širok raspon gotovih proizvoda.
Pretražite naše web-mjesto i saznajte
više detalja.

8
SQT0478
Pribor
Provjerite pribor prije upotrebe uređaja.
Pribor držite izvan dohvata djece da ga ne bi progutala.
Brojevi dijelova važeći su od rujna 2014. Podložni su promjenama.
Baterija
VW-VBD58
Punjač baterije
DE-A88D
Prilagodnik za
izmjeničnu struju
VSK0726
(Za E)
Kabel za napajanje
izmjeničnom strujom
A K2CT2YY00095 (2 kabla)
● Ujedinjeno Kraljevstvo i Irska
B K2CQ2YY00117 (2 kabla)
● Područja osim Ujedinjenog
Kraljevstva i Irske
(Za GC)
Kabel za napajanje
izmjeničnom strujom
A K2CT2YY00095 (2 kabla)
● Saudijska Arabija i Singapur
B K2CJ2YY00052 (2 kabla)
● Australija i Novi Zeland
C K2CQ2YY00117 (2 cables)
● Područja osim Saudijske
Arabije, SIngapura, Australije
i Novog Zelanda
Školjka okulara
SYA0019
USB-kabel
K2KYYYY00245
HDMI-kabel
K1HY19YY0024
Vrpca za nošenje na
ramenu
VFC4897
SYA0021
Držač mikrofona
VYC1146
Poklopac ulaznog
priključka (2 poklopca)*
1
VJF1468
Vijci držača mikrofona
VYC1144
Duljina od 12 mm (2 vijka)
Sjenilo objektiva*
2
SYK0438
*1 Poklopci ulaznog priključka isporučeni su s
držačem mikrofona.
*2 Sjenilo objektiva pričvršćeno je na uređaj u
vrijeme kupnje.
Neobavezni pribor
Određeni neobavezni pribor nije dostupan u
pojedinim državama.
Jednosmjerni mikrofon (AG-MC200G)
Baterija (litijska/VW-VBD58)
Punjač baterije (AG-B23)
LED-svjetlo za snimanje videozapisa
(VW-LED1)
8
SQT0478
Check the accessories before using this unit.
Keep the accessories out of reach of children to prevent swallowing.
Product numbers correct as of Sep. 2014. These may be subject to change.
Optional accessories
Some optional accessories may not be
available in some countries.
Accessories
Battery pack
VW-VBD58
Battery charger
DE-A88D
AC adaptor
VSK0726
(For E)
AC cable
A K2CT2YY00095 (2 cables)
≥ The United Kingdom and
Ireland
B K2CQ2YY00117 (2 cables)
≥ Areas other than the United
Kingdom and Ireland
(For GC)
AC cable
A K2CT2YY00095 (2 cables)
≥ Saudi Arabia and Singapore
B K2CJ2YY00052 (2 cables)
≥ Australia and New Zealand
C K2CQ2YY00117 (2 cables)
≥ Areas other than Saudi
Arabia, Singapore, Australia
and New Zealand
Eye cup
SYA0019
USB cable
K2KYYYY00245
HDMI cable
K1HY19YY0024
Shoulder strap
VFC4897
SYA0021
Microphone holder
VYC1146
INPUT terminal cap
(2 caps)
*1
VJF1468
Microphone holder
screws
VYC1144
12 mm length (2 screws)
Lens hood
*2
SYK0438
*1 The INPUT terminal caps are supplied
with the microphone holder.
*2 The lens hood is attached to this unit at
the time of purchase.
Unidirectional microphone (AG-MC200G)
Battery pack (lithium/VW-VBD58)
Battery charger (AG-B23)
LED video light (VW-LED1)
HC-X1000E-SQT0478_mst.book 8 ページ 2014年9月8日 月曜日 午後7時14分

9
SQT0478
1 USB terminal [USB 3.0 DEVICE]
2 USB terminal [USB 3.0 HOST]
3 HDMI connector [HDMI] (l 34)
4 Audio input terminals 2 (XLR 3 pin)
[AUDIO INPUT2] (l 15)
5 Handle
6 Lens hood release button
7 Audio input terminals 1 (XLR 3 pin)
[AUDIO INPUT1] (l 15)
8 Microphone holder attachment part
(l 14)
9 Lens hood
10 Exhaust opening (cooling fan)
11 Status indicator (l 21)
12 Power switch (l 21)
13 Recording start/stop button (l 27)
14 DC input terminal [DC IN] (l 18)
≥ Do not use any other AC adaptors except the
supplied one.
15 Camera remote jack
[CAM REMOTE] (3.5 mm mini jack)
It is possible to adjust the focus or iris by
connecting a remote control (commercially-
available).
≥ It is not possible to use the remote control
(commercially-available) in the Intelligent
Auto Mode.
[ZOOM S/S] (2.5 mm super mini jack)
It is possible to operate zoom operation or
recording start/stop connecting with the remote
control (commercially-available).
≥ Do not connect any equipment except the
remote control (commercially-available) to
the camera remote jack. Brightness of the
image may change or it may not focus when
an equipment other than the remote control
(commercially-available) is connected.
16 Headphone terminal [ ]
17 Video output connector [VIDEO OUT]
(l 34)
18 Audio output connector [AUDIO OUT]
(l 34)
19 Speaker
20 Shoulder strap fixture (l 14)
21 Wi-Fi Transmitter
22 Grip belt (l 13)
23 Inlet (cooling fan)
Preparation
Names and Functions of Main Parts
54
8
7
11
9
10
12
13
14
15
18
17
16
22
21
19
20
23
6
1
2
3
HC-X1000E-SQT0478_mst.book 9 ページ 2014年9月8日 月曜日 午後7時14分
9
SQT0478
Priprema
Nazivi i funkcije osnovnih dijelova
1 USB-priključak [USB 3.0 DEVICE]
2 USB-priključak [USB 3.0 HOST]
3 HDMI-priključak [HDMI] (
34)
4 Priključci audioulaza 2 (XLR 3-pinski)
[AUDIO INPUT2] (Audioulaz2) (
15)
5 Drška
6 Gumb za otpuštanje sjenila objektiva
7 Priključci audioulaza 1 (XLR 3-pinski)
[AUDIO INPUT1] (Audioulaz1) (
15)
8 Dio za pričvršćivanje držača mikrofona
(
14)
9 Sjenilo objektiva
10 Otvor za ispuh zraka (ventilator za hlađenje)
11 Pokazatelj statusa (
21)
12 Prekidač (
21)
13 Gumb za pokretanje/zaustavljanje
snimanja (
27)
14 Ulazni priključak istosmjerne struje [DC
IN] (
18)
● Upotrebljavajte isključivo isporučeni
prilagodnik za izmjeničnu struju.
15 Udaljeni utikač kamere
[CAM REMOTE] (Daljinski upravljač kamere)
(miniutikač od 3,5 mm)
Moguće je podesiti fokus ili blendu spajanjem
daljinskog upravljača (komercijalno dostupan).
● Nije moguće upotrebljavati daljinski
upravljač (komercijalno dostupan) u
inteligentnom automatskom načinu rada.
[ZOOM S/S] (super miniutikač od 2,5 mm)
Moguće je upravljati zumom ili započeti/
zaustaviti snimanje s pomoću daljinskog
upravljača (komercijalno dostupan).
● Nemojte spajati nijednu drugu opremu
osim daljinskog upravljača (komercijalno
dostupnog) na udaljeni utikač kamere.
Svjetlina slike može se promijeniti ili se
možda neće fokusirati kada je spojena
bilo koja druga oprema osim daljinskog
upravljača (komercijalno dostupan).
16 Priključak za naglavnu slušalicu [ ]
17 Priključak za videoizlaz [VIDEO OUT]
(
34)
18 Priključak za audioizlaz [AUDIO OUT]
(
34)
19 Zvučnik
20 Učvršćivanje vrpce za nošenje na
ramenu (
14)
21 Wi-Fi odašiljač
22 Remen za držanje (
13)
23 Otvor (ventilator za hlađenje)

10
SQT0478
24 Tripod receptacle (l 15)
25 Eyepiece corrector lever (l 23)
26 User 5 buttons [USER5]/[FOCUS
ASSIST] (l 31)
27 Focus auto/Manual/
switch
[FOCUS A/M/
] (l 29)
28 Push AF buttons [PUSH AF]
29 User 1 buttons [USER1] (l 31)
30 User 2 buttons [USER2] (l 31)
31 User 3 buttons [USER3] (l 31)
32 User 4 buttons [USER4] (l 31)
33 Focus ring (l 29)
34 Zoom ring (l 28)
35 Iris ring (l 30)
36 Iris button [IRIS] (l 30)
37 ND filter switch [ND FILTER]
38 Ring LED
39 Optical Image Stabilizer button [O.I.S.]
40 Zebra button [ZEBRA]
41 Display/Mode check button [DISP/
MODE CHK]
42 Menu button [MENU] (l 25)
43 Multi-function dial [SEL/PUSH SET]
(l 29, 30)
44 Gain button [GAIN] (l 30)
45 White Balance button [W.B.] (l 29)
46 Shutter speed button [SHUTTER] (l 30)
47 Intelligent auto/Manual switch
[iA/MANU] (l 28)
2524
40 4139
33 34 35 37 3836
4342 44 45 46 47
30
31
27
29
32
28
26
HC-X1000E-SQT0478_mst.book 10 ページ 2014年9月8日 月曜日 午後7時14分
10
SQT0478
24 Utor za tronožac (
15)
25 Ručica za podešavanje okulara (
23)
26 Gumbi korisnika 5 [USER5] (Korisnik5)
/ [FOCUS ASSIST] (Pomoć pri
fokusiranju) (
31)
27 Prekidač za automatski fokus/ručni
fokus/∞
[FOCUS A/M/∞] (Auto./ručni/∞ fokus)
(
29)
28 Gumbi za pritisak automatskog fokusa
[PUSH AF]
29 Gumbi korisnika 1 [USER1] (Korisnik1)
(
31)
30 Gumbi korisnika 2 [USER2] (Korisnik2)
(
31)
31 Gumbi korisnika 3 [USER3] (Korisnik3)
(
31)
32 Gumbi korisnika 4 [USER4] (Korisnik4)
(
31)
33 Prsten za fokusiranje (
29)
34 Prsten za zumiranje (
28)
35 Prsten za blendu (
30)
36 Gumb za blendu [IRIS] (Blenda) (
30)
37 Promjena ND-ltra [ND FILTER]
(ND-ltar)
38 Prsten za LED
39 Gumb optičkog stabilizatora slike
[O.I.S.] (Optički stabilizator slike)
40 Gumb za uzorak zebre [ZEBRA]
41 Gumb za provjeru prikaza/načina [DISP/
MODE CHK] (Provjera prikaza/načina)
42 Gumb izbornika [MENU] (
25)
43 Multifunkcionalni kotačić [SEL/PUSH
SET] (
29, 30)
44 Gumb za jakost [GAIN] (Jakost) (
30)
45 Gumb za balans bijele boje [W.B.]
(Balans bijele boje) (
29)
46 Gumb za brzinu zatvarača [SHUTTER]
(Zatvarač) (
30)
47 Inteligentno automatsko / ručno
podešavanje [iA/MANU] (
28)

11
SQT0478
48 Infrared light
49 Recording lamp (Front)
50 Lens cover (l 13)
51 Lens (LEICA DICOMAR) (l 13)
52 SD Card slot cover (l 20)
53 Access lamp (card 1) (l 20)
54 Card slot 1 (l 20)
55 Access lamp (card 2) (l 20)
56 Card slot 2 (l 20)
57 INPUT 1, 2 switches [INPUT1, INPUT2]
58 CH1, CH2 switches [CH1, CH2]
59 Audio control knobs [CH1, CH2]
60 LCD monitor extract part (l 22)
61 LCD monitor (Touch screen) (l 23)
62 Lens cover open/close lever (l 13)
63 Recording lamp (Rear)
64 Shoulder strap fixture (l 14)
65 Eye cup attachment part (l 13)
66 Viewfinder (l 23)
67 Eye cup (l 13)
68 Exhaust opening (cooling fan)
69 Battery release button [PUSH] (l 17)
70 Battery holder (l 17)
595857
52
61
60
63 64 65 66 6762
5453
5655
50
49
48
51
70
69
68
HC-X1000E-SQT0478_mst.book 11 ページ 2014年9月8日 月曜日 午後7時14分
11
SQT0478
48 Infracrveno svjetlo
49 Lampica za snimanje (prednja)
50 Poklopac objektiva (
13)
51 Objektiv (LEICA DICOMAR) (
13)
52 Poklopac utora za SD-karticu (
20)
53 Lampica pristupa (kartica 1) (
20)
54 Utor za karticu 1 (
20)
55 Lampica pristupa (kartica 2) (
20)
56 Utor za karticu 2 (
20)
57 Prekidači za ulaz 1, 2 [INPUT1, INPUT2]
58 Prekidači za kanal 1, kanal 2 [CH1, CH2]
59 Kontrolni gumbi za zvuk [CH1, CH2]
60 Dio LCD-monitora koji se izvlači (
22)
61 LCD-monitor (zaslon osjetljiv na dodir)
(
23)
62 Ručica za otvaranje/zatvaranje
poklopca objektiva (
13)
63 Lampica za snimanje (stražnja)
64 Učvršćivanje vrpce za nošenje na
ramenu (
14)
65 Dio za pričvršćivanje školjke okulara
(
13)
66 Tražilo (
23)
67 Školjka okulara (
13)
68 Otvor za ispuh zraka (ventilator za
hlađenje)
69 Gumb za otpuštanje baterije [PUSH]
(Pritisak) (
17)
70 Držač baterije (
17)

12
SQT0478
71 Internal microphones
72 Accessory shoe
73 Sub zoom lever (l 28)
≥ This lever functions in the same manner as
the zoom lever.
74 Zoom lever [T/W] (In Recording Mode)
(l 28)
Volume lever [rVOLs]/Thumbnail
display switch [ / ] (In Playback
Mode)
75 User 6 buttons [REC CHECK] (l 31)
76 NFC touch area [ ] (l 36)
77 Thumbnail button [THUMBNAIL]
78 Counter button [COUNTER]
79 Counter reset button [RESET]
80 Colour Bar Screen button [BARS]
81 Sub recording start/stop button
≥ This button functions in the same manner as
the recording start/stop button.
77 78 79 80
71 72 73 7674 75
81
HC-X1000E-SQT0478_mst.book 12 ページ 2014年9月8日 月曜日 午後7時14分
12
SQT0478
71 Unutarnji mikrofoni
72 Spojnica za pribor
73 Sporedna ručica zuma (
28)
● Ova ručica radi na isti način kao i ručica
zuma.
74 Ručica zuma [T/W] (u načinu snimanja)
(
28)
Ručica za podešavanje glasnoće
[+VOL–] / Prekidač za prikaz minijatura
[ ] (u načinu reprodukcije)
75 Gumbi korisnika 6 [REC CHECK]
(Provjera snimanja) (
31)
76 NFC-područje osjetljivo na dodir [ ]
(
36)
77 Gumb za minijature [THUMBNAIL]
(Minijature)
78 Gumb za brojač [COUNTER] (Brojač)
79 Gumb za vraćanje izvornih postavki
brojača [RESET] (Izvorne postavke)
80 Gumb zaslona trake za boju [BARS]
(Trake)
81 Sporedni gumb za pokretanje/
zaustavljanje snimanja
● Ovaj gumb radi na isti način kao i gumb za
pokretanje/zaustavljanje snimanja.

13
SQT0478
∫ Opening/closing the lens cover
You can open/close the lens cover by sliding the lens cover open/close lever.
≥ When this unit is not in use, close the lens cover to protect the lens.
≥ Do not press the lens cover hard. This may damage the lens or the lens cover.
≥ Depending on the various filters or the MC protector attached to the front side of this unit's lens,
you may not be able to open/close the lens cover or attach the lens hood.
∫ Adjust the length of the grip belt so that it fits your hand.
Adjust the grip belt according to the size of your hand.
≥ If you find it difficult to fasten the buckle B, move the pad A towards you, and fasten the buckle
B again.
∫ Attaching the eye cup
Attach by aligning the notch of the eye cup attachment part with the protrusion at the inside of the
eye cup.
≥ The illustration below is an example of attaching the eye cup to use it with your right eye. If you
rotate the eye cup to the left by 180° before attaching it, you can use it with your left eye.
OPEN
CLOSE
1 Open the buckle.
2 Pull the end of the belt.
A Notch
B Protrusion
HC-X1000E-SQT0478_mst.book 13 ページ 2014年9月8日 月曜日 午後7時14分
13
SQT0478
▄
Otvaranje/zatvaranje poklopca objektiva
S pomoću pomicanja ručice za otvaranje/zatvaranje poklopca objektiva možete otvoriti/zatvoriti
poklopac objektiva.
● Kada se uređaj ne upotrebljava, zatvorite poklopac objektiva kako biste zaštitili objektiv.
● Nemojte prejako pritiskati poklopac objektiva. To može oštetiti objektiv ili poklopac objektiva.
● Ovisno o različitim ltrima ili MC-štitniku pričvršćenom na prednju stranu objektiva uređaja,
možda nećete moći otvoriti/zatvoriti poklopac objektiva ili pričvrstiti sjenilo objektiva.
▄
Prilagodite duljinu remena za držanje tako da pristaje vašoj ruci.
Prilagodite remen za držanje prema veličini svoje ruke.
● Ako vam je teško pričvrstiti kopču B, pomaknite podlogu A prema sebi i ponovo pričvrstite
kopču B.
▄
Pričvršćivanje školjke okulara
Pričvrstite tako da poravnate urez dijela za pričvršćivanje školjke okulara s izbočinom na
unutrašnjosti školjke okulara.
● Ilustracija u nastavku primjer je pričvršćivanja školjke okulara za upotrebu s desnim okom. Ako
zakrenete školjku okulara ulijevo za 180° prije nego što je pričvrstite, možete je upotrijebiti s
lijevim okom.
❶ Otvorite kopču.
❷ Povucite kraj remena.
❶ Urez
❷ Izbočina

14
SQT0478
∫ Attaching the Shoulder strap
We recommend that you attach the shoulder strap (supplied) before going out of doors to record so
as to avoid dropping this unit.
∫ Attaching the front microphone
≥ The microphone holder is set up so that a 21 mm external microphone (AG-MC200G: optional)
can be attached. Check in advance whether the microphone you wish to use can be attached.
1 Attach the microphone holder to the microphone holder attachment part.
≥ Attach by using a commercially available screw driver.
≥ When attaching the microphone holder, be sure to tighten the screws firmly even though you
might hear a squeaking sound.
A 20 mm or longer
B Microphone holder attachment part
C Microphone holder
D Microphone holder screws
HC-X1000E-SQT0478_mst.book 14 ページ 2014年9月8日 月曜日 午後7時14分
14
SQT0478
▄
Pričvršćivanje vrpce za nošenje na ramenu
Preporučujemo pričvršćivanje vrpce za nošenje na ramenu (isporučena) prije nego što izađete van
radi snimanja kako biste izbjegli mogućnost ispuštanja uređaja.
▄
Pričvršćivanje prednjeg mikrofona
● Držač mikrofona postavljen je tako da se može pričvrstiti vanjski mikrofon od 21 mm
(AG-MC200G: neobavezan). Unaprijed provjerite može li se pričvrstiti mikrofon koji želite
upotrebljavati.
1 Pričvrstite držač mikrofona na dio za spajanje držača mikrofona.
● Pričvrstite s pomoću komercijalno dostupnog križnog odvijača.
● Kada pričvršćujete držač mikrofona, obavezno čvrsto pritegnite vijke, čak i ako čujete škripanje.
A 20 mm ili duže
B Dio za pričvršćivanje držača mikrofona
C Držač mikrofona
D Vijci držača mikrofona

15
SQT0478
2 Attach an external microphone
(optional) to the microphone holder, and
tighten the microphone holder screws.
3 Connect the external microphone to the
AUDIO INPUT1 terminal (XLR 3 pin).
≥ When wiring the microphone cable, use the cable
clamper of this unit.
∫ Attaching the INPUT terminal cap
Attach the INPUT terminal cap while the audio input terminals 1, 2 (XLR 3 pin) is not used.
∫ Attaching the tripod
≥ There are tripod receptacle that are compatible with
1/4-20UNC screws.
≥ Attaching a tripod with a screw length of 5.5 mm or
more may damage the unit.
A Microphone cable clamper
B Microphone holder screws
C External microphone (optional)
D AUDIO INPUT1 terminal
(XLR 3 pin)
E INPUT terminal cap
F Tripod receptacle
HC-X1000E-SQT0478_mst.book 15 ページ 2014年9月8日 月曜日 午後7時14分
15
SQT0478
2 Pričvrstite vanjski mikrofon (neobavezan)
na držač mikrofona i pričvrstite vijke držača
mikrofona.
3 Spojite vanjski mikrofon na priključak
audioulaza1 (XLR 3-pinski).
● Kada spajate električne instalacije kabela za
mikrofon, upotrijebite stezaljke za kabele za ovaj
uređaj.
▄
Pričvršćivanje poklopca ulaznog priključka
Pričvrstite poklopac ulaznog priključka kada se priključci audioulaza 1, 2 (XLR 3-pinski) ne
upotrebljavaju.
▄
Pričvršćivanje tronošca
● Postoje utori za tronožac koji su kompatibilni s
vijcima 1/4-20UNC.
● Pričvršćivanje tronošca čija duljina vijka iznosi 5,5
mm ili više može oštetiti uređaj.
E Poklopac ulaznog priključaka
F Utor za tronožac
A Stezaljka za kabel mikrofona
B Vijci držača mikrofona
C Vanjski mikrofon (neobavezan)
D Priključak audioulaza1
(XLR 3-pinski)

16
SQT0478
∫ About batteries that you can use with this unit
The battery that can be used with this unit is VW-VBD58/CGA-D54s.
Charging the battery
Important:
≥ Do not use the AC cable with any other equipment as it is designed only for this unit. Also,
do not use the AC cable from other equipment with this unit.
≥ It is recommended to charge the battery in a temperature between 10 oC and 30 oC.
(The battery temperature should also be the same.)
≥ Insert the plugs as far as they will go.
1 Connect the AC cable to the battery charger and the AC outlet.
2 Insert the battery into the battery charger by aligning the arrows.
Preparation
Power supply
It has been found that counterfeit battery packs which look very similar to the genuine
product are made available to purchase in some markets. Some of these battery packs
are not adequately protected with internal protection to meet the requirements of
appropriate safety standards. There is a possibility that these battery packs may lead to
fire or explosion. Please be advised that we are not liable for any accident or failure
occurring as a result of use of a counterfeit battery pack. To ensure that safe products are
used we would recommend that a genuine Panasonic battery pack is used.
When this unit is purchased, the battery is not charged. Charge the battery fully before
using this unit for the first time.
Charging lamp [CHARGE] A
Lights up:
Charging (Battery charging time: l 17)
Goes off:
Charging completed
Flashing:
Be sure to connect the unit correctly
Power lamp B
≥ This will light up when the AC cable is
connected.
HC-X1000E-SQT0478_mst.book 16 ページ 2014年9月8日 月曜日 午後7時14分
16
SQT0478
Priprema
Napajanje
▄
Baterije koje se upotrebljavaju s ovim uređajem
Baterija koju možete upotrebljavati s ovim uređajem je VW-VBD58/CGA-D54s.
Na nekim se tržištima mogu nabaviti krivotvorene baterije koje su izgledom vrlo
slične izvornima. Neke od tih baterija nisu primjereno zaštićene prema zahtjevima i
regulativama o sigurnosti proizvoda. Postoji opasnost od požara ili eksplozije. Tvrtka
Panasonic odriče se odgovornosti u slučaju ikakvih nezgoda ili kvarova nastalih uslijed
uporabe krivotvorenih baterija. Da biste bili sigurni da upotrebljavate sigurne proizvode,
predlažemo uporabu izvornih Panasonicovih baterija.
Punjenje baterije
Baterija nije napunjena kad kupite uređaj. Prije prve uporabe uređaja napunite bateriju
do kraja.
Važno:
● Nemojte upotrebljavati kabel za izmjeničnu struju s drugim uređajima jer je on predviđen
samo za uporabu s ovim uređajem. Također, s ovim uređajem nemojte upotrebljavati
kabel za izmjeničnu struju nekog drugog uređaja.
● Preporučujemo da bateriju punite na temperaturi između 10 °C i 30 °C
(temperatura baterije trebala bi biti jednaka).
Lampica punjenja [CHARGE]
(Punjenje) A
Svijetli:
Punjenje (vrijeme punjenja baterije:
17)
Isključi se:
Punjenje završeno
Treperenje:
Ispravno spojite uređaj
Lampica napajanja B
● Upalit će se kada je priključen kabel za
izmjeničnu struju.
● Umetnite utikače do kraja.
1 Priključite kabel za izmjeničnu struju na punjač baterije i u strujnu utičnicu
za izmjeničnu struju.
2 Umetnite bateriju u punjač baterije tako da poravnate strelice.

17
SQT0478
≥ We recommend using Panasonic batteries (l 8, 16, 17).
≥ If you use other batteries, we cannot guarantee the quality of this product.
≥ Do not heat or expose to flame.
≥ Do not leave the battery(ies) in a car exposed to direct sunlight for a long period of time with
doors and windows closed.
Inserting/removing the battery
Install the battery by inserting it in the direction shown in the figure.
Charging and recording time
≥ Temperature: 25 oC/humidity: 60%RH
≥ When using the viewfinder (times in parentheses are when using the LCD monitor)
≥ Please refer to “Operating Instructions (PDF format)” for details.
≥ “h” is an abbreviation for hour, “min” for minute and “s” for second.
Charging/Recording time
Battery model
number
[Voltage/Capacity
(minimum)]
Charging
time
Recording
mode
Recording
format
Maximum
continuously
recordable
time
Actual
recordable
time
Supplied battery/
VW-VBD58 (optional)
[7.2 V/5800 mAh]
6 h 20 min MP4 (LPCM) [4K/50p 150M]
5 h
(4 h 40 min)
2 h 35 min
(2 h 30 min)
Removing the battery
Make sure that the power switch is set to OFF
and the status indicator is turned off, and then
remove by holding onto it taking care not to
drop. (l 21)
While pressing the battery release button,
remove the battery.
Insert the battery until it clicks and locks.
HC-X1000E-SQT0478_mst.book 17 ページ 2014年9月8日 月曜日 午後7時14分
17
SQT0478
● Preporučujemo uporabu izvornih Panasonicovih baterija (
8, 16, 17).
● Ako upotrebljavate baterije drugih proizvođača, ne možemo jamčiti kvalitetu ovog uređaja.
● Nemojte zagrijavati ni izlagati otvorenom plamenu.
● Ne ostavljajte baterije izložene izravnoj sunčevoj svjetlosti dulje vrijeme u vozilu sa zatvorenim
vratima i prozorima.
Umetanje/vađenje baterije
Umetnite bateriju u smjeru prikazanom na slici.
Vrijeme punjenja i snimanja
Vrijeme punjenja/snimanja
● Temperatura: 25 °C / Vlaga: 60 % relativne vlažnosti
● Prilikom uporabe tražila (vrijeme navedeno u zagradi odnosi se na uporabu LCD-monitora)
Broj modela
baterije
[Napon/Kapacitet
(minimalni)]
Vrijeme
punjenja
Način
snimanja
Format
snimanja
Maksimalno
raspoloživo
vrijeme
neprekidnog
snimanja
Stvarno
raspoloživo
vrijeme
snimanja
Isporučena
baterija /
VW-VBD58
(neobavezna) [7.2
V/5800 mAh]
6 h 20 min MP4 (LPCM) [4K/50p 150M]
5 h
(4 h 40 min)
2 h 35 min
(2 h 30 min)
● Detalje potražite u "Uputama za uporabu (u PDF-formatu)".
● "h” je kratica za sat, "m” za minutu, a "s” za sekundu.
Vađenje baterije
Obavezno provjerite je li prekidač postavljen
na OFF (Isklj.) i je li pokazatelj statusa
isključen, a zatim uklonite bateriju držeći je i
pazeći da je ne ispustite. (
21)
Dok držite gumb za otpuštanje baterije,
uklonite bateriju.
Umetnite bateriju tako da čujete škljocaj,
a baterija sjedne na svoje mjesto.

18
SQT0478
≥ These times are approximations.
≥ The indicated charging time is for when the battery has been discharged completely.
Charging time and recordable time vary depending on the usage conditions such as high/
low temperature. Recordable time also varies depending on the [REC FORMAT] setting.
≥ The actual recordable time refers to the recordable time when repeatedly starting/stopping
recording, turning the unit on/off, moving the zoom lever etc.
≥ The batteries heat up after use or charging. This is not a malfunction.
Connecting to the AC outlet
The unit is in the standby condition when the AC adaptor is connected. The primary circuit is always
“live” as long as the AC adaptor is connected to an electrical outlet.
Important:
≥ Use the supplied AC adaptor. Do not use the AC adaptor of another device.
≥ Do not use the AC cable with any other equipment as it is designed only for this unit. Also,
do not use the AC cable from other equipment with this unit.
≥ Insert the plugs as far as they will go.
1 Connect the AC cable to the AC
adaptor and the AC outlet.
2 Connect the AC adaptor to the DC
input terminal [DC IN].
≥ Make sure to set the power switch to OFF
and the status indicator is turned off when
disconnecting the AC adaptor. (l 21)
≥ Even when you use the AC adaptor for recording images, keep the battery connected. This
allows you to continue the recording even if a power failure occurs or the AC adaptor is
unplugged from the AC outlet by accident.
Battery capacity indication
≥ The display changes as the battery capacity reduces. # # # #
If the battery discharges, then will flash red.
HC-X1000E-SQT0478_mst.book 18 ページ 2014年9月8日 月曜日 午後7時14分
18
SQT0478
● Navedena vremena predstavljaju približne procjene.
● Prikazano vrijeme punjenja odnosi se na slučaj kada je baterija u potpunosti ispražnjena.
Vrijeme punjenja i raspoloživo vrijeme snimanja ovise o uvjetima korištenja, kao što su
visoka/niska temperatura. Raspoloživo vrijeme snimanja također se razlikuje ovisno o
postavci [REC FORMAT] (Format snimanja).
● Stvarno raspoloživo vrijeme snimanja odnosi se na raspoloživo vrijeme snimanja kod uzastopnog
pokretanja/zaustavljanja snimanja, uključivanja/isključivanja uređaja, pomicanja ručice zuma itd.
● Baterije se tijekom uporabe ili punjenja zagrijavaju. Nije riječ o kvaru.
Pokazatelj kapaciteta baterije
● Prikaz se mijenja sa smanjenjem kapaciteta baterije.
Ako se baterija isprazni, tada će bljeskati crveno.
Spajanje u strujnu utičnicu za izmjeničnu struju
Uređaj je u stanju čekanja kad je priključen prilagodnik za izmjeničnu struju. Primarni sklop je pod
naponom sve dok je prilagodnik za izmjeničnu struju uključen u strujnu utičnicu.
Važno:
● Koristite se isporučenim prilagodnikom za izmjeničnu struju. Nemojte se koristiti
prilagodnicima za izmjeničnu struju drugih uređaja.
● Nemojte upotrebljavati kabel za izmjeničnu struju s drugim uređajima jer je on predviđen
samo za uporabu s ovim uređajem. Također, s ovim uređajem nemojte upotrebljavati
kabel za izmjeničnu struju nekog drugog uređaja.
1 Priključite kabel za izmjeničnu struju
u prilagodnik za izmjeničnu struju i
strujnu utičnicu za izmjeničnu struju.
2 Spojite prilagodnik za izmjeničnu
struju na ulazni priključak
istosmjerne struje [DC IN] (Ulaz
istosmjerne struje).
● Kada isključujete prilagodnik za izmjeničnu
struju, obavezno provjerite je li prekidač
postavljen na OFF (Isklj.) i je li pokazatelj statusa
isključen. (
21)
● Umetnite utikače do kraja.
● Čak i kada upotrebljavate prilagodnik za izmjeničnu struju za snimanje slika, baterija treba biti
spojena. To vam omogućuje da nastavite sa snimanjem čak i u slučaju nestanka struje ili ako se
prilagodnik za izmjeničnu struju slučajno izvuče iz strujne utičnice za izmjeničnu struju.

19
SQT0478
Priprema
Priprema SD-kartica
Uređaj može snimiti videozapise ili fotograje na SD-karticu.
Ovaj je uređaj (SDXC kompatibilan uređaj) kompatibilan sa SDHC i SDXC memorijskim
karticama. Kod uporabe memorijske kartice SDHC ili SDXC s drugom opremom, provjerite je li
ta oprema kompatibilna s ovim memorijskim karticama.
Kartice koje možete upotrebljavati s ovim uređajem
▄
Razredi brzine za snimanje videozapisa
● Potrebna kartica razlikuje se ovisno o [REC MODE] (Način snimanja) i [REC FORMAT] (Format
snimanja).
Koristite se karticom koja zadovoljava sljedeća ograničenja razreda brzine SD-kartice ili UHS-
razreda brzine. Upotreba nekompatibilne kartice može uzrokovati iznenadni prekid snimanja.
● Razred brzine SD-kartice (SD Speed Class) i UHS-razred brzine (UHS Speed Class) standardi
su brzine neprekinutog zapisivanja. Da biste provjerili razred, pogledajte stranu s naljepnicom
itd. kartice.
Načini snimanja
Brzine prijenosa u
[REC FORMAT]
(Format snimanja)
Razredi brzine Primjeri oznake
MOV (LPCM)/
MP4 (LPCM)/
MP4
100 Mb/s ili više UHS razred brzine 3
50 Mb/s
UHS razred brzine 1
ili viši
Razred 10 ili viši
AVCHD Sve Razred 4 ili viši
● Memorijsku karticu čuvajte izvan dohvata djece da je ne bi progutala.

20
SQT0478
Inserting/removing an SD card
Caution:
Check that the access lamp has gone off.
1 Open the SD card slot cover and
insert (remove) the SD card into
(from) the card slot B.
≥ One SD card can be inserted into each of the
card slot 1 and the card slot 2.
≥ Face the terminal side C in the direction
shown in the illustration and press it straight
in as far as it will go.
≥ Press the centre of the SD card and then pull
it straight out.
2 Securely close the SD card slot
cover.
When using a non Panasonic SD card for the first time, or one which was previously used on
another equipment, it is necessary to format the SD card. (l 25) When the SD card is formatted,
all of the recorded data is deleted. Once the data is deleted, it cannot be restored.
Access lamp A
≥ When this unit is accessing the SD card,
the access lamp lights up.
HC-X1000E-SQT0478_mst.book 20 ページ 2014年9月8日 月曜日 午後7時14分
20
SQT0478
Umetanje/vađenje SD-kartice
Kada prvi put upotrebljavate SD-karticu koju nije proizvela tvrtka Panasonic, ili SD-karticu koja
je prije prethodno bila upotrebljavana na drugoj opremi, potrebno je formatirati SD-karticu.
(
25) Kada se SD-kartica formatira, svi se snimljeni podaci brišu. Nakon što se podaci izbrišu,
više ih nije moguće vratiti.
Oprez:
Provjerite je li se lampica pristupa isključila.
1 Otvorite poklopac utora za SD-
karticu i umetnite (izvadite) SD-
karticu u (iz) utor(a) za karticu B.
● Po jedna SD-kartica može se umetnuti u
utor za karticu 1 i utor za karticu 2.
● Stranu s priključkom C okrenite u smjeru
prikazanom na slici i ravno gurnite do kraja.
● Pritisnite sredinu SD-kartice i ravno je
izvadite.
2 Čvrsto zatvorite poklopac utora
za SD-karticu.
Lampica pristupa A
● Kada uređaj pristupa SD-kartici, lampica
pristupa svijetli.
Page is loading ...
Page is loading ...
Page is loading ...
Page is loading ...
Page is loading ...
Page is loading ...
Page is loading ...
Page is loading ...
Page is loading ...
Page is loading ...
Page is loading ...
Page is loading ...
Page is loading ...
Page is loading ...
Page is loading ...
Page is loading ...
Page is loading ...
Page is loading ...
Page is loading ...
Page is loading ...
Page is loading ...
Page is loading ...
Page is loading ...
Page is loading ...
-
 1
1
-
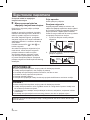 2
2
-
 3
3
-
 4
4
-
 5
5
-
 6
6
-
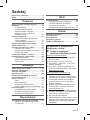 7
7
-
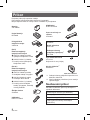 8
8
-
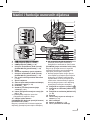 9
9
-
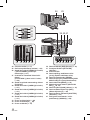 10
10
-
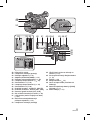 11
11
-
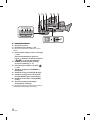 12
12
-
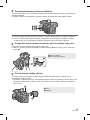 13
13
-
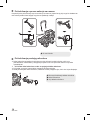 14
14
-
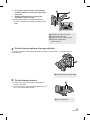 15
15
-
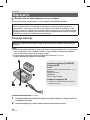 16
16
-
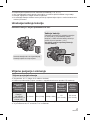 17
17
-
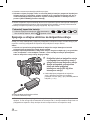 18
18
-
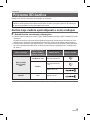 19
19
-
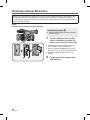 20
20
-
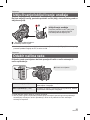 21
21
-
 22
22
-
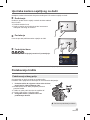 23
23
-
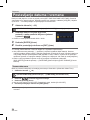 24
24
-
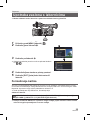 25
25
-
 26
26
-
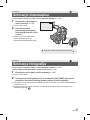 27
27
-
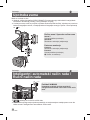 28
28
-
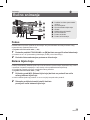 29
29
-
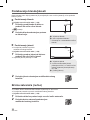 30
30
-
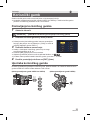 31
31
-
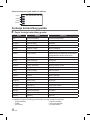 32
32
-
 33
33
-
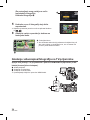 34
34
-
 35
35
-
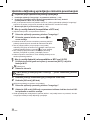 36
36
-
 37
37
-
 38
38
-
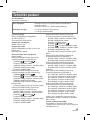 39
39
-
 40
40
-
 41
41
-
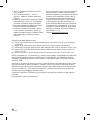 42
42
-
 43
43
-
 44
44


Panasonic HCX1000E Operating instructions
- Category
- Camcorders
- Type
- Operating instructions
Ask a question and I''ll find the answer in the document
Finding information in a document is now easier with AI
Related papers
-
Panasonic HC-X Series User HCX1000E Operating instructions
-
-
Panasonic HCV520MEG Operating instructions
-
Panasonic HCV720EG Operating instructions
-
Panasonic HCX1E Operating instructions
-
-
-
-
-